

I also heard React.js was good and recently spent some time playing with it. Now that I'm pretty comfortable with React, I decided to write a tutorial on this subject.
Target Audience: People Who Know Just Enough jQuery to Get by
Before I begin, I'd like to clarify who my target audience is.
Zed Shaw, the author of "Learn Code the Hard Way" series, recently wrote an excellent blog post called Early v.s. Beginning Coders. In his post, Zed criticizes programming educators who claim that their materials are for "beginners", but in reality are incomprehensible for most "total" beginners.
I don't want to make a similar mistake here. Of people who have never tried out React, some are comfortable with frontend JS frameworks like Backbone, Ember, or Angular. Some know JavaScript pretty well. Some know just enough jQuery to get by. A tutorial that's effective for one group may not be optimal for the other groups.
In this tutorial, I'm targeting the third group I mentioned: people who know just enough jQuery to get by. Examples of people who might fit in this category would be:
- Designers who can do basic coding in HTML/CSS/jQuery.
- WordPress developers who know how to use jQuery plugins.
- Beginning developers who have completed basic HTML/CSS/JS tutorials online.
- Backend developers who rely on Bootstrap and basic jQuery for their frontend needs.
- Anyone who does more copy-pasting than architecting when it comes to JavaScript.
If you're comfortable with JavaScript or any of the frontend frameworks like Backbone/Ember/Angular, this tutorial is NOT for you, and you'll be very frustrated with my writing style. There are tons of great tutorials you can learn from, including the official React tutorial.
Also, if you already know React, you'll be pretty upset with me as well because I'll be talking mostly about states instead of immutability or componetization. However, I found that teaching states first is the best way for jQuery developers to see why React is superior.
Anyways, let's get started!
Time Estimate: 1 ~ 2 hours
If you go really fast (and copy-paste example code instead of typing), this tutorial should take a bit over an hour. If you go slow, it should take a bit over 2 hours.
If you're stuck
If you're stuck, do any of the following:
Note: Your Browser's Back Button Might Break
There seems to be an issue with this page, where (1) the browser constantly reloads itself while viewing this page, and (2) as a result, your browser's back button gets broken. There seems to be an issue in the JSBin code I'm using, and I reported the issue here. My apologies.
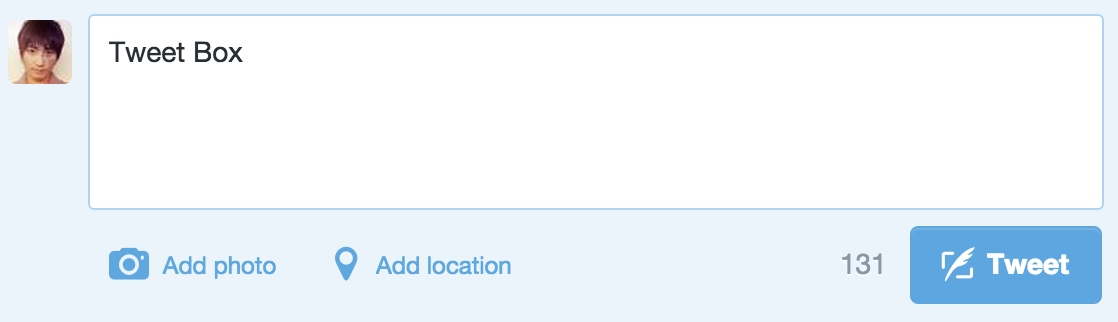
Overview: We're Going to Build a "Tweet Box"
Many React.js tutorials begin by explaining how React works or why React is awesome. My tutorial does not.
Instead, we'll get right to building a simple UI, alternating between jQuery implementations and React.js implementations, explaining the differences along the way. I believe that you'll think more this way as opposed to just typing out examples.
The UI we'll build will resemble the Tweet box that you find on Twitter. It won't be exactly like the real Tweet box, but it'll be pretty similar. Hopefully you'll find this example to be practical.
Step 1: Introduction to JSBin (5 - 10 minutes)
We'll be using JSBin, an online HTML/CSS/JS editor which supports both jQuery and React.js code. You might be familiar with similar services like CodePen or JSFiddle- they're all pretty similar, so I just decided to go with JSBin.
Here's an example JSBin:
JS Bin on jsbin.com JSBin not loading? Click here.
Try modifying the HTML on the left - i.e. change the button's text. You'll see the change on the right. That's how JSBin works.
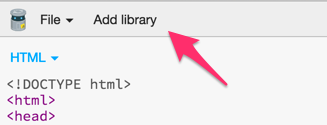
Create a JSBin Account
Unless you already have a JSBin account, head to jsbin.com to create an account. Click Login or Register on the menu to create an account.
After creating an account, you can clone public JSBins to your account, just like you clone public GitHub repositories.
Let's try it. Click "Save" on the menu on the JSBin below.
JS Bin on jsbin.com JSBin not loading? Click here.
Once you're on the JSBin site, you can select "Add Library" from the menu to import popular CSS/JS libraries.
Try doing the following:
- Click "Add Library" and add the latest Bootstrap
- Add
btn btn-primaryclasses on
And the output becomes a little prettier:
JS Bin on jsbin.com JSBin not loading? Click here.
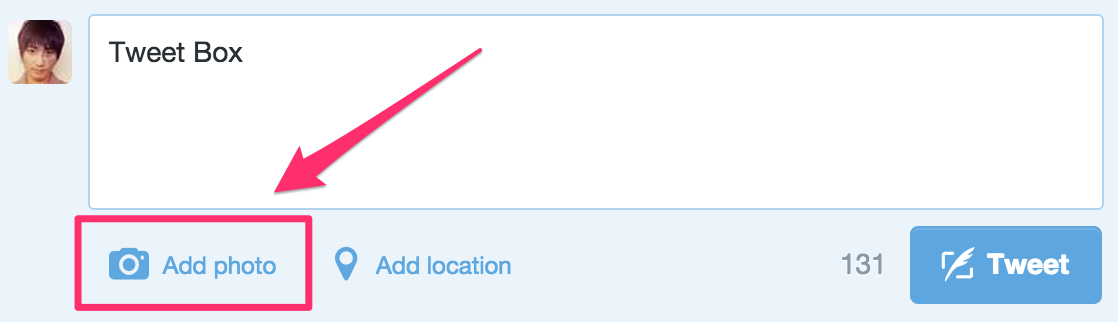
Create a Tweet Box
You seem to be pretty comfortable with JSBin now. Alright, let's build
out a Tweet box. Still on the same JSBin as before, change the HTML inside like this:
Tweet
We're using Bootstrap classes like form-control, well, clearfix,
etc., but those are just for the looks and irrelevant for the tutorial.
Here's the result:
JS Bin on jsbin.com JSBin not loading? Click here.
That's it for this step! Not too bad, eh?
Step 2: Implement the First Feature - Tweet Button Should Initially Be Disabled (5 minutes)
Now, time for some JS. We'll first implement the following feature:
Feature 1: the "Tweet" button should initially be disabled. When there's at least one character in the text field, the "Tweet" button should be enabled.
Here's the demo. As you can see, the button is initially disabled. If you type something into the text box, the button becomes enabled.
JS Bin on jsbin.com JSBin not loading? Click here.
To get this to work, continue from the previous JSBin, open the JavaScript tab, and add the following jQuery code. You don't need to add jQuery because Bootstrap, which we added on the previous step, includes jQuery.
// Initially disable the button
$("button").prop("disabled", true);

// When the value of the text area changes...
$("textarea").on("input", function() {
  // If there's at least one character...
  if ($(this).val().length > 0) {
    // Enable the button.
    $("button").prop("disabled", false);
  } else {
    // Else, disable the button.
    $("button").prop("disabled", true);
  }
});
Explanation
- I used the tag names,
buttonandtextarea, as selectors - no need to add IDs/classes for this trivial example. - To enable/disable the button, use
$(...).prop(disabled, ...). - To listen for the changes in
textarea, use theinputevent, which works on modern browsers.
Try it out by typing some text in the Tweet box and seeing the button's enabled/disabled state change.
DO NOT PROCEED if this example was confusing to you - you might need to learn some more jQuery before moving onto React. There are lots of excellent learning resources like Codecademy, Treehouse, Code School, and others.
Now that this feature is complete, we'll try to re-implement the same thing using React. This will take several steps.
Step 3: The Tweet Box Using React.js (5 - 10 minutes)
One of the first things you'll notice in React is that you'll be writing markup in JS, not in HTML.
Let me show you what I mean. Here's the React.js code which displays the same Tweet box.
WARNING! You don't need to follow along yet - just read the code.
JS Bin on jsbin.com JSBin not loading? Click here.
Some observations:
- Inside
return (...)is HTML code, not JavaScript. In React, you'll write in a special syntax called JSX, which lets you put HTML-like code inside JavaScript. - I say HTML-"like" because it's not identical to HTML. Notice that it uses
classNameinstead ofclass- but they're pretty similar, so you'll learn them quickly. - Your browser does not understand JSX, so when React processes your JSX code, it automatically converts the HTML part inside JSX into valid JavaScript code so that the browser can understand it.
- The HTML code inside
return (...)is pretty much identical to the HTML code from step 1. - Try clicking on "HTML" on the above JSBin, and you'll see that there's
no markup in HTML besides
. This is what I mean when I said in React, you'll be writing markup in JavaScript (JSX), not in HTML.
Frequently Asked Questions & Answers
Question: What do React.createClass and React.render do?
Do I need to understand them now?
Answer: Don't worry about it for now. Basically, React.createClass creates
a piece of UI with a name (in this case, TweetBox). This then
gets attached to the DOM through React.render(, document.body) -
meaning this UI is added inside the body tag. That's all you
need to know for now.
Question: Do I need to do anything special to write JSX
on my local machine?
Answer: Yes, but that's outside the scope of this tutorial
- in short, you need to import something called JSX transformer (here's how). This step is not necessary on JSBin though.
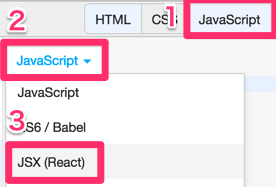
All you need to do to write JSX on JSBin is to (1) add a React library
(the one without addons) from the dropdown and (2) select "JSX (React)"
from the dropdown menu on the JS view.
Question: Isn't it a bad style to write markup (HTML)
and behavior (JS) in the same place?
Answer: It might be a bad style for simple web pages,
but not necessarily so for large web applications. In large web applications,
there will be hundreds of pieces of UI, each containing its own markup
and behavior. The code will be more manageable if those markup and behavior
are kept together for each piece of UI, as opposed to keeping "all markups"
together and "all behaviors" together. And React is designed for developing
large web applications. In fact, React was actually created and used by
Facebook, one of the largest web applications ever.
Next, I'll show you how to write the above React code step-by-step.
Step 4: Writing Your First React.js Code (5 - 10 minutes)
I created a starter HTML file for you. Using "Add library," I've imported Bootstrap (removed bootstrap.js and jquery) and React (without addons).
Please try to follow along. To begin, click "Save" to copy this to your JSBin.
JS Bin on jsbin.com JSBin not loading? Clnotaick here.
After saving to your JSBin, open the JavaScript tab and select "JSX (React)":
Now you're ready to write some React. Try to follow along and type the following JS code snippets on your JSBin.
var TweetBox = React.createClass({
  render: function() {
  }
});
This is the template for creating a piece of UI using React (in this case,
a Tweet box). It's just as essential as $(function() { ... }) on
jQuery.
To actually construct the UI, we must fill in the render() method.
For now, let's keep it simple with just a single div tag.
var TweetBox = React.createClass({
  render: function() {
    return (

        Hello World!

    );
  }
});
Like the above example, put a pair of parenthesis (...) after return, and write the markup inside.
JSX Gotchas
There's one thing you need to remember with JSX - on render(),
there must be exactly one outer-most tag inside return (...).
So the following doesn't work because there's zero outer-most tag:
This also doesn't work because there are two outer-most (span)
tags inside return (...):
return (

    Hello


    World

);
For the above example, the workaround is to create an extra tag which
wraps the two span tags. I just used div here. This
is a necessary evil when using React.
return (


      Hello


      World


);
Attaching the UI to the DOM
Now we need to "attach" this UI to the DOM in order to see Hello World. We will put it inside body by using React.render:
var TweetBox = React.createClass({
  ...
});

React.render(
  ,
  document.body
);
React.render takes two arguments. The first argument is the
UI object, which is . The second
argument is the DOM object.
Now, you should see Hello World appear on your JSBin. Congratulations,
you wrote your first React UI!
(Note: an ellipsis (...) on the code snippet
indicates code that has been omitted for clarity. In other words, don't
touch this part of the code and leave it as is.)
Write the Actual HTML for the Tweet Box
Now, instead of Hello World, we'll implement the HTML for
the Tweet Box. Swap the contents of render() with this:
return (


    Tweet

);
There are two things you need to watch out for:
- Do not use
class. Instead, useclassName. It's because JSX gets translated to JS, andclassis a keyword in the newest version of JS. - If you use
/on self-closing tags.
Everything else should be the same with the jQuery example from before.
If you typed this correctly, then you should see the Tweet box on your JSBin. If nothing appears in the output, then check your code very carefully, to make sure there aren't any typos.
That's it for this step! Here's the JSBin up to this part:
JS Bin on jsbin.com JSBin not loading? Click here.
Step 5: Re-implement the First Feature - Tweet Button Should Initially Be Disabled - in React (5 - 10 minutes)
We're going to re-implement in React the first feature we implemented using jQuery:
Feature 1: the "Tweet" button should initially be disabled. When there's at least one character in the text field, the "Tweet" button should be enabled.
Here's the jQuery code we wrote:
JS Bin on jsbin.com JSBin not loading? Click here.
Let's see how we can do this in React.
Start with the JSBin from the previous step. (Tip: Since you won't be touching HTML in React, you can close the HTML tab on JSBin so you can get more screen space).
First, let's disable the button by adding disabled.
render: function() {
  return (
    ...
    Tweet
    ...
  );
}
Then the button should now be disabled. Note that in our jQuery implementation we wrote:
$("button").prop("disabled", true);
to initially disable the button, but we could have instead modified the button tag
like above.
Now, we need to enable the button when there's at least one character in the text field.
Handle Change Event
First, we need to wait when users enter the text. In our jQuery implementation, we wrote:
$("textarea").on("input", function() {
  ...
}
In the React land, we write the event handler as a method. Let's call it handleChange:
React.createClass({
  handleChange: function(event) {
  },
  render: function() {
    ...
  }
});
Next, we invoke this handler when text is entered. To do so, modify the textarea tag in render() like this:
- We used
inputevent for jQuery, but in React we useonChange- you'll learn about how events differ in React's JSX from React's documentation, so don't worry too much now. - More importantly, we use
{...}syntax to include any JavaScript code inside the HTML syntax part of JSX. In this case, we want to pass the handlerhandleChange, and we prefix it withthis.because it's a method on this UI object. - If you're used to jQuery, this might seem like a bad practice, but don't worry. Again, in large applications, the code will be more manageable if those markup and behavior are kept together for each piece of UI.
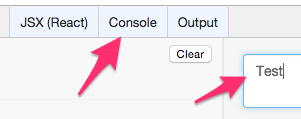
To make sure that the handler is indeed being called, let's add console.log inside handleChange:
handleChange: function(event) {
  console.log(event.target.value);
},
The event object contains target, which is the textarea.
We use .value on it to output the current value of the textarea.
In your JSBin, open the console tab to check the output. Then type something on the Tweet box.
You can try it out here:
JS Bin on jsbin.com JSBin not loading? Click here.
That's it for this step! We'll finish this feature on the next step.
NOTE: Close the console tab on JSBin when you're done. We no longer need it.
Step 6: Implementing State (10 - 15 minutes)
I'll now explain one of the biggest differences between jQuery-style code and React.js-style code.
In jQuery, when some event happens, you usually change the DOM (like we did earlier):
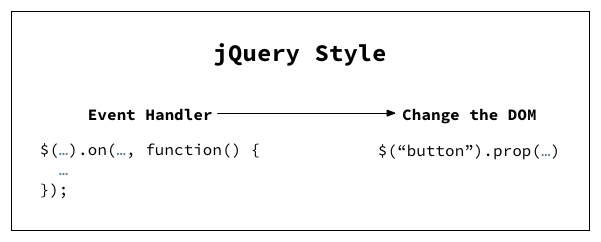
In React, you don't directly modify the DOM. Instead,
in an event handler, you modify something called the "state".
And this is done by calling this.setState.
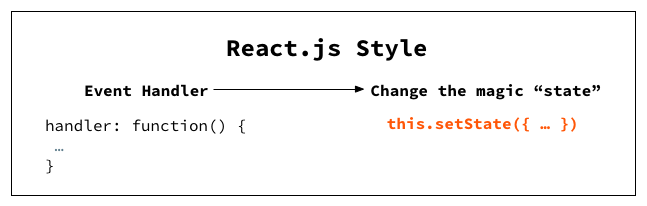
Then, every time the state is updated, render() is called again.
And inside render() you can access the state.
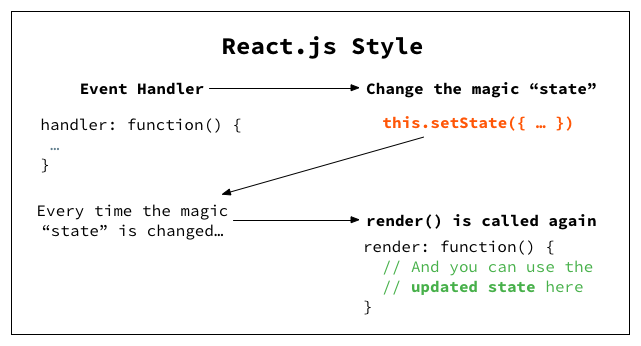
This is how you update the UI in response to an event. Yes it's confusing, so let me explain using code.
Writing the Event Handler
Start with the JSBin from the previous step. First, we need to initialize the state object - without this, nothing will work.
To do this, we need to write a special method called getInitialState and have it return a JS object,
which becomes the initial state.
What goes in the object? Let's create a single key called text and
have it store whatever is inside the Tweet box.
var TweetBox = React.createClass({
  getInitialState: function() {
    return {
      text: ""
    };
  },
  handleChange: ...
  render: ...
});
Next, we'll modify the event handler to set the state's text field
to whatever is currently in the text box. To do this, we use a special in method called setState and pass the updated key-value pair.
handleChange: function(event) {
  this.setState({ text: event.target.value });
},
Now, let's check that the state is correctly being set by writing some
debug-only code in render().
To do this, simply add this.state.text near the end of render(), and use the { ... } syntax to
call JS code inside the HTML syntax part of JSX.
render: function() {
  return (

      ...
      Tweet


      {this.state.text}

  )
}
Now, try entering some text on the tweet box. The same set of text should appear below the button.
You can try it out on the JSBin below as well:
JS Bin on jsbin.com JSBin not loading? Click here.
Now the previous diagram might make more sense to you.
Remove the Debugging Code
Once you confirm that the state is correctly being set, remove the debugging code we just added:
Enabling/Disabling the Button
Now that we can watch for the text changes, all that's left is to enable/disable the button depending on whether the text is entered.
Using the state, we can use this logic:
- If
this.state.text.length === 0, then the button should be disabled.
To do this in React, add disabled attribute, and set it with the return value of this.state.text.length === 0.
Since this is JS code, you need to wrap it with {}.
Tweet
If you write disabled="true" or disabled="false" in
raw HTML it won't work - in raw HTML, you need to remove the disabled attribute
to enable the button. But React is not raw HTML - it does
the following magic behind the scenes:
- If you do
disabled={true}in JSX, it gets converted to justin HTML. - If you do
disabled={false}in JSX, thedisabledattribute is removed from thebuttontag in HTML.
This works with other boolean attributes like checked. This
is not officially documented as of writing, but it should be included soon.
The resulting JSBin is here:
JS Bin on jsbin.com JSBin not loading? Click here.
Reflections
Again, keep this difference between jQuery and React in mind before moving onto the next step:
- In jQuery, you write event handlers which modify the DOM.
- In React.js, you write event handlers which modify the state.
And you write
render()to reflect the current state.
Step 7: Remaining Character Count in jQuery (5 minutes)
The next feature we'll implement is the remaining character count.
Here's the spec:
- The character count will display
140 - the number of characters entered.
We'll first implement this in jQuery, then in React.
We'll start with our previous jQuery implementation. We'll put our React.js code on hold. From now on, I will give you new code to start with at the beginning of each chapter, as we alternate between jQuery and React. That means after you're done with each step, you can play with the code before moving to the next step.
✔ Click "Save" below to copy the code to your JSBin and get started.
JS Bin on jsbin.com JSBin not loading? Click here.
First, add character count in HTML using span.
Let's set it as span:
140
Tweet
And inside the input handler in JS, add this code to update the character count:
$("textarea").on("input", function() {
  $("span").text(140 - $(this).val().length);
  ...
});
That's it! Try typing in the Tweet box and you'll see the character count update. Here's the JSBin:
JS Bin on jsbin.com JSBin not loading? Click here.
Step 8: Remaining Character Count in React.js (5 minutes)
How about in React? You should try doing this on your own. Start with our previous React implementation.
✔ Click "Save" below to copy the code to your JSBin and get started.
JS Bin on jsbin.com JSBin not loading? Click here.
(Tip: Since you won't be touching HTML in React, you can close the HTML tab on JSBin so you can get more screen space).
Hint:
- No need to change
getInitialState()orhandleChange() - Use
this.state.text.lengthinrender().
Answer:
Add this after render():
{140 - this.state.text.length}
Here's the JSBin:
JS Bin on jsbin.com JSBin not loading? Click here.
Too easy? Not sure why React.js is so much better than jQuery? Well, the next step has more complexity, and this is when React.js really shines.
Step 9: The "Add Photo" Button (5 minutes)
For our next feature, we'll add an "Add Photo" button to the UI. This is when things get tricky.
However, we will not actually let users upload photos. Instead, here's what we're going to do.
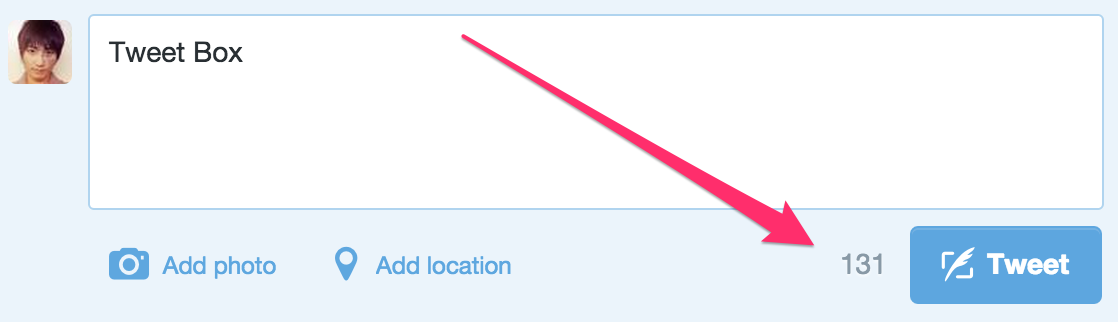
When you upload a photo on Twitter, it counts against the number of characters you can use. On my attempt, it decreased the number of remaining characters from 140 to 117:
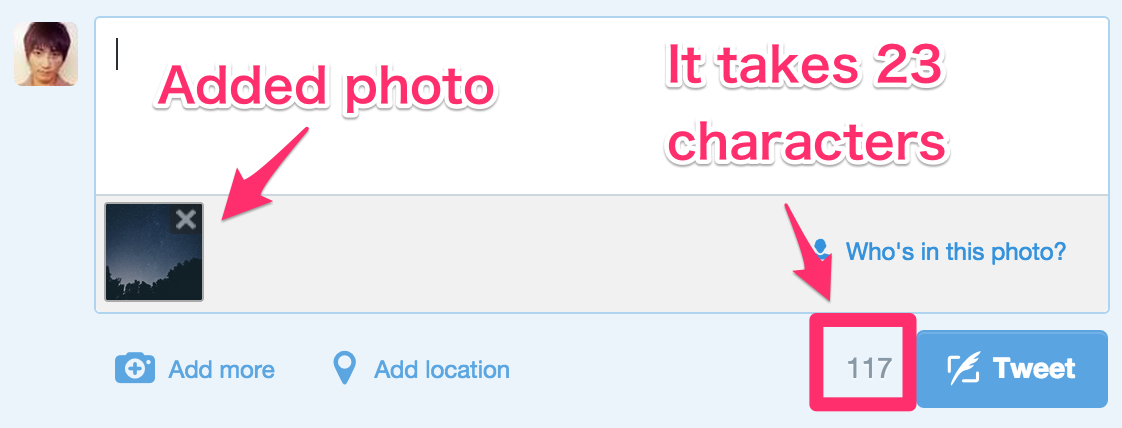
So that's what we're going to do. Here's the spec:
- Create an "Add Photo" button.
- Clicking this button toggles the ON/OFF state. If it's ON, the button will say
✓ Photo Added. - If this button is ON, the number of available characters decreases by 23.
- Also, if this button is ON, even if there's no text entered, the "Tweet" button remains enabled.
Here's the demo JSBin. Try clicking the "Add Photo" button and see what happens to the character count and the Tweet button.
JS Bin on jsbin.com JSBin not loading? Click here.
Let's implement this. We'll first try with jQuery.
Step 10: The "Add Photo" Button, in jQuery (15 - 20 minutes)
Start with our previous jQuery implementation.
✔ Click "Save" below to copy the code to your JSBin and get started.
JS Bin on jsbin.com JSBin not loading? Click here.
We'll modify both the HTML and JS. Before, we were attaching a handler
to $("button"), but this won't work if there are two buttons. So let's modify the HTML like this:
...
Tweet
Add Photo
...
Here are the changes:
- Added the second button called "Add Photo".
- Added classes
js-tweet-buttonandjs-add-photo-buttonto each button. They're prefixed withjs-because they are used only in JS and not in CSS. - Added the
disabledattribute to the Tweet button so I don't have to do this in JS.
Next, rewrite the entire JS file like this:
$("textarea").on("input", function() {
  $("span").text(140 - $(this).val().length);

  if ($(this).val().length > 0) {
    $(".js-tweet-button").prop("disabled", false);
  } else {
    $(".js-tweet-button").prop("disabled", true);
  }
});
Here are the changes:
- (Important) Removed
$("button").prop("disabled", true);from the first line because I addeddisabledattribute to the Tweet button, - Replaced
$("button")with$(".js-tweet-button")so it can be distinguished from.js-add-photo-button.
Adding the Button
Next, we'll implement one of the features:
- Clicking the "Add Photo" button toggles the ON/OFF state. If it's ON, the button will say
✓ Photo Added.
To do this, let's add this piece of code:
$("textarea").on("input", function() {
  ...
});

$(".js-add-photo-button").on("click", function() {
  if ($(this).hasClass("is-on")) {
    $(this)
      .removeClass("is-on")
      .text("Add Photo");
  } else {
    $(this)
      .addClass("is-on")
      .text("✓ Photo Added");
  }
});
We use the class is-on to keep track of the state. Check to see that this works by
clicking the "Add Photo" button multiple times and seeing the text alternate.
Decrement Character Count
Next, we'll implement this feature:
- If the "Add Photo" button is ON, the number of available characters decreases by 23.
To do this, modify the click handler we just added like this.
if ($(this).hasClass("is-on")) {
  $(this)
    .removeClass("is-on")
    .text("Add Photo");
  $("span").text(140 - $("textarea").val().length);
} else {
  $(this)
    .addClass("is-on")
    .text("✓ Photo Added");
  $("span").text(140 - 23 - $("textarea").val().length);
}
We change span's text on every click. If the button becomes
ON, then we need to subtract the text length from 117, which is 140 - 23.
We use 140 - 23 for clarity now - eventually we should use constants.
Check to see that this works by clicking the "Add Photo" button.
Fixing the Input Handler
This is not complete however - if you have the "Add Photo" button ON and start typing on the text area, the remaining character count goes out of sync.
To fix this, we also need to update the input handler for textarea:
$("textarea").on("input", function() {
  if ($(".js-add-photo-button").hasClass("is-on")) {
    $("span").text(140 - 23 - $(this).val().length);
  } else {
    $("span").text(140 - $(this).val().length);
  }

  if (...) {
    ...
});
Check to see that this works by clicking the "Add Photo" button and typing some text.
I know this is taking some time...
But stick with it! The jQuery code here is supposed to be confusing, so don't worry!
Implement the Final Feature
The last feature we need to implement is this:
- If the "Add Photo" button is ON, even if there's no text entered, the "Tweet" button remains enabled.
To do this, we need to modify the click handler of the "Add Photo" button:
$(".js-add-photo-button").on("click", function() {
  if ($(this).hasClass("is-on")) {
    ...
    if ($("textarea").val().length === 0) {
      $(".js-tweet-button").prop("disabled", true);
    }
  } else {
    ...
    $(".js-tweet-button").prop("disabled", false);
  }
});
Here's the explanation:
- If the "Add Photo" button is going from ON to OFF (
ifclause), we need to check if there's no text entered and if so, disable the "Tweet" button. - If the "Add Photo" button is going from OFF to ON (
elseclause), we always enable the "Tweet" button.
But again, this is broken
We're not done yet. The following steps will break the code. Try it out yourself:
- Turn on the "Add Photo" button.
- Type some text.
- Delete all of the text.
- The "Tweet" button should still be enabled because the "Add Photo" button is ON, but this isn't the case.
This means that our input handler for textarea is missing some
logic. To fix this, we need to add another condition to the if statement in the input handler.
$("textarea").on("input", function() {
  ...
  if ($(this).val().length > 0 || $(".js-add-photo-button").hasClass("is-on")) {
    ...
  } else {
    ...
  }
});
We add the following check to whether or not the button should be disabled:
- When the text changes, if the "Add Photo" button is ON, do not disable the button.
Try the above steps again and this time it won't break.
Step 11: Reflection on the jQuery Code - Why So Confusing? (5 minutes)
Here's the final HTML and JS code from the previous step:
JS Bin on jsbin.com JSBin not loading? Click here.
Take a look at the jQuery code once again. It's very confusing. If you're keeping the code as-is, you'll probably need some comments so you remember what you did. There are clear signs of duplication, but you have to think a bit on how to refactor.
The question is: why did it get so ugly so fast?
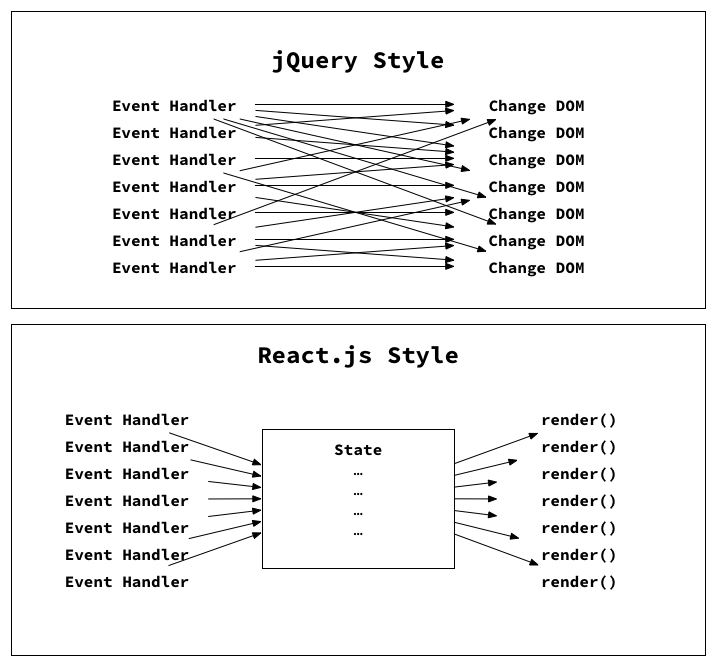
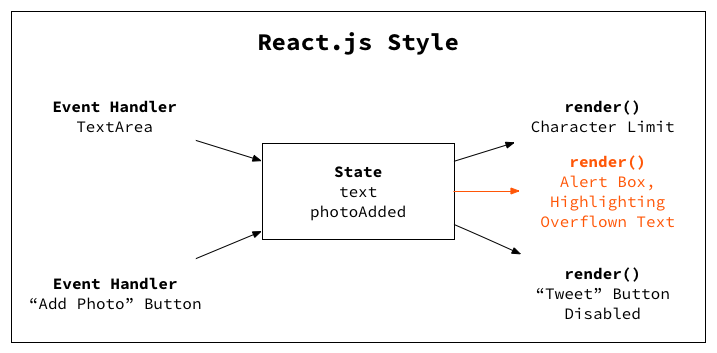
And the answer has to do with the "jQuery style" of code we talked about previously. Recall this diagram:
This is simple when there are only 1 event handler and 1 DOM. However, like we just saw, if several event handlers are modifying several parts of the DOM, the code gets ugly.
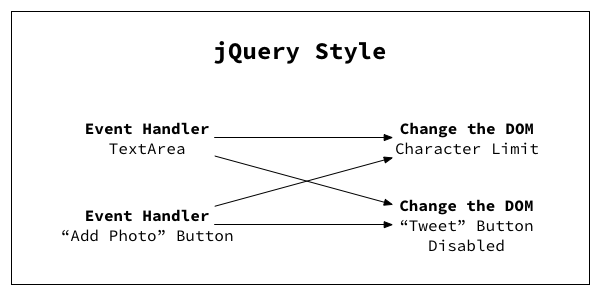
Imagine adding some more features that could influence both the character limit and the "Tweet" button state. The above diagram will have even more arrows. And the code would become unmanageable.
You can, in theory, mitigate this by refactoring into reusable functions. But you'd still have to think hard about it every time you add something new. (Update: Someone from Hacker News sent me the refactored jQuery code. Very clean but again, it requires some thinking.)
Now, let's see how it's like to do the same thing in React. Hint: It's going to be much simpler.
Step 12: The "Add Photo" Button, in React (10-20 minutes)
Start with our previous React implementation.
✔ Click "Save" below to copy the code to your JSBin and get started.
JS Bin on jsbin.com JSBin not loading? Click here.
(Tip: Since you won't be touching HTML in React, you can close the HTML tab on JSBin so you can get more screen space).
Adding the Button
First, let's add the "Add Photo" button. Modify the JSX:
Tweet
Add Photo
Now, let's add a click handler to this button so that the
text changes from Add Photo to ✓ Photo Added. Recall
the React style of writing code:
We will:
- Create a state variable that keeps track of whether the "Add Photo" button is ON or OFF.
- Use the state on
render()to decide whether to showAdd Photoor✓ Photo Added. - Modify the state on the click handler.
For (1), we'll modify getInitialState and
add a key-value pair in the state to keep track of whether the photo is
added or not:
getInitialState: function() {
  return {
    text: "",
    photoAdded: false
  };
},
For (2), we'll modify the JSX markup for the "Add Photo"
button. We'll have the button say "Photo Added" if this.state.photoAdded is
true. We can just use a ternary expression here.
{this.state.photoAdded ? "✓ Photo Added" : "Add Photo" }
Finally, for (3), we'll attach a click handler on JSX like
we did for textarea:
{this.state.photoAdded ? "✓ Photo Added" : "Add Photo" }
And add a handler method which reverses this.state.photoAdded:
togglePhoto: function(event) {
  this.setState({ photoAdded: !this.state.photoAdded });
},
Now, clicking on Add Photo should toggle the text. Try it out yourself.
Decrement Character Count
We'll now implement the next feature:
- If the "Add Photo" button is ON, the number of available characters decreases by 23.
Currently, the number of available characters is displayed as follows
in render():
{140 - this.state.text.length}
This will now also depend on this.state.photoAdded, so we
need an if and else here.
However, in JSX, you can't write if or else inside { ... }.
You can use a ternary expression (a ? b : c) like we did before,
but that would be pretty long in this case.
Usually the simplest way in this situation is to refactor a conditional into a method. Let's try it.
First, modify the above code to use a method, like this:
{ this.remainingCharacters() }
And define the method like this:
remainingCharacters: function() {
  if (this.state.photoAdded) {
    return 140 - 23 - this.state.text.length;
  } else {
    return 140 - this.state.text.length;
  }
},
Now, the remaining character count should update accordingly when the "Add Photo" button is toggled.
Question: In render(), why does { this.remainingCharacters() } have () but { this.handleChange } and { this.togglePhoto } don't?
Good question. Let's take a look at render() again:
render: function() {
  return (
    ...

      ...
      { this.remainingCharacters() }
      ...

        ...
Answer:
- We've written
remainingCharacters()method to return a number. We need to get this number and put it in between, so we need to callremainingCharacters()method by using(). That's why there's()inremainingCharacters(). - On the other hand,
handleChangeandtogglePhotoare event handlers. We want these methods to be called only when the user interacts with the UI (changing the text or clicking the button). To do so, inrender(), we need to write them without()and assign them to attributes likeonChangeandonClick.
The "Tweet" Button's States
We've got one more feature to implement:
- If the "Add Photo" button is ON, even if there's no text entered, the "Tweet" button remains enabled.
This is actually really easy to do. Previously, the Tweet button's disabled option
was set as:
...
In other words, the button was disabled if the text's length was 0. Now, the button is disabled if:
- The text's length is 0, and:
- The "Add Photo" button is OFF.
So the logic becomes like this:
...
Or, you can simplify the above code by utilizing remainingCharacters().
If there are 140 characters remaining, that means no text is entered, so
the button should be disabled.
...
That's it! Try toggling the "Add Photo" button and check that the "Tweet Button" is enabled/disabled correctly.
We're Done!
That was easy. Here's the resulting JSBin:
JS Bin on jsbin.com JSBin not loading? Click here.
Step 13: Reflection on the React Code - Why So Simple? (5 minutes)
The changes to accommodate the "Add Photo" button were minimal when using React. No refactoring needed. Why is this the case?
Again, it has to do with React's style of writing UI code. In React, event
handlers modify the "state", and whenever the state is modified, React
automatically calls render() again to update the UI.
In this particular example, the diagram now looks like this:
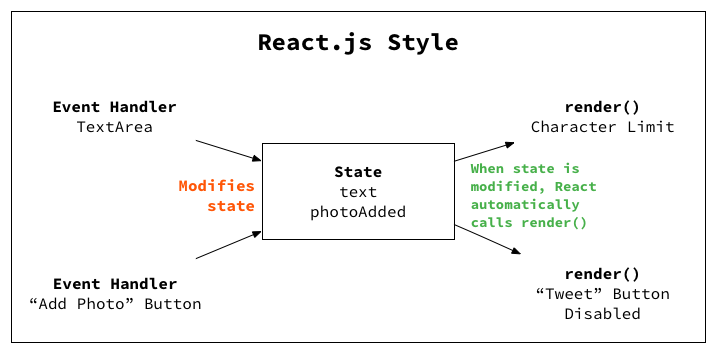
The state becomes an intermediary thing which sits in between the event
handlers and render():
- Event handlers don't need to worry about which part of the DOM changes. They just need to set the state.
- Similarly, when you write
render(), all you need to worry about is what the currentstateis.
Compare with jQuery
You can imagine what would happen as the UI gets more features. Without the intermediary "state", we'd have a tough time managing complexity. This is why you'd want to use React over jQuery for complex UIs.
Again, it's possible to write clean jQuery code that doesn't look like spaghetti. But you have to come up with the code structure yourself and think about how to refactor every time you add a new feature. React provides you this structure and reduces your cognitive load.
Step 14: The Final Feature - Highlighting Overflown Characters (5 minutes)
The last feature we're going to implement is highlighting characters that are over the limit.
Unfortunately, we're not going to highlight the actual text inside the Tweet box,
because that would require us to change textarea to contenteditable,
and contenteditable is a bit too complicated for illustrative
purposes.
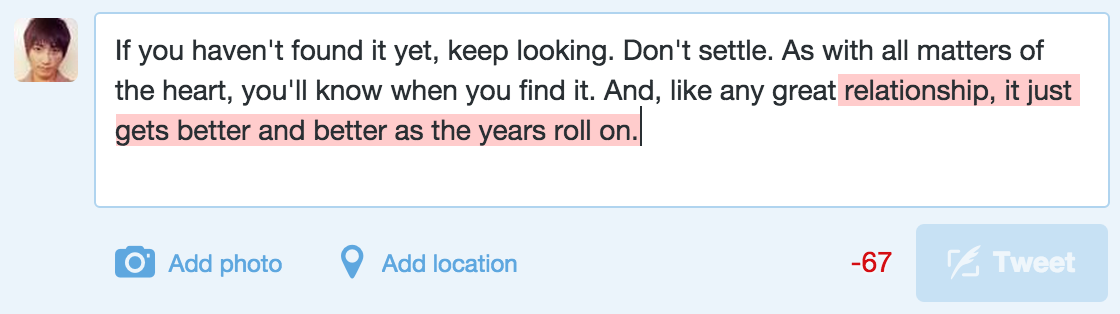
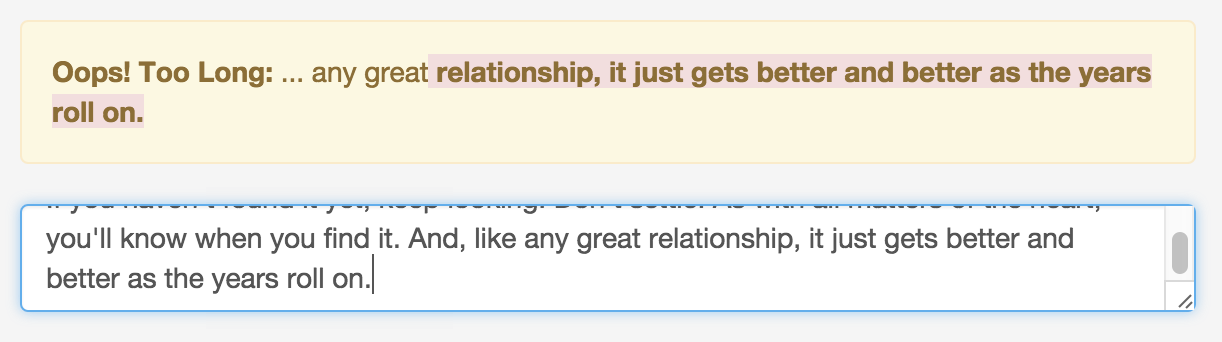
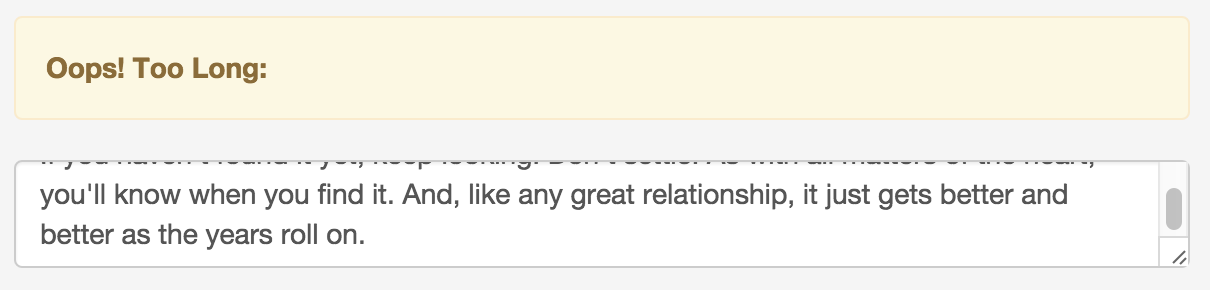
Instead, we'll be displaying an alert box on top and indicate which characters need to be deleted, like this:
To try it out, copy the following quote by Steve Jobs:
If you haven't found it yet, keep looking. Don't settle. As with all matters of the heart, you'll know when you find it. And, like any great relationship, it just gets better and better as the years roll on.
And paste it into the Tweet box below:
JS Bin on jsbin.com JSBin not loading? Click here.
- It should show an alert box with the overflown characters highlighted in red
- It should also show 10 characters before the cutoff point, without any highlighting.
If we were to implement this in jQuery, our code will be even messier. Notice in the diagram that we'll be adding two more arrows for one new feature.
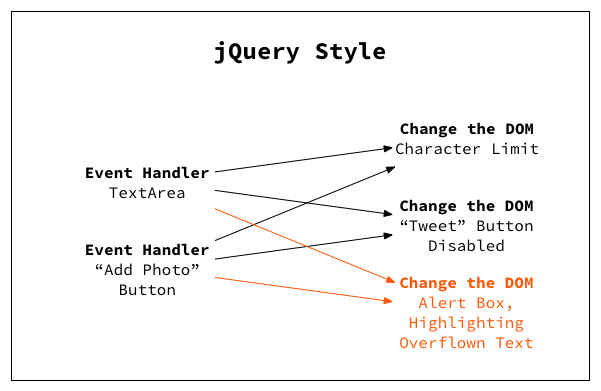
So we're not going to implement this in jQuery. We'll just do it in React and call it a day. It'd be pretty simple to do in React - just one extra arrow on the diagram:
Step 15: Highlighting Overflown Characters in React (10 - 15 minutes)
Start with our previous React implementation.
✔ Click "Save" below to copy the code to your JSBin and get started.
JS Bin on jsbin.com JSBin not loading? Click here.
We'll do this step by step. First, we'll display a simple alert when you write past the limit. The alert will have some static text.
Since this will require a conditional, let's write it in a separate method. Add { this.overflowAlert() } in front of the text box:
{ this.overflowAlert() }
Now, this method should return:
- A div tag for the alert box if there are no more characters left.
- Nothing (i.e. empty text) otherwise.
It turns out that in React, you can return JSX markup from a method and use this in some other method, everything will just work. In other words, you can do something like:
someMethod: function() {
  return (
    Hello World
  );
},
someMethod2: function() {
  return (

      { this.someMethod() }

  );
},
In our case, we can return (
... ) on one condition,
and nothing on the other. So our overflowAlert method will look like this:
overflowAlert: function() {
  if (this.remainingCharacters() < 0) {
    return (

        Oops! Too Long:

    );
  } else {
    return "";
  }
},
Notice that we're checking this.remainingCharacters() to see
if we should show the alert or not.
Try this out by typing 140+ characters (or 117+ characters with the "Add Photo" button ON). It should show the alert.
Displaying Overflown Characters
Here's the breakdown of what goes inside the alert message:
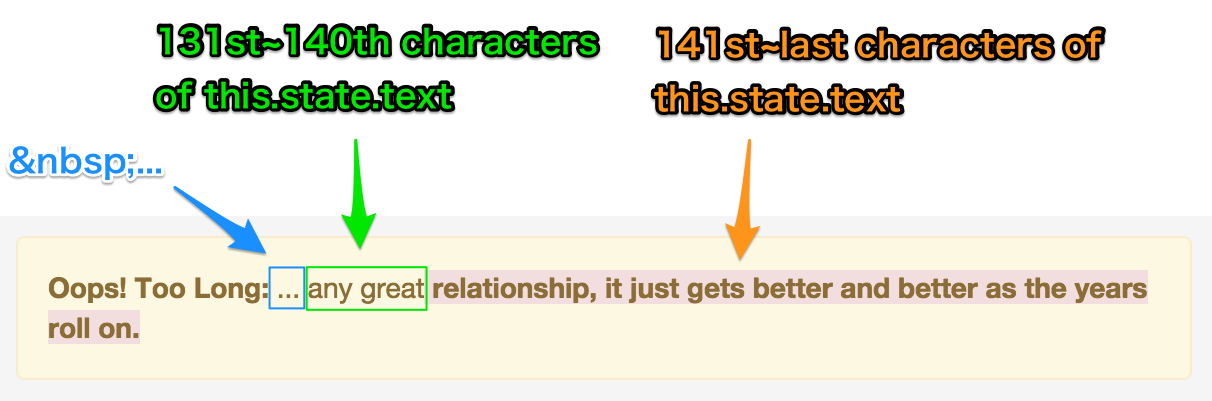
- Between "Oops! Too Long:" and the actual text, there's an empty single
space followed by three dots. I used
- Then there are the 131st~140th (total of 10) characters of
this.state.text. - Then there are the remaining characters highlighted in red.
Let's write this in JSX. Inside the if clause of overflowAlert, we'll create two variables: beforeOverflowText and overflowText. We'll use .substring() method on this.state.text.
if (this.remainingCharacters() < 0) {
  var beforeOverflowText = this.state.text.substring(140 - 10, 140);
  var overflowText = this.state.text.substring(140);

  return (

      Oops! Too Long:
       ...{beforeOverflowText}
      {overflowText}

  );
}
- If you do
.substring(a, b), it will returna + 1th throughbth characters from the string. - If you do
.substring(a), it will returna + 1th through last characters from the string. - We use Bootstrap's
bg-dangerclass to highlight the text in red.
Copy paste this text again and see that the correct texts are highlighted. We're almost done!
If you haven't found it yet, keep looking. Don't settle. As with all matters of the heart, you'll know when you find it. And, like any great relationship, it just gets better and better as the years roll on.
What if the "Add Photo" button is ON?
If the "Add Photo" button is ON then the character limit decreases by
23. So our beforeOverflowText and overflowText need to take that into account:
if (this.state.photoAdded) {
  var beforeOverflowText = this.state.text.substring(140 - 23 - 10, 140 - 23);
  var overflowText = this.state.text.substring(140 - 23);
} else {
  var beforeOverflowText = this.state.text.substring(140 - 10, 140);
  var overflowText = this.state.text.substring(140);
}
Now, try toggling the "Add Photo" button while entering any text that's longer than the limit. It should work correctly. Here's the JSBin:
JS Bin on jsbin.com JSBin not loading? Click here.
That's it! Again, you can see that the code changes were simple:
Step 16: What's Next? (5 minutes)
This concludes my tutorial. Hopefully you learned:
- The difference between jQuery code v.s. React code, and
- How to write some basic React code in JSX.
What's next? Well, I only covered one of the greatest features of React. The next thing you should learn is:
- How to compose React components, and
props, which is more widely used thanstate.
Fortunately, the official React tutorial is pretty good at explaining this. It might be pretty challenging if you don't know JS too well though.
If you like videos, try egghead.io's React videos. I recommend the Build Your First React.js App series.
Thanks for reading, and if you have any feedback/questions, shoot me an email at shu@chibicode.com or a tweet at @chibicode.
Also, thanks to my colleagues Brady Fukumoto for reading a draft version of this post and Greg Becker for providing me extensive feedback.
Sign up to be notified when I publish more tutorials!
Like This Tutorial? Please Tweet / Follow :)
I'll publish more tutorials like this soon - follow me to get notified :)
...or Retweet :)
Official Account:
Our first tutorial: “React.js Introduction For People Who Know Just Enough
jQuery To Get By” t.co/PbtUXsTBMp
pic.twitter.com/71oBkFHl62
— React for Designers (@ReactDesigners) July 6, 2015
The Author:
Just released a "@ReactJS Introduction
For People Who Know Just Enough jQuery To Get By" → ⚛ → t.co/a346enMWch
pic.twitter.com/7YkdmWqYPz
— Shu Uesugi (@chibicode) July 9, 2015
My Employer:
Smart stuff: #ReactJS Introduction
For People Who Know Just Enough jQuery To Get By t.co/Ia0TB3kA9X via
@reactdesigners
— EdSurge (@EdSurge) July 10, 2015
