

网络处理,应该是我们平时开发的时候最常用到的操作。比如读取 JSON 数据,下载图片,这些操作都要和网络打交道,一个高效稳定的网络操作库对于提升我们日常的开发效率有着非常关键的作用。Alamofire 正是这样一个库,成熟,稳定,高效。
关于 Alamofire
如果你使用过 Objective-C 进行开发,那么你一定对 AFNetworking 这个库不陌生,在 Objective-C 生态中,这个库作为做常用的网络操作库之一,被大家广泛使用。Mattt Thompson 作为 AFNetworking 的发起人,在贡献了这个强大的第三方库之后,又基于 Swift 语言开发了一个新的网络操作库 - Alamofire。而 AFNetworking 前面的 AF 正是 Alamofire 的字头缩写。这样说起来就很明白了吧~
开始行动
现在我们就开始尝试使用 Alamofire 进行网络操作。
创建 Playground
首先在一个合适的地方建立一个目录:
$ mkdir alamofire
目录创建好之后,我们在这个目录中创建一个空的 workspace 文件,打开 Xcode 选择 File -> New -> Workspace…
将新建的 workspace 保存到我们刚刚创建的目录中。
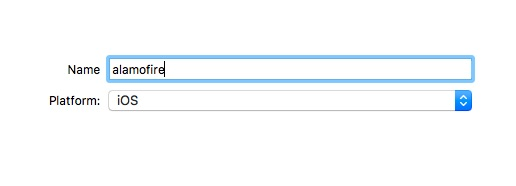
然后打开这个 workspace ,点击 File -> New -> Playground… 在这个 workspace 中创建一个新的 Playground,在选项表单中填写如下内容:
然后点击下一步,将新创建的 Playground 存储到我们刚刚创建的目录中。
安装 Alamofire
我们推荐使用 Carthage 包管理的方式来安装 Alamofire,当然你也可以用你喜欢的其他方式来安装 Alamofire。
Alamofire 的 Github 主页上面详细说明了各种安装方法: github.com/Alamofire/A…
我们也有一篇文章介绍如何使用 Carthage 包管理: swiftcafe.io/2015/10/25/…
如果需要,可以参考上面列出的内容。那么,我们就正式开始了,首先我们在我们创建的 alamofire 目录中创建一个 Cartfile 文件,里面写入 Carthage 包管理的配置信息:
github "Alamofire/Alamofire" ~> 3.0
配置文件里面非常简单,仅仅将 Alamofire 的 Github 名称和版本写进来。现在我们的 alamofire 目录应该包含这两个文件:
Cartfile
alamofire.playground
一个是 Carthage 的配置文件,另一个是我们刚刚创建的 playground 文件。配置完成后,我们输入:
carthage update
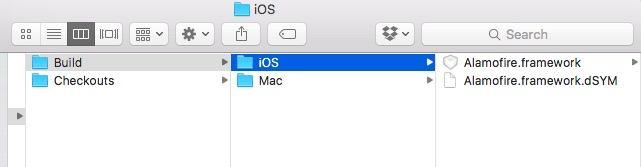
这个命令可以将我们在 Cartfile 中配置的依赖库下载并且构建出来,构建成功后,我们可以在 Carthage/Build/iOS 目录中看到构建出来的 Alamofire.framwork 库:
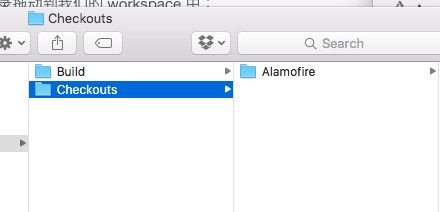
还可以在 Checkouts 目录中看到 Alamofire 的原始项目:
我们把 Checkouts 中的 Alamofire 目录拖动到我们的 workspace 中:
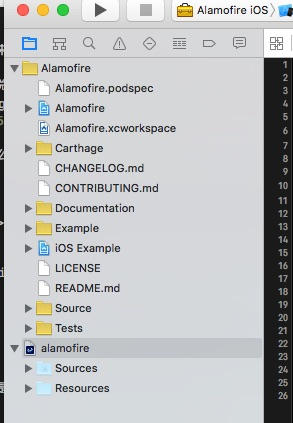
这样我们的 storyboard 就能够检测到 Alamofire 库了。
开始使用 Alamofire
环境配置好之后,我们可以在 storyboard 中导入 Alamofire 库:
import Alamofire
发送基本请求
导入完成后,我们就可以使用 Alamofire 请求网络了,我们可以发送最基本的 GET 请求:
Alamofire.request(.GET, "https://swiftcafe.io")
当然,我们还可以为请求添加参数,并且处理响应信息,调用方式也很简单:
Alamofire.request(.GET, "https://httpbin.org/get", parameters: ["foo": "bar"])
    .responseJSON { response in

        print(response.request)  // 请求对象
        print(response.response) // 响应对象
        print(response.data)     // 服务端返回的数据

        if let JSON = response.result.value {
            print("JSON: \(JSON)")
        }

}
Alamofire 提供了多种返回数据的序列化方法,比如刚才我们用到的 responseJSON, 会返回服务端返回的 JSON 数据,这样就不用我们自己再去解析了。
下面是 Alamofire 目前支持的数据序列化方法:
- response()
- responseData()
- responseString(encoding: NSStringEncoding)
- responseJSON(options: NSJSONReadingOptions)
- responsePropertyList(options: NSPropertyListReadOptions)
支持普通数据,字符串, JSON 和 plist 形式的返回。
上传文件
Alamofire 提供了 upload 方法用于上传本地文件到服务器:
let fileURL = NSBundle.mainBundle().URLForResource("Default", withExtension: "png")
Alamofire.upload(.POST, "https://httpbin.org/post", file: fileURL)
当然,我们还可以获取上传时候的进度:
Alamofire.upload(.POST, "https://httpbin.org/post", file: fileURL)
         .progress { bytesWritten, totalBytesWritten, totalBytesExpectedToWrite in
             print(totalBytesWritten)

             // This closure is NOT called on the main queue for performance
             // reasons. To update your ui, dispatch to the main queue.
             dispatch_async(dispatch_get_main_queue()) {
                 print("Total bytes written on main queue: \(totalBytesWritten)")
             }
         }
         .responseJSON { response in
             debugPrint(response)
         }
还支持 MultipartFormData 形式的表单数据上传:
Alamofire.upload(
    .POST,
    "https://httpbin.org/post",
    multipartFormData: { multipartFormData in
        multipartFormData.appendBodyPart(fileURL: unicornImageURL, name: "unicorn")
        multipartFormData.appendBodyPart(fileURL: rainbowImageURL, name: "rainbow")
    },
    encodingCompletion: { encodingResult in
        switch encodingResult {
        case .Success(let upload, _, _):
            upload.responseJSON { response in
                debugPrint(response)
            }
        case .Failure(let encodingError):
            print(encodingError)
        }
    }
)
下载文件
Alamofire 同样也提供了文件下载的方法:
Alamofire.download(.GET, "https://httpbin.org/stream/100") { temporaryURL, response in
    let fileManager = NSFileManager.defaultManager()
    let directoryURL = fileManager.URLsForDirectory(.DocumentDirectory, inDomains: .UserDomainMask)[0]
    let pathComponent = response.suggestedFilename

    return directoryURL.URLByAppendingPathComponent(pathComponent!)
}
还可以设置默认的下载存储位置:
let destination = Alamofire.Request.suggestedDownloadDestination(directory: .DocumentDirectory, domain: .UserDomainMask)
Alamofire.download(.GET, "https://httpbin.org/stream/100", destination: destination)
也提供了 progress 方法检测下载的进度:
Alamofire.download(.GET, "https://httpbin.org/stream/100", destination: destination)
         .progress { bytesRead, totalBytesRead, totalBytesExpectedToRead in
             print(totalBytesRead)

             dispatch_async(dispatch_get_main_queue()) {
                 print("Total bytes read on main queue: \(totalBytesRead)")
             }
         }
         .response { _, _, _, error in
             if let error = error {
                 print("Failed with error: \(error)")
             } else {
                 print("Downloaded file successfully")
             }
         }
HTTP 验证
Alamofire 还很提供了一个非常方便的 authenticate 方法提供了 HTTP 验证:
let user = "user"
let password = "password"

Alamofire.request(.GET, "https://httpbin.org/basic-auth/\(user)/\(password)")
         .authenticate(user: user, password: password)
         .responseJSON { response in
             debugPrint(response)
         }
HTTP 响应状态信息识别
Alamofire 还提供了 HTTP 响应状态的判断识别,通过 validate 方法,对于在我们期望之外的 HTTP 响应状态信息,Alamofire 会提供报错信息:
Alamofire.request(.GET, "https://httpbin.org/get", parameters: ["foo": "bar"])
         .validate(statusCode: 200..<300)
         .validate(contentType: ["application/json"])
         .response { response in
             print(response)
         }
validate 方法还提供自动识别机制,我们调用 validate 方法时不传入任何参数,则会自动认为 200…299 的状态吗为正常:
Alamofire.request(.GET, "https://httpbin.org/get", parameters: ["foo": "bar"])
         .validate()
         .responseJSON { response in
             switch response.result {
             case .Success:
                 print("Validation Successful")
             case .Failure(let error):
                 print(error)
             }
         }
调试状态
我们通过使用 debugPrint 函数,可以打印出请求的详细信息,这样对我们调试非常的方便:
let request = Alamofire.request(.GET, "https://httpbin.org/get", parameters: ["foo": "bar"])

debugPrint(request)
这样就会产生如下输出:
$ curl -i \
    -H "User-Agent: Alamofire" \
    -H "Accept-Encoding: Accept-Encoding: gzip;q=1.0,compress;q=0.5" \
    -H "Accept-Language: en;q=1.0,fr;q=0.9,de;q=0.8,zh-Hans;q=0.7,zh-Hant;q=0.6,ja;q=0.5" \
    "https://httpbin.org/get?foo=bar"
结语
Alamofire 是一个非常强大并且使用简洁的网络操作库,接口非常的简单,而且稳定。关于 Alamofire 的更多信息,大家还可以到它的 Github 主页上面了解到更多。大家也可以下载我们这里个 playground 演示示例: github.com/swiftcafex/…
