

- 原文链接 : Approaching Android with MVVM — ribot labs — Medium
- 译文出自 : 掘金翻译计划
- 译者 : Sausure
- 校对者: EthanWu (ethan-wu)、dodocat (Quanqi)、foolishgao
我考察了一段时间安卓的数据绑定类库,决定尝试下它的“Model-View-ViewModel”模式。因为我曾经和 @matto1990 合作开发过一款应用 HackerNews Reader,所以我决定利用这种模式重新实现它。

这篇文章通过一款简单的App来论证MVVM模式,我建议你先看看这个项目,让你大概了解下它。
什么是MVVM模式?
Model-View-ViewModel 就是将其中的 View 的状态和行为抽象化,让我们可以将UI和业务逻辑分开。当然这些工作 ViewModel 已经帮我们做了,它可以取出 Model 的数据同时帮忙处理 View 中由于需要展示内容而涉及的业务逻辑。
MVVM模式是通过以下三个核心组件组成,每个都有它自己独特的角色:
- Model - 包含了业务和验证逻辑的数据模型
- View - 定义屏幕中View的结构,布局和外观
- ViewModel - 扮演“View”和“Model”之间的使者,帮忙处理 View 的全部业务逻辑
那这和我们曾经用过的MVC模式有什么不同呢?以下是MVC的结构
- View 在 Controller 的顶端,而 Model 在 Controller 的底部
- Controller 需要同时关注 View 和 Model
- View 只能知道 Model 的存在并且能在Model的值变更时收到通知
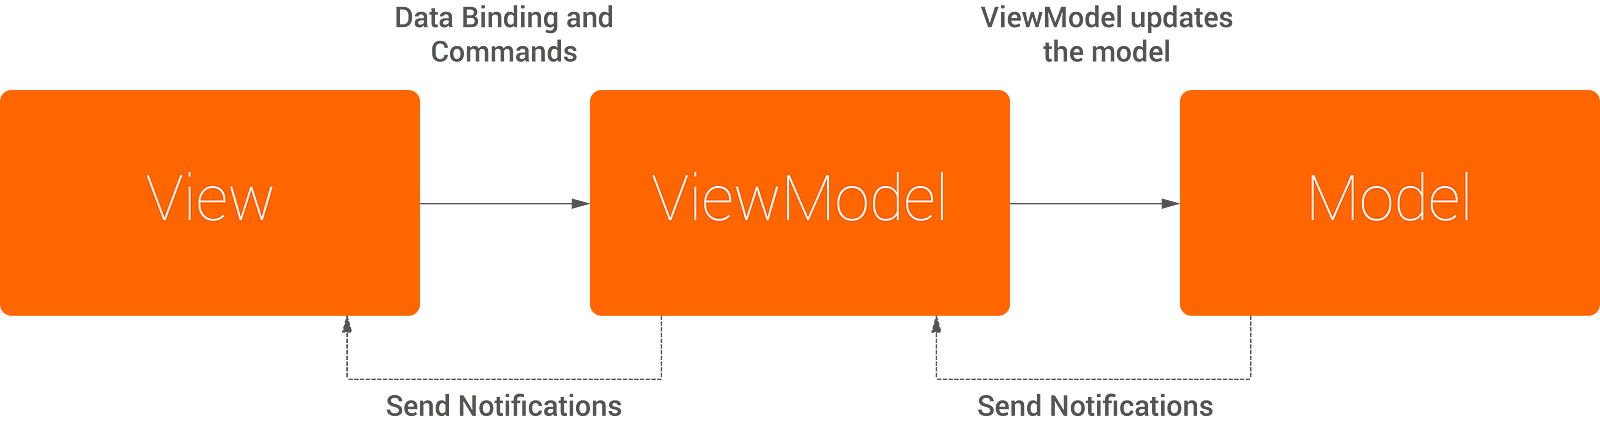
MVVM模式和MVC有些类似,但有以下不同:
- ViewModel 替换了 Controller,在UI层之下
- ViewModel 向 View 暴露它所需要的数据和指令对象
- ViewModel 接收来自 Model 的数据
你可以看到这两种模式有着相似的结构,但新加入的 ViewModel 是用不同的方法将组件们联系起来的,它是双向的,而MVC只能单向连接。
概括起来,MVVM是由MVC发展而来 - 通过在 Model 之上而在 View 之下增加一个非视觉的组件将来自 Model 的数据映射到 View 中。接下来,我们将更多地看到MVVM的这种特性。
The Hacker News reader
正如前面提及过的,我将我原来的一个项目拆开为这篇文章服务。这款应用有以下几种特性:
- 查看帖子列表
- 查看单个帖子
- 查看帖子下的评论
- 查看指定作者的帖子
我们这么做是为了缩减代码库的规模,更加容易去了解这些操作是如何进行的。下面的图片能让你很快了解它是怎么工作的:
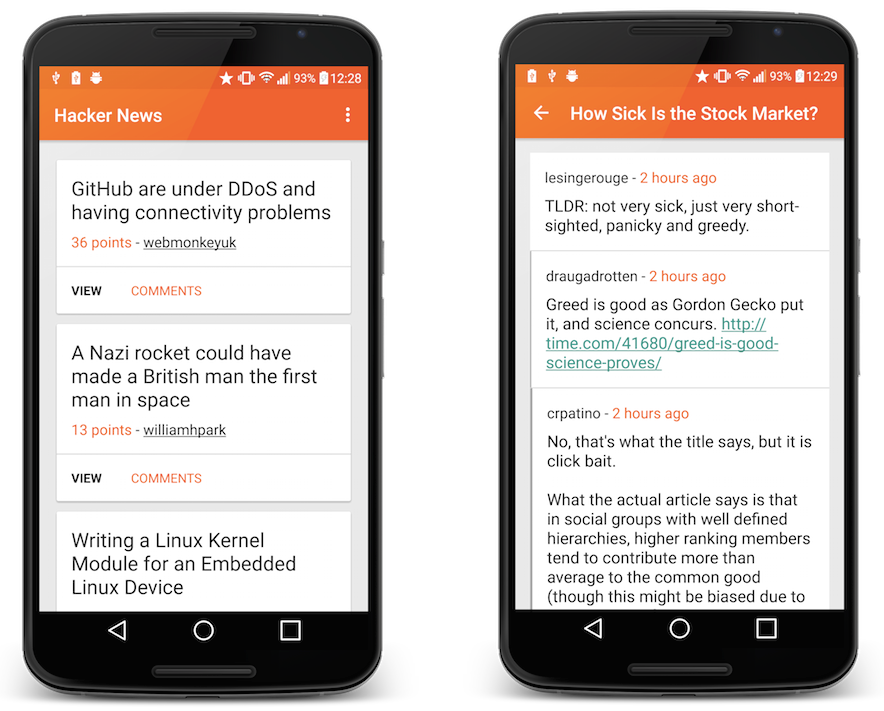
左边的图片展示的是帖子的列表,它也是这款应用的主要部分,接下来右边的图片展示的是该帖子的评论列表,它和前者有相似的地方,但也有一些不同,我们将在后面看到。
展示帖子

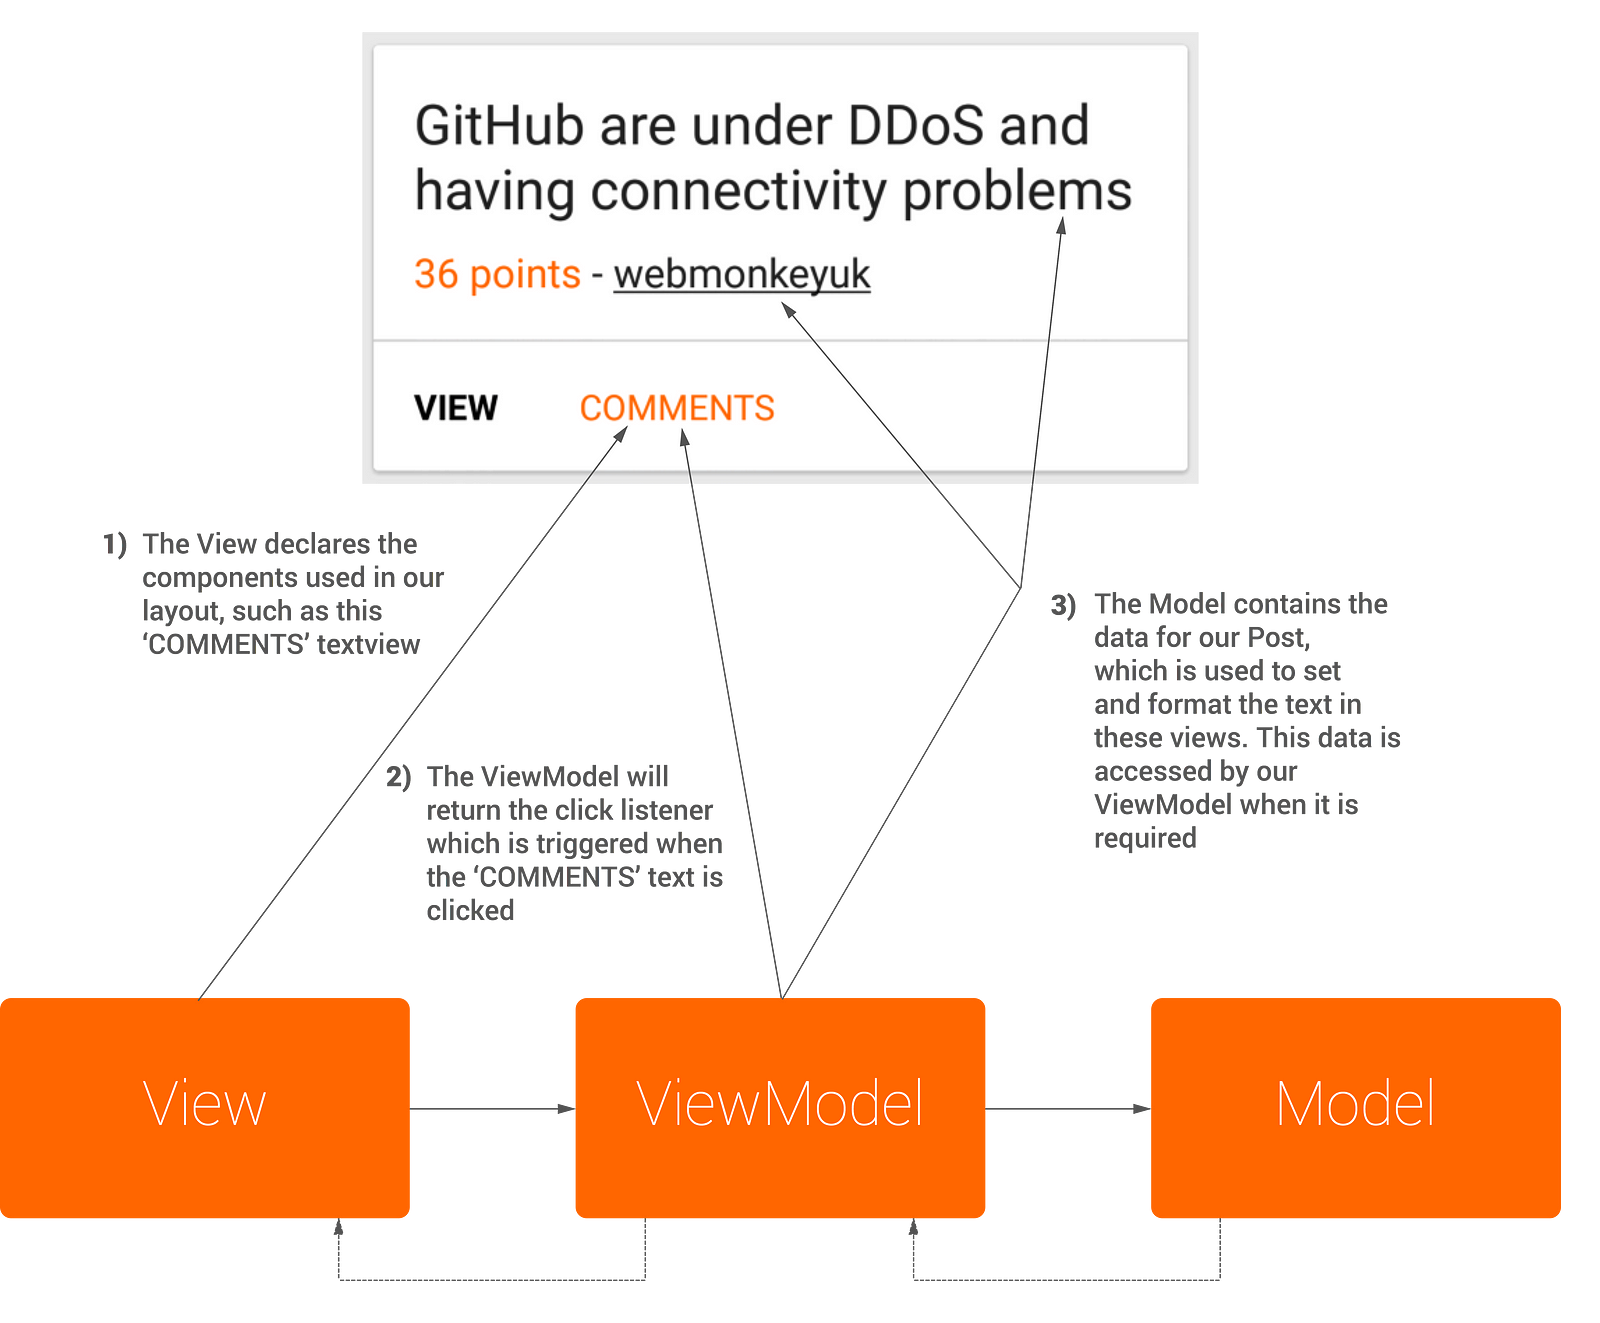
每个帖子信息都用 RecyclerView 所包含的 CardView 包装起来,正如上图展示的。
使用MVVM我们可以将不同层抽象出来很好的实现这些卡片,这意味着每个MVVM组件只要处理它被分配的任务即可。通过使用前面介绍的MVVM的不同组件,组合在一起后能构造出我们的帖子卡片实例,那么我们该如何将它们从布局中抽离出来?
Model
简单来说,Model 由那些帖子的业务逻辑组成,包括一些像 id,name,text之类的属性,以下代码展示了该类的部分代码:
public class Post {

    public Long id;
    public String by;
    public Long time;
    public ArrayList<Long> kids;
    public String url;
    public Long score;
    public String title;
    public String text;
    @SerializedName("type")
    public PostType postType;

    public enum PostType {
        @SerializedName("story")
        STORY("story"),
        @SerializedName("ask")
        ASK("ask"),
        @SerializedName("job")
        JOB("job");

        private String string;

        PostType(String string) {
            this.string = string;
        }

        public static PostType fromString(String string) {
            if (string != null) {
                for (PostType postType : PostType.values()) {
                    if (string.equalsIgnoreCase(postType.string)) return postType;
                }
            }
            return null;
        }
    }

    public Post() { }

}
为了可读性,上面的 POST 类中去掉了一些Parcelable变量和方法
这里你可以看到Post类只包含所有它的属性,没有一点别的逻辑 - 别的组件会处理它们。
View
View 的任务是定义布局,外观和结构。View 最好能完全通过XML来定义,即使它包含些许java代码也不应该有业务逻辑部分,
View 会通过绑定从 ViewModel中取出数据。在运行时,若 ViewModel的属性的值有变化的话它会通知 View来更新UI。
首先,我们先给 RecyclerView 传入一个自定义的适配器。为此,我们需要让我们的 BindingHolder 类持有对 Binding 的引用。
public static class BindingHolder extends RecyclerView.ViewHolder {
    private ItemPostBinding binding;

public BindingHolder(ItemPostBinding binding) {
        super(binding.cardView);
        this.binding = binding;
    }
}
onBindViewHolder() 方法才是真正将 ViewModel 和 View 绑定的地方。我们获取一个 ItemPostBinding 对象(它会被 item_post 布局自动生成),然后将新建的 PostViewModel 对象传给它的 ViewModel 引用。
ItemPostBinding postBinding = holder.binding;
postBinding.setViewModel(new PostViewModel(mContext,
                             mPosts.get(position), mIsUserPosts));
下面就是完整的 PostAdaper 类:
public class PostAdapter extends RecyclerView.Adapter<PostAdapter.BindingHolder> {
    private List<Post> mPosts;
    private Context mContext;
    private boolean mIsUserPosts;

    public PostAdapter(Context context, boolean isUserPosts) {
        mContext = context;
        mIsUserPosts = isUserPosts;
        mPosts = new ArrayList<>();
    }

    @Override
    public BindingHolder onCreateViewHolder(ViewGroup parent, int viewType) {
        ItemPostBinding postBinding = DataBindingUtil.inflate(
                LayoutInflater.from(parent.getContext()),
                R.layout.item_post,
                parent,
                false);
        return new BindingHolder(postBinding);
    }

    @Override
    public void onBindViewHolder(BindingHolder holder, int position) {
        ItemPostBinding postBinding = holder.binding;
        postBinding.setViewModel(new PostViewModel(mContext, mPosts.get(position), mIsUserPosts));
    }

    @Override
    public int getItemCount() {
        return mPosts.size();
    }

    public void setItems(List<Post> posts) {
        mPosts = posts;
        notifyDataSetChanged();
    }

    public void addItem(Post post) {
        mPosts.add(post);
        notifyDataSetChanged();
    }

    public static class BindingHolder extends RecyclerView.ViewHolder {
        private ItemPostBinding binding;

        public BindingHolder(ItemPostBinding binding) {
            super(binding.cardView);
            this.binding = binding;
        }
    }

}
看下我们的XML布局,首先我们要将所有的布局都包含在layout标签下,同时使用data标签来声明我们的 ViewModel:
<layout xmlns:android="http://schemas.android.com/apk/res/android">
<data>
<variable name="viewModel" type="com.hitherejoe.mvvm_hackernews.viewModel.PostViewModel" /></data>
<!-- Other layout views -->
</layout>
声明 ViewModel 可以让我们在整个布局中引用它,在 item_post 布局中我们会多次用到 ViewModel:
androidText - 你可以从 ViewModel 中引用相应的方法给文本视图设置内容。正如下面你所看到的 @{viewModel.postTitle},它从 ViewModel 中引用了 getPostTitle() 方法 - 它将返回相应帖子的标题。
onClick - 我们也可以引用单击事件到布局文件中。如你所看到的,@{viewModel.onClickPost} 是指从 ViewModel 中引用 onClickPost()方法 - 它将返回一个能处理单击事件的 OnClickListener 对象。
visibility - 控制去comments activity的入口,依赖于该帖子是否有相应的评论。通过检查 comments list 的长度来决定该 visibility 的值,这些操作都是在 ViewModel 中完成的。在这里,我们引用了它的getCommentsVisiblity()方法来计算是否该显示
<?xml version="1.0" encoding="utf-8"?>
<layout xmlns:android="http://schemas.android.com/apk/res/android">

    <data>
        <variable name="viewModel" type="com.hitherejoe.mvvm_hackernews.viewModel.PostViewModel" />
    </data>

    <android.support.v7.widget.CardView
        xmlns:card_view="http://schemas.android.com/apk/res-auto"
        android:id="@+id/card_view"
        android:layout_width="match_parent"
        android:layout_height="wrap_content"
        android:layout_marginTop="2dp"
        android:layout_marginBottom="2dp"
        card_view:cardCornerRadius="2dp"
        card_view:cardUseCompatPadding="true">

        <LinearLayout
            android:id="@+id/container_post"
            android:layout_width="match_parent"
            android:layout_height="wrap_content"
            android:clickable="true"
            android:orientation="vertical"
            android:onClick="@{viewModel.onClickPost}">

            <LinearLayout
                android:layout_width="match_parent"
                android:layout_height="wrap_content"
                android:orientation="vertical"
                android:padding="16dp"
                android:background="@drawable/touchable_background_white">

                <TextView
                    android:id="@+id/text_post_title"
                    android:layout_width="match_parent"
                    android:layout_height="wrap_content"
                    android:layout_marginBottom="8dp"
                    android:text="@{viewModel.postTitle}"
                    android:textColor="@color/black_87pc"
                    android:textSize="@dimen/text_large_title"
                    android:onClick="@{viewModel.onClickPost}"/>

                <RelativeLayout
                    android:layout_width="match_parent"
                    android:layout_height="wrap_content">

                    <TextView
                        android:id="@+id/text_post_points"
                        android:layout_width="wrap_content"
                        android:layout_height="wrap_content"
                        android:layout_alignParentLeft="true"
                        android:text="@{viewModel.postScore}"
                        android:textSize="@dimen/text_body"
                        android:textColor="@color/hn_orange" />

                    <TextView
                        android:id="@+id/text_post_author"
                        android:layout_width="wrap_content"
                        android:layout_height="wrap_content"
                        android:layout_toRightOf="@+id/text_post_points"
                        android:text="@{viewModel.postAuthor}"
                        android:textColor="@color/black_87pc"
                        android:textSize="@dimen/text_body"
                        android:bufferType="spannable"
                        android:onClick="@{viewModel.onClickAuthor}"/>

                </RelativeLayout>

            </LinearLayout>

            <View
                android:layout_width="match_parent"
                android:layout_height="1dp"
                android:background="@color/light_grey" />

            <LinearLayout
                android:layout_width="match_parent"
                android:layout_height="wrap_content"
                android:orientation="horizontal"
                android:background="@color/white">

                <TextView
                    android:id="@+id/text_view_post"
                    android:layout_width="wrap_content"
                    android:layout_height="wrap_content"
                    android:padding="16dp"
                    android:background="@drawable/touchable_background_white"
                    android:clickable="true"
                    android:textColor="@color/black"
                    android:textSize="@dimen/text_small_body"
                    android:textStyle="bold"
                    android:text="@string/view_button"
                    android:onClick="@{viewModel.onClickPost}"/>

                <TextView
                    android:id="@+id/text_view_comments"
                    android:layout_width="wrap_content"
                    android:layout_height="wrap_content"
                    android:padding="16dp"
                    android:background="@drawable/touchable_background_white"
                    android:clickable="true"
                    android:textColor="@color/hn_orange"
                    android:textSize="@dimen/text_small_body"
                    android:text="@string/comments_button"
                    android:onClick="@{viewModel.onClickComments}"
                    android:visibility="@{viewModel.commentsVisibility}"/>

            </LinearLayout>

        </LinearLayout>

    </android.support.v7.widget.CardView>

</layout>
这样做实在太棒了,我们能抽象出显示逻辑到我们的布局文件中,让我们的 ViewModel 来关注它们。
ViewModel
ViewModel 扮演了 View 和 Model 之间使者的角色,让它来关注所有涉及到 View 的业务逻辑,同时它可以访问 Model 的方法和属性,这些最终会作用到 View 中。通过
ViewModel,可以移除原本需要在别的组件中返回或处理的数据。
在这里,PostViewModel 用 Post 对象来处理 CardView 需要显示的内容,在下面的类中,你可以看到一系列的方法,每个方法对最终作用于我们的帖子视图。
- getPostTitle() - 通过 Post 对象返回一个帖子的标题
- getPostAuthor() - 这个方法首先会从应用的resources中获取相应的字符串,然后传入Post对象的author属性对它进行格式化,如果isUserPosts 等于true我们就需要加入下划线,最终返回该字符串。
- getCommentsVisibility() - 该方法决定是否显示有关评论的TextView
- onClickPost() - 该方法返回相应View需要的OnClickListener
这些例子表明不同的业务逻辑都有我们的 ViewModel 来处理。下面就是我们PostViewModel类的完整代码以及那些被item_post布局引用的方法。
public class PostViewModel extends BaseObservable {

    private Context context;
    private Post post;
    private Boolean isUserPosts;

    public PostViewModel(Context context, Post post, boolean isUserPosts) {
        this.context = context;
        this.post = post;
        this.isUserPosts = isUserPosts;
    }

    public String getPostScore() {
        return String.valueOf(post.score) + context.getString(R.string.story_points);
    }

    public String getPostTitle() {
        return post.title;
    }

    public Spannable getPostAuthor() {
        String author = context.getString(R.string.text_post_author, post.by);
        SpannableString content = new SpannableString(author);
        int index = author.indexOf(post.by);
        if (!isUserPosts) content.setSpan(new UnderlineSpan(), index, post.by.length() + index, 0);
        return content;
    }

    public int getCommentsVisibility() {
        return  post.postType == Post.PostType.STORY && post.kids == null ? View.GONE : View.VISIBLE;
    }

    public View.OnClickListener onClickPost() {
        return new View.OnClickListener() {
            @Override
            public void onClick(View v) {
                Post.PostType postType = post.postType;
                if (postType == Post.PostType.JOB || postType == Post.PostType.STORY) {
                    launchStoryActivity();
                } else if (postType == Post.PostType.ASK) {
                    launchCommentsActivity();
                }
            }
        };
    }

    public View.OnClickListener onClickAuthor() {
        return new View.OnClickListener() {
            @Override
            public void onClick(View v) {
                context.startActivity(UserActivity.getStartIntent(context, post.by));
            }
        };
    }

    public View.OnClickListener onClickComments() {
        return new View.OnClickListener() {
            @Override
            public void onClick(View v) {
                launchCommentsActivity();
            }
        };
    }

    private void launchStoryActivity() {
        context.startActivity(ViewStoryActivity.getStartIntent(context, post));
    }

    private void launchCommentsActivity() {
        context.startActivity(CommentsActivity.getStartIntent(context, post));
    }
}是不是很爽?正如你看到的,我们的PostViewModel关注以下方面:
- 维护 Post 对象的属性,最终会在 View 中展示
- 对这些属性进行相应的格式化
- 通过 onclick 属性给相应的views对提供点击事件的支持
- 通过 Post 对象的属性处理相关views的显示
测试 ViewModel
使用MVVM的一大好处是我们可以很容易对 ViewModel 进行单元测试。在 PostViewModel 中,可以写些简单的测试方法来验证我们的 ViewModel 是否正确实现。
- shouldGetPostScore() - 测试getPostScore()方法,确认该帖子的得分是否正确地格式化成字符串对象并返回。
- shouldGetPostTitle() - 测试getPostTitle()方法,确认该帖子的标题被正确返回。
- shouldGetPostAuthor() - 测试getPostAuthor()方法,确认返回的帖子的作者被正确地格式化了
- shouldGetCommentsVisiblity() - 测试getCommentsVisibility()方法是否正确返回了visibility属性的值,它将会用在帖子的
Comments按钮中。我们传入一个包含不同状态的ArrayLists来确认它是否能正确返回。
@RunWith(RobolectricTestRunner.class)
@Config(constants = BuildConfig.class, sdk = DefaultConfig.EMULATE_SDK, manifest = DefaultConfig.MANIFEST)
public class PostViewModelTest {

    private Context mContext;
    private PostViewModel mPostViewModel;
    private Post mPost;

    @Before
    public void setUp() {
        mContext = RuntimeEnvironment.application;
        mPost = MockModelsUtil.createMockStory();
        mPostViewModel = new PostViewModel(mContext, mPost, false);
    }

    @Test
    public void shouldGetPostScore() throws Exception {
        String postScore = mPost.score + mContext.getResources().getString(R.string.story_points);
        assertEquals(mPostViewModel.getPostScore(), postScore);
    }

    @Test
    public void shouldGetPostTitle() throws Exception {
        assertEquals(mPostViewModel.getPostTitle(), mPost.title);
    }

    @Test
    public void shouldGetPostAuthor() throws Exception {
        String author = mContext.getString(R.string.text_post_author, mPost.by);
        assertEquals(mPostViewModel.getPostAuthor().toString(), author);
    }

    @Test
    public void shouldGetCommentsVisibility() throws Exception {
        // Our mock post is of the type story, so this should return gone
        mPost.kids = null;
        assertEquals(mPostViewModel.getCommentsVisibility(), View.GONE);
        mPost.kids = new ArrayList<>();
        assertEquals(mPostViewModel.getCommentsVisibility(), View.VISIBLE);
        mPost.kids = null;
        mPost.postType = Post.PostType.ASK;
        assertEquals(mPostViewModel.getCommentsVisibility(), View.VISIBLE);
    }
}
现在我们可以知道的 ViewModel 已经正确工作了!!
评论
实现评论的方法和前面很像但还是有点不同。
有两个不同的ViewModel被用来操作这次评论,CommentHeaderViewModel 和 CommentViewModel。正如你在CommentAdapter中看到的,我们的 View 有两种的不同类型:
private static final int VIEW_TYPE_COMMENT = 0;
private static final int VIEW_TYPE_HEADER = 1;如果该帖子是一个发问的帖子,我们将在屏幕的顶端显示一个头部,它显示所问的问题 - 接着评论会正常显示在下面。同时你应该会注意到在 onCreateViewHolder() 中我们会通过判断 VIEW_TYPE 来加载不同的布局,它会返回两种不同布局中的其中一种。
if (viewType == _VIEW_TYPE_HEADER_) {
    ItemCommentsHeaderBinding commentsHeaderBinding =
    DataBindingUtil._inflate_(
            LayoutInflater._from_(parent.getContext()),
            R.layout._item_comments_header_,
            parent,
            false);
    return new BindingHolder(commentsHeaderBinding);
} else {
    ItemCommentBinding commentBinding =
        DataBindingUtil._inflate_(
            LayoutInflater._from_(parent.getContext()),
            R.layout._item_comment_,
            parent,
            false);
    return new BindingHolder(commentBinding);
}
接着在我们的 onBindViewHolder()方法中我们会根据不同的视图类型来创建绑定。这是因为不同的 ViewModel 对头部有不同的处理方法
if (getItemViewType(position) == _VIEW_TYPE_HEADER_) {
    ItemCommentsHeaderBinding commentsHeaderBinding =
                        (ItemCommentsHeaderBinding) holder.binding;
    commentsHeaderBinding.setViewModel(new
                          CommentHeaderViewModel(mContext, mPost));
} else {
    int actualPosition = (postHasText()) ? position - 1 : position;
    ItemCommentBinding commentsBinding =
                               (ItemCommentBinding) holder.binding;
    mComments.get(actualPosition).isTopLevelComment =
                                               actualPosition == 0;
    commentsBinding.setViewModel(new CommentViewModel(
                         mContext, mComments.get(actualPosition)));
}这就是它们的不同点,评论部分有两个不同的ViewModel类型 — 取决于该帖子是否是发问类的帖子。
总结
如果正确使用,数据绑定类库可能会改变我们开发应用的方式。当然,还有其他方法实现数据的绑定,使用MVVM模式只是其中的一种途径。
比如,你可以在布局中引用我们的 Model 然后通过它的变量引用直接访问它的属性:
<data>
    <variable name="post" type="your.package.name.model.Post"/>
</data>
<TextView
    ...
    android:text="@{post.title}"/>
同时我们可以很容易从adapers和classes中移除一些基础的显示逻辑。下面有种很新颖的方法实现我们这种需求:
<data>
    <import type="android.view.View"/>
</data>
<TextView
    ...
    android:visibility="@{post.hasComments ? View.Visible :
    View.Gone}"/>
这就是我看到上面实现方式的表情!
我认为这是数据绑定类库中不好的地方,它将 View 的显示逻辑包含到了 View 中。不仅会造成混乱,也让我们的测试和调试变的更加困难,因为它将逻辑和布局混淆在一起。
当然,认定MVVM是开发应用的正确方式还为时过早,但这次尝试也让我有机会见识到未来项目的一种趋势。如果你想阅读更多有关数据绑定类库的文章,你可以看这里。同时微软也有一篇关于MVVM通俗易懂的文章.
我很愿意听取你们想法,如果你们有任何的看法和建议可以随时发 Tweet 和我讨论!
