涉及知识
绘制过程
| 类别 | API | 描述 |
|---|---|---|
| 布局 | onMeasure | 测量View与Child View的大小 |
| onLayout | 确定Child View的位置 | |
| onSizeChanged | 确定View的大小 | |
| 绘制 | onDraw | 实际绘制View的内容 |
| 事件处理 | onTouchEvent | 处理屏幕触摸事件 |
| 重绘 | invalidate | 调用onDraw方法,重绘View中变化的部分 |
(如果对绘制过程与构造函数还不了解的,请查看我之前文章自定义View——Android坐标系与View绘制流程)
Canvas涉及方法
| 类别 | API | 描述 |
|---|---|---|
| 绘制图形 | drawPoint, drawPoints, drawLine, drawLines, drawRect, drawRoundRect, drawOval, drawCircle, drawArc | 依次为绘制点、直线、矩形、圆角矩形、椭圆、圆、扇形 |
| 绘制文本 | drawText, drawPosText, drawTextOnPath | 依次为绘制文字、指定每个字符位置绘制文字、根据路径绘制文字 |
| 画布变换 | translate, scale, rotate, skew | 依次为平移、缩放、旋转、倾斜(错切) |
| 画布裁剪 | clipPath, clipRect, clipRegion | 依次为按路径、按矩形、按区域对画布进行裁剪 |
| 画布状态 | save,restore | 保存当前画布状态,恢复之前保存的画布 |
Paint涉及方法
| 类别 | API | 描述 |
|---|---|---|
| 颜色 | setColor,setARGB,setAlpha | 依次为设置画笔颜色、透明度 |
| 类型 | setStyle | 填充(FILL),描边(STROKE),填充加描边(FILL_AND_STROKE) |
| 抗锯齿 | setAntiAlias | 画笔是否抗锯齿 |
| 字体大小 | setTextSize | 设置字体大小 |
| 字体测量 | getFontMetrics(),getFontMetricsInt() | 返回字体的测量,返回值一次为float、int |
| 文字宽度 | measureText | 返回文字的宽度 |
| 文字对齐方式 | setTextAlign | 左对齐(LEFT),居中对齐(CENTER),右对齐(RIGHT) |
| 宽度 | setStrokeWidth | 设置画笔宽度 |
| 笔锋 | setStrokeCap | 默认(BUTT),半圆形(ROUND),方形(SQUARE) |
(PS: 因API较多,只列出了涉及的方法,想了解更多,请查看官方文档)
(注意: 以下的代码中未指定函数名的都是在onDraw函数中进行使用,同时为了演示方便,在onDraw中使用了一些new方法,请在实际使用中不要这样做,因为onDraw函数是经常需要重新运行的)
一、Canvas
1、创建画笔
创建画笔并初始化
//创建画笔
private Paint mPaint = new Paint();

private void initPaint(){
    //初始化画笔
    mPaint.setStyle(Paint.Style.FILL);//设置画笔类型
    mPaint.setAntiAlias(true);//抗锯齿
}
2、绘制坐标轴
使用onSizeChanged方法,获取根据父布局等因素确认的View宽高
//宽高
private int mWidth;
private int mHeight;

@Override
protected void onSizeChanged(int w, int h, int oldw, int oldh) {
    super.onSizeChanged(w, h, oldw, oldh);
    mWidth = w;
    mHeight = h;
}
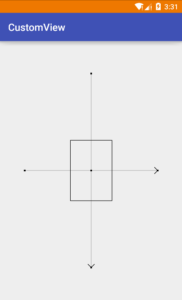
把原点从左上角移动到画布中心
@Override
protected void onDraw(Canvas canvas) {
    super.onDraw(canvas);
    canvas.translate(mWidth/2,mHeight/2);// 将画布坐标原点移动到中心位置
}
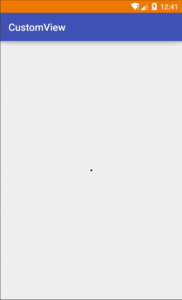
绘制坐标原点
//绘制坐标原点
mPaint.setColor(Color.BLACK);//设置画笔颜色
mPaint.setStrokeWidth(10);//为了看得清楚,设置了较大的画笔宽度
canvas.drawPoint(0,0,mPaint);
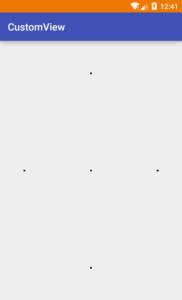
//绘制坐标轴4个断点
canvas.drawPoints(new float[]{
    mWidth/2*0.8f,0
    ,0,mHeight/2*0.8f
    ,-mWidth/2*0.8f,0
    ,0,-mHeight/2*0.8f},mPaint);
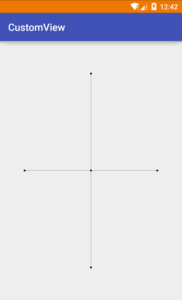
绘制坐标轴
mPaint.setStrokeWidth(1);//恢复画笔默认宽度
//绘制X轴
canvas.drawLine(-mWidth/2*0.8f,0,mWidth/2*0.8f,0,mPaint);
//绘制Y轴
canvas.drawLine(0,mHeight/2*0.8f,0,mHeight/2*0.8f,mPaint);
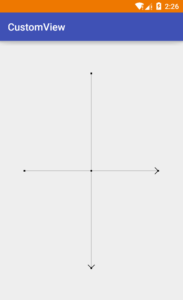
绘制坐标轴箭头,一次绘制多条线
mPaint.setStrokeWidth(3);
//绘制X轴箭头
canvas.drawLines(new float[]{
    mWidth/2*0.8f,0,mWidth/2*0.8f*0.95f,-mWidth/2*0.8f*0.05f,            mWidth/2*0.8f,0,mWidth/2*0.8f*0.95f,mWidth/2*0.8f*0.05f
},mPaint);
//绘制Y轴箭头
canvas.drawLines(new float[]{
      0,mHeight/2*0.8f,mWidth/2*0.8f*0.05f,mHeight/2*0.8f-mWidth/2*0.8f*0.05f,
      0,mHeight/2*0.8f,-mWidth/2*0.8f*0.05f,mHeight/2*0.8f-mWidth/2*0.8f*0.05f,
},mPaint);
为什么Y轴的箭头是向下的呢?这是因为原坐标系原点在左上角,向下为Y轴正方向,有疑问的可以查看我之前的文章自定义View——Android坐标系与View绘制流程
如果觉得不舒服,一定要箭头向上的话,可以在绘制Y轴箭头之前翻转坐标系
canvas.scale(1,-1);//翻转Y轴
3、画布变换
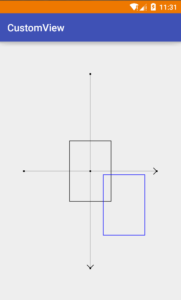
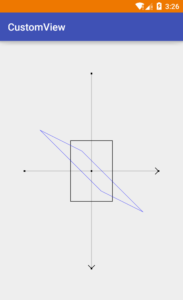
绘制矩形
//绘制矩形
mPaint.setStyle(Paint.Style.STROKE);//设置画笔类型
canvas.drawRect(-mWidth/8,-mHeight/8,mWidth/8,mHeight/8,mPaint);
canvas.translate(200,200);
mPaint.setColor(Color.BLUE);
canvas.drawRect(new RectF(-mWidth/8,-mHeight/8,mWidth/8,mHeight/8),mPaint);
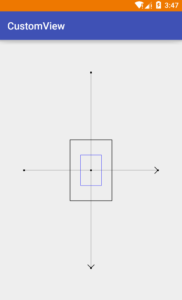
缩放
canvas.scale(0.5f,0.5f);
mPaint.setColor(Color.BLUE);
canvas.drawRect(new RectF(-mWidth/8,-mHeight/8,mWidth/8,mHeight/8),mPaint);
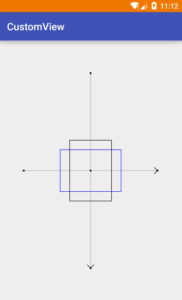
旋转
canvas.rotate(90);
mPaint.setColor(Color.BLUE);
canvas.drawRect(new RectF(-mWidth/8,-mHeight/8,mWidth/8,mHeight/8),mPaint);
错切
canvas.skew(1,0.5f);
mPaint.setColor(Color.BLUE);
canvas.drawRect(new RectF(-mWidth/8,-mHeight/8,mWidth/8,mHeight/8),mPaint);
4、画布的保存和恢复
save():用于保存canvas的状态,之后可以调用canvas的平移、旋转、缩放、错切、裁剪等操作。
restore():在save之后调用,用于恢复之前保存的画布状态,从而在之后的操作中忽略save与restore之间的画布变化。
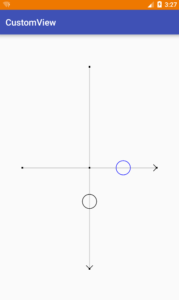
float point = Math.min(mWidth,mHeight)*0.06f/2;
float r = point*(float) Math.sqrt(2);
mPaint.setStyle(Paint.Style.STROKE);
mPaint.setColor(Color.BLACK);
canvas.save();
canvas.rotate(90);
canvas.drawCircle(200,0,r,mPaint);//圆心(200,0)
canvas.restore();
mPaint.setColor(Color.BLUE);
canvas.drawCircle(200,0,r,mPaint);//圆心(200,0)
保存画布,旋转90°,绘制一个圆,之后恢复画布,使用相同参数再绘制一个圆。可以看到在恢复画布前后,相同参数绘制的圆,分别显示在了坐标系的不同位置。
二、豆瓣加载动画
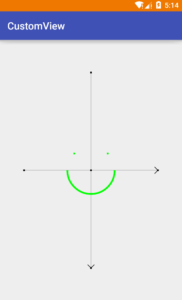
绘制2个点和一个半圆弧
mPaint.setStyle(Paint.Style.STROKE);//设置画笔样式为描边,如果已经设置,可以忽略
mPaint.setColor(Color.GREEN);
mPaint.setStrokeWidth(10);
float point = Math.min(mWidth,mHeight)*0.2f/2;
float r = point*(float) Math.sqrt(2);
RectF rectF = new RectF(-r,-r,r,r);
canvas.drawArc(rectF,0,180,false,mPaint);
canvas.drawPoints(new float[]{
        point,-point
        ,-point,-point
},mPaint);
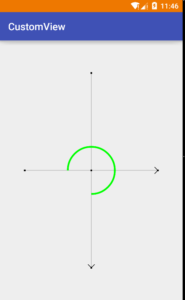
但是豆瓣表情在旋转的过程中,是一个链接着两个点的270°的圆弧
mPaint.setColor(Color.GREEN);
mPaint.setStrokeWidth(10);
float point = Math.min(mWidth,mHeight)*0.2f/2;
float r = point*(float) Math.sqrt(2);
RectF rectF = new RectF(-r,-r,r,r);
canvas.drawArc(rectF,-180,270,false,mPaint);
这里使用ValueAnimator类,来进行演示(实际上应该是根据touch以及网络情况来进行加载的变化)
简单说下ValueAnimator类:
| API | 简介 |
|---|---|
| ofFloat(float… values) | 构建ValueAnimator,设置动画的浮点值,需要设置2个以上的值 |
| setDuration(long duration) | 设置动画时长,默认的持续时间为300毫秒。 |
| setInterpolator(TimeInterpolator value) | 设置动画的线性非线性运动,默认AccelerateDecelerateInterpolator |
| addUpdateListener(ValueAnimator.AnimatorUpdateListener listener) | 监听动画属性每一帧的变化 |
分解步骤,计算一下总共需要的角度:
1、一个笑脸,x轴下方的圆弧旋转135°,覆盖2个点,此过程中圆弧增加45°
2、画布旋转135°,此过程中圆弧增加45°
3、画布旋转360°,此过程中圆弧减少360/5度
4、画布旋转90°,此过程中圆弧减少90/5度
5、画布旋转135°,释放覆盖的2个点
动画部分:
private ValueAnimator animator;
private float animatedValue;
private long animatorDuration = 5000;
private TimeInterpolator timeInterpolator = new DecelerateInterpolator();

private void initAnimator(long duration){
    if (animator !=null &&animator.isRunning()){
        animator.cancel();
        animator.start();
    }else {
        animator=ValueAnimator.ofFloat(0,855).setDuration(duration);
        animator.setInterpolator(timeInterpolator);
        animator.addUpdateListener(new ValueAnimator.AnimatorUpdateListener() {
            @Override
            public void onAnimationUpdate(ValueAnimator animation) {
                animatedValue = (float) animation.getAnimatedValue();
                invalidate();
            }
        });
        animator.start();
    }
}
表情部分:在绘制前最好使用sava()方法保存当前的画布状态,在结束后使用restore()恢复之前保存的状态。
为了是表情看上去更自然,所以减少10°的初始角度
private void doubanAnimator2(Canvas canvas, Paint mPaint){
    mPaint.setStyle(Paint.Style.STROKE);//描边
    mPaint.setStrokeCap(Paint.Cap.ROUND);//圆角笔触
    mPaint.setColor(Color.rgb(97, 195, 109));
    mPaint.setStrokeWidth(15);
    float point = Math.min(mViewWidth,mViewWidth)*0.06f/2;
    float r = point*(float) Math.sqrt(2);
    RectF rectF = new RectF(-r,-r,r,r);
    canvas.save();

    // rotate
    if (animatedValue>=135){
        canvas.rotate(animatedValue-135);
    }

    // draw mouth
    float startAngle=0, sweepAngle=0;
    if (animatedValue<135){
        startAngle = animatedValue +5;
        sweepAngle = 170+animatedValue/3;
    }else if (animatedValue<270){
        startAngle = 135+5;
        sweepAngle = 170+animatedValue/3;
    }else if (animatedValue<630){
        startAngle = 135+5;
        sweepAngle = 260-(animatedValue-270)/5;
    }else if (animatedValue<720){
        startAngle = 135-(animatedValue-630)/2+5;
        sweepAngle = 260-(animatedValue-270)/5;
    }else{
        startAngle = 135-(animatedValue-630)/2-(animatedValue-720)/6+5;
        sweepAngle = 170;
    }
    canvas.drawArc(rectF,startAngle,sweepAngle,false,mPaint);

    // draw eye
    canvas.drawPoints(new float[]{
        -point,-point
        ,point,-point
    },mPaint);

    canvas.restore();
}
在调试完成之后就可以删除,坐标系部分的代码了
三、小结
本文介绍了canvas的变化,文中的不同部分穿插说明了canvas绘制各种图形的方法,以及结合ValueAnimator制作的豆瓣加载动画。之后的一篇文章会主要分析字符串的长度和宽度,根据这些来参数调整字符串的位置,以达到居中等效果,再后一篇文章内容应该就会编写PieChart了。如果在阅读过程中,有任何疑问与问题,欢迎与我联系。
GitHub:github.com/Idtk
博客:www.idtkm.com
邮箱:Idtkma@gmail.com
