

了解Android Paint,一篇就够。引用Aige《自定义控件其实很简单》系列博客的话“很多时候你压根不需要了解太多原理,只需站在巨人的丁丁上即可”,所谓前人种树后人好乘凉,这里记录下我的实践结果。
我们可以通过Paint中setter方法来为画笔设置属性:
 浩浩荡荡来将这些方法一一过一遍:
set
为当前画笔copy一个画笔
setARGB
void setARGB(int a, int r, int g, int b)
设置Paint对象颜色,a代表透明度,r,g,b代表颜色值
插播:RGB与十六进制区别
一般在xml里定义颜色可以直接写:
android:textColor="#FF6281"
但是在code代码中就必须写成这样:
text.setTextColor(0xffff6281);
xml中透明度写不写无所谓,默认是ff不透明,但是代码中用十六进制0x来表示,就必须跟上ff透明度,不然会默认00全透明。
setAlpha
设置alpha透明度,范围为0~255
setAntiAlias
void setAntiAlias(boolean aa)
是否抗锯齿
setColor
void setColor(int color)
设置paint颜色
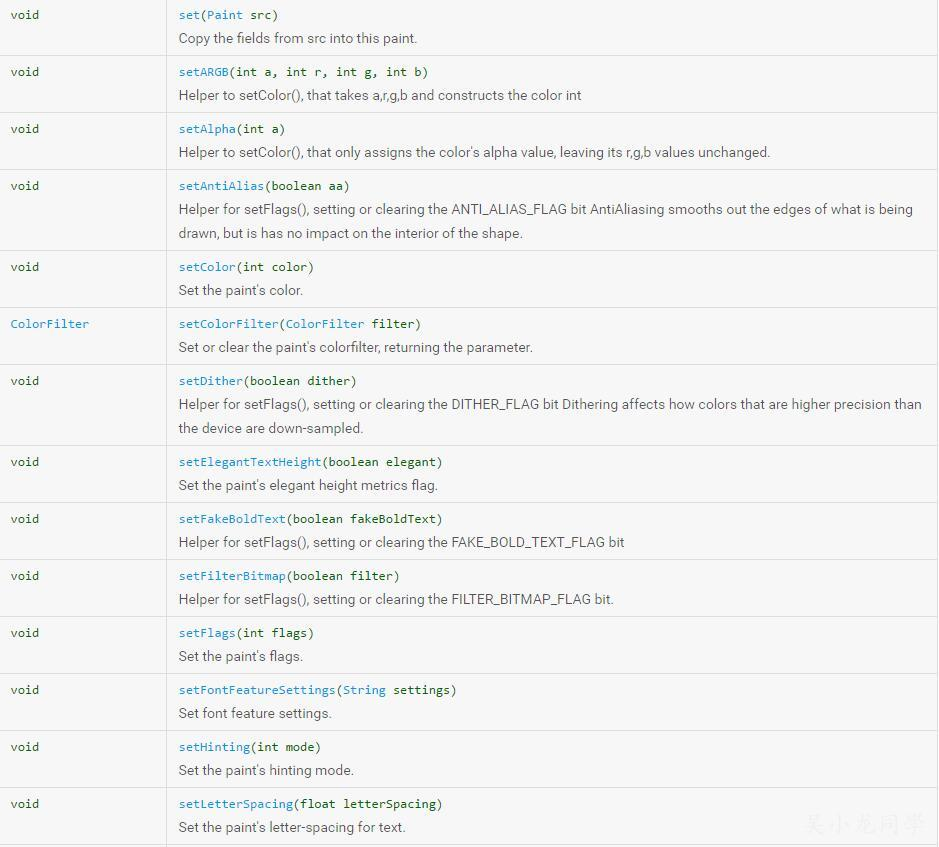
setColorFilter
ColorFilter setColorFilter (ColorFilter filter)
设置颜色过滤,ColorFilter有三个子类去实现ColorMatrixColorFilter、LightingColorFilter和PorterDuffColorFilter
ColorMatrixColorFilter
public class PaintCanvas extends View {
    private Paint mPaint;
    private void init() {
        mPaint = new Paint();
        mPaint.setAntiAlias(true);
        ColorMatrix colorMatrix = new ColorMatrix(new float[]{
                0.5F, 0, 0, 0, 0,
                0, 0.5F, 0, 0, 0,
                0, 0, 0.5F, 0, 0,
                0, 0, 0, 1, 0,
        });
        mPaint.setColorFilter(new ColorMatrixColorFilter(colorMatrix));
    }
    @Override    protected void onDraw(Canvas canvas) {
        Bitmap bitmap = BitmapFactory.decodeResource(getResources(), R.mipmap.logo);
        canvas.drawBitmap(bitmap, 0, 0, mPaint);
    }
    }
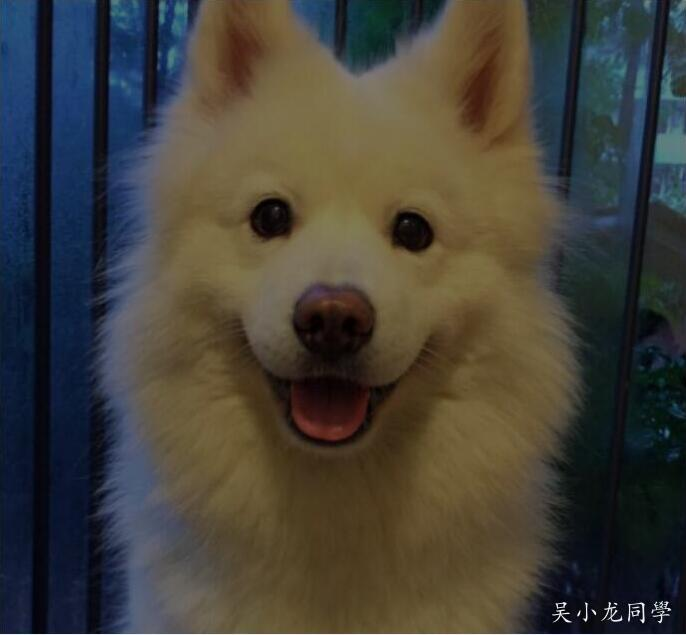
第一行表示的R(红色)的向量,第二行表示的G(绿色)的向量,第三行表示的B(蓝色)的向量,最后一行表示A(透明度)的向量,这一顺序必须要正确不能混淆!这个矩阵不同的位置表示的RGBA值,其范围在0.0F至2.0F之间,1为保持原图的RGB值。每一行的第五列数字表示偏移值。
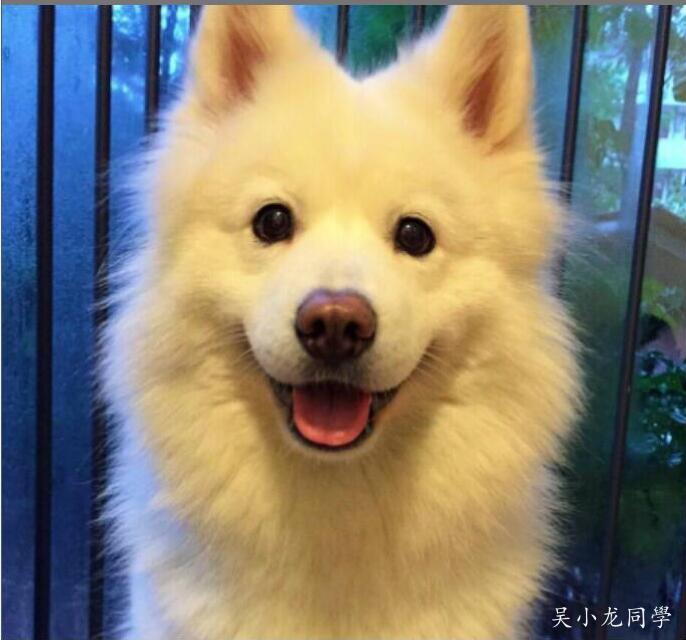 这是原图效果,增加ColorMatrix,效果如下:
LightingColorFilter
只有一个构造方法,LightingColorFilter (int mul, int add),参数1:mul全称是colorMultiply意为色彩倍增;参数2:add全称是colorAdd意为色彩添加,这两个值都是16进制的色彩值0xAARRGGBB。
mPaint.setColorFilter(new LightingColorFilter(0xFFFF00FF, 0x00000000));
效果如下:
PorterDuffColorFilter
也只有一个构造方法,PorterDuffColorFilter (int color, PorterDuff.Mode mode),参数1:16进制表示的颜色值;参数2:PorterDuff内部类Mode中的一个常量值,这个值表示混合模式。
// 设置颜色过滤,Color的值设为红色,模式PorterDuff.Mode.DARKEN变暗
mPaint.setColorFilter(new PorterDuffColorFilter(Color.RED, PorterDuff.Mode.DARKEN));
效果如下:
 混合模式还有很多,不仅是应用于图像色彩混合,还应用于图形混合。
setDither
void setDither(boolean dither)
设定是否使用图像抖动处理,会使绘制出来的图片颜色更加平滑和饱满,图像更加清晰
setFakeBoldText
void setFakeBoldText(boolean fakeBoldText)
设置伪粗体文本
setFilterBitmap
void setFilterBitmap(boolean filter)
设置位图进行滤波处理
setHinting
void setHinting (int mode)
Added in API level 14,设置暗示模式,HINTING_OFF 或 HINTING_ON
setLetterSpacing
void setLetterSpacing (float letterSpacing)
Added in API level 21,设置文本字母间距,默认0,负值收紧文本
setLinearText
void setLinearText(boolean linearText)
设置线性文本
setMaskFilter
MaskFilter setMaskFilter (MaskFilter maskfilter)
设置滤镜的效果,MaskFilter有两个子类实现BlurMaskFilter, EmbossMaskFilter
BlurMaskFilter
设置画笔模糊阴影效果
mPaint.setMaskFilter(new BlurMaskFilter(20f, BlurMaskFilter.Blur.SOLID));
参数1:模糊延伸半径,必须>0; 参数2:有四种枚举 NORMAL,同时绘制图形本身内容+内阴影+外阴影,正常阴影效果 INNER,绘制图形内容本身+内阴影,不绘制外阴影 OUTER,不绘制图形内容以及内阴影,只绘制外阴影 SOLID,只绘制外阴影和图形内容本身,不绘制内阴影 BlurMaskFilter绘制的Bitmap基本完全不受影响
四种枚举效果如下:

EmbossMaskFilter
if (Build.VERSION.SDK_INT >= Build.VERSION_CODES.HONEYCOMB) {
    this.setLayerType(View.LAYER_TYPE_SOFTWARE, null);
    }
mPaint.setMaskFilter(new EmbossMaskFilter(new float[]{1, 1, 1}, 0.4f, 8f, 3f));
效果如下:

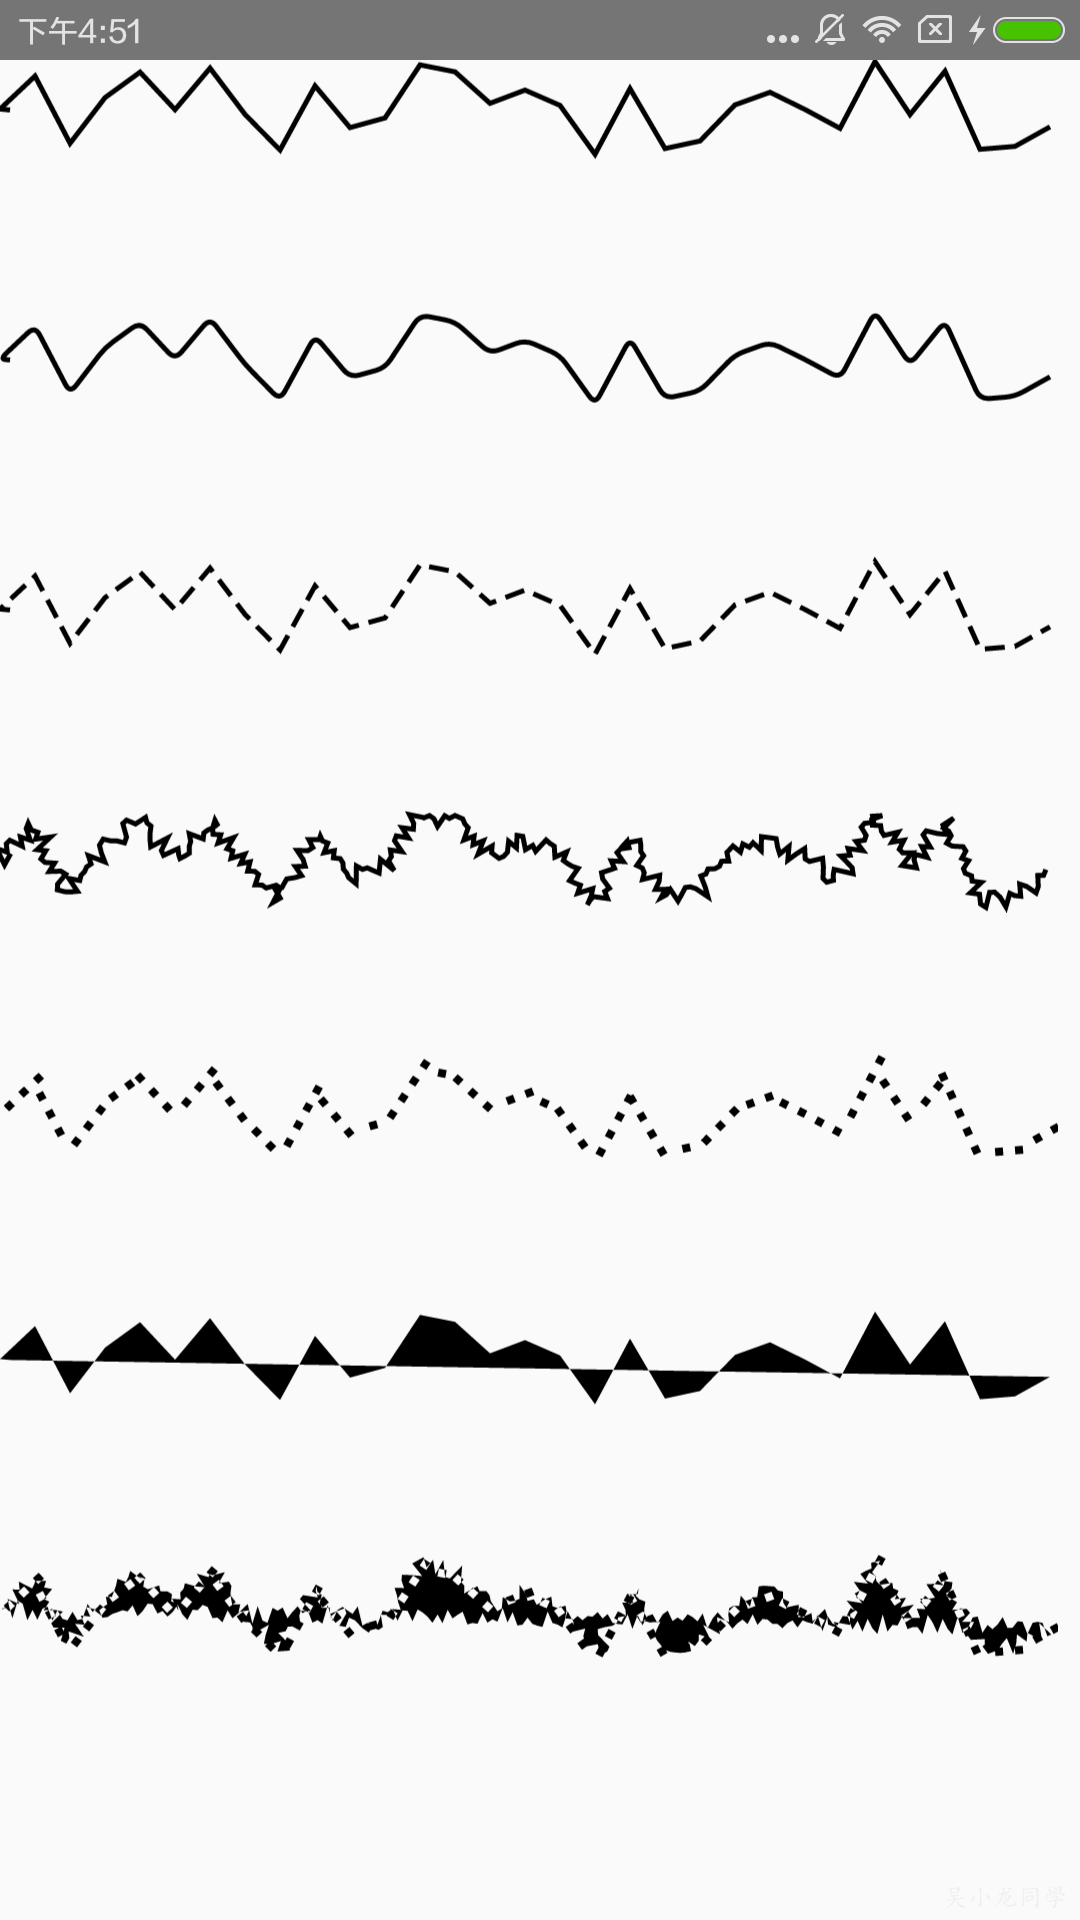
setPathEffect
PathEffect setPathEffect(PathEffect effect)
设置路径效果,PathEffect有6个子类实现ComposePathEffect, CornerPathEffect, DashPathEffect, DiscretePathEffect, PathDashPathEffect, SumPathEffect 具体代码:
public class PaintCanvas extends View {
    private Paint mPaint;
    private Path mPath;
    private PathEffect[] pathEffects = new PathEffect[7];
    private float mPhase=5;
    private void init() {
        mPaint = new Paint();
        mPaint.setStyle(Paint.Style.STROKE);
        mPaint.setStrokeWidth(5);
        mPaint.setAntiAlias(true);
        initPath();
    }
    private void initPath() {
        mPath = new Path();
        mPath.moveTo(10, 50);
        for (int i = 0; i
            mPath.lineTo(i * 35, (float) (Math.random() * 100));
        }
        pathEffects[0] = null;
        pathEffects[1] = new CornerPathEffect(10);
        pathEffects[2] = new DashPathEffect(new float[]{20, 10}, mPhase);
        pathEffects[3] = new DiscretePathEffect(5.0f, 10.0f);
        Path path = new Path();
        path.addRect(0, 0, 8, 8, Path.Direction.CCW);
        pathEffects[4] = new PathDashPathEffect(path, 20, mPhase, PathDashPathEffect.Style.ROTATE);
        pathEffects[5] = new ComposePathEffect(pathEffects[2], pathEffects[4]);
        pathEffects[6] = new SumPathEffect(pathEffects[4], pathEffects[3]);
    }
    @Override    protected void onDraw(Canvas canvas) {
                  * 绘制路径         */
        for (int i = 0; i < pathEffects.length; i++) {
            mPaint.setPathEffect(pathEffects[i]);
            canvas.drawPath(mPath, mPaint);
            canvas.translate(0, 250);
        }
    }
    }
效果如下:
setRasterizer
Rasterizer setRasterizer(Rasterizer rasterizer)
设置光栅化,API21已过时
setShader
Shader setShader(Shader shader)
设置着色器,Shader 子类实现有BitmapShader, ComposeShader, LinearGradient, RadialGradient, SweepGradient
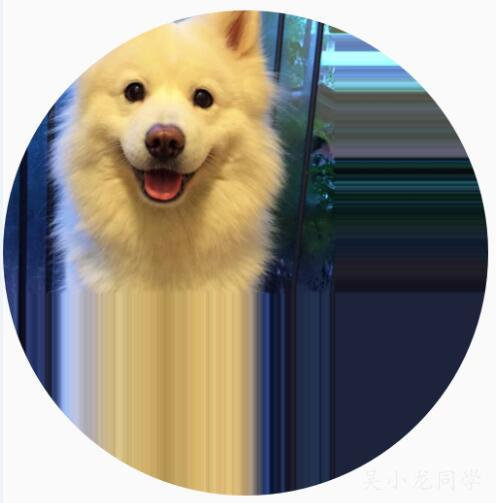
BitmapShader
对图形进行渲染,构造方法:
BitmapShader (Bitmap bitmap,Shader.TileMode tileX,Shader.TileMode tileY)
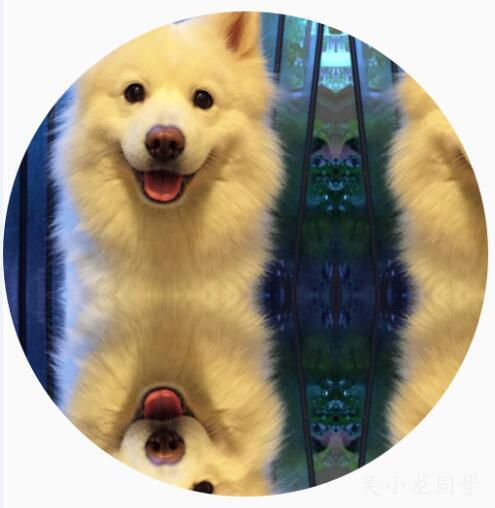
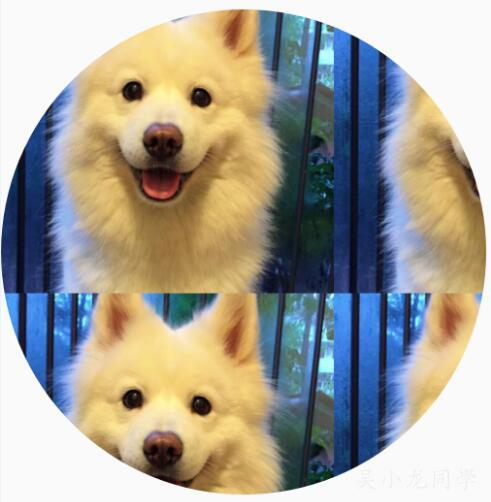
tileX、tileY参数Shader.TileMode有三个: CLAMP 重复最后一个颜色至最后 MIRROR 重复着色的图像水平或垂直方向已镜像方式填充会有翻转效果 REPEAT 重复着色的图像水平或垂直方向
设置tileX、tileY为Shader.TileMode.CLAMP
public class PaintCanvas extends View {
    private Paint mPaint;
    private Context mContext;
    private Bitmap mBitmap;
    private BitmapShader mShader;
    private void init() {
        mBitmap = BitmapFactory.decodeResource(mContext.getResources(), R.mipmap.logo);
        mShader= new BitmapShader(mBitmap, Shader.TileMode.CLAMP, Shader.TileMode.CLAMP);
        mPaint = new Paint();
        mPaint.setAntiAlias(true);
    }
    @Override
    protected void onDraw(Canvas canvas) {
        mPaint.setShader(mBitmapShader);
        canvas.drawCircle(500, 550, 500, mPaint);
    }
    }
效果如下:
设置tileX、tileY为Shader.TileMode.MIRROR
效果如下:
设置tileX、tileY为Shader.TileMode.REPEAT
效果如下:
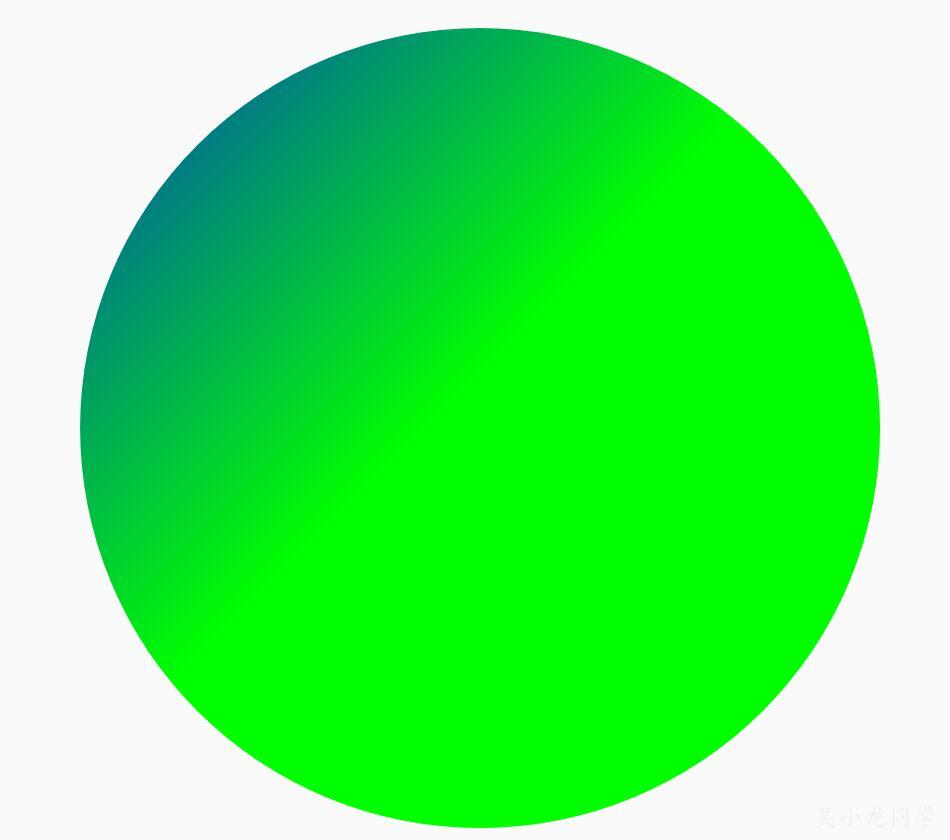
LinearGradient
设置线性渐变效果,有两个构造函数
LinearGradient(float x0, float y0, float x1, float y1, int color0, int color1, Shader.TileMode tile)
LinearGradient(float x0, float y0, float x1, float y1, int[] colors, float[] positions,Shader.TileMode tile)
例子:
public class PaintCanvas extends View {
    private Paint mPaint;
    private Context mContext;
    private Bitmap mBitmap;
    private Shader mShader;
    private void init() {
        mShader = new LinearGradient(0, 0, 500, 500, Color.BLUE, Color.GREEN,Shader.TileMode.CLAMP);
        mPaint = new Paint();
        mPaint.setAntiAlias(true);
    }
    @Override
    protected void onDraw(Canvas canvas) {
        mPaint.setShader(mBitmapShader);
        canvas.drawCircle(500, 550, 400, mPaint);
    }
    }
效果如下:
 设置REPEAT 和 MIRROR就不贴图片了,小伙伴们可以自己试试看看效果。
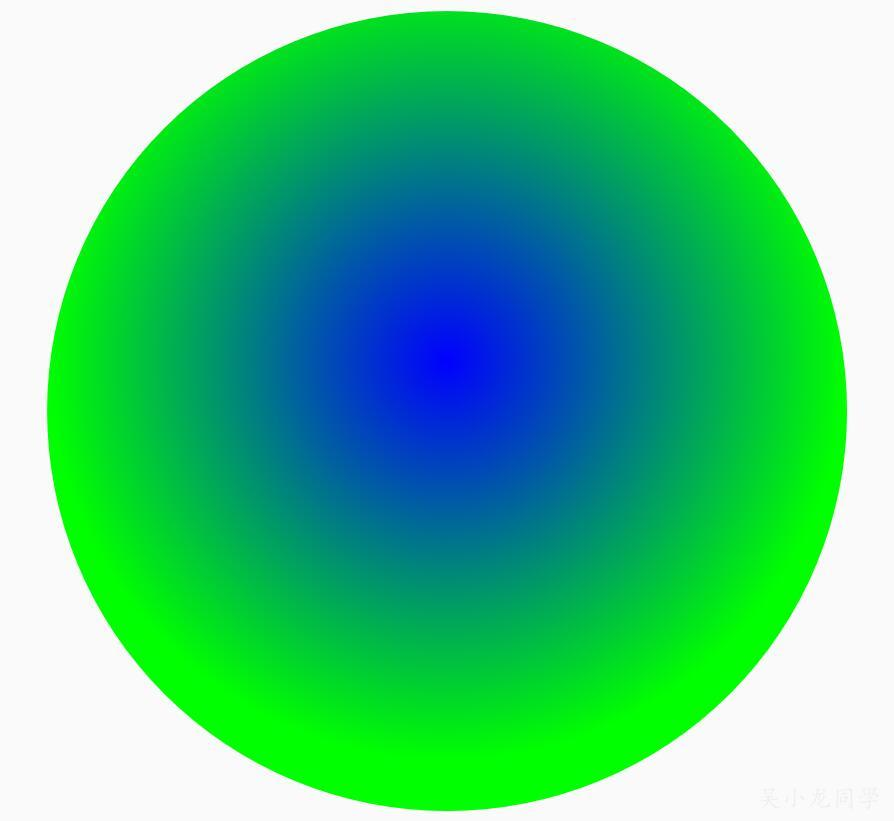
RadialGrdient
设置光束从中心向四周发散的辐射渐变效果,构造方法:
RadialGradient(float centerX, float centerY, float radius, int centerColor, int edgeColor, Shader.TileMode tileMode)
RadialGradient(float centerX, float centerY, float radius, int[] colors, float[] stops, Shader.TileMode tileMode)
例子:
public class PaintCanvas extends View {
    private Paint mPaint;
    private Context mContext;
    private Shader mShader;
    private void init() {
        mShader = new RadialGradient(500, 500, 400, Color.BLUE, Color.GREEN, Shader.TileMode.CLAMP);
        mPaint = new Paint();
        mPaint.setAntiAlias(true);
    }
    @Override
    protected void onDraw(Canvas canvas) {
        mPaint.setShader(mBitmapShader);
        canvas.drawCircle(500, 550, 400, mPaint);
    }
    }
效果如下:
 设置REPEAT 和 MIRROR也不贴图片了。
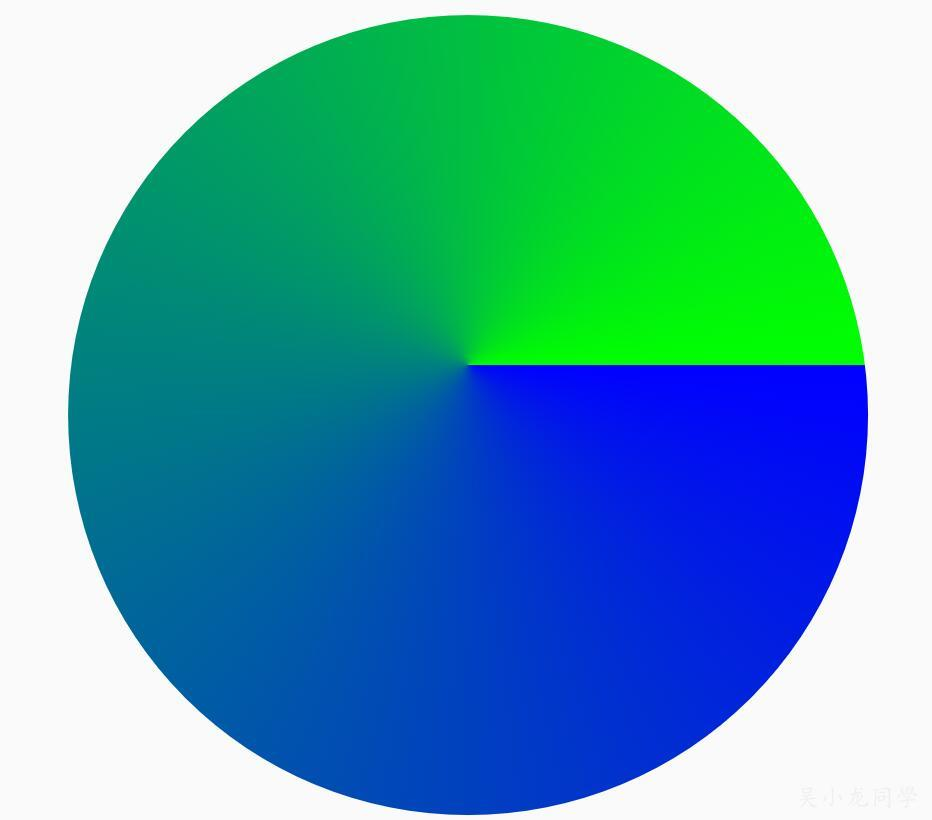
SweepGradient
设置绕着某中心点进行360度旋转渐变效果,构造方法:
//坐标(cx,cy)决定了中心点的位置,会绕着该中心点进行360度旋转。color0表示的是起点的颜色,color1表示的是终点的颜色
SweepGradient(float cx, float cy, int color0, int color1)
//坐标(cx,cy)决定了中心点的位置,colors颜色数组,position取值范围为[0,1],0和1都表示3点钟位置,0.25表示6点钟位置,0.5表示9点钟位置,0.75表示12点钟位置,诸如此类
SweepGradient(float cx, float cy, int[] colors, float[] positions)
例子:
public class PaintCanvas extends View {
    private Paint mPaint;
    private Context mContext;
    private Shader mShader;
    private void init() {
        mShader = new SweepGradient(500, 500, Color.BLUE, Color.GREEN);
        mPaint = new Paint();
        mPaint.setAntiAlias(true);
    }
    @Override
    protected void onDraw(Canvas canvas) {
        mPaint.setShader(mBitmapShader);
        canvas.drawCircle(500, 550, 400, mPaint);
    }
    }
效果如下:
ComposeShader
混合,有两个构造函数
ComposeShader(Shader shaderA, Shader shaderB, Xfermode mode)
ComposeShader(Shader shaderA, Shader shaderB, PorterDuff.Mode mode)
例子:
public class PaintCanvas extends View {
    private Paint mPaint;
    private Context mContext;
    private Bitmap mBitmap;
    private Shader bitmapShader, linearGradient, composeShader;
    private void init() {
        mBitmap = BitmapFactory.decodeResource(mContext.getResources(), R.mipmap.logo);
        bitmapShader = new BitmapShader(mBitmap, Shader.TileMode.MIRROR, Shader.TileMode.MIRROR);
        linearGradient = new LinearGradient(0, 0, mBitmap.getWidth(), mBitmap.getHeight(), Color.BLUE, Color.GREEN, Shader.TileMode.CLAMP);
        composeShader = new ComposeShader(bitmapShader, linearGradient, PorterDuff.Mode.MULTIPLY);
        mPaint = new Paint();
        mPaint.setAntiAlias(true);
    }
    @Override
    protected void onDraw(Canvas canvas) {
        mPaint.setShader(mBitmapShader);
        canvas.drawCircle(500, 550, 400, mPaint);
    }
    }
效果如下:

setShadowLayer
void setShadowLayer(float radius, float dx, float dy, int shadowColor)
图形添加一个阴影层效果
setStrikeThruText
void setStrikeThruText (boolean strikeThruText)
设置删除线
setStrokeCap
void setStrokeCap (Paint.Cap cap)
当设置setStyle是Stroke或StrokeAndFill,设置笔刷的图形样式,如圆形样式Cap.ROUND或方形样式Cap.SQUARE
setStrokeJoin
void setStrokeJoin (Paint.Join join)
当设置setStyle是Stroke或StrokeAndFill,设置绘制时各图形的结合方式,如影响矩形角的外轮廓
setStrokeMiter
void setStrokeMiter (float miter)
当设置setStyle是Stroke或StrokeAndFill,设置斜切
setStrokeWidth
void setStrokeWidth (float width)
当画笔样式为STROKE或FILL_OR_STROKE时,设置笔刷的粗细度
setStyle
void setStyle (Paint.Style style)
设置画笔样式,画笔样式分三种: Paint.Style.STROKE:描边 Paint.Style.FILL_AND_STROKE:描边并填充 Paint.Style.FILL:填充
setSubpixelText
void setSubpixelText (boolean subpixelText)
有助于文本在LCD屏幕上的显示效果
setTextAlign
void setTextAlign(Paint.Align align)
设置文本对齐
setTextScaleX
void setTextScaleX(float scaleX)
设置文本缩放倍数,1.0f为原始
setTextSize
void setTextSize(float textSize)
设置字体大小
setTextSkewX
void setTextSkewX (float skewX)
设置斜体文字,skewX为倾斜弧度,默认值0,大于0,向左斜,小于0,向右斜
setTypeface
Typeface setTypeface(Typeface typeface)
设置字体,Typeface包含了字体的类型,粗细,还有倾斜、颜色等。
mPaint.setTypeface(Typeface.SANS_SERIF);
setUnderlineText
void setUnderlineText(boolean underlineText)
设置下划线
setXfermode
Xfermode setXfermode (Xfermode xfermode)
设置图像混合模式,Xfermode 有个子类去实现PorterDuffXfermode
PorterDuffXfermode
构造方法PorterDuffXfermode(PorterDuff.Mode mode),参数就是上面的提到的,图形混合模式如图:
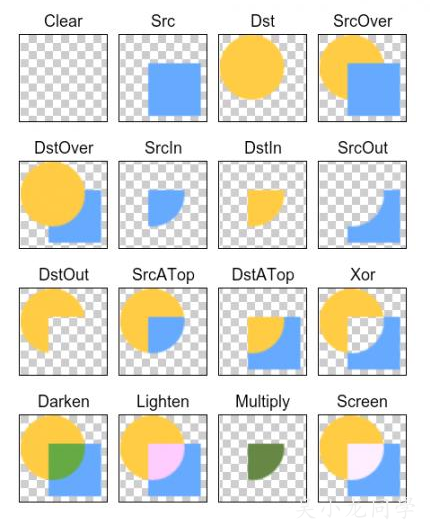
Dst:先画(下层)的图形;Src:后画(上层)的图形,然而被网上这张图片误导了,解释见孙群博客,
他也给了最终运行效果:
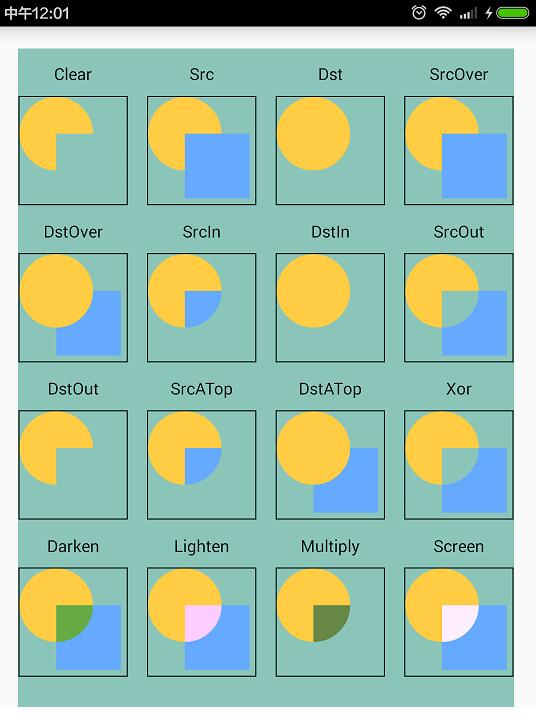
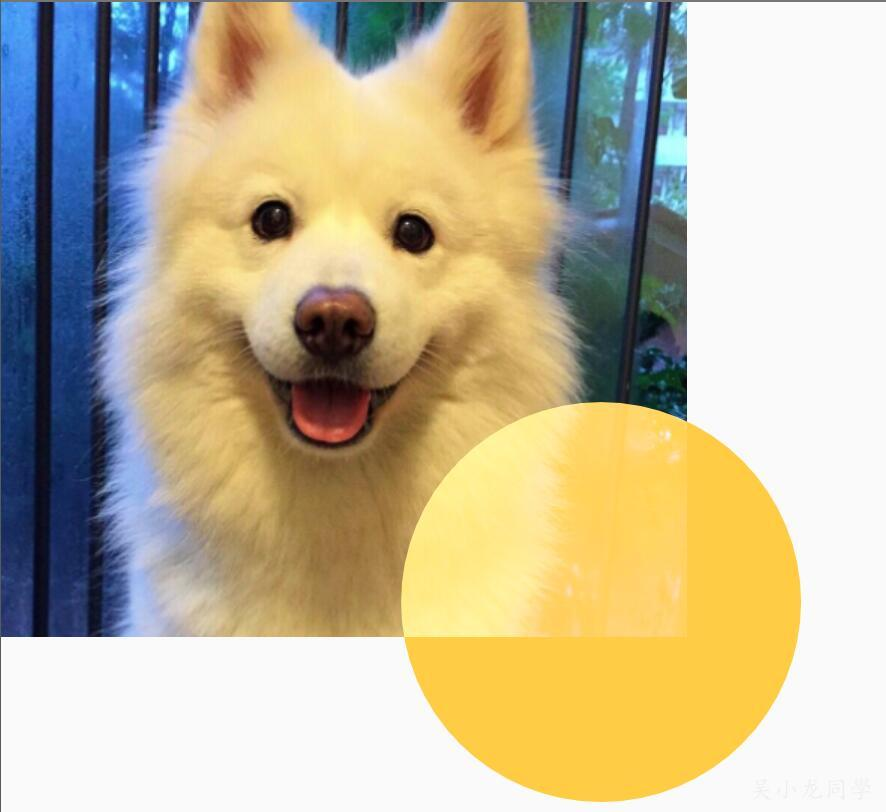
我一一运行确实是如此,这里贴出Mode 为Screen代码:
public class PaintCanvas extends View {
    private Paint mPaint;
    private PorterDuffXfermode porterDuffXfermode;
    private Context mContext;
    private Bitmap mBitmap;
    private void init() {
        mBitmap = BitmapFactory.decodeResource(mContext.getResources(), R.mipmap.logo);
        mPaint = new Paint();
        mPaint.setAntiAlias(true);
        porterDuffXfermode = new PorterDuffXfermode(PorterDuff.Mode.SCREEN);
    }
    @Override    protected void onDraw(Canvas canvas) {
        int canvasWidth = canvas.getWidth();
        int canvasHeight = canvas.getHeight();
        int layerId = canvas.saveLayer(0, 0, canvasWidth, canvasHeight, null, Canvas.ALL_SAVE_FLAG);
        canvas.drawBitmap(mBitmap, 0, 0, mPaint);
        mPaint.setXfermode(porterDuffXfermode);
        mPaint.setColor(0xFFFFCC44);
        canvas.drawCircle(600, 600, 200, mPaint);
        mPaint.setXfermode(null);
        canvas.restoreToCount(layerId);
    }
    }
例子源码
微信公众号
我的微信公众号:吴小龙同学,不止于技术分享,每天进步一点点,欢迎微信扫一扫关注。

最后
这篇文章真长,从开始写到最后的校对,花了很长时间,每段代码运行都截图上传。只能说实践是检验真理的唯一标准,不一定知道每个原理,都必须知道每个是什么样子的效果,记录完成方便自己日后查找,也方便大家哦,如果您能读到这篇文章的话。最后的最后,萨摩耶有话说:我只想安静做一只可爱的狗狗!
鸣谢
官网Paint 自定义控件其实很简单1/6 自定义控件其实很简单1/4 Android中Canvas绘图之PorterDuffXfermode使用及工作原理详解 Android中Canvas绘图之MaskFilter图文详解(附源码下载)
