


公司的UI图
在很多app中都有这样通用的页面,一直没有机会使用UICollectionView,只是简单的看过他的使用方法。今天公司美工出图,使用了他,并且遇到了好多的坑。记录一下过程,不确定使用的方法是不是最优的,如果有更好的方案,一起讨论,一起进步
理论篇
一.UICollectionViewLayout是做什么的?
1.1 在创建UITableView的时候,使用的是- (instancetype)initWithFrame:(CGRect)frame style:(UITableViewStyle)style用于判断是普通还是分组,
1.2 UICollectionViewLayout实际的作用是一样的,是用来设置cell的布局的,初始化collectionView的时候,一定要给他设置这个属性,否者不会显示。UICollectionViewFlowLayout是UICollectionViewLayout的子类,给collectionView赋值的时候,一定要使用 UICollectionViewFlowLayout初始化。
1.3 UICollectionViewFlowLayout和UICollectionViewLayout的关系就像是UIGestureRecognizer和UITapGestureRecognizer的一样。一个是父类,一个是子类。使用的时候都用子类
二. UICollectionViewLayout的属性

每一个绿色款都是cell
如果都是固定的,建议生成layout对象的时候,设置全局属性,(其布局很有意思,当你的cell设置大小后,一行多少个cell,由cell的宽度决定)
NS_CLASS_AVAILABLE_IOS(6_0) @interface UICollectionViewFlowLayout : UICollectionViewLayout

//每行之间竖直之间的最小间距 (可以大于)
@property (nonatomic) CGFloat minimumLineSpacing;

//同行的cell与cell之间水平之间的最小间距(可以)
@property (nonatomic) CGFloat minimumInteritemSpacing;

//每个cell的尺寸,如果都是上图的那种,整个collectionView都是同一种,那么可以用整个属性,如果想我们公司那样的样式,不建议设置该属性
@property (nonatomic) CGSize itemSize;

//预估cell的尺寸,ios8之后可以先去预估cell的尺寸,然后去自适应
@property (nonatomic) CGSize estimatedItemSize NS_AVAILABLE_IOS(8_0); // defaults to CGSizeZero - setting a non-zero size enables cells that self-size via -perferredLayoutAttributesFittingAttributes:

//滑动的方向,水平或者竖直,看到很多图片浏览器都是用collectionview做出来的(注册之后,可以复用),非常的好用!但是要记住,水平滑动只有collectionview有,tableview不支持的,默认竖直方法滑动
@property (nonatomic) UICollectionViewScrollDirection scrollDirection; // default is UICollectionViewScrollDirectionVertical

//组头组尾的size
@property (nonatomic) CGSize headerReferenceSize;
@property (nonatomic) CGSize footerReferenceSize;

//组的四周切的范围
@property (nonatomic) UIEdgeInsets sectionInset;

@end
minimumLineSpacing 属性详解

绿色是minimumLineSpacing最新行间距

蓝色是实际的行间距

在实际开发过程中,很可能行间距会是不同的
sectionInset 属性详解

sectionInset的配图,每个组装有很多的cell,默认该属性是0,如图

但是有的是时候我们会往里面切图,整个组往里面切,里面的cell也跟着移动
注意,我刚才说的,如果所有的cell都是一样尺寸,我们可以设置初始化layout之后,直接赋值,如果想我们公司那样,随意可能改变,建议看看下边的代理方法
三. UICollectionViewLayout的代理方法
3.1 过去我们使用UITableView的时候,直接声明数据源方法,和代理方法,
3.2 使用UICollectionView的时候,也要声明两个。1.UICollectionViewDelegateFlowLayout2.UICollectionViewDataSource,
因为1中包含了3.UICollectionViewDelegate,所以可以省略3
#pragma mark - UICollectionViewDelegateFlowLayout
//每个cell的大小,因为有indexPath,所以可以判断哪一组,或者哪一个item,可一个给特定的大小,等同于layout的itemSize属性
- (CGSize)collectionView:(UICollectionView *)collectionView layout:(UICollectionViewLayout*)collectionViewLayout sizeForItemAtIndexPath:(NSIndexPath *)indexPath {
  return CGSizeMake(34,56);
}

// 设置整个组的缩进量是多少
- (UIEdgeInsets)collectionView:(UICollectionView *)collectionView layout:(UICollectionViewLayout*)collectionViewLayout insetForSectionAtIndex:(NSInteger)section {
  return UIEdgeInsetsMake(5, 5, 5, 5);
}

// 设置最小行间距,也就是前一行与后一行的中间最小间隔
- (CGFloat)collectionView:(UICollectionView *)collectionView layout:(UICollectionViewLayout*)collectionViewLayout minimumLineSpacingForSectionAtIndex:(NSInteger)section {
  return 10;
}

// 设置最小列间距,也就是左行与右一行的中间最小间隔
- (CGFloat)collectionView:(UICollectionView *)collectionView layout:(UICollectionViewLayout*)collectionViewLayout minimumInteritemSpacingForSectionAtIndex:(NSInteger)section {
  return 10;
}

// 设置section头视图的参考大小,与tableheaderview类似
- (CGSize)collectionView:(UICollectionView *)collectionView layout:(UICollectionViewLayout*)collectionViewLayout referenceSizeForHeaderInSection:(NSInteger)section {
  return CGSizeMake(self.view.frame.size.width, 40);
}

// 设置section尾视图的参考大小,与tablefooterview类似
- (CGSize)collectionView:(UICollectionView *)collectionView layout:(UICollectionViewLayout*)collectionViewLayout referenceSizeForFooterInSection:(NSInteger)section {
  return CGSizeMake(self.view.frame.size.width, 40);
}
四. UICollectionView的组头和组尾(页眉和页脚)

组头和足尾
1.
UICollectionView中非常明确是以组为单位,可以设置组的组头和尾巴,这里的头尾还可以复用
2.复用的时候,首先头尾view要继承于UICollectionReusableView,然后注册(分为nib和class两种)
3.用的时候通过collectionView去dequeue一下获取,和cell的思路一样
4.可以使用上文中的layout属性直接设置组头和组尾的size,也可以使用代理方法,去设置
五. UICollectionView的数据源方法
和tableview的数据源方法一样,想要成为其数据源,然后声明数据源
#pragma mark - UICollectionViewDataSource
// 指定Section个数
- (NSInteger)numberOfSectionsInCollectionView:(UICollectionView *)collectionView {
  return 3;
}

// 指定section中的collectionViewCell的个数
- (NSInteger)collectionView:(UICollectionView *)collectionView numberOfItemsInSection:(NSInteger)section {
  return 10;
}

// 配置section中的collectionViewCell的显示
- (UICollectionViewCell *)collectionView:(UICollectionView *)collectionView cellForItemAtIndexPath:(NSIndexPath *)indexPath {
  CollectionViewCell *cell = [collectionView dequeueReusableCellWithReuseIdentifier:@"CellIdentifier" forIndexPath:indexPath];
  cell.backgroundColor = [UIColor redColor];
  cell.textLabel.text = [NSString stringWithFormat:@"(%ld %ld)", indexPath.section, indexPath.row];

  return cell;
}
六. UICollectionView的代理方法
#pragma mark - UICollectionViewDelegate
// 允许选中时,高亮
- (BOOL)collectionView:(UICollectionView *)collectionView shouldHighlightItemAtIndexPath:(NSIndexPath *)indexPath {
  NSLog(@"%s", __FUNCTION__);
  return YES;
}

// 高亮完成后回调
- (void)collectionView:(UICollectionView *)collectionView didHighlightItemAtIndexPath:(NSIndexPath *)indexPath {
  NSLog(@"%s", __FUNCTION__);
}

// 由高亮转成非高亮完成时的回调
- (void)collectionView:(UICollectionView *)collectionView didUnhighlightItemAtIndexPath:(NSIndexPath *)indexPath {
  NSLog(@"%s", __FUNCTION__);
}

// 设置是否允许选中
- (BOOL)collectionView:(UICollectionView *)collectionView shouldSelectItemAtIndexPath:(NSIndexPath *)indexPath {
  NSLog(@"%s", __FUNCTION__);
  return YES;
}

// 设置是否允许取消选中
- (BOOL)collectionView:(UICollectionView *)collectionView shouldDeselectItemAtIndexPath:(NSIndexPath *)indexPath {
  NSLog(@"%s", __FUNCTION__);
  return YES;
}

// 选中操作
- (void)collectionView:(UICollectionView *)collectionView didSelectItemAtIndexPath:(NSIndexPath *)indexPath {
  NSLog(@"%s", __FUNCTION__);
}

// 取消选中操作
- (void)collectionView:(UICollectionView *)collectionView didDeselectItemAtIndexPath:(NSIndexPath *)indexPath {
  NSLog(@"%s", __FUNCTION__);
}
实战篇
一. 将设计图分解成合理结构
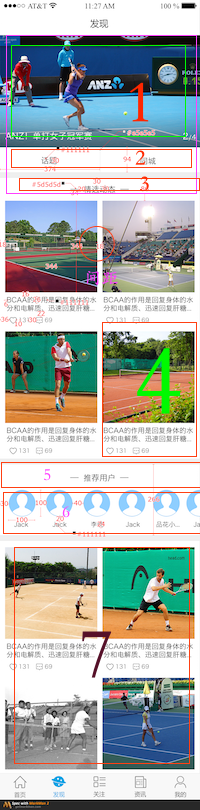
被分解后的设计图
分解原因及说明
0.创建控制器(继承自UICollectionViewController),然后创建基本的layout,给某些固定的数据赋值
    UICollectionViewFlowLayout * layout = [[UICollectionViewFlowLayout alloc] init];
    layout.minimumInteritemSpacing = 0;
    layout.minimumLineSpacing = 9;
layout.sectionInset = UIEdgeInsetsMake(0, 9, 0, 9);
    layout.scrollDirection = UICollectionViewScrollDirectionVertical;
    THFindController * discoverVC = [[THFindController alloc] initWithCollectionViewLayout:layout];
    discoverVC.title = @"发现";
1.说了一顿,特意说明,
UICollectionView是很强调组这个概念,有组头,组尾这两个概念,但一直没有提到tableHeaderView这样的控件,所以我们将1(轮播图)+2(两个按键view)+ 间隔+3(精选动态)封装成第一组的headerView(封装的类名是THFineAdView),继承自UICollectionReusableView(继承自UIView,没啥功能,除了复用)
2.将5也集成字
UICollectionReusableView封装一下
3.封装完毕之后,要去注册一下,注册的使用,分为nib,和class注册
3.1 第一组的headerView是同纯代码封装的,所以注册的时候这样
    [self.collectionView registerClass:[THFineAdView class]
            forSupplementaryViewOfKind:UICollectionElementKindSectionHeader
                   withReuseIdentifier:kTHFindAdViewIden];
3.2 第二组的headerView使用的是nib方式,所以也要注册一下
    UINib * nib = [UINib nibWithNibName:@"THFindStyleHeaderView" bundle:nil];
    [self.collectionView registerNib:nib
            forSupplementaryViewOfKind:UICollectionElementKindSectionHeader
                   withReuseIdentifier:kTHFindStyleHeaderViewIden];
3.3 (模块4和模块5之间的间隙,模块6和模块7之间的间隙)可以通过sectionInset来实现,但是我认为成为组1,组2的sectionFooter更加靠谱一些。那就注册一下
  [self.collectionView registerClass:[THFindSectionFooterView class]
            forSupplementaryViewOfKind:UICollectionElementKindSectionFooter
                   withReuseIdentifier:kFooterViewIden];
注意
UICollectionElementKindSectionHeader这个代表头的意思,如果注册尾巴,使用UICollectionElementKindSectionFooter
注册的三个方法应该写在一起4.调用组头和组尾
#pragma mark - collectionview的代理方法
- (UICollectionReusableView *)collectionView:(UICollectionView *)collectionView
           viewForSupplementaryElementOfKind:(NSString *)kind
                                 atIndexPath:(NSIndexPath *)indexPath{

//先通过kind类型判断是头还是尾巴,然后在判断是哪一组,如果都是一样的头尾,那么只要第一次判断就可以了
     if (kind == UICollectionElementKindSectionHeader){
        if (indexPath.section == 0) {
           THFineAdView *view = [collectionView dequeueReusableSupplementaryViewOfKind:UICollectionElementKindSectionHeader
                                                                  withReuseIdentifier:kTHFindAdViewIden
                                                                         forIndexPath:indexPath];
            view.bannerArr = self.bannerArr;
            return view;
        }
        else if(indexPath.section == 1){
         THFindStyleHeaderView * view = [collectionView dequeueReusableSupplementaryViewOfKind:UICollectionElementKindSectionHeader
                                                      withReuseIdentifier:kTHFindStyleHeaderViewIden
                                                             forIndexPath:indexPath];
        view.titleLab.text = @"推荐用户";
        return view;
        }
     }
     else{
         UICollectionReusableView *footer = [collectionView dequeueReusableSupplementaryViewOfKind:UICollectionElementKindSectionFooter
                                                                               withReuseIdentifier:kFooterViewIden
                                                                                      forIndexPath:indexPath];
         return footer;
     }
    return nil;
}
5.调用组头和组尾的高度
设置头和尾的size,要用两个代理方法,使用代理方法的好处在于可以分情况判断
 // 设置section头视图的参考大小,与tableheaderview类似
- (CGSize)collectionView:(UICollectionView *)collectionView layout:(UICollectionViewLayout*)collectionViewLayout
referenceSizeForHeaderInSection:(NSInteger)section {
    if(section == 0){
        return CGSizeMake(ScreenWidth, [THFineAdView adViewHeight]);
    }else if(section == 1){
        return CGSizeMake(ScreenWidth, [THFindStyleHeaderView findStyleHeight]);
    }else{
        return CGSizeZero;
    }
}

- (CGSize)collectionView:(UICollectionView *)collectionView
                  layout:(UICollectionViewLayout*)collectionViewLayout
referenceSizeForFooterInSection:(NSInteger)section{
    return CGSizeMake(ScreenWidth, 10*THScreenScaleNum);
}
6.数据源方法
#pragma mark

- (NSInteger)numberOfSectionsInCollectionView:(UICollectionView *)collectionView {
    NSInteger pre = (self.preArr.count != 0);
    NSInteger next = (self.nextArr.count != 0);
    NSInteger users = (self.userArr.count != 0);
    return pre+next+users;
}


- (NSInteger)collectionView:(UICollectionView *)collectionView numberOfItemsInSection:(NSInteger)section {

    if (section == 0) {
        return 4;
    }else if(section == 1){
        return 1;
    }else{
        return self.nextArr.count;
    }
    return 0;
}

- (UICollectionViewCell *)collectionView:(UICollectionView *)collectionView
                  cellForItemAtIndexPath:(NSIndexPath *)indexPath {

    UICollectionViewCell * cell = nil;
    if (indexPath.section == 0) {
        THRecommendCell *recCell = [THRecommendCell recommendCellWithCollectionView:collectionView indePath:indexPath];
        recCell.twitterM = self.preArr[indexPath.item];
        cell = recCell;
    }else if (indexPath.section == 1){
        THRecommendUsersCell * userCell = [THRecommendUsersCell cellWithColletionView:collectionView indexPath:indexPath];
        userCell.users = self.userArr;
        cell = userCell;
    }else{
        THRecommendCell *rCell = [THRecommendCell recommendCellWithCollectionView:collectionView indePath:indexPath];
        rCell.twitterM = self.nextArr[indexPath.item];
        cell = rCell;
    }
    return cell;
}
7.在使用自定义cell之前一定要注册,否者不能复用,给系统造成很大的压力,经常卡顿
//我是自定义了一个方法,传递indexPAth和collectionview直接注册
+ (instancetype)recommendCellWithCollectionView:(UICollectionView *)collectionView
                                       indePath:(NSIndexPath *)indexPath{
    [collectionView registerClass:[self class] forCellWithReuseIdentifier:@"THRecommendCell"];
    return [collectionView dequeueReusableCellWithReuseIdentifier:@"THRecommendCell" forIndexPath:indexPath];
}
8.如何自定义cell
他的自定义非常简单,就几个方法
#pragma mark - 直接写这个方法
- (instancetype)initWithFrame:(CGRect)frame{

    if (self = [super initWithFrame:frame]) {
        [self createSub];
    }
    return self;
}

- (void)createSub{
    self.contentView.backgroundColor = [UIColor whiteColor];
    //1.图片
    [self.contentView addSubview:self.iconImage];
    //2.题目
    [self.contentView addSubview:self.titleLab];
    //3.喜欢数
    [self.contentView addSubview:self.likeBtn];
    //4.评论数
    [self.contentView addSubview:self.recommentBtn];
}

#pragma mark - 布局
- (void)updateConstraints{
    [super updateConstraints];
    //图片
}如果是xib加载的话,最多有个awakeFromNib和view的一样使用
9.代理方法,就懒得写了
如果各位同行有什么好的建议,可以告诉我,我会虚心接受,再次修改本文的,一起进步~ 顺便给有个好文章,可以看看 参考文档
