

转载请注明出处(万分感谢!):
blog.csdn.net/javazejian/…
出自【zejian的博客】
关联文章:
Android 多线程之HandlerThread 完全详解
Android 多线程之IntentService 完全详解
一、IntentService概述
上一篇我们聊到了HandlerThread,本篇我们就来看看HandlerThread在IntentService中的应用,看本篇前建议先看看上篇的HandlerThread,有助于我们更好掌握IntentService。同样地,我们先来看看IntentService的特点:
- 它本质是一种特殊的Service,继承自Service并且本身就是一个抽象类
- 它可以用于在后台执行耗时的异步任务,当任务完成后会自动停止
- 它拥有较高的优先级,不易被系统杀死(继承自Service的缘故),因此比较适合执行一些高优先级的异步任务
- 它内部通过HandlerThread和Handler实现异步操作
- 创建IntentService时,只需实现onHandleIntent和构造方法,onHandleIntent为异步方法,可以执行耗时操作
二、IntentService的常规使用套路
大概了解了IntentService的特点后,我们就来了解一下它的使用方式,先看个案例:
IntentService实现类如下:
package com.zejian.handlerlooper;

import android.app.IntentService;
import android.content.Intent;
import android.graphics.Bitmap;
import android.graphics.BitmapFactory;
import android.os.IBinder;
import android.os.Message;

import com.zejian.handlerlooper.util.LogUtils;

import java.io.BufferedInputStream;
import java.io.IOException;
import java.net.HttpURLConnection;
import java.net.URL;

/**
 * Created by zejian
 * Time 16/9/3.
 * Description:
 */
public  class MyIntentService extends IntentService {
    public static final String DOWNLOAD_URL="download_url";
    public static final String INDEX_FLAG="index_flag";
    public static UpdateUI updateUI;


    public static void setUpdateUI(UpdateUI updateUIInterface){
        updateUI=updateUIInterface;
    }

    public MyIntentService(){
        super("MyIntentService");
    }

    /**
     * 实现异步任务的方法
     * @param intent Activity传递过来的Intent,数据封装在intent中
     */
    @Override
    protected void onHandleIntent(Intent intent) {


        Bitmap bitmap=downloadUrlBitmap(intent.getStringExtra(DOWNLOAD_URL));
        Message msg1 = new Message();
        msg1.what = intent.getIntExtra(INDEX_FLAG,0);
        msg1.obj =bitmap;

        if(updateUI!=null){
            updateUI.updateUI(msg1);
        }


        LogUtils.e("onHandleIntent");
    }

    @Override
    public void onCreate() {
        LogUtils.e("onCreate");
        super.onCreate();
    }

    @Override
    public void onStart(Intent intent, int startId) {
        super.onStart(intent, startId);
        LogUtils.e("onStart");
    }

    @Override
    public int onStartCommand(Intent intent, int flags, int startId) {
        LogUtils.e("onStartCommand");
        return super.onStartCommand(intent, flags, startId);

    }

    @Override
    public void onDestroy() {
        LogUtils.e("onDestroy");
        super.onDestroy();
    }

    @Override
    public IBinder onBind(Intent intent) {
        LogUtils.e("onBind");
        return super.onBind(intent);
    }


    public interface UpdateUI{
        void updateUI(Message message);
    }


    private Bitmap downloadUrlBitmap(String urlString) {
        HttpURLConnection urlConnection = null;
        BufferedInputStream in = null;
        Bitmap bitmap=null;
        try {
            final URL url = new URL(urlString);
            urlConnection = (HttpURLConnection) url.openConnection();
            in = new BufferedInputStream(urlConnection.getInputStream(), 8 * 1024);
            bitmap= BitmapFactory.decodeStream(in);
        } catch (final IOException e) {
            e.printStackTrace();
        } finally {
            if (urlConnection != null) {
                urlConnection.disconnect();
            }
            try {
                if (in != null) {
                    in.close();
                }
            } catch (final IOException e) {
                e.printStackTrace();
            }
        }
        return bitmap;
    }

}
通过代码可以看出,我们继承了IntentService,这里有两个方法是必须实现的,一个是构造方法,必须传递一个线程名称的字符串,另外一个就是进行异步处理的方法onHandleIntent(Intent intent) 方法,其参数intent可以附带从activity传递过来的数据。这里我们的案例主要利用onHandleIntent实现异步下载图片,然后通过回调监听的方法把下载完的bitmap放在message中回调给Activity(当然也可以使用广播完成),最后通过Handler去更新UI。下面再来看看Acitvity的代码:
activity_intent_service.xml
IntentServiceActivity.java
package com.zejian.handlerlooper.util;

import android.app.Activity;
import android.content.Intent;
import android.graphics.Bitmap;
import android.os.Bundle;
import android.os.Handler;
import android.os.Message;
import android.widget.ImageView;

import com.zejian.handlerlooper.MyIntentService;
import com.zejian.handlerlooper.R;

/**
 * Created by zejian
 * Time 16/9/3.
 * Description:
 */
public class IntentServiceActivity extends Activity implements MyIntentService.UpdateUI{
    /**
     * 图片地址集合
     */
    private String url[] = {
            "http://img.blog.csdn.net/20160903083245762",
            "http://img.blog.csdn.net/20160903083252184",
            "http://img.blog.csdn.net/20160903083257871",
            "http://img.blog.csdn.net/20160903083257871",
            "http://img.blog.csdn.net/20160903083311972",
            "http://img.blog.csdn.net/20160903083319668",
            "http://img.blog.csdn.net/20160903083326871"
    };

    private static ImageView imageView;
    private static final Handler mUIHandler = new Handler() {
        @Override
        public void handleMessage(Message msg) {
            imageView.setImageBitmap((Bitmap) msg.obj);
        }
    };

    @Override
    protected void onCreate(Bundle savedInstanceState) {
        super.onCreate(savedInstanceState);
        setContentView(R.layout.activity_intent_service);
        imageView = (ImageView) findViewById(R.id.image);

        Intent intent = new Intent(this,MyIntentService.class);
        for (int i=0;i<7;i++) {
            intent.putExtra(MyIntentService.DOWNLOAD_URL,url[i]);
            intent.putExtra(MyIntentService.INDEX_FLAG,i);
            startService(intent);
        }
        MyIntentService.setUpdateUI(this);
    }


    @Override
    public void updateUI(Message message) {
        mUIHandler.sendMessageDelayed(message,message.what * 1000);
    }
}
代码比较简单,通过for循环多次去启动IntentService,然后去下载图片,注意即使我们多次启动IntentService,但IntentService的实例只有一个,这跟传统的Service是一样的,最终IntentService会去调用onHandleIntent执行异步任务。这里可能我们还会担心for循环去启动任务,而实例又只有一个,那么任务会不会被覆盖掉呢?其实是不会的,因为IntentService真正执行异步任务的是HandlerThread+Handler,每次启动都会把下载图片的任务添加到依附的消息队列中,最后由HandlerThread+Handler去执行。好~,我们运行一下代码:

每间隔一秒去更新图片,接着我们看一组log:
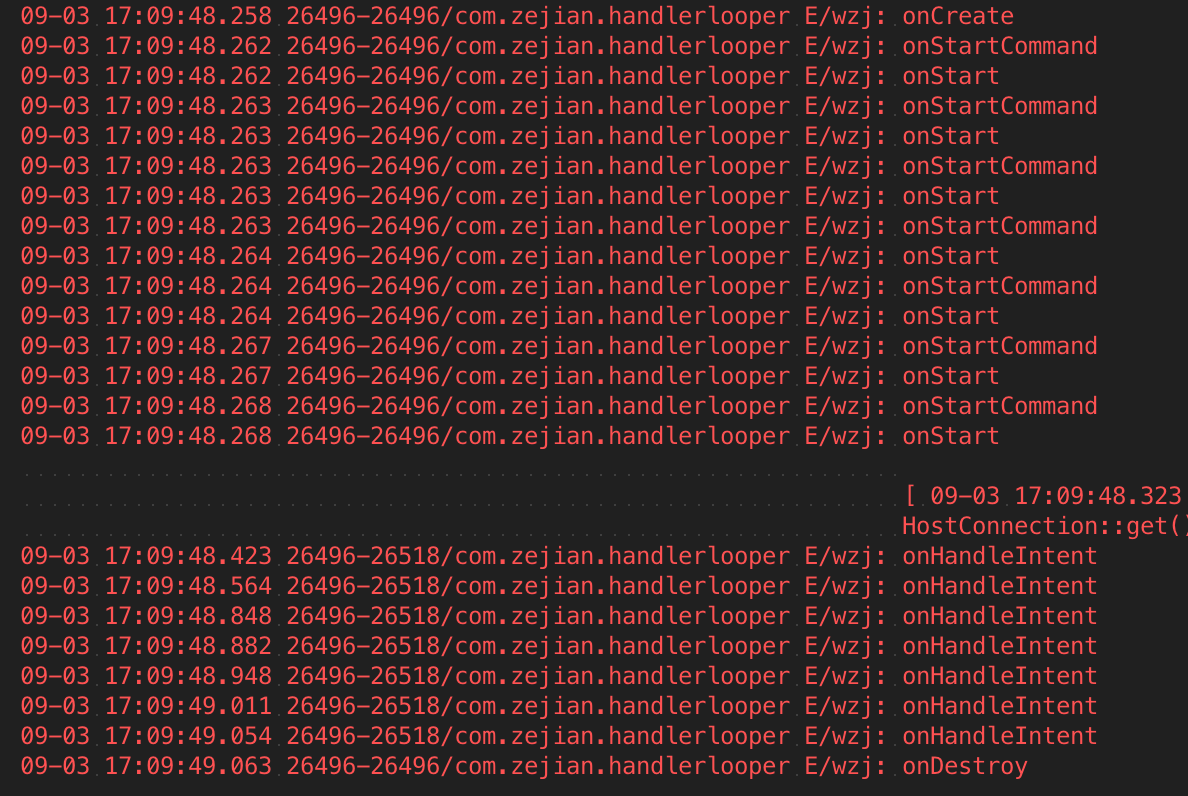
从Log可以看出onCreate只启动了一次,而onStartCommand和onStart多次启动,这就证实了之前所说的,启动多次,但IntentService的实例只有一个,这跟传统的Service是一样的,最后任务都执行完成后,IntentService自动销毁。以上便是IntentService德使用方式,怎么样,比较简单吧。接着我们就来分析一下IntentService的源码,其实也比较简单只有100多行代码。
三、IntentService源码解析
我们先来看看IntentService的onCreate方法:
@Override
public void onCreate() {


   super.onCreate();
   HandlerThread thread = new HandlerThread("IntentService[" + mName + "]");
   thread.start();

   mServiceLooper = thread.getLooper();
   mServiceHandler = new ServiceHandler(mServiceLooper);
}
当第一启动IntentService时,它的onCreate方法将会被调用,其内部会去创建一个HandlerThread并启动它,接着创建一个ServiceHandler(继承Handler),传入HandlerThread的Looper对象,这样ServiceHandler就变成可以处理异步线程的执行类了(因为Looper对象与HandlerThread绑定,而HandlerThread又是一个异步线程,我们把HandlerThread持有的Looper对象传递给Handler后,ServiceHandler内部就持有异步线程的Looper,自然就可以执行异步任务了),那么IntentService是怎么启动异步任务的呢?其实IntentService启动后还会去调用onStartCommand方法,而onStartCommand方法又会去调用onStart方法,我们看看它们的源码:
@Override
public void onStart(Intent intent, int startId) {
    Message msg = mServiceHandler.obtainMessage();
    msg.arg1 = startId;
    msg.obj = intent;
    mServiceHandler.sendMessage(msg);
}

/**
 * You should not override this method for your IntentService. Instead,
 * override {@link #onHandleIntent}, which the system calls when the IntentService
 * receives a start request.
 * @see android.app.Service#onStartCommand
 */
@Override
public int onStartCommand(Intent intent, int flags, int startId) {
    onStart(intent, startId);
    return mRedelivery ? START_REDELIVER_INTENT : START_NOT_STICKY;
}
从源码我们可以看出,在onStart方法中,IntentService通过mServiceHandler的sendMessage方法发送了一个消息,这个消息将会发送到HandlerThread中进行处理(因为HandlerThread持有Looper对象,所以其实是Looper从消息队列中取出消息进行处理,然后调用mServiceHandler的handleMessage方法),我们看看ServiceHandler的源码:
private final class ServiceHandler extends Handler {
   public ServiceHandler(Looper looper) {
       super(looper);
   }

   @Override
   public void handleMessage(Message msg) {
       onHandleIntent((Intent)msg.obj);
       stopSelf(msg.arg1);
   }
}
这里其实也说明onHandleIntent确实是一个异步处理方法(ServiceHandler本身就是一个异步处理的handler类),在onHandleIntent方法执行结束后,IntentService会通过 stopSelf(int startId)方法来尝试停止服务。这里采用stopSelf(int startId)而不是stopSelf()来停止服务,是因为stopSelf()会立即停止服务,而stopSelf(int startId)会等待所有消息都处理完后才终止服务。最后看看onHandleIntent方法的声明:
protected abstract void onHandleIntent(Intent intent);到此我们就知道了IntentService的onHandleIntent方法是一个抽象方法,所以我们在创建IntentService时必须实现该方法,通过上面一系列的分析可知,onHandleIntent方法也是一个异步方法。这里要注意的是如果后台任务只有一个的话,onHandleIntent执行完,服务就会销毁,但如果后台任务有多个的话,onHandleIntent执行完最后一个任务时,服务才销毁。最后我们要知道每次执行一个后台任务就必须启动一次IntentService,而IntentService内部则是通过消息的方式发送给HandlerThread的,然后由Handler中的Looper来处理消息,而Looper是按顺序从消息队列中取任务的,也就是说IntentService的后台任务时顺序执行的,当有多个后台任务同时存在时,这些后台任务会按外部调用的顺序排队执行,我们前面的使用案例也很好说明了这点。最后贴一下到IntentService的全部源码,大家再次感受一下:
package android.app;

import android.annotation.WorkerThread;
import android.content.Intent;
import android.os.Handler;
import android.os.HandlerThread;
import android.os.IBinder;
import android.os.Looper;
import android.os.Message;

/**
 * IntentService is a base class for {@link Service}s that handle asynchronous
 * requests (expressed as {@link Intent}s) on demand.  Clients send requests
 * through {@link android.content.Context#startService(Intent)} calls; the
 * service is started as needed, handles each Intent in turn using a worker
 * thread, and stops itself when it runs out of work.
 *
 * This "work queue processor" pattern is commonly used to offload tasks
 * from an application's main thread.  The IntentService class exists to
 * simplify this pattern and take care of the mechanics.  To use it, extend
 * IntentService and implement {@link #onHandleIntent(Intent)}.  IntentService
 * will receive the Intents, launch a worker thread, and stop the service as
 * appropriate.
 *
 * All requests are handled on a single worker thread -- they may take as
 * long as necessary (and will not block the application's main loop), but
 * only one request will be processed at a time.
 *
 *
 * Developer Guides
 * For a detailed discussion about how to create services, read the
 * Services developer guide.
 *
 *
 * @see android.os.AsyncTask
 */
public abstract class IntentService extends Service {
    private volatile Looper mServiceLooper;

    private volatile ServiceHandler mServiceHandler;
    private String mName;
    private boolean mRedelivery;

    private final class ServiceHandler extends Handler {
        public ServiceHandler(Looper looper) {
            super(looper);
        }

        @Override
        public void handleMessage(Message msg) {
            onHandleIntent((Intent)msg.obj);
            stopSelf(msg.arg1);
        }
    }

    /**
     * Creates an IntentService.  Invoked by your subclass's constructor.
     *
     * @param name Used to name the worker thread, important only for debugging.
     */
    public IntentService(String name) {
        super();
        mName = name;
    }

    /**
     * Sets intent redelivery preferences.  Usually called from the constructor
     * with your preferred semantics.
     *
     * If enabled is true,
     * {@link #onStartCommand(Intent, int, int)} will return
     * {@link Service#START_REDELIVER_INTENT}, so if this process dies before
     * {@link #onHandleIntent(Intent)} returns, the process will be restarted
     * and the intent redelivered.  If multiple Intents have been sent, only
     * the most recent one is guaranteed to be redelivered.
     *
     * If enabled is false (the default),
     * {@link #onStartCommand(Intent, int, int)} will return
     * {@link Service#START_NOT_STICKY}, and if the process dies, the Intent
     * dies along with it.
     */
    public void setIntentRedelivery(boolean enabled) {
        mRedelivery = enabled;
    }

    @Override
    public void onCreate() {


        super.onCreate();
        HandlerThread thread = new HandlerThread("IntentService[" + mName + "]");
        thread.start();

        mServiceLooper = thread.getLooper();
        mServiceHandler = new ServiceHandler(mServiceLooper);
    }

    @Override
    public void onStart(Intent intent, int startId) {
        Message msg = mServiceHandler.obtainMessage();
        msg.arg1 = startId;
        msg.obj = intent;
        mServiceHandler.sendMessage(msg);
    }

    /**
     * You should not override this method for your IntentService. Instead,
     * override {@link #onHandleIntent}, which the system calls when the IntentService
     * receives a start request.
     * @see android.app.Service#onStartCommand
     */
    @Override
    public int onStartCommand(Intent intent, int flags, int startId) {
        onStart(intent, startId);
        return mRedelivery ? START_REDELIVER_INTENT : START_NOT_STICKY;
    }

    @Override
    public void onDestroy() {
        mServiceLooper.quit();
    }

    /**
     * Unless you provide binding for your service, you don't need to implement this
     * method, because the default implementation returns null.
     * @see android.app.Service#onBind
     */
    @Override
    public IBinder onBind(Intent intent) {
        return null;
    }

    /**
     * This method is invoked on the worker thread with a request to process.
     * Only one Intent is processed at a time, but the processing happens on a
     * worker thread that runs independently from other application logic.
     * So, if this code takes a long time, it will hold up other requests to
     * the same IntentService, but it will not hold up anything else.
     * When all requests have been handled, the IntentService stops itself,
     * so you should not call {@link #stopSelf}.
     *
     * @param intent The value passed to {@link
     *               android.content.Context#startService(Intent)}.
     */
    @WorkerThread
    protected abstract void onHandleIntent(Intent intent);
}
此IntentService的源码就分析完了,嗯,本篇完结。
Android 多线程之HandlerThread 完全详解
Android 多线程之IntentService 完全详解
