

本文是重试OkHttp系列的第2篇,依然是基于OkHttp3.4。上一篇重识OkHttp——更深入了解如何使用算是对OkHttp的基本使用做了一个简单的总结,本篇会深入源码内部,探究OkHttp是如何工作的。
1 客户端完整的请求
OkHttp发送一个请求需要4步:
- 构建OkHttpClient
- 构建Request
- 创建一个Call
- 执行Call的同步或者异步方法,处理响应。
我们只以一个简单的异步get请求来举例:
//创建OkHttpClient
OkHttpClient client = new OkHttpClient.Builder().build();

//创建Request
Request request = new Request.Builder()
        .url("http://publicobject.com/helloworld.txt")
        .build();

//创建Call
Call call = client.newCall(request);

//执行Call的异步方法
 call.enqueue(new Callback() {
            @Override
            public void onFailure(Call call, IOException e) {
                //做一些请求失败的处理
            }

            @Override
            public void onResponse(Call call, Response response) throws IOException {
              //做一些请求成功的处理
            }
        });
Request和OkHttpClient都是我们自己创建的,不再讨论了。就从这个Call来展开讨论。
2 探究源码
2.1 Call的实现类RealCall
Call是一个准备执行的请求,它是一个接口。含有一个内部接口Factory 用于生成Call。
public interface Call {
//返回当前Call的Request
  Request request();
//同步请求
  Response execute() throws IOException;
//异步请求
  void enqueue(Callback responseCallback);
//取消请求
  void cancel();
//判断是否执行过
  boolean isExecuted();
//判断是否取消了
  boolean isCanceled();

  interface Factory {
    Call newCall(Request request);
  }
}
OkHttpClient实现了Call.Factory接口,所以有一个newCall方法,这个方法中干了这么个事:
#OkHttpClient
  @Override public Call newCall(Request request) {
    return new RealCall(this, request);
  }

#RealCall的构造方法
  protected RealCall(OkHttpClient client, Request originalRequest) {
    this.client = client;
    this.originalRequest = originalRequest;
    this.retryAndFollowUpInterceptor = new RetryAndFollowUpInterceptor(client);
  }
可以看到,返回了一个RealCall,这个RealCall是OkHttp中Call的唯一实现类。说明我们执行请求,是通过RealCall发出的。
在RealCall的构造方法中,我们还创建了一个拦截器RetryAndFollowUpInterceptor,通过名字我们可以猜测一下这个拦截器的作用是重试和跟进,这个负责是否断线重连和重定向,可以看到这个拦截器跟OkHttpClient有关联,我们可以在配置OkHttpClient的时候配置断线重连等,默认的都是true。
在OkHttp中以Real为前缀的类,都是真正干活的类
2.2 RealCall的enqueue( Callback callBack)方法
OkHttpClient的newCall方法只是创建了一个RealCall,RealCall的enqueue方法传递了一个CallBack用于处理回调,那我们看看这个方法都干了些什么:
#RealCall
  @Override public void enqueue(Callback responseCallback) {
    synchronized (this) {
 //同一个Call只能执行一次,否则会报错。
      if (executed) throw new IllegalStateException("Already Executed");
      executed = true;
    }
    client.dispatcher().enqueue(new AsyncCall(responseCallback));
  }
从上面可以看出,同一个Call只能执行一次,否则会报错。
client.dispatcher()返回的是与OkHttpClient绑定的一个Dispatcher。这个Dispatcher用来管理请求的调度。在上一篇重识OkHttp——更深入了解如何使用中我们简单的也提到过这个类。这个类主要是用来管理异步请求的调度,同步请求中虽然也参与了,但只是简单的统计正在执行的Call并在Call执行完毕之后做相应的处理。
AsyncCall是RealCall的内部类,继承了NamedRunnable,实际上也是一个Runnable实现类。这个AsyncCall 包装了Callback。它的run()方法中最终会调用它自己的execute()方法。后面我们会讲到AsyncCall的execute()方法。
#NamedRunnable
  @Override public final void run() {
    String oldName = Thread.currentThread().getName();
    Thread.currentThread().setName(name);
    try {
      execute();
    } finally {
      Thread.currentThread().setName(oldName);
    }
  }

  protected abstract void execute();
RealCall的enqueue( Callback callBack)实际上最后调用了Dispatcher的enqueue(AsyncCall call)方法。
2.3 Dispatcher的enqueue方法
Dispatcher的enqueue方法是这样的:
#Dispatcher
  synchronized void enqueue(AsyncCall call) {
//判断是否可以执行当前这个Call
    if (runningAsyncCalls.size() < maxRequests && runningCallsForHost(call) < maxRequestsPerHost) {
//满足条件,添加到代表执行的Call的集合中,并开始执行
      runningAsyncCalls.add(call);
      executorService().execute(call);
    } else {
//不满足条件,添加到等待的集合中
      readyAsyncCalls.add(call);
    }
  }
这个方法中首先会判断当前正在执行的Call的数量以及访问同一个主机地址的Call的数量是否在限定范围内。Dispatcher默认的Call的并发数是64,同一个主机地址的并发数是5。这个并发数可以更改。
如果满足条件,就向代表当前正在执行的Call的集合中添加该Call,并且去执行它。否则就会向等待的集合中添加该Call,等待被执行。
executorService()返回的是ExecutorService对象,调用ExecutorService的execute(call)方法实际上最后调用的就是AsyncCall 的execute()方法。
#RealCall.AsyncCall
   @Override protected void execute() {
      boolean signalledCallback = false;
      try {
//最核心的方法,调用之后返回Response
        Response response = getResponseWithInterceptorChain();
        if (retryAndFollowUpInterceptor.isCanceled()) {
          signalledCallback = true;
          responseCallback.onFailure(RealCall.this, new IOException("Canceled"));
        } else {
          signalledCallback = true;
          responseCallback.onResponse(RealCall.this, response);
        }
      } catch (IOException e) {
        if (signalledCallback) {
          // Do not signal the callback twice!
          Platform.get().log(INFO, "Callback failure for " + toLoggableString(), e);
        } else {
          responseCallback.onFailure(RealCall.this, e);
        }
      } finally {
        client.dispatcher().finished(this);
      }
    }
在这个execute()方法中,能获得返回Response,之后做回调处理,Dispatcher也会对Call进行管理。核心的方法就是getResponseWithInterceptorChain()。
2.4 核心方法getResponseWithInterceptorChain()
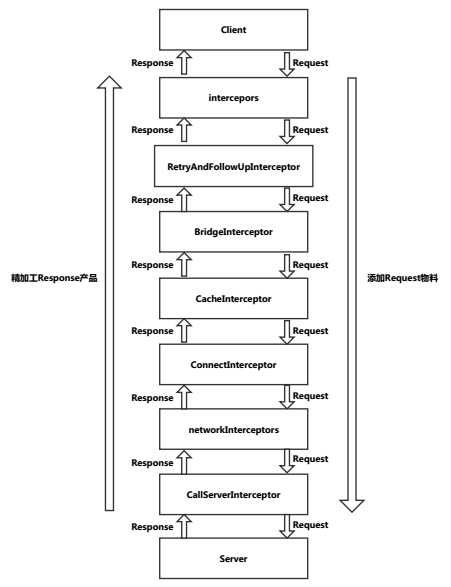
 private Response getResponseWithInterceptorChain() throws IOException {
    // Build a full stack of interceptors.
    List<Interceptor> interceptors = new ArrayList<>();
//添加开发者用户自己定义的拦截器。
    interceptors.addAll(client.interceptors());

//添加失败重连和重定向的拦截器
    interceptors.add(retryAndFollowUpInterceptor);

//这个拦截器主要是添加一些请求头和其它信息,同时对返回的响应做一些响应头或其它处理。
    interceptors.add(new BridgeInterceptor(client.cookieJar()));

//添加缓存拦截器,根据不同的缓存策略做相应的处理。
    interceptors.add(new CacheInterceptor(client.internalCache()));
/**
 * 添加连接拦截器,与服务器建立Socket连接。
 * 其他的拦截器都会对Request和Response进行一些操作,这个拦截器不会。
 */
    interceptors.add(new ConnectInterceptor(client));
/**
 * 默认retryAndFollowUpInterceptor.isForWebSocket()为false,
 * 所以会添加网络拦截器networkInterceptors(),
 * 这个拦截器也是在配置OkHttpClient的时候开发者添加的。
 * 这个拦截器工作的时候肯定已经联网了。
 */
    if (!retryAndFollowUpInterceptor.isForWebSocket()) {
      interceptors.addAll(client.networkInterceptors());
    }
/**
 * 添加CallServerInterceptor拦截器,它主要就是IO操作了, 本质就是Socket的网络IO操作。
 * 对服务器:写入请求头,如果有请求体的话写入请求体。
 * 拿到响应之后处理响应头、code、message、body等。
 */
    interceptors.add(new CallServerInterceptor(
        retryAndFollowUpInterceptor.isForWebSocket()));


 // 创建一个RealInterceptorChain,用它来开始处理请求。
    Interceptor.Chain chain = new RealInterceptorChain(
        interceptors, null, null, null, 0, originalRequest);
    return chain.proceed(originalRequest);
  }
在这个getResponseWithInterceptorChain()方法中,有大量的Interceptors,有开发者自己定义的Interceptor也有OkHttp自己的Interceptor。这些Interceptor都存入到了ArrayList集合,我们在这里就可以大胆猜测一下这个Interceptor应该是顺序执行的。最后创建了一个RealInterceptorChain,通过调用它的proceed(request)方法开始处理原始的request,然后我们就拿到了我们想要的Response。
RealInterceptorChain是Interceptor.Chain的实现类,看这个Real前缀就知道它干的绝对是重要的事。它是一个具体的拦截器链,我们存放在List<Interceptor> interceptors集合中的拦截器之间的传递都要靠它。
它的proceed(request)最终会调用到四个参数的重载方法:
 public Response proceed(Request request, StreamAllocation streamAllocation, HttpStream httpStream,
      Connection connection) throws IOException {
  ...
//下面的代码能够调用拦截器链中的下一个拦截器Interceptor
    // Call the next interceptor in the chain.
//创建一个新的RealInterceptorChain用于把Request传递给下一个Interceptor去处理
    RealInterceptorChain next = new RealInterceptorChain(
        interceptors, streamAllocation, httpStream, connection, index + 1, request);
    Interceptor interceptor = interceptors.get(index);
    Response response = interceptor.intercept(next);
  ...
    return response;
  }
上述代码部分就是这个方法的核心,能够把Request依次传递给下一个Interceptor去处理。
拦截器Interceptor的设计真是很赞,每一个Interceptor在发送Request的时候只处理自己那一部分Request,然后通过RealInterceptorChain的带动传递给下一个Interceptor进行处理,最后一个Interceptor发送完请求得到服务器的响应Response,经过自己的处理之后返回给它之前的那个Interceptor进行处理,依次进行,最后一个处理完毕的Response返回给开发者用户。
形象一点,Interceptor就像是生产线上的工人,Request是物料,Response是产品,RealInterceptorChain是一节一节的传送带。每个工人同时负责处理自己那一部分的Request和Response,由传送带进行传递,各司其职,最后完成一件对用户来讲完美的产品。
我第一次看OkHttp3.4源码的的时候真是一脸懵逼继而叹为观止。后来看了其它文章,才知道原来这个设计模式叫作责任链模式。在Android源码设计模式解析与实战这本书中介绍了Android的事件分发处理采用的也是责任链模式。
具体到每个拦截器都是怎么处理Request和Response的,最好自己去看一下,我们就不展开讨论了。
3 同步请求
看了异步请求的调用,同步请求的分析就比较简单了,因为最终调用的还是getResponseWithInterceptorChain()这个核心方法。
#RealCall
  @Override public Response execute() throws IOException {
    synchronized (this) {
  //同一个Call只能执行一次,否则会报错。
      if (executed) throw new IllegalStateException("Already Executed");
      executed = true;
    }
    try {
//Dispatcher.execute(Call call)方法,只是把当前正在执行的Call添加到代表执行中的集合去。
      client.dispatcher().executed(this);
//核心的方法就是调用的这个getResponseWithInterceptorChain()方法返回响应Response。
      Response result = getResponseWithInterceptorChain();
      if (result == null) throw new IOException("Canceled");
      return result;
    } finally {
//下面的方法只是代表对一个Call结束之后做的处理。
      client.dispatcher().finished(this);
    }
  }
4 总结
本文对OkHttp一个完整的请求过程做了简单的说明,限于篇幅有些地方讲的不是很详细,有兴趣的读者可以自己去探索一下这个流程,尤其是在拦截器那一部分,掌握好了之后对我们平时灵活运用OkHttp会有很大帮助,如配置我们自定义的缓存拦截器,或者在拦截器中监听下载进度,网上也有很多文章可供参考。
