

前言
这两天禁(晋)烟(嫣)的秀恩爱,身为程序员的我们又被默默的送了一把狗粮,这段时间一直在忙公司项目,两个多月都没有写过文章了,今天闲来无事想把iOS中播放音乐(包括段音效)的部分拿出来总结一下。
主要部分:
1.音效的播放
2.音乐的播放(本地, 网络)
3.音频队列服务
1.音效播放(AudioToolbox/AudioToolbox.h)
音频文件必须打包成.caf、.aif、.wav中的一种(注意这是官方文档的说法,实际测试发现一些.mp3也可以播放)
这个段音效播放不能大于30s,这个30s不是我说的,是苹果的API说的
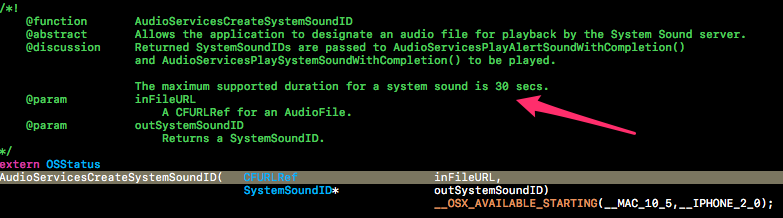
创建音效的ID,音效的播放和销毁都靠这个ID来执行
AudioServicesCreateSystemSoundID(CFURLRef inFileURL, SystemSoundID* outSystemSoundID)
播放音效
AudioServicesPlaySystemSound(SystemSoundID inSystemSoundID)
iOS9以后可以用的,带有block回调的播放
AudioServicesPlaySystemSoundWithCompletion(SystemSoundID inSystemSoundID, void (^__nullable inCompletionBlock)(void))
带有震动的播放
AudioServicesPlayAlertSound(SystemSoundID inSystemSoundID)
iOS9以后可以用的,带有block回调的播放
AudioServicesPlayAlertSoundWithCompletion( SystemSoundID inSystemSoundID,void (^__nullable inCompletionBlock)(void))
在iOS9之前,如何判断一个音效是否播放完成呢?(利用下面的方法)
AudioServicesAddSystemSoundCompletion(SystemSoundID inSystemSoundID,CFRunLoopRef __nullable inRunLoop, CFStringRef __nullable inRunLoopMode,AudioServicesSystemSoundCompletionProc inCompletionRoutine,void * __nullable inClientData)
销毁音效的播放
AudioServicesDisposeSystemSoundID(SystemSoundID inSystemSoundID)
下面对上面的方法的演示,播放一些音效, 播放48s的mp3时会报错
static SystemSoundID soundID = 0;

- (IBAction)play:(id)sender {

//    NSString *str = [[NSBundle mainBundle] pathForResource:@"vcyber_waiting" ofType:@"wav"];
    NSString *str = [[NSBundle mainBundle] pathForResource:@"28s" ofType:@"mp3"];
//    NSString *str = [[NSBundle mainBundle] pathForResource:@"48s" ofType:@"mp3"];
    NSURL *url = [NSURL fileURLWithPath:str];


    AudioServicesCreateSystemSoundID((__bridge CFURLRef _Nonnull)(url), &soundID);
//
//    AudioServicesAddSystemSoundCompletion(soundID, NULL, NULL, soundCompleteCallBack, NULL);
//
//    //AudioServicesPlaySystemSound(soundID);
//
//    AudioServicesPlayAlertSound(soundID);


//    AudioServicesPlaySystemSoundWithCompletion(soundID, ^{
//        NSLog(@"播放完成");
//        AudioServicesDisposeSystemSoundID(soundID);
//    });

    AudioServicesPlayAlertSoundWithCompletion(soundID, ^{
        NSLog(@"播放完成");
    });

}

void soundCompleteCallBack(SystemSoundID soundID, void * clientDate) {
    NSLog(@"播放完成");
    AudioServicesDisposeSystemSoundID(soundID);
}

- (IBAction)stop:(id)sender {
    AudioServicesDisposeSystemSoundID(soundID);
}
2.本地音乐播放
AVAudioPlayer
AVAudioPlayer是播放本地音乐最常到的,这个类对于大多数人来说应该很常用,这里不多说,说一下它的基本用法和代理的用法,直接上代码,代码注释很详细
@interface LocalMusicViewController ()

/**
 播放器
 */
@property (nonatomic, strong) AVAudioPlayer *player;

/**
 播放进度条
 */
@property (weak, nonatomic) IBOutlet UIProgressView *progress;

/**
 改变播放进度滑块
 */
@property (weak, nonatomic) IBOutlet UISlider *progressSlide;

/**
 改变声音滑块
 */
@property (weak, nonatomic) IBOutlet UISlider *volum;

/**
 改变进度条滑块显示的定时器
 */
@property (nonatomic, strong) NSTimer *timer;

@end

@implementation LocalMusicViewController

- (void)viewDidLoad {
    [super viewDidLoad];

    NSError *err;
    NSURL *url = [[NSBundle mainBundle] URLForResource:@"1" withExtension:@"mp3"];
//    初始化播放器
    _player = [[AVAudioPlayer alloc] initWithContentsOfURL:url error:&err];
    self.volum.value = 0.5;
//    设置播放器声音
    _player.volume = self.volum.value;
//    设置代理
    _player.delegate = self;
//    设置播放速率
    _player.rate = 1.0;
//    设置播放次数 负数代表无限循环
    _player.numberOfLoops = -1;
//    准备播放
    [_player prepareToPlay];
    self.progress.progress = 0;
    self.progressSlide.value = 0;
    _timer = [NSTimer scheduledTimerWithTimeInterval:0.1 target:self selector:@selector(change) userInfo:nil repeats:YES];

}

- (void)viewWillDisappear:(BOOL)animated {
    [super viewWillDisappear:animated];

}

- (void)change {
    self.progress.progress = _player.currentTime / _player.duration;
}

- (IBAction)progressChange:(UISlider *)sender {
//    改变当前的播放进度
    _player.currentTime = sender.value * _player.duration;
    self.progress.progress = sender.value;

}
- (IBAction)volumChange:(UISlider *)sender {
//    改变声音大小
    _player.volume = sender.value;
}

- (IBAction)player:(id)sender {
//    开始播放
    [_player play];
}

- (IBAction)stop:(id)sender {
//    暂停播放
    [_player stop];
}

#pragma mark --AVAudioPlayerDelegate
/**
 完成播放, 但是在打断播放和暂停、停止不会调用
 */
- (void)audioPlayerDidFinishPlaying:(AVAudioPlayer *)player successfully:(BOOL)flag {

}

/**
 播放过程中解码错误时会调用
 */
- (void)audioPlayerDecodeErrorDidOccur:(AVAudioPlayer *)player error:(NSError * __nullable)error {

}

/**
 播放过程被打断

 */
- (void)audioPlayerBeginInterruption:(AVAudioPlayer *)player NS_DEPRECATED_IOS(2_2, 8_0) {

}

/**
 打断结束
*/
- (void)audioPlayerEndInterruption:(AVAudioPlayer *)player withOptions:(NSUInteger)flags NS_DEPRECATED_IOS(6_0, 8_0) {

}

/**
 打断结束

 */
- (void)audioPlayerEndInterruption:(AVAudioPlayer *)player withFlags:(NSUInteger)flags NS_DEPRECATED_IOS(4_0, 6_0) {

}

/**
 这个方法被上面的方法代替了
 */
- (void)audioPlayerEndInterruption:(AVAudioPlayer *)player NS_DEPRECATED_IOS(2_2, 6_0) {

}
网络音乐播放(AVPlayer)
AVPlayer是播放网络音乐和网络视频最常用到的,它可以自己缓存网络数据,然后播放,AVPlayer在播放视频时必须创建一个AVPlayerLayer用来展示视频,如果播放音乐,声音就不用创建这个对象。这里简单演示一下网络播放音乐
1. 通过网络链接创建AVPlayerItem
AVPlayerItem的初始化方法很多,我这里直接用initWithURL:这个方法创建
- (AVPlayerItem *)getItemWithIndex:(NSInteger)index {
    NSURL *url = [NSURL URLWithString:self.musicArray[index]];
    AVPlayerItem *item = [[AVPlayerItem alloc] initWithURL:url];
    //KVO监听播放状态
    [item addObserver:self forKeyPath:@"status" options:NSKeyValueObservingOptionNew context:nil];
    //KVO监听缓存大小
    [item addObserver:self forKeyPath:@"loadedTimeRanges" options:NSKeyValueObservingOptionNew context:nil];
    //通知监听item播放完毕
     [[NSNotificationCenter defaultCenter] addObserver:self selector:@selector(playOver:) name:AVPlayerItemDidPlayToEndTimeNotification object:item];
    return item;
}
2.实现KVO的方法,根据keyPath来判断观察的属性是哪一个
- (void)observeValueForKeyPath:(NSString *)keyPath ofObject:(id)object change:(NSDictionary *)change context:(void *)context {

    AVPlayerItem *item = object;

    if ([keyPath isEqualToString:@"status"]) {
        switch (self.player.status) {
            case AVPlayerStatusUnknown:
                NSLog(@"未知状态,不能播放");
                break;
            case AVPlayerStatusReadyToPlay:
                NSLog(@"准备完毕,可以播放");
                break;
            case AVPlayerStatusFailed:
                NSLog(@"加载失败, 网络相关问题");
                break;

            default:
                break;
        }
    }

    if ([keyPath isEqualToString:@"loadedTimeRanges"]) {
        NSArray *array = item.loadedTimeRanges;
        //本次缓存的时间
        CMTimeRange timeRange = [array.firstObject CMTimeRangeValue];
        NSTimeInterval totalBufferTime = CMTimeGetSeconds(timeRange.start) + CMTimeGetSeconds(timeRange.duration); //缓存的总长度
        self.bufferProgress.progress = totalBufferTime / CMTimeGetSeconds(item.duration);
    }
}
3.懒加载AVPlayer
- (AVPlayer *)player {
    if (!_player) {
//        根据链接数组获取第一个播放的item, 用这个item来初始化AVPlayer
        AVPlayerItem *item = [self getItemWithIndex:self.currentIndex];
//        初始化AVPlayer
        _player = [[AVPlayer alloc] initWithPlayerItem:item];
        __weak typeof(self)weakSelf = self;
//        监听播放的进度的方法,addPeriodicTime: ObserverForInterval: usingBlock:
        /*
         DMTime 每到一定的时间会回调一次,包括开始和结束播放
         block回调,用来获取当前播放时长
         return 返回一个观察对象,当播放完毕时需要,移除这个观察
         */
        _timeObserver = [_player addPeriodicTimeObserverForInterval:CMTimeMake(1, 1) queue:dispatch_get_main_queue() usingBlock:^(CMTime time) {
            float current = CMTimeGetSeconds(time);
            if (current) {
                [weakSelf.progressView setProgress:current / CMTimeGetSeconds(item.duration) animated:YES];
                weakSelf.progressSlide.value = current / CMTimeGetSeconds(item.duration);
            }
        }];
    }
    return _player;
}
4.播放和暂停
//  播放
- (IBAction)play:(id)sender {
    [self.player play];
}

//暂停
- (IBAction)pause:(id)sender {
    [self.player pause];
}
5.下一首和上一首
- (IBAction)next:(UIButton *)sender {
    [self removeObserver];
   self.currentIndex ++;
    if (self.currentIndex >= self.musicArray.count) {
        self.currentIndex = 0;
    }
//  这个方法是用一个item取代当前的item
    [self.player replaceCurrentItemWithPlayerItem:[self getItemWithIndex:self.currentIndex]];
    [self.player play];
}

- (IBAction)last:(UIButton *)sender {
    [self removeObserver];
    self.currentIndex --;
    if (self.currentIndex < 0) {
        self.currentIndex = 0;
    }
//  这个方法是用一个item取代当前的item
    [self.player replaceCurrentItemWithPlayerItem:[self getItemWithIndex:self.currentIndex]];
    [self.player play];
}

// 在播放另一个时,要移除当前item的观察者,还要移除item播放完成的通知
- (void)removeObserver {
    [self.player.currentItem removeObserver:self forKeyPath:@"status"];
    [self.player.currentItem removeObserver:self forKeyPath:@"loadedTimeRanges"];
    [[NSNotificationCenter defaultCenter] removeObserver:self];
}6.控制播放进度,这个也有很多的方法,如果不是太精确,用- (void)seekToTime:(CMTime)time:这个方法就行,如果要精确的用这个- (void)seekToTime:(CMTime)time toleranceBefore:(CMTime)toleranceBefore toleranceAfter:(CMTime)toleranceAfter
- (IBAction)changeProgress:(UISlider *)sender {
    if (self.player.status == AVPlayerStatusReadyToPlay) {
        [self.player seekToTime:CMTimeMake(CMTimeGetSeconds(self.player.currentItem.duration) * sender.value, 1)];
    }
}
音频队列服务(Audio Queue Services)
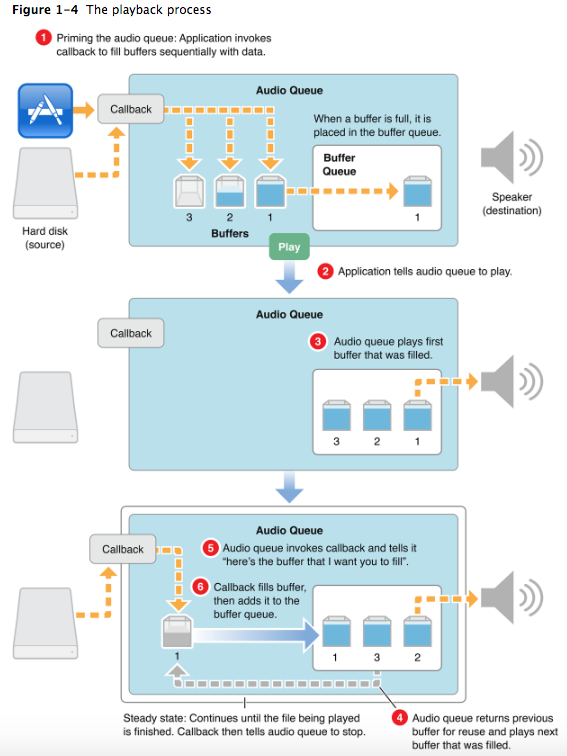
在AudioToolbox框架中的音频队列服务,是用来播放网络流媒体的一个框架,它完全可以做到音频播放和录制,一个音频服务队列有三个部分组成:
1.三个缓冲器Buffers:没个缓冲器都是一个存储音频数据的临时仓库。
2.一个缓冲队列Buffer Queue:一个包含音频缓冲器的有序队列。
3.一个回调CallBack:一个自定义的队列回调函数。
在音频播放缓冲队列中,将音频读取到缓冲器中,一旦一个缓冲器填充满之后就放到缓冲队列中,然后继续填充其他缓冲器;当开始播放时,则从第一个缓冲器中读取音频进行播放;一旦播放完之后就会触发回调函数,开始播放下一个缓冲器中的音频,同时填充第一个缓冲器放;填充满之后再次放回到缓冲队列。下面是官方详细的流程:
AudioQueue的工作大致流程:
1.创建AudioQueue,创建BufferArray数组,用于存放AudioQueueBufferRef
2.通过AudioQueueAllocateBuffer创建AudioQueueBufferRef一般2-3个,放入到BufferArray数组中
3.有数据时从buffer数组取出一个buffer,memcpy数据后用AudioQueueEnqueueBuffer方法把buffer插入AudioQueue中
4.AudioQueue中存在Buffer后,调用AudioQueueStart播放。(具体等到填入多少buffer后再播放可以自己控制,只要能保证播放不间断即可)
5.AudioQueue播放音乐后消耗了某个buffer,在另一个线程回调并送出该buffer,把buffer放回BufferArray供下一次使用
6.返回步骤3继续循环直到播放结束
常用API
创建AudioQueue
第一个参数表示需要播放的音频数据格式类型,是一个AudioStreamBasicDescription对象,是使用AudioFileStream或者AudioFile解析出来的数据格式信息;
第二个参数AudioQueueOutputCallback是某块Buffer被使用之后的回调;
第三个参数为上下文对象;
第四个参数inCallbackRunLoop为AudioQueueOutputCallback需要在的哪个RunLoop上被回调,如果传入NULL的话就会再AudioQueue的内部RunLoop中被回调,所以一般传NULL就可以了;
第五个参数inCallbackRunLoopMode为RunLoop模式,如果传入NULL就相当于kCFRunLoopCommonModes,也传NULL就可以了;
第六个参数inFlags是保留字段,目前没作用,传0;
第七个参数,返回生成的AudioQueue实例;
返回值用来判断是否成功创建(OSStatus == noErr)。
extern OSStatus
AudioQueueNewOutput( const AudioStreamBasicDescription *inFormat,
                      AudioQueueOutputCallback        inCallbackProc,
                     void * __nullable               inUserData,
                       CFRunLoopRef __nullable         inCallbackRunLoop,
                       CFStringRef __nullable          inCallbackRunLoopMode,
                       UInt32                          inFlags,
                      AudioQueueRef __nullable * __nonnull outAQ)

参数和上面基本相同,只是把RunLoop换成了dispatch queue
AudioQueueNewOutputWithDispatchQueue(AudioQueueRef __nullable * __nonnull outAQ,
                                    const AudioStreamBasicDescription *inFormat,
                                    UInt32                          inFlags,
                                    dispatch_queue_t                inCallbackDispatchQueue,
                                    AudioQueueOutputCallbackBlock   inCallbackBlock)
创建Buffer
第一个参数方法传入AudioQueue实例
第二个参数Buffer大小
第三个传出的BufferArray实例;
extern OSStatus
AudioQueueAllocateBuffer(AudioQueueRef    inAQ,
                          UInt32    inBufferByteSize,
                          AudioQueueBufferRef __nullable * __nonnull outBuffer)

比上面的方法多了一个inNumberPacketDescriptions,这个参数可以指定生成的Buffer中PacketDescriptions的个数
extern OSStatus
AudioQueueAllocateBufferWithPacketDescriptions(
                                    AudioQueueRef           inAQ,
                                    UInt32                  inBufferByteSize,
                                    UInt32                  inNumberPacketDescriptions,
                                    AudioQueueBufferRef __nullable * __nonnull outBuffer)
释放buffer
第一个参数AudioQueue实例
第二个参数指定的buffer
extern OSStatus
AudioQueueFreeBuffer(               AudioQueueRef           inAQ,
                                    AudioQueueBufferRef     inBuffer)
插入buffer
第一个参数AudioQueue实例
第二个参数指定的Buffer
第三个参数数据包的个数
第四个参数数据包描述
extern OSStatus
AudioQueueEnqueueBuffer(            AudioQueueRef                       inAQ,
                                    AudioQueueBufferRef                 inBuffer,
                                    UInt32                              inNumPacketDescs,
                                    const AudioStreamPacketDescription * __nullable inPacketDescs)

上面的方法基本满足要求,这个方法对插入的buffer进行额外的更多的操作
extern OSStatus
AudioQueueEnqueueBufferWithParameters(
                                    AudioQueueRef                                inAQ,
                                    AudioQueueBufferRef                          inBuffer,
                                    UInt32                                       inNumPacketDescs,
                                    const AudioStreamPacketDescription * __nullable inPacketDescs,
                                    UInt32                                       inTrimFramesAtStart,
                                    UInt32                                       inTrimFramesAtEnd,
                                    UInt32                                       inNumParamValues,
                                    const AudioQueueParameterEvent * __nullable  inParamValues,
                                    const AudioTimeStamp * __nullable            inStartTime,
                                    AudioTimeStamp * __nullable                  outActualStartTime)     __OSX_AVAILABLE_STARTING(__MAC_10_5,__IPHONE_2_0);
开始播放
第一个参数AudioQueue实例
第二个参数播放时间,如果直接开始播放 传NULL
extern OSStatus
AudioQueueStart(                    AudioQueueRef                     inAQ,
                                    const AudioTimeStamp * __nullable inStartTime)
解码数据,不常用,调用开始播放会自动解码
extern OSStatus
AudioQueuePrime(                    AudioQueueRef           inAQ,
                                    UInt32                  inNumberOfFramesToPrepare,
                                    UInt32 * __nullable     outNumberOfFramesPrepared)
停止播放
第二个参数Bool值,控制是否立即停止,如果传false,会把Enqueue的所有buffer播放完成再停止
extern OSStatus
AudioQueueStop(                     AudioQueueRef           inAQ,
                                    Boolean                 inImmediate)            __OSX_AVAILABLE_STARTING(__MAC_10_5,__IPHONE_2_0);
暂停播放
extern OSStatus
AudioQueuePause(                    AudioQueueRef           inAQ)       __OSX_AVAILABLE_STARTING(__MAC_10_5,__IPHONE_2_0);
重置解码器
这个方法会播放完队列中的buffer后重置解码器,防止当前的解码器影响下一段音频,比如切换歌曲的时候,如果和AudioQueueStop(AQ,false)
一起使用并不会起效,因为Stop方法的false参数也会做同样的事情。
extern OSStatus
AudioQueueFlush(                    AudioQueueRef           inAQ)            __OSX_AVAILABLE_STARTING(__MAC_10_5,__IPHONE_2_0);
重置AudioQueue
重置AudioQueue会清除所有已经Enqueue的buffer,并触发AudioQueueOutputCallback,调用AudioQueueStop方法时同样会触发该方法。这个方法的直接调用一般在seek时使用,用来清除残留的buffer(seek时还有一种做法是先AudioQueueStop
,等seek完成后重新start)。
extern OSStatus
AudioQueueReset(                    AudioQueueRef           inAQ)            __OSX_AVAILABLE_STARTING(__MAC_10_5,__IPHONE_2_0);
获取播放时间
调用时传入AudioTimeStamp,从这个结构体当中获取播放时间
extern OSStatus
AudioQueueGetCurrentTime(           AudioQueueRef                    inAQ,
                                    AudioQueueTimelineRef __nullable inTimeline,
                                    AudioTimeStamp * __nullable      outTimeStamp,
                                    Boolean * __nullable             outTimelineDiscontinuity)       __OSX_AVAILABLE_STARTING(__MAC_10_5,__IPHONE_2_0);
销毁AudioQueue
参数的意义基本和AudioQueueStop一样
extern OSStatus
AudioQueueDispose(                  AudioQueueRef           inAQ,
                                    Boolean                 inImmediate)            __OSX_AVAILABLE_STARTING(__MAC_10_5,__IPHONE_2_0);
AudioQueue参数
AudioQueueGetParameter
AudioQueueSetParameter
参数列表
CF_ENUM(AudioQueueParameterID)
{
    kAudioQueueParam_Volume         = 1,
    kAudioQueueParam_PlayRate       = 2,
    kAudioQueueParam_Pitch          = 3,
    kAudioQueueParam_VolumeRampTime = 4,
    kAudioQueueParam_Pan            = 13
};
AudioQueue属性
AudioQueueGetPropertySize
AudioQueueGetProperty
AudioQueueSetProperty
属性列表
CF_ENUM(AudioQueuePropertyID) {
    kAudioQueueProperty_IsRunning               = 'aqrn',       // value is UInt32

    kAudioQueueDeviceProperty_SampleRate        = 'aqsr',       // value is Float64
    kAudioQueueDeviceProperty_NumberChannels    = 'aqdc',       // value is UInt32
    kAudioQueueProperty_CurrentDevice           = 'aqcd',       // value is CFStringRef

    kAudioQueueProperty_MagicCookie             = 'aqmc',       // value is void*
    kAudioQueueProperty_MaximumOutputPacketSize = 'xops',       // value is UInt32
    kAudioQueueProperty_StreamDescription       = 'aqft',       // value is AudioStreamBasicDescription

    kAudioQueueProperty_ChannelLayout           = 'aqcl',       // value is AudioChannelLayout
    kAudioQueueProperty_EnableLevelMetering     = 'aqme',       // value is UInt32
    kAudioQueueProperty_CurrentLevelMeter       = 'aqmv',       // value is array of AudioQueueLevelMeterState, 1 per channel
    kAudioQueueProperty_CurrentLevelMeterDB     = 'aqmd',       // value is array of AudioQueueLevelMeterState, 1 per channel

    kAudioQueueProperty_DecodeBufferSizeFrames  = 'dcbf',       // value is UInt32
    kAudioQueueProperty_ConverterError          = 'qcve',       // value is UInt32

    kAudioQueueProperty_EnableTimePitch         = 'q_tp',       // value is UInt32, 0/1
    kAudioQueueProperty_TimePitchAlgorithm      = 'qtpa',       // value is UInt32. See values below.
    kAudioQueueProperty_TimePitchBypass         = 'qtpb',       // value is UInt32, 1=bypassed
};
监听属相变化相关方法
AudioQueueAddPropertyListener
AudioQueueRemovePropertyListener
总结:
这里说的东西都比(能)较(力)基(有)础(限),其实AudioQueue的功能还有很多,如果大家想去研究比较细致的AudioQueue的使用,这里给大家推荐两个github地址,一个是AudioStreamer,一个是FreeStreamer,这里的两个播放都是使用AudioQueue实现的。
