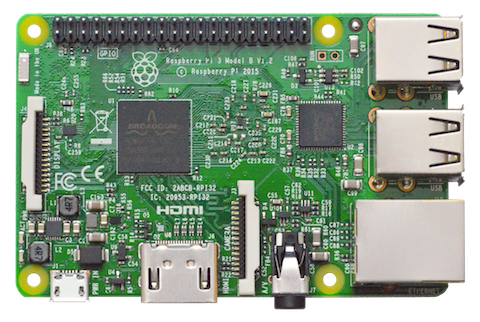
Raspberry Pi 3 B型是世界上最受欢迎的单板电脑的最新版本。 它运行在一颗1.2GHz的四核64位ARM Cortex-A53 CPU上,四个USB 2.0端口,有线和无线网络,HDMI和复合视频输出以及一个40针GPIO连接器,用于物理接口项目。
有关该板上的外设I/O信号的更多详细信息,请参阅Raspberry Pi I/O。
Android Things系统刷入
在Android Things系统刷入之前,除了Raspberry Pi之外,还需要以下项目:
- HDMI电缆
- 支持HDMI的显示器
- Micro-USB线
- 以太网电缆
- SD卡读卡器
要想将Android Things系统刷入Raspberry Pi中,需要下载最新版本的系统镜像
官方下载地址:developer.android.google.cn/things/prev…
下载完系统镜像后按以下步骤操作:
1、将8GB或更大的SD卡插入你的电脑。
2、解压下载完成的系统镜像
3、按照官方Raspberry Pi说明方法将系统镜像写入SD卡:
4、将SD卡插入Raspberry Pi
5、安装以下示意图将Raspberry Pi与外设链接
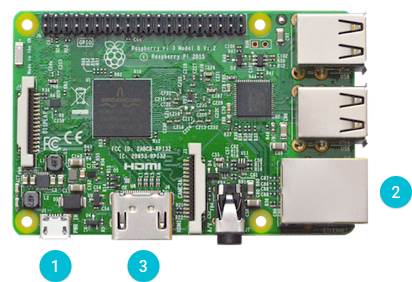
示意图中
1通过USB线缆连接电源适配器,2通过网线连接到局域网,3通过HDMI线缆连接显示器。
6、验证Android Things已经运行在设备上了。然后就能看到Raspberry Pi的信息包括IP地址已经显示到Android Things 系统桌面上了。
7、通过adb tool将Raspberry Pi与电脑连接
$ adb connect <ip-address>
connected to <ip-address>:5555
注意:Raspberry Pi通过多播DNS广播主机名Android.local。 如果主机平台支持MDNS,则还可以使用以下命令连接到Raspberry Pi:
$ adb connect Android.local
连接WIFI
刷入系统后,强烈建议将其连接到互联网。 这样您的设备就可以提交崩溃报告和接收更新。
注意:设备不需要与计算机位于同一网络上。
使用adb将您的Raspberry Pi连接到WiFi:
1、向Wi-Fi Service 发送包含本地网络的SSID和密码的Intent:
$ adb shell am startservice -n com.google.wifisetup/.WifiSetupService -a WifiSetupService.Connect -e ssid <Network_SSID> -e passphrase <Network_Passcode>2、通过logcat验证连接是否成功:
$ adb logcat -d | grep Wifi
...
V WifiWatcher: Network state changed to CONNECTED
V WifiWatcher: SSID changed: ...
I WifiConfigurator: Successfully connected to ...
3、测试您是否可以访问远程IP地址:
$ adb shell ping 8.8.8.8
PING 8.8.8.8 (8.8.8.8) 56(84) bytes of data.
64 bytes from 8.8.8.8: icmp_seq=1 ttl=57 time=6.67 ms
64 bytes from 8.8.8.8: icmp_seq=2 ttl=57 time=55.5 ms
64 bytes from 8.8.8.8: icmp_seq=3 ttl=57 time=23.0 ms
64 bytes from 8.8.8.8: icmp_seq=4 ttl=57 time=245 ms
Raspberry Pi I/O
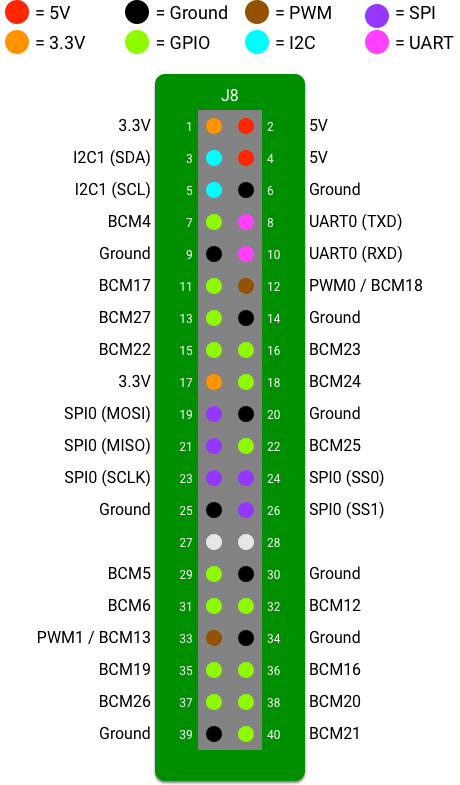
本节介绍在Raspberry Pi 3上运行的应用程序可用的外设I/O接口。
以下引脚示意图说明了此板的断开连接器暴露的可用端口的位置: