

Easily one of my all-time favorite papers in computer vision literature is Seam Carving for Content-Aware Image Resizing by Avidan and Shamir from Mitsubishi Electric Research Labs (MERL).
Originally published in the SIGGRAPH 2007 proceedings, I read this paper for the first time during my computational photography class as an undergraduate student.
This paper, along with the demo video from the authors, made the algorithm feel like magic, especially to a student who was just getting his feet wet in the world of computer vision and image processing.
The seam carving algorithm works by finding connected pixels called seams with low energy (i.e., least important) that traverse the entire image from left-to-right or top-to-bottom.
These seams are then removed from the original image, allowing us to resize the image while preserving the most salient regions (the original algorithm also supports adding seams, allowing us to increase the image size as well).
In the remainder of today’s blog post I’ll discuss the seam carving algorithm, how it works, and how to apply seam carving using Python, OpenCV, and sickit-image.
To learn more about this classic computer vision algorithm, just keep reading!
Looking for the source code to this post?
Jump right to the downloads section.
Seam carving with OpenCV, Python, and scikit-image
The first part of this blog post will discuss what the seam carving algorithm is and why we may prefer to use it over traditional resizing methods.
From there I’ll demonstrate how to use seam carving using OpenCV, Python, and scikit-image.
Finally, I’ll wrap up this tutorial by providing a demonstration of the seam carving algorithm in action.
The seam carving algorithm
Introduced by Avidan and Shimar in 2007, the seam carving algorithm is used to resize (both downsample and upsample) an image by removing/adding seams that have low energy.
Seams are defined as connected pixels that flow from left-to-right or top-to-bottom provided that they traverse the entire width/height of the image.
Thus, in order to perform seam carving we need two important inputs:
- The original image. This is the input image that we want to resize.
- The energy map. We derive the energy map from the original image. The energy map should represent the most salient regions of the image. Typically, this is either the gradient magnitude representation (i.e., output of Sobel, Scharr, etc. operators), entropy maps, or saliency maps.
For example, let’s take a look at the following image:
![Figure 1: Our input image to the seam carving algorithm [source: Wikipedia].](https://p1-jj.byteimg.com/tos-cn-i-t2oaga2asx/gold-user-assets/2017/1/31/c7158e5eff91fd587a02b06a220a1a76~tplv-t2oaga2asx-jj-mark:3024:0:0:0:q75.png)
Figure 1: Our input image to the seam carving algorithm [source: Wikipedia].
Using this image as an input, we can compute the gradient magnitude to serve as our energy map:![Figure 2: Computing the gradient magnitude representation of of the input image. This representation will serve as our energy map [source: Wikipedia].](https://p1-jj.byteimg.com/tos-cn-i-t2oaga2asx/gold-user-assets/2017/1/31/8e14b6d1c0b75a48cc5288b2bddeacd4~tplv-t2oaga2asx-jj-mark:3024:0:0:0:q75.png)
Figure 2: Computing the gradient magnitude representation of of the input image. This representation will serve as our energy map [source: Wikipedia].
Given our energy map we can then generate a set of seams that either span the image from left-to-right or top-to-bottom:![Figure 3: Generating seams from the energy map. Low energy seams can be removed/duplicated to perform the actual resizing [source: Wikipedia].](https://p1-jj.byteimg.com/tos-cn-i-t2oaga2asx/gold-user-assets/2017/1/31/e6235fe8e8f26746ba8a64d1a0af1883~tplv-t2oaga2asx-jj-mark:3024:0:0:0:q75.png)
Figure 3: Generating seams from the energy map. Low energy seams can be removed/duplicated to perform the actual resizing [source: Wikipedia].
These seams are efficiently computed via dynamic programming and are sorted by their energy. Seams with low energy are placed at the front of the list while high energy seams are placed at the back of the list.To resize an image we either remove seams with low energy to downsample an image or we duplicate seams with low energy to upsample the image.
Below is an example of taking the original image, finding the seams with the lowest energy, and then removing them to reduce the final size of the output image:
![Figure 4: Removing low energy seams from an image using the seam carving algorithm [source: Wikipedia].](https://p1-jj.byteimg.com/tos-cn-i-t2oaga2asx/gold-user-assets/2017/1/31/ab84a0a3fd5657389901ef2f8e2902e9~tplv-t2oaga2asx-jj-mark:3024:0:0:0:q75.png)
Figure 4: Removing low energy seams from an image using the seam carving algorithm [source: Wikipedia].
For more information on the seam carving algorithm, please see the original publication.Why use traditional seam carving over traditional resizing?
Keep in mind that the purpose of seam carving is to preserve the most salient (i.e., “interesting”) regions of an image while still resizing the image itself.
Using traditional methods for resizing changes the dimensions of the entire image — no care is taken to determine what part of the image is most or least important.
Seam carving instead applies heuristics/path finding derived from the energy map to determine which regions of the image can be removed/duplicated to ensure (1) all “interesting” regions of the image are preserved and (2) this is done in an aesthetically pleasing way.
Note: Preserving the most interesting regions of an image in an aesthetically pleasing manner is a lot harder than it sounds. While seam carving may seem like magic, it’s actually not — and it has its limitations. See the “Summary” section for more information on these limitations.
To compare traditional resizing versus seam carving, consider the following input image:
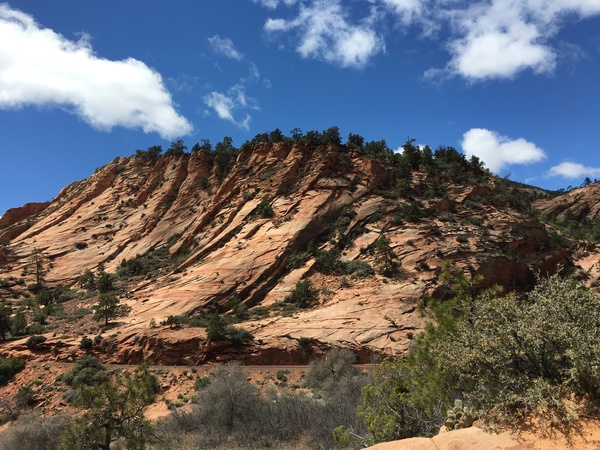
Figure 5: An example image to resize.
This image has a width of 600 pixels and I would like to resize it to approximately 500 pixels.
Using traditional interpolation methods my resized image would look like this:
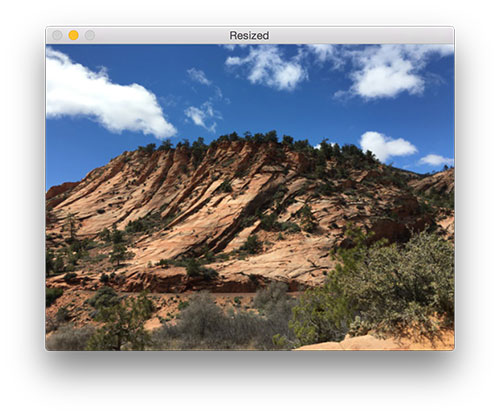
Figure 6: Resizing an image using traditional interpolation techniques. Notice how the height changes along with the width to retain the aspect aspect ratio.
However, by applying seam carving I can “shrink” the image along the horizontal dimension and still preserve the most interesting regions of the image without changing the image height:
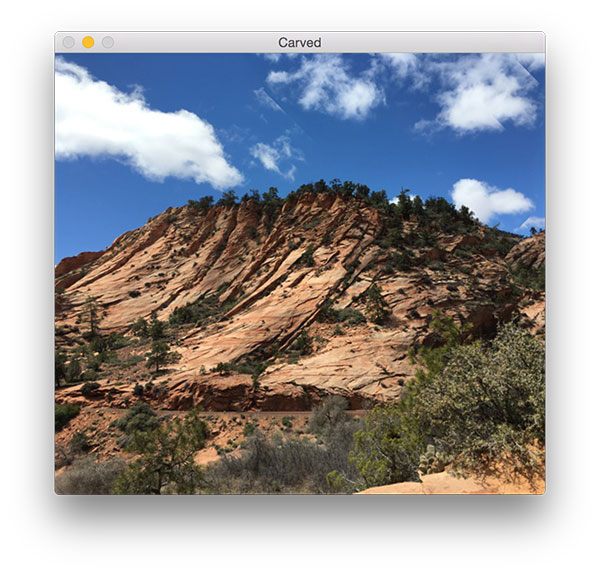
Figure 7: Resizing the image using seam carving.
Utilizing seam carving in computer vision and image processing
In this section I’ll demonstrate how to use seam carving with OpenCV, Python, and scikit-image.
I’ll assume you already have OpenCV installed on your system — if not, please refer to this page where I provided resources to install OpenCV on many different operating systems.
From there, you should ensure you have scikit-image installed as well. This page provides more information on installing scikit-image, but for most systems you can use pip :
$ pip install --upgrade scikit-imageLet’s go ahead and see how we can apply seam carving to our own images.
Open up a new file, name it seam_carving .py , and insert the following code:
# import the necessary packages
from skimage import transform
from skimage import filters
import argparse
import cv2

# construct the argument parse and parse the arguments
ap = argparse.ArgumentParser()
ap.add_argument("-i", "--image", required=True,
	help="path to input image file")
ap.add_argument("-d", "--direction", type=str,
	default="vertical", help="seam removal direction")
args = vars(ap.parse_args())
Lines 2-5 import our required Python packages while Lines 8-13 parse our command line arguments. This script will require one argument followed by a second optional one:
- -- image : The path to the input image we want to apply seam carving to.
- -- direction : The direction in which we’ll apply seam carving. A value of vertical will adjust the image width while a value of horizontal will adjust the image height. We default the carving direction to vertical .
Next, let’s load our input image from disk, convert it to grayscale, and compute the Sobel gradient magnitude representation (i.e., our energy map):
# import the necessary packages
from skimage import transform
from skimage import filters
import argparse
import cv2

# construct the argument parse and parse the arguments
ap = argparse.ArgumentParser()
ap.add_argument("-i", "--image", required=True,
	help="path to input image file")
ap.add_argument("-d", "--direction", type=str,
	default="vertical", help="seam removal direction")
args = vars(ap.parse_args())

# load the image and convert it to grayscale
image = cv2.imread(args["image"])
gray = cv2.cvtColor(image, cv2.COLOR_BGR2GRAY)

# compute the Sobel gradient magnitude representation
# of the image -- this will serve as our "energy map"
# input to the seam carving algorithm
mag = filters.sobel(gray.astype("float"))

# show the original image
cv2.imshow("Original", image)
In order to apply seam carving we’ll be using the implementation inside the scikit-image library. The seam_carve function accepts four required parameters:
- The input image that we are applying seam carving to.
- An energy map.
- The direction in which we’ll be applying seam carving (either horizontal or vertical).
- The number of seams to remove. At this point in time the seam_carve function only supports downsampling images — no upsample support is provided.
To demonstrate seam carving in action, let’s loop over a number of seams to remove:
# import the necessary packages
from skimage import transform
from skimage import filters
import argparse
import cv2

# construct the argument parse and parse the arguments
ap = argparse.ArgumentParser()
ap.add_argument("-i", "--image", required=True,
	help="path to input image file")
ap.add_argument("-d", "--direction", type=str,
	default="vertical", help="seam removal direction")
args = vars(ap.parse_args())

# load the image and convert it to grayscale
image = cv2.imread(args["image"])
gray = cv2.cvtColor(image, cv2.COLOR_BGR2GRAY)

# compute the Sobel gradient magnitude representation
# of the image -- this will serve as our "energy map"
# input to the seam carving algorithm
mag = filters.sobel(gray.astype("float"))

# show the original image
cv2.imshow("Original", image)

# loop over a number of seams to remove
for numSeams in range(20, 140, 20):
	# perform seam carving, removing the desired number
	# of frames from the image -- `vertical` cuts will
	# change the image width while `horizontal` cuts will
	# change the image height
	carved = transform.seam_carve(image, mag, args["direction"],
		numSeams)
	print("[INFO] removing {} seams; new size: "
		"w={}, h={}".format(numSeams, carved.shape[1],
			carved.shape[0]))

	# show the output of the seam carving algorithm
	cv2.imshow("Carved", carved)
	cv2.waitKey(0)
We call the seam_carve function on Lines 33 and 34, removing the current number of numSeams .
The new carved image dimensions are printed to our terminal on Lines 35-37.
We also display the seam carved image to our screen on Lines 40 and 41.
Seam carving results
To give this seam carving example a try for yourself, be sure to download the source code and example image using the “Downloads” section at the bottom of this blog post.
From there, execute the following command:
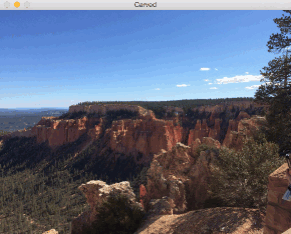
$ python seam_carving.py --image bryce_canyon.jpg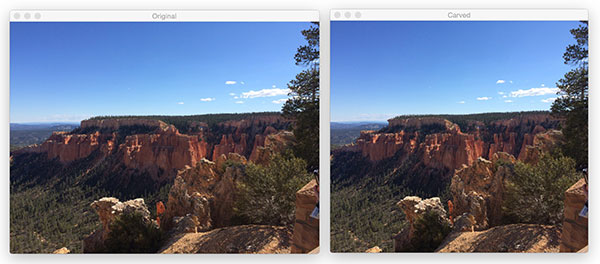
Figure 8: (Left) The original input image. (Right) Removing vertical seams from the image, thereby decreasing the image width.
On the left you can see the original input image — a photo of Bryce Canyon, one of the most beautiful National Parks to visit in the United States. Then on the right we have the seam carved image. As you can see, we have removed vertical seams from the image, thereby decreasing the image width.
We can reduce the image height by removing horizontal seams:
$ python seam_carving.py -- image bryce_canyon.jpg --direction horizontal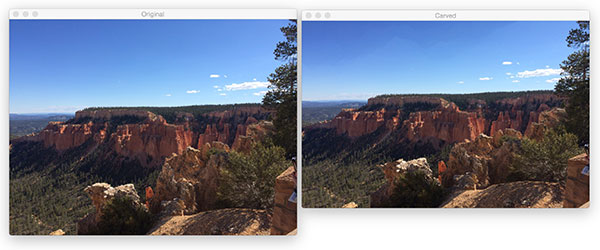
Figure 9: (Left) The original image. (Right) Removing horizontal seams from the image to decrease height.
I have also included a GIF animation below that demonstrates seam carving one pixel at a time to give you a better feel for the algorithm:
Figure 10: Applying seam carving to an image using OpenCV, Python, and scikit-image.
Summary
In today’s blog post I discussed the seminal seam carving algorithm used for content-aware resizing of images.
This is a classic algorithm in computer vision literature, so if you haven’t read the original publication, I suggest you add it to your reading list.
Inside the paper Avidan and Shimar demonstrate that seam carving can not only be used for reducing image size, but also for increasing image size as well; however, the scikit-image implementation currently only supports downsampling.
While this algorithm may have felt like “magic” to myself as an undergraduate, I eventually learned there is no such thing as magic in the computer vision world — every algorithm has its limitations.
For seam carving, these limitations often demonstrate themselves as less than visually appealing results where important semantic information of the image is partially destroyed or cut out entirely. A great example would be applying seam carving to an image that contains faces and seams from the faces are removed.
To get around this we can annotate our image to provide “hints” to the seam carving algorithm, ensuring the labeled regions are not cut during the seam carving process. In an ideal world, we could provide energy maps that better reflect the salient regions of the image we wish to keep, thereby requiring no modification to the actual seam carving algorithm.
Personally, I’m interested to see the future landscape of seam carving. With deep learning algorithms used for tasks such as saliency detection, these salient maps can then be used for seam carving. We may eventually see an end-to-end seam carving network.
Anyway, I hope you enjoyed the discussion of this classic computer vision paper!
To be notified when future blog posts go live, be sure to enter your email address in the form below.
