

前言
Fresco 库已经出来好长时间了,虽然我们的项目里也在用,但是一直没有时间去好好研究一下(吐槽:不是没有时间,是懒)。趁着项目迭代的间隙时间来好好了解一下这个库的使用,以便以后的使用有文档可寻。在这里也默默的决定以后要好好利用时间,多了解一些新的知识,转化为自己的东西。多说无益,直接开始。
Fresco 简介
我们首先介绍一下 Fresco 这个库。Fresco 是 FaceBook 开源的一个项目,是应用于图片加载的库,简称图片加载库。该库自带缓存,支持GIF,WebP,缩略图···图片的缓存管理对5.0以下支持的也很好。同时还支持很多的特效处理,一般的效果都可以实现。可惜的是只能使用该库自己的控件。Fresco 默认试用的 HttpURLConnection 作为网络层,我们也可以自己设置网络库,可以说非常方便。
相关文档推荐
Fresco 官方文档:www.fresco-cn.org/
Fresco 开源地址:github.com/facebook/fr…
Fresco 使用步骤
接下来我们一步一步的说明使用的步骤。
导包
compile 'com.facebook.fresco:fresco:1.1.0'
//如果支持 GIF 图需要导包,注意后面的版本号
compile 'com.facebook.fresco:animated-gif:0.12.0'
初始化
你只需要调用Fresco.initialize一次即可完成初始化,在 Application 里面做这件事再适合不过了(如下面的代码),注意多次的调用初始化是无意义的
初始化时,可以指定相应的缓存路径和使用的网络层,这个后面会讲,现在我们就可以进行试用了。
SimpleDraweeView 的使用
SimpleDraweeView 是 Fresco 最常使用的控件。这里先介绍一下 SimpleDraweeView 的基本属性:
XML属性     意义
fadeDuration     淡入淡出动画持续时间(单位:毫秒ms)
actualImageScaleType     实际图像的缩放类型
placeholderImage     占位图
placeholderImageScaleType     占位图的缩放类型
progressBarImage     进度图
progressBarImageScaleType     进度图的缩放类型
progressBarAutoRotateInterval     进度图自动旋转间隔时间(单位:毫秒ms)
failureImage     失败图
failureImageScaleType     失败图的缩放类型
retryImage     重试图
retryImageScaleType     重试图的缩放类型
backgroundImage     背景图
overlayImage     叠加图
pressedStateOverlayImage     按压状态下所显示的叠加图
roundAsCircle     设置为圆形图
roundedCornerRadius     圆角半径
roundTopLeft     左上角是否为圆角
roundTopRight     右上角是否为圆角
roundBottomLeft     左下角是否为圆角
roundBottomRight     右下角是否为圆角
roundingBorderWidth     圆形或者圆角图边框的宽度
roundingBorderColor     圆形或者圆角图边框的颜色
roundWithOverlayColor     圆形或者圆角图底下的叠加颜色(只能设置颜色)
viewAspectRatio     控件纵横比

缩放类型—ScaleType:
类型               描述
center             居中,无缩放
centerCrop         保持宽高比缩小或放大,使得两边都大于或等于显示边界。居中显示。
focusCrop          同centerCrop, 但居中点不是中点,而是指定的某个点
centerInside       使两边都在显示边界内,居中显示。如果图尺寸大于显示边界,则保持长宽比缩小图片。
fitCenter          保持宽高比,缩小或者放大,使得图片完全显示在显示边界内。居中显示
fitStart           同上。但不居中,和显示边界左上对齐
fitEnd             同fitCenter, 但不居中,和显示边界右下对齐
fitXY              不保存宽高比,填充满显示边界
none               如要使用tile mode显示, 需要设置为none
在使用中我们可以直接选择需要的属性进行加载图片
<com.facebook.drawee.view.SimpleDraweeView
    android:id="@+id/iv_test_one"
    android:layout_width="130dp"
    android:layout_height="130dp"
    fresco:placeholderImage="@mipmap/ic_launcher"/>
相应的我们需要加载显示图片
private SimpleDraweeView image1;
image1 = (SimpleDraweeView) findViewById(R.id.iv_test_one);
image1.setImageURI(url);
怎么样是不是很简单,当然这只是最简单和常用的方式,还有很多其他用法,下面我们会介绍。这里提醒一下,SimpleDraweeView 是不支持 wrap_content 的,具体原因请看官方文档。
加载网络图片(URL,RUI),本地图片(res,drawable,File,Asset)
接下来我们就各种情况下的图片进行加载显示。
Fresco 不支持相对路径的URI. 所有的 URI 都必须是绝对路径,并且带上该 URI 的 scheme。
下面是支持各种路径:
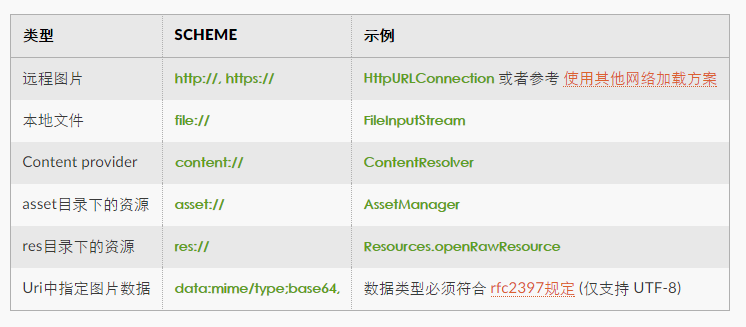
加载网络
simpleDraweeView.setImageURI("http://pic31.nipic.com/20130802/7487939_100434185000_2.jpg");加载本地
simpleDraweeView.setImageResource(R.drawable.local_image);
simpleDraweeView.setImageResource("res://"+ getPackageName() + "/" + R.drawable.local_image);
这里仅仅举几个例子,只要按照上面图片给的格式加载数据即可。
特殊效果处理
圆角图片设置
//通过 XML 进行设置
roundAsCircle     设置为圆形图
roundedCornerRadius     圆角半径
roundTopLeft     左上角是否为圆角
roundTopRight     右上角是否为圆角
roundBottomLeft     左下角是否为圆角
roundBottomRight     右下角是否为圆角
roundingBorderWidth     圆形或者圆角图边框的宽度
roundingBorderColor     圆形或者圆角图边框的颜色
roundWithOverlayColor     圆形或者圆角图底下的叠加颜色(只能设置颜色)

//设置一个圆角半径为1dp的四个角均为圆角的图片
<com.facebook.drawee.view.SimpleDraweeView
       android:id="@+id/iv_beauty_big_pic"
       android:layout_width="match_parent"
       android:layout_height="wrap_content"
       android:scaleType="centerCrop"
       fresco:fadeDuration="300"
       fresco:roundAsCircle="false"//设置圆形图片
       fresco:roundedCornerRadius="1dp"
       fresco:roundTopLeft="true"
       fresco:roundTopRight="true"
       fresco:roundBottomLeft="true"
       fresco:roundBottomRight="true"
       fresco:viewAspectRatio="1.33"
        />

//通过代码进行设置
/**
 * 加载任意圆角图片
 *
 * @param context
 * @param picUrl
 * @param simpleDraweeView
 * @param topLeft
 * @param topRight
 * @param bottomLeft
 * @param bottomRight
 */
public static void loadImage(Context context, String picUrl, final SimpleDraweeView simpleDraweeView, int topLeft, int topRight, int bottomLeft, int bottomRight) {
    Uri fileUri = Uri.parse(picUrl);
    RoundingParams params = RoundingParams.fromCornersRadii(
            DensityUtils.dip2px(context, topLeft),
            DensityUtils.dip2px(context, topRight),
            DensityUtils.dip2px(context, bottomLeft),
            DensityUtils.dip2px(context, bottomRight));
    GenericDraweeHierarchyBuilder builder = new GenericDraweeHierarchyBuilder(context.getResources());
    if (params != null) {
        builder.setRoundingParams(params);
    }
    GenericDraweeHierarchy hierarchy = builder
            .setFadeDuration(300)
            .setPlaceholderImage(cn.com.nggirl.commons.R.drawable.works_list_default_img)
            .setFailureImage(cn.com.nggirl.commons.R.drawable.works_list_default_img)
            .setRetryImage(cn.com.nggirl.commons.R.drawable.works_list_default_img)
            .setActualImageScaleType(ScalingUtils.ScaleType.CENTER_CROP)
            .build();

    final ImageRequest requestBuilder = ImageRequestBuilder.newBuilderWithSource(fileUri)
            .setProgressiveRenderingEnabled(true)
            .build();

    final DraweeController controller = Fresco.newDraweeControllerBuilder()
            .setImageRequest(requestBuilder)
            .setAutoPlayAnimations(true)
            .setTapToRetryEnabled(true)
            .build();
    simpleDraweeView.setHierarchy(hierarchy);
    simpleDraweeView.setController(controller);
}
从上面的圆角设置可以看出来其中的一些属性都是可以通过代码进行设置的。
fresco:roundAsCircle="true"//显示圆形图片高斯模糊
/**
 * 以高斯模糊显示。
 *
 * @param draweeView View。
 * @param url        url.
 * @param iterations 迭代次数,越大越魔化。
 * @param blurRadius 模糊图半径,必须大于0,越大越模糊。
 */
public static void loadImage(String url, SimpleDraweeView draweeView, int iterations, int blurRadius) {
    try {
        Uri uri = Uri.parse(url);
        ImageRequest request = ImageRequestBuilder.newBuilderWithSource(uri)
                .setPostprocessor(new IterativeBoxBlurPostProcessor(iterations, blurRadius))// iterations, blurRadius
                .build();
        AbstractDraweeController controller = Fresco.newDraweeControllerBuilder()
                .setOldController(draweeView.getController())
                .setImageRequest(request)
                .build();
        draweeView.setController(controller);
    } catch (Exception e) {
        e.printStackTrace();
    }
}
加载 GIF 图
/**
 * 加载 GIF 图
 * 注意一定要导入正确的包
 *
 * @param url
 * @param mSimpleDraweeView
 */
public static void loadImageGif(String url, SimpleDraweeView mSimpleDraweeView) {
    DraweeController controller = Fresco.newDraweeControllerBuilder()
            .setUri(Uri.parse(url))
            .setAutoPlayAnimations(true)
            .build();
    mSimpleDraweeView.setController(controller);
}
还有一些加载图片的效果,比如图片边框、过度图、加载失败的图、占位图等等效果,这里就需要我们根据自己的需要来进行组合处理。
如果需要直接加载 bitmap 图或者其他的图片源,请移步我的例子代码中。
高级设置
我们来说一下高级设置。
这里高级设置是指对缓存路径的设置和使用自己的网络加载库。
设置缓存路径
/**
 * 用于高级的初始化方法
 * 1、用于指定缓存的路径
 *  注意:指定缓存路径时需要考虑在 Android6.0 以后的运行时权限问题
 *  在设置缓存路径为 SDK 时,要进行判断手机是否有 SDK,如果没有则使用默认初始化
 *
 */
private void frescoInitWithCache() {
    Fresco.initialize(this, ImagePipelineConfig.newBuilder(this)
            .setMainDiskCacheConfig(DiskCacheConfig.newBuilder(this)
                    .setBaseDirectoryPath(new File(""))// 指定缓存路径
                    .build())
            .build());
}
设置使用 OKHttp 为网络加载层
/**
 * 2、用于网络加载的核心库
 *  注意:Fresco 默认使用 HttpURLConnection 作为网络层
 *  这里使用网络层为 Okhttp,导包为 com.facebook.fresco:imagepipeline-okhttp**
 */
private void frescoInitWithNet() {
    OkHttpClient okHttpClient = new OkHttpClient();
    Fresco.initialize(this, OkHttpImagePipelineConfigFactory
            .newBuilder(this, okHttpClient)
            .setMainDiskCacheConfig(DiskCacheConfig
                    .newBuilder(this)
                    .setBaseDirectoryPath(new File(""))// 指定缓存路径
                    .build())
            .build());
}
使用自己的网络加载器
/**
 * 3、使用自定义的网络库
 *  注意:在使用自己定义的网络库时官方推荐:
 *      为了完全控制网络层的行为,你可以自定义网络层。
 *      继承NetworkFetchProducer, 这个类包含了网络通信。
 *      你也可以选择性地继承FetchState, 这个类是请求时的数据结构描述。
 */
private void frescoInitWithCustomerNet() {
    Fresco.initialize(this, ImagePipelineConfig
            .newBuilder(this)
            .setNetworkFetcher(customerNetWork)// 这里传入自定义的网络层
            .build());
}
结语
这里已经包含了图片的最基本和常用的场景,感兴趣的同学可以看一下 Fresco 的源码。了解一下 Fresco 的实现原理,或者到 Fresco 的官方文档查看需求。
这里我们的 Fresco 的使用就要告一段落了,如果有一些新的使用方式,我会在例子代码中持续更新。如果帖子中有什么不对的地方,希望小伙伴们踊跃提出来,俺们一定虚心接受。技术水平有限,勿喷。
最后感谢提供参考文档作者,你们真心不容易啊。
