

Microservices with Node.js - 2 days of hands-on training in San Francisco. Delivered by Peter, RisingStack's CTO.
In this article we cover best practices for writing Node.js REST APIs, including topics like naming your routes, authentication, black-box testing & using proper cache headers for these resources.
One of the most popular use-cases for Node.js is to write RESTful APIs using it. Still, while we help our customers to find issues in their applications with Trace, our Node.js monitoring tool we constantly experience that developers have a lot of problems with REST APIs.
I hope these best-practices we use at RisingStack can help:
#1 - Use HTTP Methods & API Routes
Imagine, that you are building a Node.js RESTful API for creating, updating, retrieving or deleting users. For these operations HTTP already has the adequate toolset: POST, PUT, GET, PATCH or DELETE.
As a best practice, your API routes should always use nouns as resource identifiers. Speaking of the user's resources, the routing can look like this:
POST /userorPUT /user:/idto create a new user,GET /userto retrieve a list of users,GET /user/:idto retrieve a user,PATCH /user/:idto modify an existing user record,DELETE /user/:idto remove a user.
"API routes should always use nouns as resource identifiers!" via @RisingStack
#2 - Use HTTP Status Codes Correctly
If something goes wrong while serving a request, you must set the correct status code for that in the response:
2xx, if everything was okay,3xx, if the resource was moved,4xx, if the request cannot be fulfilled because of a client error (like requesting a resource that does not exist),5xx, if something went wrong on the API side (like an exception happened).
If you are using Express, setting the status code is as easy as res.status(500).send({error: 'Internal server error happened'}). Similarly with Restify: res.status(201).
For a full list, check the list of HTTP status codes
#3 - Use HTTP headers to Send Metadata
To attach metadata about the payload you are about to send, use HTTP headers. Headers like this can be information on:
- pagination,
- rate limiting,
- or authentication.
A list of standardized HTTP headers can be found here.
If you need to set any custom metadata in your headers, it was a best practice to prefix them with X. For example, if you were using CSRF tokens, it was a common (but non-standard) way to name them X-Csrf-Token. However
with RFC 6648 they got deprecated. New APIs should make their best effort to not use header names that can conflict with other applications. For example, OpenStack prefixes its headers
with OpenStack:
OpenStack-Identity-Account-ID
OpenStack-Networking-Host-Name
OpenStack-Object-Storage-Policy
Note that the HTTP standard does not define any size limit on the headers; however, Node.js (as of writing this article) imposes an 80KB size limit on the headers object for practical reasons.
" Don't allow the total size of the HTTP headers (including the status line) to exceed
HTTP_MAX_HEADER_SIZE. This check is here to protect embedders against denial-of-service attacks where the attacker feeds us a never-ending header that the embedder keeps buffering."From the Node.js HTTP parser
#4 - Pick the right framework for your Node.js REST API
It is important to pick the framework that suits your use-case the most.
Express, Koa or Hapi
Express, Koa and Hapi can be used to create browser applications, and as such, they support templating and rendering - just to name a few features. If your application needs to provide the user-facing side as well, it makes sense to go for them.
Restify
On the other hand, Restify is focusing on helping you build REST services. It exists to let you build "strict" API services that are maintainable and observable. Restify also comes with automatic DTrace support for all your handlers.
Restify is used in production in major applications like npm or Netflix.
#5 - Black-Box Test your Node.js REST APIs
One of the best ways to test your REST APIs is to treat them as black boxes.
Black-box testing is a method of testing where the functionality of an application is examined without the knowledge of its internal structures or workings. So none of the dependencies are mocked or stubbed, but the system is tested as a whole.
One of the modules that can help you with black-box testing Node.js REST APIs is supertest.
A simple test case which checks if a user is returned using the test runner mocha can be implemented like this:
const request = require('supertest')

describe('GET /user/:id', function() {
  it('returns a user', function() {
    // newer mocha versions accepts promises as well
    return request(app)
      .get('/user')
      .set('Accept', 'application/json')
      .expect(200, {
        id: '1',
        name: 'John Math'
      }, done)
  })
})
You may ask: how does the data gets populated into the database which serves the REST API?
In general, it is a good approach to write your tests in a way that they make as few assumptions about the state of the system as possible. Still, in some scenarios you can find yourself in a spot when you need to know what is the state of the system exactly, so you can make assertions and achieve higher test coverage.
So based on your needs, you can populate the database with test data in one of the following ways:
- run your black-box test scenarios on a known subset of production data,
- populate the database with crafted data before the test cases are run.
Of course, black-box testing does not mean that you don't have to do unit testing, you still have to write unit tests for your APIs.

Node.js Monitoring and Debugging from the Experts of RisingStack
Improve your REST APIs with Trace
Learn more#6 - Do JWT-Based, Stateless Authentication
As your REST APIs must be stateless, so does your authentication layer. For this, JWT (JSON Web Token) is ideal.
JWT consists of three parts:
- Header, containing the type of the token and the hashing algorithm
- Payload, containing the claims
- Signature (JWT does not encrypt the payload, just signs it!)
Adding JWT-based authentication to your application is very straightforward:
const koa = require('koa')
const jwt = require('koa-jwt')

const app = koa()

app.use(jwt({
  secret: 'very-secret'
}))

// Protected middleware
app.use(function *(){
  // content of the token will be available on this.state.user
  this.body = {
    secret: '42'
  }
})
After that, the API endpoints are protected with JWT. To access the protected endpoints, you have to provide the token in the Authorization header field.
curl --header "Authorization: Bearer eyJhbGciOiJIUzI1NiIsInR5cCI6IkpXVCJ9.eyJzdWIiOiIxMjM0NTY3ODkwIiwibmFtZSI6IkpvaG4gRG9lIiwiYWRtaW4iOnRydWV9.TJVA95OrM7E2cBab30RMHrHDcEfxjoYZgeFONFh7HgQ" my-website.com
One thing that you could notice is that the JWT module does not depend on any database layer. This is the case because all JWT tokens can be verified on their own, and they can also contain time to live values.
Also, you always have to make sure that all your API endpoints are only accessible through a secure connection using HTTPS.
In a previous article, we explained web authentication methods in details - I recommend to check it out!
#7 - Use Conditional Requests
Conditional requests are HTTP requests which are executed differently depending on specific HTTP headers. You can think of these headers as preconditions: if they are met, the requests will be executed in a different way.
"Conditional requests are executed differently depending on specific HTTP headers" via @RisingStack
These headers try to check whether a version of a resource stored on the server matches a given version of the same resource. Because of this reason, these headers can be:
- the timestamp of the last modification,
- or an entity tag, which differs for each version.
These headers are:
Last-Modified(to indicate when the resource was last modified),Etag(to indicate the entity tag),If-Modified-Since(used with theLast-Modifiedheader),If-None-Match(used with theEtagheader),
Let's take a look at an example!
The client below did not have any previous versions of the doc resource, so neither the If-Modified-Since, nor the If-None-Match header was applied when the resource was sent. Then, the server responds
with the Etag and Last-Modified headers properly set.
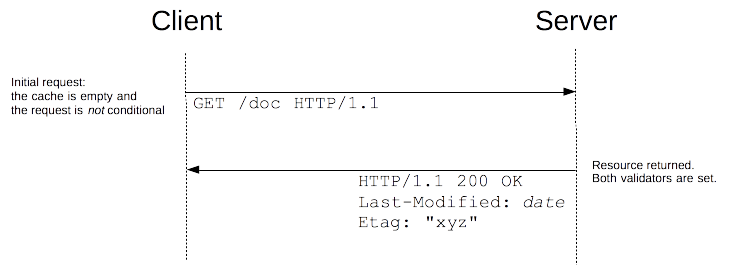
From the MDN Conditional request documentation
The client can set the If-Modified-Since and If-None-Match headers once it tries to request the same resource - since it has a version now. If the response would be the same, the server simply responds with the 304 - Not Modified status and does not send the resource again.
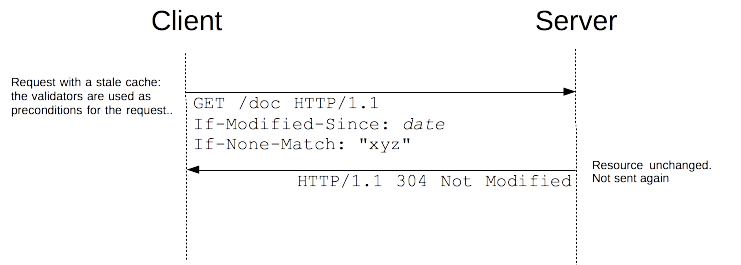
From the MDN Conditional request documentation
#8 - Embrace Rate Limiting
Rate limiting is used to control how many requests a given consumer can send to the API.
To tell your API users how many requests they have left, set the following headers:
X-Rate-Limit-Limit, the number of requests allowed in a given time intervalX-Rate-Limit-Remaining, the number of requests remaining in the same interval,X-Rate-Limit-Reset, the time when the rate limit will be reset.
Most HTTP frameworks support it out of the box (or with plugins). For example, if you are using Koa, there is the koa-ratelimit package.
Note, that the time window can vary based on different API providers - for example, GitHub uses an hour for that, while Twitter 15 minutes.
#9 - Create a Proper API Documentation
You write APIs so others can use them, benefit from them. Providing an API documentation for your Node.js REST APIs are crucial.
The following open-source projects can help you with creating documentation for your APIs:
Alternatively, if you want to use a hosted products, you can go for Apiary.
#10 - Don't Miss The Future of APIs
In the past years, two major query languages for APIs arose - namely GraphQL from Facebook and Falcor from Netflix. But why do we even need them?
Imagine the following RESTful resource request:
/org/1/space/2/docs/1/collaborators?include=email&page=1&limit=10
This can get out of hand quite easily - as you'd like to get the same response format for all your models all the time. This is where GraphQL and Falcor can help.
About GraphQL
GraphQL is a query language for APIs and a runtime for fulfilling those queries with your existing data. GraphQL provides a complete and understandable description of the data in your API, gives clients the power to ask for exactly what they need and nothing more, makes it easier to evolve APIs over time, and enables powerful developer tools. - Read more here.
About Falcor
Falcor is the innovative data platform that powers the Netflix UIs. Falcor allows you to model all your backend data as a single Virtual JSON object on your Node server. On the client, you work with your remote JSON object using familiar JavaScript operations like get, set, and call. If you know your data, you know your API. - Read more here.
Amazing REST APIs for Inspiration
If you are about to start developing a Node.js REST API or creating a new version of an older one, we have collected four real-life examples that are worth checking out:
I hope that now you have a better understanding of how APIs should be written using Node.js. Please let me know in the comments if you miss anything!

node.js tutorial best practices Node.js REST API Read more from us:
