

前提
最近在做一个关于Camera的app我们的ux设计师根据Snapchat设计了我现在正在做的app,刚开始打开Snapchat这个app的时候看他这个动画确实很炫酷,很多细节上面的动画,打开app的时候是在ios上的 我就怀疑android 是不是能实现一样的效果,于是仔细的观察了这个主页的布局方式和动画的效果。其实很好实现。下面我们来一一分析到底如何做到这样的动画。
原理分析
- 恶心的是,这个app需要翻墙你才能用,那我们仔细看一下他这个动画的过程
- 主页act 肯定是一个viewpager,然后三个fragment (我认为是两个fragment,第二个只是个透明的fragment,占个茅坑而已)
- 然后大家仔细看看当我在左右滑动的过程中,底部的三个icon 左右移动 放大缩小,同时还有一个icon 当我们移动到中间的时候会发现从底部移动上来了
- 同时backgroundcolor也跟着动态的变色。
- toolbar也是跟着不同的icon hide show title的改变。
- 然后就是中间拍照的时候 长安会出现 一行表情动态 改面部识别,点击每个icon 会有个从左往右 或相反的方向移动然后缩放。(这个功能也好做,一会慢慢讲解)
- 还有就是状态栏颜色的动态改变,过渡颜色
上图
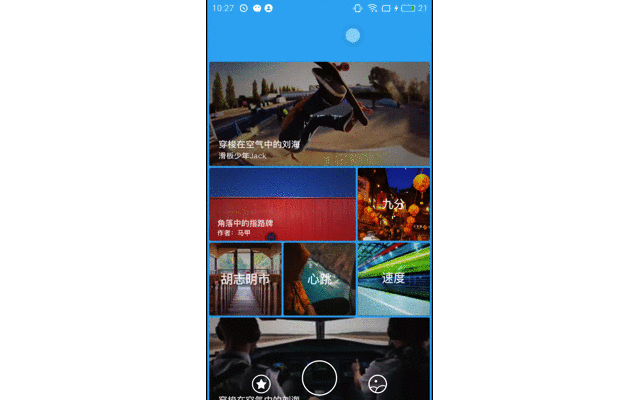
snapchat.gif
小伙子们感觉怎么样啊 是不是就是实现了你们想要的功能。
布局实现
- 最外层布局是ConstraintLayout 这个google提供的一个非常niubility的一个强大的RelativeLayout,如果还有小伙伴没有用过的话,强烈建议去mark一下,让你的布局适配所有机器ConstraintLayout学习链接分分钟学会
- 然后就是viewpager and 很多icon 相互协调做出来的。
- 主要有一个中间按个大icon 和下放的那个小icon 需要用一个相对布局包裹起来。
直接上布局文件 方便小伙伴的copy
<?xml version="1.0" encoding="utf-8"?>
<android.support.constraint.ConstraintLayout xmlns:android="http://schemas.android.com/apk/res/android"
    xmlns:app="http://schemas.android.com/apk/res-auto"
    xmlns:tools="http://schemas.android.com/tools"
    android:id="@+id/home_background"
    android:layout_width="match_parent"
    android:layout_height="match_parent"
    android:orientation="vertical">

    <android.support.v4.view.ViewPager
        android:id="@+id/viewPager"
        android:layout_width="0dp"
        android:layout_height="0dp"
        android:layout_marginTop="70dp"
        app:layout_constraintBottom_toBottomOf="parent"
        app:layout_constraintHorizontal_bias="1.0"
        app:layout_constraintLeft_toLeftOf="parent"
        app:layout_constraintRight_toRightOf="parent"
        app:layout_constraintTop_toTopOf="parent"
        app:layout_constraintVertical_bias="1.0" />


    <ImageView
        android:id="@+id/recommended"
        android:layout_width="100dp"
        android:layout_height="30dp"
        android:layout_margin="10dp"
        android:src="@drawable/choiceness_icon"
        app:layout_constraintBottom_toBottomOf="parent"
        app:layout_constraintLeft_toLeftOf="parent" />


    <android.support.constraint.Guideline
        android:id="@+id/guideline"
        android:layout_width="wrap_content"
        android:layout_height="wrap_content"
        android:orientation="horizontal"
        app:layout_constraintGuide_percent=".8" />


    <ImageView
        android:id="@+id/model_panorama"
        android:layout_width="70dp"
        android:layout_height="70dp"
        app:layout_constraintLeft_toLeftOf="parent"
        app:layout_constraintRight_toRightOf="parent"
        app:layout_constraintTop_toBottomOf="@id/guideline"
        app:srcCompat="@mipmap/panorama_model" />

    <ImageView
        android:id="@+id/model_capture"
        android:layout_width="70dp"
        android:layout_height="50dp"
        android:layout_marginTop="15dp"
        app:layout_constraintRight_toLeftOf="@id/model_panorama"
        app:layout_constraintTop_toBottomOf="@id/guideline"
        app:srcCompat="@mipmap/capture_model" />


    <ImageView
        android:id="@+id/model_record"
        android:layout_width="70dp"
        android:layout_height="50dp"
        android:layout_marginTop="15dp"
        app:layout_constraintLeft_toRightOf="@+id/model_panorama"
        app:layout_constraintTop_toBottomOf="@id/guideline"
        app:srcCompat="@mipmap/record_model" />


    <ImageView
        android:id="@+id/gallery"
        android:layout_width="100dp"
        android:layout_height="30dp"
        android:layout_margin="10dp"
        android:src="@drawable/gallery_icon"
        app:layout_constraintBottom_toBottomOf="parent"
        app:layout_constraintRight_toRightOf="parent" />


    <RelativeLayout
        android:id="@+id/container"
        android:layout_width="wrap_content"
        android:layout_height="150dp"
        app:layout_constraintLeft_toLeftOf="parent"
        app:layout_constraintRight_toRightOf="parent"
        app:layout_constraintTop_toBottomOf="@id/guideline">

        <ImageView
            android:id="@+id/camera"
            android:layout_width="70dp"
            android:layout_height="70dp"
            android:layout_alignParentStart="true"
            android:layout_alignParentTop="true"
            android:src="@drawable/circle_sp" />

        <ImageView
            android:layout_marginTop="10dp"
            android:layout_width="30dp"
            android:layout_height="30dp"
            android:src="@drawable/circle_sp"
            android:layout_below="@+id/camera"
            android:layout_centerHorizontal="true" />

    </RelativeLayout>


</android.support.constraint.ConstraintLayout>
看到了吧,ImageView viewpager RelativeLayout 几个布局嵌套就完成了这个Snapchat的叼叼的动画效果,我也很懵逼,分析一下确实这样。看起来很牛啊,其实实现起来很简单,有需求的小伙伴可以去试试。那么布局实现了 肯定最主要的当然是在代码中了。不废话,来让我们codeing吧
代码
可能我的代码会比较乱,因为当初是想着写个demo看看效果的,所以就demo级别的代码。
- 那么我们来解决原理分析中的第一个问题 viewpager中的fragment和三个fragment吧,这没有什么含金量。就是写个list集合添加到viewpager得adapter里面,然后把第二个fragment设置为透明状态。over
- 第二个问题是,左右滑动icon的移动变大缩放的过程。大家想一想我们正常的view 是不是可以设置padding。那么padding是干嘛的。内边距。好的进入主题。你设置了一个icon的宽高固定后。然后在设置相应的padding是不是对于的是不是相应的宽高就就会被padding 占了,icon这不就边小了吗?设置左右padding 这不就位移了吗?那么问题来了
- 怎么才能控制滑动过程中padding的动态改变呢,这个不废话吗,viewpager干嘛的 viewpager是不是有addOnPageChangeListener这个方法,这个回调中是不是🈶onPageScrolled(int position, float positionOffset, int positionOffsetPixels)这个方法,我们稍微滑动一下,这里面的值都是一致在改变的,这就是设置动态设置padding的原理 获取当前滑动的距离,做一下参数的调整即可实现第二个问题要做的事
- 第三个问题backgroundcolor的颜色改变。和上面第二个问题一样。设置初始值startcolor 和endColor 来根据滑动的距离来得到当前的颜色。不懂原理的可以看一下我的另一篇文章:彩虹进度条
- toolbar的颜色改变也是一样,设置alpha的值0-1 来动态的改变
- 那么最后一个问题也是一样通过这个三方工具可以简单的实现这个功能,问题四已经拿到了color
- 问题解决思路是这样下面我就直接把代码逻辑copy上了有不懂得可以留言
代码
  viewPager.addOnPageChangeListener(new ViewPager.OnPageChangeListener() {


            @Override
            public void onPageScrolled(int position, float positionOffset, int positionOffsetPixels) {
                float widthOfPagers = viewPager.getWidth() * (adapter.getCount() - 1);
                float top = 160.0f;
                float LeftRight = 20.0f;
                float alpha = 1.0f;

                float ratioTop = top / viewPager.getWidth();
                float ratioLeftRight = LeftRight / viewPager.getWidth();
                float ratioAlpha = alpha/viewPager.getWidth();
                // 当前Pager的滑动距离
                float currentPosOfPager = position * viewPager.getWidth() + positionOffsetPixels;

                if (position >= 1) {
                    startColor = Color.parseColor("#9D52CB");
                    endColor = Color.parseColor("#ffffff");
                    currentPosOfPager = widthOfPagers - currentPosOfPager;

                } else {
                    startColor = Color.parseColor("#08A9F3");
                    endColor = Color.parseColor("#ffffff");
                }


                float sizeTop = (currentPosOfPager * ratioTop);
                float sizeLeftRight = (currentPosOfPager * ratioLeftRight);
                float sizeAlpha = currentPosOfPager * ratioAlpha;

                container.setPadding(0, ((int) (top - sizeTop)), 0, 0);
                camera.setPadding(((int) (LeftRight - sizeLeftRight)), ((int) (LeftRight - sizeLeftRight)), ((int) (LeftRight - sizeLeftRight)), ((int) (LeftRight - sizeLeftRight)));

                recommended.setPadding(((int) (top - sizeTop)), 0, 0, 0);
                gallery.setPadding(0, 0, ((int) (top - sizeTop)), 0);

                float progress = (currentPosOfPager / ((float) viewPager.getWidth())) * 100.0f;
                LogUtil.e(progress);
                int currentColor = getCurrentColor((int) progress);
                homeBackground.setBackgroundColor(currentColor);
                StatusBarUtil.setColor(mContext, currentColor, 0);

                modelCapture.setAlpha(sizeAlpha);
                modelPanorama.setAlpha(sizeAlpha);
                modelRecord.setAlpha(sizeAlpha);
                LogUtil.e("    "+currentColor);

            }

            @Override
            public void onPageSelected(int position) {
                if (position == 1){
                    modelCapture.setVisibility(View.VISIBLE);
                    modelRecord.setVisibility(View.VISIBLE);
                    modelPanorama.setVisibility(View.VISIBLE);
                }else{
                    modelCapture.setVisibility(View.GONE);
                    modelRecord.setVisibility(View.GONE);
                    modelPanorama.setVisibility(View.GONE);
                }
            }

            @Override
            public void onPageScrollStateChanged(int state) {

            }
        });
这个就是核心代码。根据上面的讲解然后在看这段代码的话应该很快的了解到原理实现。
ending
好了,基本的逻辑和布局上面已经都考出来了,我就不上传github了,小伙伴们copy 一下功能就能完成了。今天就到这里了。88
