引入
透明状态栏是 Android apps 中经常需要实现的一种效果,很长一段时间,开发者都要为不同版本的适配而头痛,自 Android 4.4 KitKat 以来,系统中就已经提供修改状态栏(SystemUI)显示行为的选项了。其中带来的一个最令人困惑的问题就是 fitsSystemWindows 这个属性究竟该如何使用。
我们知道,给 Activity 设置透明状态栏十分简单,使用下面的 code snippet 就可以了:
if (Build.VERSION.SDK_INT >= Build.VERSION_CODES.LOLLIPOP) {
    Window window = getWindow();
    window.clearFlags(WindowManager.LayoutParams.FLAG_TRANSLUCENT_STATUS);
    window.addFlags(WindowManager.LayoutParams.FLAG_DRAWS_SYSTEM_BAR_BACKGROUNDS);
    window.getDecorView().setSystemUiVisibility(View.SYSTEM_UI_FLAG_LAYOUT_FULLSCREEN
            | View.SYSTEM_UI_FLAG_LAYOUT_STABLE);
    window.setStatusBarColor(Color.TRANSPARENT);
}
它相较于直接在 style.xml 中定义样式的好处就是不会有一个 scrim(不知道怎么翻译好,就是那个半透明的遮罩)。但只做这个工作就会导致下面这个情况:

内容与状态栏区域重叠了!通常,大多数人会在布局中加一个:
android:fitsSystemWindows="true"然后状态栏就显示正常了,但这还取决于布局,有的布局类直接加这个属性可能就不 work,尤其是 CoordinatorLayout 相关的布局,让人感觉这个属性很迷。确实,没有分析源码的时候我也很困惑。但经过简单的分析,一切都不是秘密。
初步分析
首先要想搞清楚这个属性的作用,我们就要到类中看看设置相关属性后到底会发生什么变化,于是找到 View 类的 setFitsSystemWindows 方法:
public void setFitsSystemWindows(boolean fitSystemWindows) {
    setFlags(fitSystemWindows ? FITS_SYSTEM_WINDOWS : 0, FITS_SYSTEM_WINDOWS);
}
额,好吧,其实经过继续跟踪之后,改变这个 flag 根本不会造成 View 的重新布局和 invalidate,所以这个属性一定是要在布局发生之前设置好的。但是看方法文档可以发现,这个属性与一个名为 fitSystemWindows 的方法密切相关,看一下:
protected boolean fitSystemWindows(Rect insets) {
    if ((mPrivateFlags3 & PFLAG3_APPLYING_INSETS) == 0) {
        if (insets == null) {
            // Null insets by definition have already been consumed.
            // This call cannot apply insets since there are none to apply,
            // so return false.
            return false;
        }
        // If we're not in the process of dispatching the newer apply insets call,
        // that means we're not in the compatibility path. Dispatch into the newer
        // apply insets path and take things from there.
        try {
            mPrivateFlags3 |= PFLAG3_FITTING_SYSTEM_WINDOWS;
            return dispatchApplyWindowInsets(new WindowInsets(insets)).isConsumed();
        } finally {
            mPrivateFlags3 &= ~PFLAG3_FITTING_SYSTEM_WINDOWS;
        }
    } else {
        // We're being called from the newer apply insets path.
        // Perform the standard fallback behavior.
        return fitSystemWindowsInt(insets);
    }
}这里面涉及一个转发修正的问题,我们这里先不去管它,直接看真正的实现fitSystemWindowsInt:
private boolean fitSystemWindowsInt(Rect insets) {
    if ((mViewFlags & FITS_SYSTEM_WINDOWS) == FITS_SYSTEM_WINDOWS) {
        mUserPaddingStart = UNDEFINED_PADDING;
        mUserPaddingEnd = UNDEFINED_PADDING;
        Rect localInsets = sThreadLocal.get();
        if (localInsets == null) {
            localInsets = new Rect();
            sThreadLocal.set(localInsets);
        }
        boolean res = computeFitSystemWindows(insets, localInsets);
        mUserPaddingLeftInitial = localInsets.left;
        mUserPaddingRightInitial = localInsets.right;
        internalSetPadding(localInsets.left, localInsets.top,
                localInsets.right, localInsets.bottom);
        return res;
    }
    return false;
}可以看到,fitsSystemWindows 这个属性在这发挥了用武之地,如果设置了这个属性,那么就会有一个 padding 的设置,那这个 padding 来自哪,它是什么,现在还不得而知,这里就预计是状态栏的区域吧。padding 有什么用呢,ViewGroup 的一些子类在 measure 和 layout 的时候会获取 super 中与 padding 相关的成员变量来做布局上的调整,这就可以实现避开状态栏的问题了。
但是,上述方法的调用时机究竟是什么时候呢,我们可以通过 IDE 中强大的 Find Usages 来反向推导一下。最后发现它是由一个名为 dispatchApplyWindowInsets 的方法调用的,而且通过参数传了一个 WindowInsets 对象,这是什么鬼,我们后面就会讲到。在此之前我们断点打一下,看看这个方法是怎么被调用起来的:

原来是 ViewRootImpl 发起的,这个类很重要,实现了很多 View
与 WindowManager 的交互,这里 ViewRootImpl somehow 拿到了一个 WindowInsets 对象,这个对象大家可以看看文档,就是包含了一些系统所占用的区域,这些区域可以被消耗掉,并且消耗之后返回的是一个全新的对象,这句话请谨记。
有关状态栏的高度包含在这个对象中无疑了,为了日后的扩展性,这个对象可能还会新增更多的 insets 类型,但就目前而言,仅限于状态栏和圆形手表上的一些特殊模式。
好,我们继续分析上面提到的那个方法:
public WindowInsets dispatchApplyWindowInsets(WindowInsets insets) {
    try {
        mPrivateFlags3 |= PFLAG3_APPLYING_INSETS;
        if (mListenerInfo != null && mListenerInfo.mOnApplyWindowInsetsListener != null) {
            return mListenerInfo.mOnApplyWindowInsetsListener.onApplyWindowInsets(this, insets);
        } else {
            return onApplyWindowInsets(insets);
        }
    } finally {
        mPrivateFlags3 &= ~PFLAG3_APPLYING_INSETS;
    }
}
可以看到,这里不管设没设置 fitsSystemWindows 属性,都会激发一个 onApplyWindowInsets 回调,并且这个回调还可以通过 Listener 设置,有点意思。当然了,默认的回调实现的功能上面已经分析过了。
到现在为止貌似就可以解释为什么设置 fitsSystemWindows 属性后,绝大部分布局就可以避开状态栏了。但是不知道你有没有发现 CoordinatorLayout 会在状态栏下面画一个底色?FrameLayout 就没有这个特技,看来 CoordinatorLayout 的处理方式并非一个简单的 padding,肯定有自己的实现逻辑。
我们去它的源码找找看:
@Override
    public void setFitsSystemWindows(boolean fitSystemWindows) {
    super.setFitsSystemWindows(fitSystemWindows);
    setupForInsets();
}
直奔 setupForInsets:
private void setupForInsets() {
    if (Build.VERSION.SDK_INT < 21) {
        return;
    }

    if (ViewCompat.getFitsSystemWindows(this)) {
        if (mApplyWindowInsetsListener == null) {
            mApplyWindowInsetsListener =
                    new android.support.v4.view.OnApplyWindowInsetsListener() {
                        @Override
                        public WindowInsetsCompat onApplyWindowInsets(View v,
                                WindowInsetsCompat insets) {
                            return setWindowInsets(insets);
                        }
                    };
        }
        // First apply the insets listener
        ViewCompat.setOnApplyWindowInsetsListener(this, mApplyWindowInsetsListener);

        // Now set the sys ui flags to enable us to lay out in the window insets
        setSystemUiVisibility(View.SYSTEM_UI_FLAG_LAYOUT_STABLE
                | View.SYSTEM_UI_FLAG_LAYOUT_FULLSCREEN);
    } else {
        ViewCompat.setOnApplyWindowInsetsListener(this, null);
    }
}
这段代码可以说就是 View 需要自定义 fitsSystemWindows 行为的标准范式。核心的处理逻辑就在 setWindowInsets 这个方法中:
final WindowInsetsCompat setWindowInsets(WindowInsetsCompat insets) {
    if (!objectEquals(mLastInsets, insets)) {
        mLastInsets = insets;
        mDrawStatusBarBackground = insets != null && insets.getSystemWindowInsetTop() > 0;
        setWillNotDraw(!mDrawStatusBarBackground && getBackground() == null);

        // Now dispatch to the Behaviors
        insets = dispatchApplyWindowInsetsToBehaviors(insets);
        requestLayout();
    }
    return insets;
}
知道状态栏下面的背景怎么来的了吧。
到这里理顺一下思路: fitsSystemWindows 与 onApplyWindowInsets 关系十分密切,后者将系统给出的 WindowInsets 派发给 View 让其根据前者这个属性来做自己的布局和绘制逻辑。
进阶应用
这一部分我们来讨论一下 WindowInsets 这个类,它有一个很重要的概念:consume。
这个概念重要到什么程度呢?如果你搞不懂 consume 和其 immutability,你自己的布局或者自定义 View 基本就爆炸了。
当一个 View 的 dispatchApplyWindowInsets 被调用时,它需要对 WindowInsets 对象作出响应,然后将处理的结果返回,处理结果基本就两种:
- 你消耗了这个 insets,这时其它 View 收到的 insets 就是 0。
- 你不想消耗 insets,那么其它 View 将继续响应一开始的 insets 值。
还有一种特殊的情况:你返回了消耗过的 insets,但保存了一份原始 insets 引用,这时这个视图的兄弟视图和其兄弟视图的子视图就会收到值为 0 的 insets,而这个视图可以根据情况让它的子视图收到一个原始未消耗的 insets,这也是 DrawerLayout 所做的事情,想搞清它这么做的原因,本文就讲不完了,我后期可能会再开一篇文章分析。
讲这么多有没有
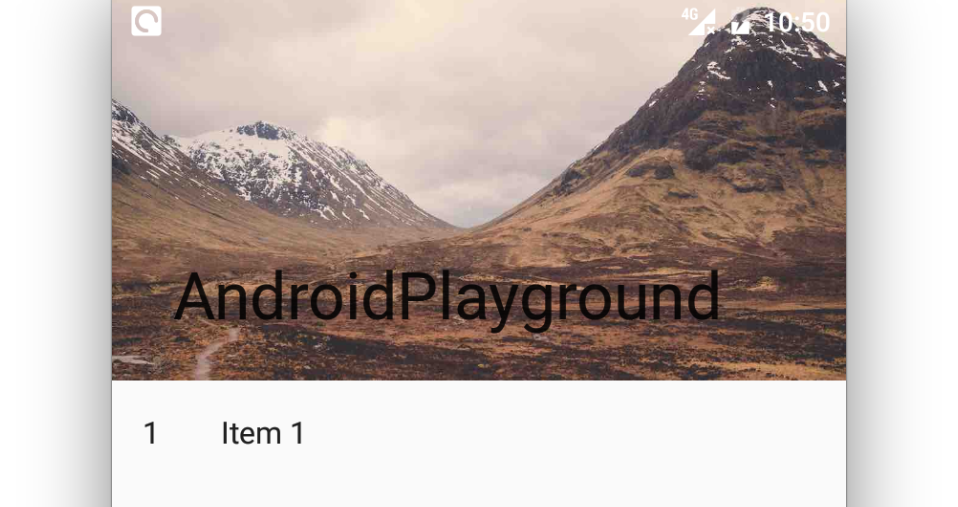
🌰 呢?当然有,先看下面的效果:

显然,这是 CoordinatorLayout 配合 CollapsingToolbarLayout 实现的,但是这里给 CoordinatorLayout 加 fitsSystemWindows 就不灵了,它会吃掉状态栏的位置,然后画个背景色,我们的图片就不能垫在状态栏底下了,我通过分析各个类(这块真是花了很多时间),发现 AppBarLayout 也实现了 fitsSystemWindows 的自定义行为(毕竟放在它里面的 CollapsingToolbarLayout 有一个 statusBarScrim 属性),但是给它加上这个属性以后,图片依然会被挤下去。
怎么办呢?就在我扫荡 CollapsingToolbarLayout 的源码的时候发现了下面这段逻辑:
@Override
protected void onLayout(boolean changed, int left, int top, int right, int bottom) {
    super.onLayout(changed, left, top, right, bottom);

    if (mLastInsets != null) {
        // Shift down any views which are not set to fit system windows
        final int insetTop = mLastInsets.getSystemWindowInsetTop();
        for (int i = 0, z = getChildCount(); i < z; i++) {
            final View child = getChildAt(i);
            if (!ViewCompat.getFitsSystemWindows(child)) {
                if (child.getTop() < insetTop) {
                    // If the child isn't set to fit system windows but is drawing within
                    // the inset offset it down
                    ViewCompat.offsetTopAndBottom(child, insetTop);
                }
            }
        }
    }

    ...
}
这就是说,如果 CollapsingToolbarLayout 的某个子视图开启了 fitsSystemWindows 这个属性,那么它就会被填满父视图,否则,它就会被下移 top inset 的距离。那这个问题的解决方法就很明显了,直接给 ImageView 加一个 fitsSystemWindows,完事了。
不得不感叹 Android 设计的精巧。
在我这么做之前,我看了市面上 99% 的 app 都是用了很“暴力”的方式解决,强行算状态栏高度,然后设置 margin,很不优雅,实际上 Android 已经为我们考虑地十分周全了,很多效果基本都可以用原生的方式实现,就看你会不会做了,如何发现这些小技巧,还是要靠源码分析。
那么最后给大家留一个小小的 homework,可否给我们的图片在状态栏的位置加一个 scrim?(hint:可以参考 NavigationView)
推广信息
如果你对我的 Android 源码分析系列文章感兴趣,可以点个 star 哦,我会持续不定期更新文章。