

声明:内容整理自
感谢各位博主的无私分享。各位博主已经写的很好,个人做了一些梳理和补充,方便日后回顾。持续更新本文。
Google Protocol Buffer
引用自:Caffe代码解析(2) - Google Protocol Buffer
在Caffe中定义一个网络是通过编辑一个prototxt文件来完成的,一个简单的网络定义文件如下:
1 name: "ExampleNet"
 2 layer {
 3   name: "data"
 4   type: "Data"


 5   top: "data"
 6   top: "label"
 7   data_param {
 8     source: "path/to/train_database"
 9     batch_size: 64
10     backend: LMDB
11   }
12 }
13 layer {
14   name: "conv1"
15   type: "Convolution"
16   bottom: "data"
17   top: "conv1"
18   convolution_param {
19     num_output: 20
20     kernel_size: 5
21     stride: 1
22   }
23 }
24 layer {
25   name: "ip1"
26   type: "InnerProduct"
27   bottom: "conv1"
28   top: "ip1"
29   inner_product_param {
30     num_output: 500
31   }
32 }
33 layer {
34   name: "loss"
35   type: "SoftmaxWithLoss"
36   bottom: "ip1"
37   bottom: "label"
38   top: "loss"
39 }
这个网络定义了一个name为ExampleNet的网络,这个网络的输入数据是LMDB数据,batch_size为64,包含了一个卷积层和一个全连接层,训练的loss function为SoftmaxWithLoss。通过这种简单的key: value描述方式,用户可以很方便的定义自己的网络,利用Caffe来训练和测试网络,验证自己的想法。
Caffe中定义了丰富的layer类型,每个类型都有对应的一些参数来描述这一个layer。为了说明的方便,接下来将通过一个简单的例子来展示Caffe是如何使用Google Protocol Buffer来完成Solver和Net的定义。
首先我们需要了解Google Protocol Buffer定义data schema的方式,Google Protocol Buffer通过一种类似于C++的语言来定义数据结构,下面是官网上一个典型的AddressBook例子:
 1 // AddressBook.proto
 2 package tutorial;
 3
 4 message Person {
 5   required string name = 1;
 6   required int32 id = 2;
 7   optional string email = 3;
 8
 9   enum PhoneType {
10     MOBILE = 0;
11     HOME = 1;
12     WORK = 2;
13   }
14
15   message PhoneNumber {
16     required string number = 1;
17     optional PhoneType type = 2 [default = HOME];
18   }
19
20   repeated PhoneNumber phone = 4;
21 }
22
23 message AddressBook {
24   repeated Person person = 1;
25 }
第2行的package tutorial类似于C++里的namespace,message可以简单的理解为一个class,message可以嵌套定义。每一个field除了一般的int32和string等类型外,还有一个属性来表明这个field是required,optional或者’repeated’。required的field必须存在,相对应的optional的就可以不存在,repeated的field可以出现0次或者多次。这一点对于Google Protocol Buffer的兼容性很重要,比如新版本的AddressBook添加了一个string类型的field,只有把这个field的属性设置为optional,就可以保证新版本的代码读取旧版本的数据也不会出错,新版本只会认为旧版本的数据没有提供这个optional field,会直接使用default。同时我们也可以定义enum类型的数据。每个field等号右侧的数字可以理解为在实际的binary encoding中这个field对应的key值,通常的做法是将经常使用的field定义为0-15的数字,可以节约存储空间(涉及到具体的encoding细节,感兴趣的同学可以看看官网的解释),其余的field使用较大的数值。
类似地在caffe/src/caffe/proto/中有一个caffe.proto文件,其中对layer的部分定义为:
1 message LayerParameter {
2   optional string name = 1; // the layer name
3   optional string type = 2; // the layer type
4   repeated string bottom = 3; // the name of each bottom blob
5   repeated string top = 4; // the name of each top blob
6 //  other fields
7 }
在定义好了data schema之后,需要使用protoc compiler来编译定义好的proto文件。常用的命令为:
protoc -I=/protofile/directory –cpp_out=/output/directory /path/to/protofile
-I之后为proto文件的路径,--cpp_out为编译生成的.h和.cc文件的路径,最后是proto文件的路径。编译之后会生成AddressBook.pb.h和AddressBook/pb.cc文件,其中包含了大量的接口函数,用户可以利用这些接口函数获取和改变某个field的值。对应上面的data schema定义,有这样的一些接口函数:
 1 // name
 2 inline bool has_name() const;
 3 inline void clear_name();
 4 inline const ::std::string& name() const;  //getter
 5 inline void set_name(const ::std::string& value);  //setter
 6 inline void set_name(const char* value);  //setter
 7 inline ::std::string* mutable_name();
 8
 9 // email
10 inline bool has_email() const;
11 inline void clear_email();
12 inline const ::std::string& email() const; //getter
13 inline void set_email(const ::std::string& value);  //setter
14 inline void set_email(const char* value);  //setter
15 inline ::std::string* mutable_email();
16
17 // phone
18 inline int phone_size() const;
19 inline void clear_phone();
20 inline const ::google::protobuf::RepeatedPtrField< ::tutorial::Person_PhoneNumber >& phone() const;
21 inline ::google::protobuf::RepeatedPtrField< ::tutorial::Person_PhoneNumber >* mutable_phone();
22 inline const ::tutorial::Person_PhoneNumber& phone(int index) const;
23 inline ::tutorial::Person_PhoneNumber* mutable_phone(int index);
24 inline ::tutorial::Person_PhoneNumber* add_phone();
每个类都有对应的setter和getter,因为phone是repeated类型的,所以还多了通过index来获取和改变某一个元素的setter和getter,phone还有一个获取数量的phone_size函数。
官网上的tutorial是通过bool ParseFromIstream(istream* input);来从binary的数据文件里解析数据,为了更好地说明Caffe中读取数据的方式,我稍微修改了代码,使用了和Caffe一样的方式通过TextFormat::Parse来解析文本格式的数据。具体的代码如下:
#include <iostream>
#include <fstream>
#include <string>
#include <algorithm>
#include <stdint.h>
#include <fcntl.h>
#include <unistd.h>
#include <google/protobuf/io/coded_stream.h>
#include <google/protobuf/io/zero_copy_stream_impl.h>
#include <google/protobuf/text_format.h>
#include "addressBook.pb.h"

using namespace std;
using google::protobuf::io::FileInputStream;
using google::protobuf::io::FileOutputStream;
using google::protobuf::io::ZeroCopyInputStream;
using google::protobuf::io::CodedInputStream;
using google::protobuf::io::ZeroCopyOutputStream;
using google::protobuf::io::CodedOutputStream;
using google::protobuf::Message;

// Iterates though all people in the AddressBook and prints info about them.
void ListPeople(const tutorial::AddressBook& address_book) {
  for (int i = 0; i < address_book.person_size(); i++) {
    const tutorial::Person& person = address_book.person(i);

    cout << "Person ID: " << person.id() << endl;
    cout << "  Name: " << person.name() << endl;
    if (person.has_email()) {
      cout << "  E-mail address: " << person.email() << endl;
    }

    for (int j = 0; j < person.phone_size(); j++) {
      const tutorial::Person::PhoneNumber& phone_number = person.phone(j);

      switch (phone_number.type()) {
        case tutorial::Person::MOBILE:
          cout << "  Mobile phone #: ";
          break;
        case tutorial::Person::HOME:
          cout << "  Home phone #: ";
          break;
        case tutorial::Person::WORK:
          cout << "  Work phone #: ";
          break;
      }
      cout << phone_number.number() << endl;
    }
  }
}

// Main function:  Reads the entire address book from a file and prints all
//   the information inside.
int main(int argc, char* argv[]) {
  // Verify that the version of the library that we linked against is
  // compatible with the version of the headers we compiled against.
  GOOGLE_PROTOBUF_VERIFY_VERSION;

  if (argc != 2) {
    cerr << "Usage:  " << argv[0] << " ADDRESS_BOOK_FILE" << endl;
    return -1;
  }

  tutorial::AddressBook address_book;

  {
    // Read the existing address book.
    int fd = open(argv[1], O_RDONLY);
    FileInputStream* input = new FileInputStream(fd);
    if (!google::protobuf::TextFormat::Parse(input, &address_book)) {
      cerr << "Failed to parse address book." << endl;
      delete input;
      close(fd);
      return -1;
    }
  }

  ListPeople(address_book);

  // Optional:  Delete all global objects allocated by libprotobuf.
  google::protobuf::ShutdownProtobufLibrary();

  return 0;
}
读取和解析数据的代码:
1 int fd = open(argv[1], O_RDONLY);
2 FileInputStream* input = new FileInputStream(fd);
3 if (!google::protobuf::TextFormat::Parse(input, &address_book)) {
4   cerr << "Failed to parse address book." << endl;
5 }
这一段代码将input解析为我们设计的数据格式,写入到address_book中。之后再调用ListPeople函数输出数据,来验证数据确实是按照我们设计的格式来存储和读取的。ListPeople函数中使用了之前提到的各个getter接口函数。
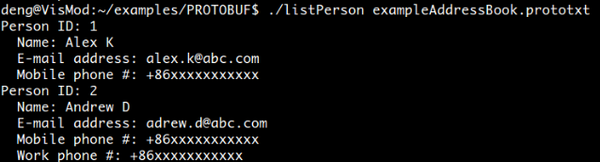
1 # ExampleAddressBook.prototxt 2 person { 3 name: "Alex K" 4 id: 1 5 email: "kongming.liang@abc.com" 6 phone { 7 number: "+86xxxxxxxxxxx" 8 type: MOBILE 9 } 10 } 11 12 person { 13 name: "Andrew D" 14 id: 2 15 email: "xuesong.deng@vipl.ict.ac.cn" 16 phone { 17 number: "+86xxxxxxxxxxx" 18 type: MOBILE 19 } 20 phone { 21 number: "+86xxxxxxxxxxx" 22 type: WORK 23 } 24 }上面的文件的解析结果如图所示:&amp;amp;amp;amp;amp;lt;img src="https://pic1.zhimg.com/v2-04a5242bcc52aacb685e664cfc8a4be4_b.png" data-rawwidth="638" data-rawheight="172" class="origin_image zh-lightbox-thumb" width="638" data-original="https://pic1.zhimg.com/v2-04a5242bcc52aacb685e664cfc8a4be4_r.png"&amp;amp;amp;amp;amp;gt;

另外可以参考这篇:Google Protocol Buffer 的使用和原理
Google Flags
从Caffe官网中可以看到,caffe的Command Line Interfaces一共提供了四个功能:train/test/time/device_query,而Interfaces的输入除了这四种功能还可以输入诸如-solver/-weights/-snapshot/-gpu等参数。这些参数的解析是通过Google Flags这个工具来完成的。
在caffe.cpp(位于/CAFFE_ROOT/tools/caffe.cpp)的开头,我们可以看到很多这样的宏:
DEFINE_string(gpu, "",
    "Optional; run in GPU mode on given device IDs separated by ','."
    "Use '-gpu all' to run on all available GPUs. The effective training "
    "batch size is multiplied by the number of devices.");
这个宏的使用方式为DEFINE_xxx(name, default_value, instruction);,这样就定义了一个xxx类型名为FLAGS_name的标志,如果用户没有在Command Line中提供其值,那么会默认为default_value,instruction是这个标志含义的说明。因此,上面的代码定义了一个string类型的名为FLAGS_gpu的标志,如果在Command Line中用户没有提供值,那么会默认为空字符串,根据说明可以得知这个标志是提供给用户来指定caffe将使用的GPU的。其余的定义也是类似的理解方式就不一一列举了。
解析这些标志的代码在caffe.cpp中的main()中调用了/CAFFE_ROOT/src/common.cpp中的GlobalInit(&argc, &argv)函数:
1 void GlobalInit(int* pargc, char*** pargv) {
2   // Google flags.
3   ::gflags::ParseCommandLineFlags(pargc, pargv, true);
4   // Google logging.
5   ::google::InitGoogleLogging(*(pargv)[0]);
6   // Provide a backtrace on segfault.
7   ::google::InstallFailureSignalHandler();
8 }
第三行的函数就是Google Flags用来解析输入的参数的,前两个参数分别是指向main()的argc和argv的指针,第三个参数为true,表示在解析完所有的标志之后将这些标志从argv中清除,因此在解析完成之后,argc的值为2,argv[0]为main,argv[1]为train/test/time/device_query中的一个。
math_functions
引用自:Caffe源码(一):math_functions 分析
math_function 定义了caffe 中用到的一些矩阵操作和数值计算的一些函数,这里以float类型为例做简单的分析
1. caffe_cpu_gemm 函数:
template<>
void caffe_cpu_gemm<float>(const CBLAS_TRANSPOSE TransA,
    const CBLAS_TRANSPOSE TransB, const int M, const int N, const int K,
    const float alpha, const float* A, const float* B, const float beta,
    float* C) {
  int lda = (TransA == CblasNoTrans) ? K : M;
  int ldb = (TransB == CblasNoTrans) ? N : K;
  cblas_sgemm(CblasRowMajor, TransA, TransB, M, N, K, alpha, A, lda, B,
      ldb, beta, C, N);
}
功能: C=alpha*A*B+beta*C
A,B,C 是输入矩阵(一维数组格式)
CblasRowMajor :数据是行主序的(二维数据也是用一维数组储存的)
TransA, TransB:是否要对A和B做转置操作(CblasTrans CblasNoTrans)
M: A、C 的行数
N: B、C 的列数
K: A 的列数, B 的行数
lda : A的列数(不做转置)行数(做转置)
ldb: B的列数(不做转置)行数(做转置)2. caffe_cpu_gemv 函数:
template <>
void caffe_cpu_gemv<float>(const CBLAS_TRANSPOSE TransA, const int M,
    const int N, const float alpha, const float* A, const float* x,
    const float beta, float* y) {
  cblas_sgemv(CblasRowMajor, TransA, M, N, alpha, A, N, x, 1, beta, y, 1);
}
功能: y=alpha*A*x+beta*y
其中X和Y是向量,A 是矩阵
M:A 的行数
N:A 的列数
cblas_sgemv 中的 参数1 表示对X和Y的每个元素都进行操作3.caffe_axpy 函数:
template <>
void caffe_axpy<float>(const int N, const float alpha, const float* X,
    float* Y) { cblas_saxpy(N, alpha, X, 1, Y, 1); }
功能: Y=alpha*X+Y N:为X和Y中element的个数
4.caffe_set 函数:
template <typename Dtype>
void caffe_set(const int N, const Dtype alpha, Dtype* Y) {
  if (alpha == 0) {
    memset(Y, 0, sizeof(Dtype) * N);  // NOLINT(caffe/alt_fn)
    return;
  }
  for (int i = 0; i < N; ++i) {
    Y[i] = alpha;
  }
}
功能:用常数 alpha 对 Y 进行初始化 函数 void *memset(void *buffer, char c, unsigned count) 一般为新申请的内存做初始化,功能是将buffer所指向内存中的每个字节的内容全部设置为c指定的ASCII值, count为块的大小
5.caffe_add_scalar 函数:
template <>
void caffe_add_scalar(const int N, const float alpha, float* Y) {
  for (int i = 0; i < N; ++i) {
    Y[i] += alpha;
  }
}
功能: 给 Y 的每个 element 加上常数 alpha
6.caffe_copy 函数:
template <typename Dtype>
void caffe_copy(const int N, const Dtype* X, Dtype* Y) {
  if (X != Y) {
    if (Caffe::mode() == Caffe::GPU) {
#ifndef CPU_ONLY
      // NOLINT_NEXT_LINE(caffe/alt_fn)
      CUDA_CHECK(cudaMemcpy(Y, X, sizeof(Dtype) * N, cudaMemcpyDefault));
#else
      NO_GPU;
#endif
    } else {
      memcpy(Y, X, sizeof(Dtype) * N);  // NOLINT(caffe/alt_fn)
    }
  }
}
函数 void *memcpy(void *dest, void *src, unsigned int count) 把src所指向的内存区域 copy到dest所指向的内存区域, count为块的大小
7.caffe_scal 函数:
template <>
void caffe_scal<float>(const int N, const float alpha, float *X) {
  cblas_sscal(N, alpha, X, 1);
}
功能:X = alpha*X N: X中element的个数
8.caffeine_cup_axpby 函数:
template <>
void caffe_cpu_axpby<float>(const int N, const float alpha, const float* X,
                            const float beta, float* Y) {
  cblas_saxpby(N, alpha, X, 1, beta, Y, 1);
}
功能:Y= alpha*X+beta*Y
9.caffe_add、 caffe_sub、 caffe_mul、 caffe_div 函数:
template <>
void caffe_add<float>(const int n, const float* a, const float* b,
    float* y) {
  vsAdd(n, a, b, y);
}
template <>
void caffe_sub<float>(const int n, const float* a, const float* b,
    float* y) {
  vsSub(n, a, b, y);
}

template <>
void caffe_mul<float>(const int n, const float* a, const float* b,
    float* y) {
  vsMul(n, a, b, y);
}

template <>
void caffe_div<float>(const int n, const float* a, const float* b,
    float* y) {
  vsDiv(n, a, b, y);
}
功能:这四个函数分别实现element-wise的加减乘除(y[i] = a[i] + - * \ b[i])
10.caffe_powx、 caffe_sqr、 caffe_exp、 caffe_abs 函数:
template <>
void caffe_powx<float>(const int n, const float* a, const float b,
    float* y) {
  vsPowx(n, a, b, y);
}

template <>
void caffe_sqr<float>(const int n, const float* a, float* y) {
  vsSqr(n, a, y);
}


template <>
void caffe_exp<float>(const int n, const float* a, float* y) {
  vsExp(n, a, y);
}

template <>
void caffe_abs<float>(const int n, const float* a, float* y) {
    vsAbs(n, a, y);
}
功能 : 同样是element-wise操作,分别是y[i] = a[i] ^ b, y[i] = a[i]^2,y[i] = exp(a[i] ),y[i] = |a[i] |
11.int caffe_rng_rand 函数:
unsigned int caffe_rng_rand() {
  return (*caffe_rng())();
}
功能:返回一个随机数
12.caffe_nextafer 函数:
template <typename Dtype>
Dtype caffe_nextafter(const Dtype b) {
  return boost::math::nextafter<Dtype>(
      b, std::numeric_limits<Dtype>::max());
}
功能 : 返回 b 最大方向上可以表示的最接近的数值。
13.caffe_cpu_strided_dot 函数:
template <>
double caffe_cpu_strided_dot<double>(const int n, const double* x,
    const int incx, const double* y, const int incy) {
  return cblas_ddot(n, x, incx, y, incy);
}
功能: 返回 vector X 和 vector Y 的内积。 incx, incy : 步长,即每隔incx 或 incy 个element 进行操作。
14.caffe_cpu_hamming_distance 函数:
template <>
int caffe_cpu_hamming_distance<float>(const int n, const float* x,
                                  const float* y) {
  int dist = 0;
  for (int i = 0; i < n; ++i) {
    dist += __builtin_popcount(static_cast<uint32_t>(x[i]) ^
                               static_cast<uint32_t>(y[i]));
  }
  return dist;
}
功能:返回 x 和 y 之间的海明距离。(两个等长字符串之间的海明距离是两个字符串对应位置的不同字符的个数。)
15. caffe_cpu_asum 函数:
template <>
float caffe_cpu_asum<float>(const int n, const float* x) {
  return cblas_sasum(n, x, 1);
}
功能:计算 vector x 的所有element的绝对值之和。
16.caffe_cpu_scale 函数:
template <>
void caffe_cpu_scale<float>(const int n, const float alpha, const float *x,
                            float* y) {
  cblas_scopy(n, x, 1, y, 1);
  cblas_sscal(n, alpha, y, 1);
}
功能:y = alpha*x

