作者:刘蓬
本文为原创文章,转载请注明作者及出处
在机器学习领域,有之前火爆网络的 TensorFlow ,我还一直以为 Apple 在机器学习领域就要那么埋没下去了,结果万万没有想到今年 WWDC 憋了大招:Core ML。
现场几乎每天关于 Core ML 的 session 都是爆满, 排队排得我都觉得每次站的脚痛。回国之后抽空体验了二者在 iOS 上性能表现,今天跟大家一起来聊一聊。
二者直接拿来对比是一个误区
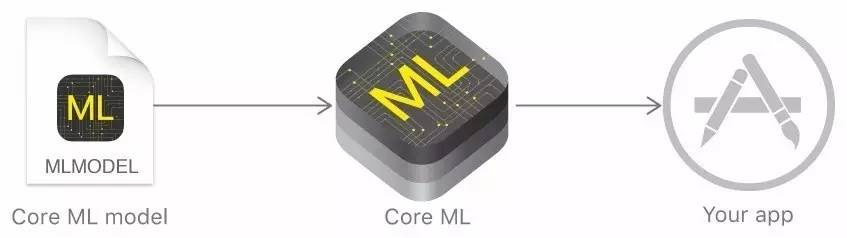
看上图,Core ML 是把已经训练好的数据模型(比如利用 Caffe 训练的模型), 通过 coremltools 转换成 Core ML 格式的模型, 最后提供了一系列的 API,快速的集成到 app 中,所以并不包含训练过程。
再来看看具体 Xcode 中 Model 的展示信息:
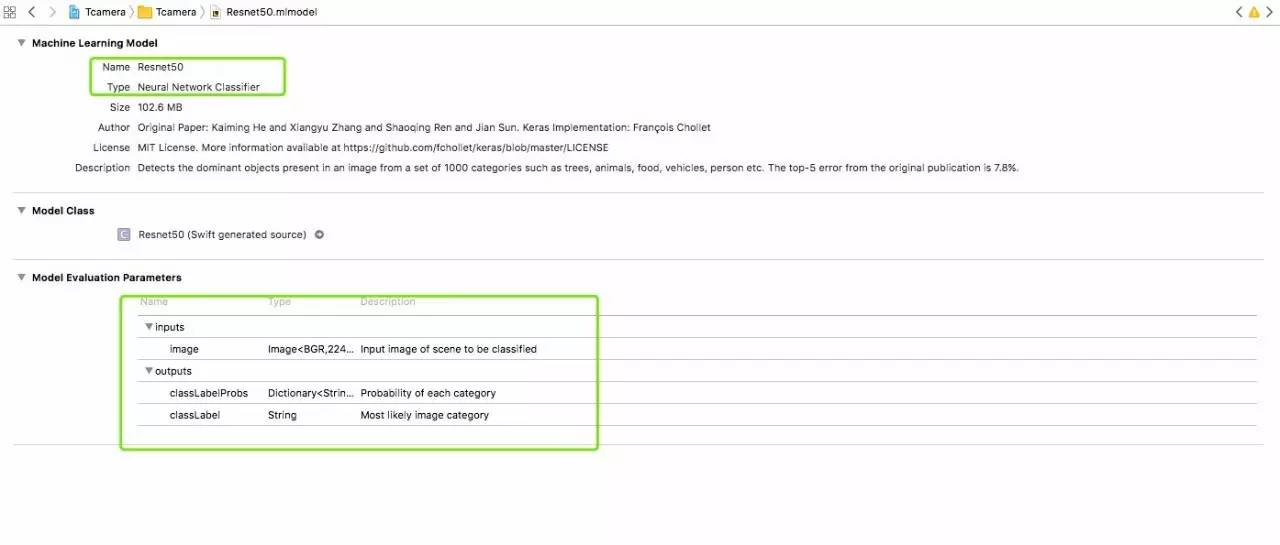
Core ML 的数据格式包括三大部分:名称、输入以及输出。Xcode 会自动生成 swift 或者 OC 的包装类,app 可以通过 Core ML 提供的 API 方便的使用该训练好的数据模型。
所以综上所述,Core ML 本身的 API 只是借助已经训练好的数据模型,最后生成对应的包装类,接收输入,输出结果值。
而 TensorFlow 又是什么呢?
TensorFlow™ is an open source software library for numerical computation using data flow graphs. Nodes in the graph represent mathematical operations, while the graph edges represent the multidimensional data arrays (tensors) communicated between them. The flexible architecture allows you to deploy computation to one or more CPUs or GPUs in a desktop, server, or mobile device with a single API. TensorFlow was originally developed by researchers and engineers working on the Google Brain Team within Google’s Machine Intelligence research organization for the purposes of conducting machine learning and deep neural networks research, but the system is general enough to be applicable in a wide variety of other domains as well.
TensorFlow 是一个采用数据流图 (data flow graphs),用于数值计算的开源软件库。TensorFlow 支持 Python 和 C++ 两种编程语言,再复杂的多层神经网络模型都可以用 Python 来实现。
所以综上所述,TensorFlow 更偏向的是数据训练层,如果要对比,那么他应该是和 Caffe 等框架在一个层面上,而不是和 Core ML 使用层去对比。当然 TensorFlow 也可以和 Core ML 一样 ,在移动设备上运行的。
TensorFlow 和 Core ML 在 iOS 上性能表现
既然都可以在 iOS 上运行,那么同样的数据集,在同一台设备上表现的如何呢?昨晚花了一点时间,把自己已经上架的 app 从 TensorFlow 转向了 Core ML,成本并不高,因为只需要换运算部分,当然也意味着我的 app 仅能运行在 ios 11+ 的设备上
Core ML:
(工程地址: https://github.com/liufsd/TestCoreMl)
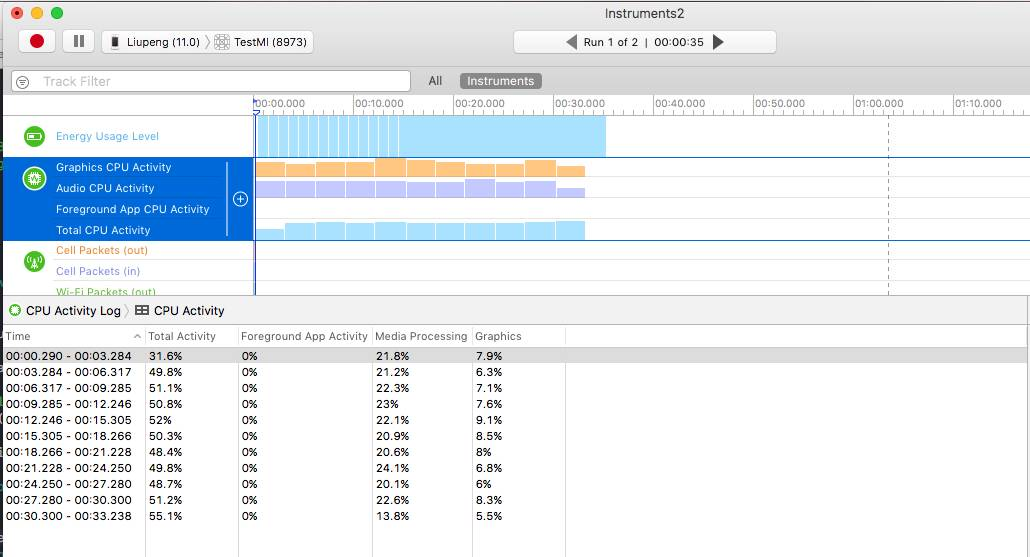
TensorFlow:
(工程地址: https://github.com/tensorflow/tensorflow/blob/master/tensorflow/examples/ios/camera)
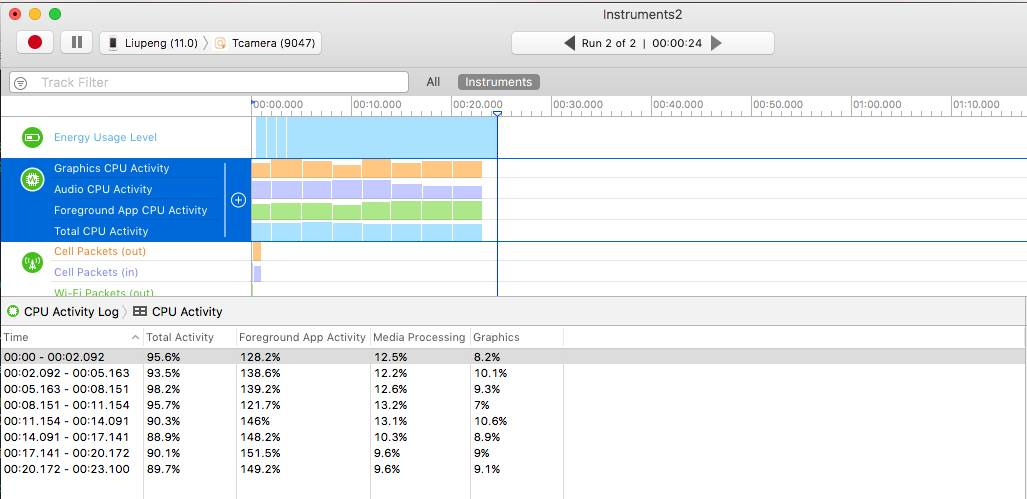
在识别速度上几乎无差别,但在运算损耗上后者更高,意味着手机很快就会发烫。这就是我为什么把 app 转换成 Core ML 实现了的。
TensorFlow 和 Core ML 在 iOS API 使用难易程度对比
Core ML以官网API Doc 来讲,TensorFlow以官方 Demo 为例。
Core ML API:
Doc: https://developer.apple.com/documentation/coreml/core_ml_api
训练数据方面:
训练部分不属于Core ML ,你只需要把你训练好的数据 model, 通过 coremltools 转换成 Core ML 格式的模型即可。当然官方已经提供了一些转换好的供大家使用,比如 demo 中使用的Resnet50.mlmodel,下载地址:https://developer.apple.com/machine-learning/
API 使用:
Core ML 的 API 非常简单,当你导入转换好的模型到 Xcode 中后,Xcode 会自动生成对应的包装类。拿上面性能对比的例子来讲,当我们往 Xcode 中导入已经转换好的训练模型Resnet50.mlmodel,会自动在Tcamera.build/DerivedSources/CoreMLGenerated/Resnet50 目录下面生成一个Resnet50.swift文件。
-
Resnet50 核心入口类,真正代码打交道的主入口类
@objc class Resnet50:NSObject {
    var model: MLModel
    init(contentsOf url: URL) throws {
        self.model = try MLModel(contentsOf: url)
    }
    convenience override init() {
        let bundle = Bundle(for: Resnet50.self)
        let assetPath = bundle.url(forResource: "Resnet50", withExtension:"mlmodelc")
        try! self.init(contentsOf: assetPath!)
    }
    func prediction(input: Resnet50Input) throws -> Resnet50Output {
        let outFeatures = try model.prediction(from: input)
        let result = Resnet50Output(classLabelProbs: outFeatures.featureValue(for: "classLabelProbs")!.dictionaryValue as! [String : Double], classLabel: outFeatures.featureValue(for: "classLabel")!.stringValue)
        return result
    }
    func prediction(image: CVPixelBuffer) throws -> Resnet50Output {
        let input_ = Resnet50Input(image: image)
        return try self.prediction(input: input_)
    }
}
2.Resnet50Input 输入类, 负责输入要求的数据,比如 60*60 大小的图片
class Resnet50Input : MLFeatureProvider {
    var image: CVPixelBuffer

    var featureNames: Set<String> {
        get {
            return ["image"]
        }
    }

    func featureValue(for featureName: String) -> MLFeatureValue? {
        if (featureName == "image") {
            return MLFeatureValue(pixelBuffer: image)
        }
        return nil
    }

    init(image: CVPixelBuffer) {
        self.image = image
    }
}
3.Resnet50Output 输出类, 负责输出预测结果值,比如输出预测的图片对应的类别
class Resnet50Output : MLFeatureProvider {
    let classLabelProbs: [String : Double]
    let classLabel: String

    var featureNames: Set<String> {
        get {
            return ["classLabelProbs", "classLabel"]
        }
    }

    func featureValue(for featureName: String) -> MLFeatureValue? {
        if (featureName == "classLabelProbs") {
            return try! MLFeatureValue(dictionary: classLabelProbs as [NSObject : NSNumber])
        }
        if (featureName == "classLabel") {
            return MLFeatureValue(string: classLabel)
        }
        return nil
    }

    init(classLabelProbs: [String : Double], classLabel: String) {
        self.classLabelProbs = classLabelProbs
        self.classLabel = classLabel
    }
}
上面部分属于 Xcode 自动帮我们生成的,对于我们使用的时候:
let prediction = try? Resnet50().prediction(image: pixelBuffer)是不是很简单呢?所以再次证明 Core ML 「降低了机器学习的门槛」,而让我们去专注数据训练部分。
TensorFlow API:
如何在 iOS 上运行可以参考这里:https://petewarden.com/2016/09/27/tensorflow-for-mobile-poets/,这里不展开来讲了的。
训练数据方面:
需要自己根据TensorFlow Python API 编写自己的训练算法,当然TensorFlow已经提供了一些常用的图片分类算法等。最终生成的数据包括两个文件:imagenet_comp_graph_label_strings.txt 以及 tensorflow_inception_graph.pb (也可以自行下载训练好的数据:https://storage.googleapis.com/download.tensorflow.org/models/inception5h.zip)
API 使用:
以官方的 camera demo 为例:https://github.com/tensorflow/tensorflow/blob/master/tensorflow/examples/ios/camera
-
需要自行编译libtensorflow-core.a
-
图片识别的核心方法:
runCNNOnFrame -
初始化训练数据
加载pb部分:
-
识别图片:
runCNNOnFrame,首先根据拿到的图片创建一个image_tensor,然后配合tf_session进行预测拿到结果值。
tensorflow::Status LoadModel(NSString* file_name, NSString* file_type,
                             std::unique_ptr<tensorflow::Session>* session) {
  tensorflow::SessionOptions options;

  tensorflow::Session* session_pointer = nullptr;
  tensorflow::Status session_status =
      tensorflow::NewSession(options, &session_pointer);
  if (!session_status.ok()) {
    LOG(ERROR) << "Could not create TensorFlow Session: " << session_status;
    return session_status;
  }
  session->reset(session_pointer);

  tensorflow::GraphDef tensorflow_graph;

  NSString* model_path = FilePathForResourceName(file_name, file_type);
  if (!model_path) {
    LOG(ERROR) << "Failed to find model proto at" << [file_name UTF8String]
               << [file_type UTF8String];
    return tensorflow::errors::NotFound([file_name UTF8String],
                                        [file_type UTF8String]);
  }
  const bool read_proto_succeeded =
      PortableReadFileToProto([model_path UTF8String], &tensorflow_graph);
  if (!read_proto_succeeded) {
    LOG(ERROR) << "Failed to load model proto from" << [model_path UTF8String];
    return tensorflow::errors::NotFound([model_path UTF8String]);
  }

  tensorflow::Status create_status = (*session)->Create(tensorflow_graph);
  if (!create_status.ok()) {
    LOG(ERROR) << "Could not create TensorFlow Graph: " << create_status;
    return create_status;
  }

  return tensorflow::Status::OK();
}

tensorflow::Status LoadMemoryMappedModel(
    NSString* file_name, NSString* file_type,
    std::unique_ptr<tensorflow::Session>* session,
    std::unique_ptr<tensorflow::MemmappedEnv>* memmapped_env) {
  NSString* network_path = FilePathForResourceName(file_name, file_type);
  memmapped_env->reset(
      new tensorflow::MemmappedEnv(tensorflow::Env::Default()));
  tensorflow::Status mmap_status =
      (memmapped_env->get())->InitializeFromFile([network_path UTF8String]);
  if (!mmap_status.ok()) {
    LOG(ERROR) << "MMap failed with " << mmap_status.error_message();
    return mmap_status;
  }

  tensorflow::GraphDef tensorflow_graph;
  tensorflow::Status load_graph_status = ReadBinaryProto(
      memmapped_env->get(),
      tensorflow::MemmappedFileSystem::kMemmappedPackageDefaultGraphDef,
      &tensorflow_graph);
  if (!load_graph_status.ok()) {
    LOG(ERROR) << "MMap load graph failed with "
               << load_graph_status.error_message();
    return load_graph_status;
  }

  tensorflow::SessionOptions options;
  // Disable optimizations on this graph so that constant folding doesn't
  // increase the memory footprint by creating new constant copies of the weight
  // parameters.
  options.config.mutable_graph_options()
      ->mutable_optimizer_options()
      ->set_opt_level(::tensorflow::OptimizerOptions::L0);
  options.env = memmapped_env->get();

  tensorflow::Session* session_pointer = nullptr;
  tensorflow::Status session_status =
      tensorflow::NewSession(options, &session_pointer);
  if (!session_status.ok()) {
    LOG(ERROR) << "Could not create TensorFlow Session: " << session_status;
    return session_status;
  }

  tensorflow::Status create_status = session_pointer->Create(tensorflow_graph);
  if (!create_status.ok()) {
    LOG(ERROR) << "Could not create TensorFlow Graph: " << create_status;
    return create_status;
  }

  session->reset(session_pointer);

  return tensorflow::Status::OK();
}
加载label部分:
tensorflow::Status LoadLabels(NSString* file_name, NSString* file_type,
                              std::vector<std::string>* label_strings) {
  // Read the label list
  NSString* labels_path = FilePathForResourceName(file_name, file_type);
  if (!labels_path) {
    LOG(ERROR) << "Failed to find model proto at" << [file_name UTF8String]
               << [file_type UTF8String];
    return tensorflow::errors::NotFound([file_name UTF8String],
                                        [file_type UTF8String]);
  }
  std::ifstream t;
  t.open([labels_path UTF8String]);
  std::string line;
  while (t) {
    std::getline(t, line);
    label_strings->push_back(line);
  }
  t.close();
  return tensorflow::Status::OK();
}所以看下来 TensorFlow 在 iOS 上运行的时候,都是要依赖 C++ 混编的,封装的还很差,门槛相对于上面的Core ML还是要高很多了的。
对二者的一点点思考
Google 一直的感觉是拥抱开源, Apple以前则是相反,所以导致后者基本上设计的东西都没有跨平台的说法,那么 Core ML 自然也仅限 iOS,但却可以发挥设备本身最大的性能。
目前而言 Core ML 让我觉得头疼的是,从上面的介绍中也提到了的,数据集是跟随 app 版本一起发布出去了的,他并不支持对数据再次训练,导致我们无法优化我们的数据集,而且加上通常情况下训练的数据体检都很大,比如我 demo 中 100M+,这样无形中就导致了 app 体积过大。而 TensorFlow 则可以更新数据集。
Core ML 仅仅是个开始,但我深信 Apple 不会就此停下前进的步伐。
End
推荐阅读
沪江Web前端技术团队倾情翻译「前端开发者指南 (2017)」震撼来袭!