
前言
这个问题很早之前就碰到过,后来通过google找到了解决办法,也就没有去管它了,直到最近有朋友问到这个问题,感觉很熟悉却又说不出具体原因,因此,就想通过源码分析一下。顺便做个总结,避免以后出现类似的问题。
问题复现
为什么发现了这个问题呢?是当时要写一个列表,列表本来很简单,一行显示一个文本,实现起来也很容易,一个RecyclerView就搞定。
Activity以及Adapter代码如下:
private void initView() {
        mRecyclerView = (RecyclerView) findViewById(R.id.rv_inflate_test);
        RVAdapter adapter = new RVAdapter();
        adapter.setData(mockData());
        LinearLayoutManager manager = new LinearLayoutManager(this);
        manager.setOrientation(LinearLayoutManager.VERTICAL);
        mRecyclerView.addItemDecoration(new DividerItemDecoration(this,DividerItemDecoration.VERTICAL));
        mRecyclerView.setLayoutManager(manager);
        mRecyclerView.setAdapter(adapter);
        adapter.notifyDataSetChanged();
    }

private List<String> mockData(){
        List<String> datas = new ArrayList<>();
        for(int i=0;i<100;i++){
            datas.add("这是第"+i+ "个item ");
        }        return datas;
    }

public static class RVAdapter extends RecyclerView.Adapter{
       private List<String> mData;
       public void setData(List<String> data) {
            mData = data;
        }

        @Override
        public RecyclerView.ViewHolder onCreateViewHolder(ViewGroup parent, int viewType) {
           return new InflateViewHolder(LayoutInflater.from(parent.getContext()).inflate(R.layout.inflate_test_item,null));
        }
        @Override
        public void onBindViewHolder(RecyclerView.ViewHolder holder, int position) {
             InflateViewHolder viewHolder = (InflateViewHolder) holder;
             ((InflateViewHolder) holder).mTextView.setText(mData.get(position));
        }
        @Override
        public int getItemCount() {
          return mData == null ? 0:mData.size();
        }

        public static class InflateViewHolder extends RecyclerView.ViewHolder{
           private TextView mTextView;
           public InflateViewHolder(View itemView) {
                super(itemView);

                mTextView = (TextView) itemView.findViewById(R.id.text_item);
            }
        }
    }
然后RecyclerView的item布局文件如下:
<?xml version="1.0" encoding="utf-8"?>
<LinearLayout xmlns:android="http://schemas.android.com/apk/res/android"
android:orientation="vertical"
android:layout_width="match_parent"
android:layout_height="wrap_content">
<TextView
android:id="@+id/text_item"
android:layout_width="match_parent"
android:layout_height="50dp"
android:textSize="18sp"
android:textColor="@android:color/white"
android:background="#AA47BC"
android:gravity="center"
/>
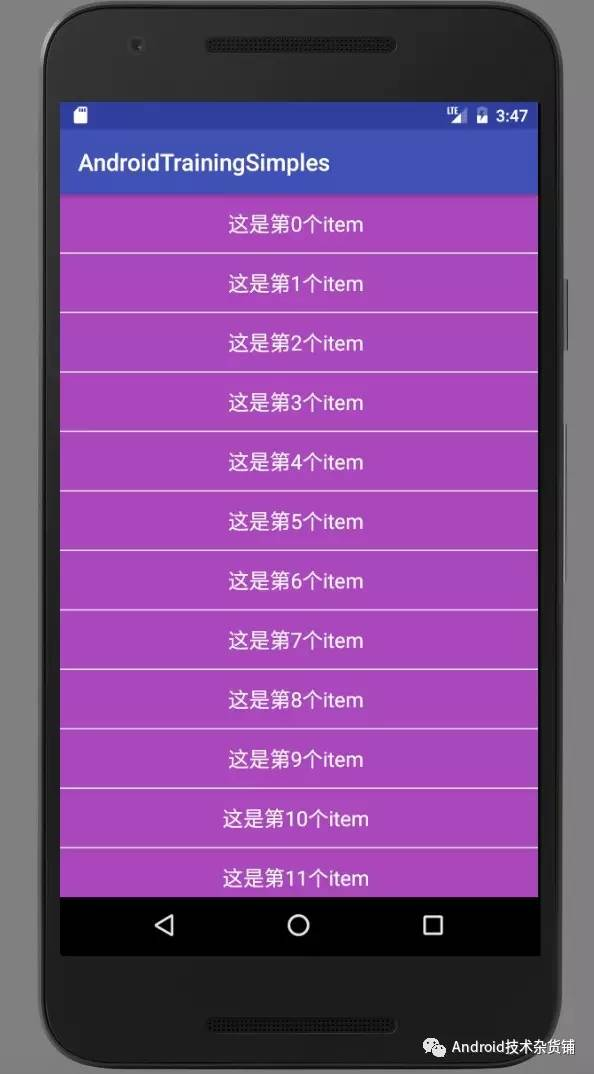
</LinearLayout>代码很简单,就是一个RecyclerView 显示一个简单的列表,一行显示一个文本。写完代码运行看一下效果:
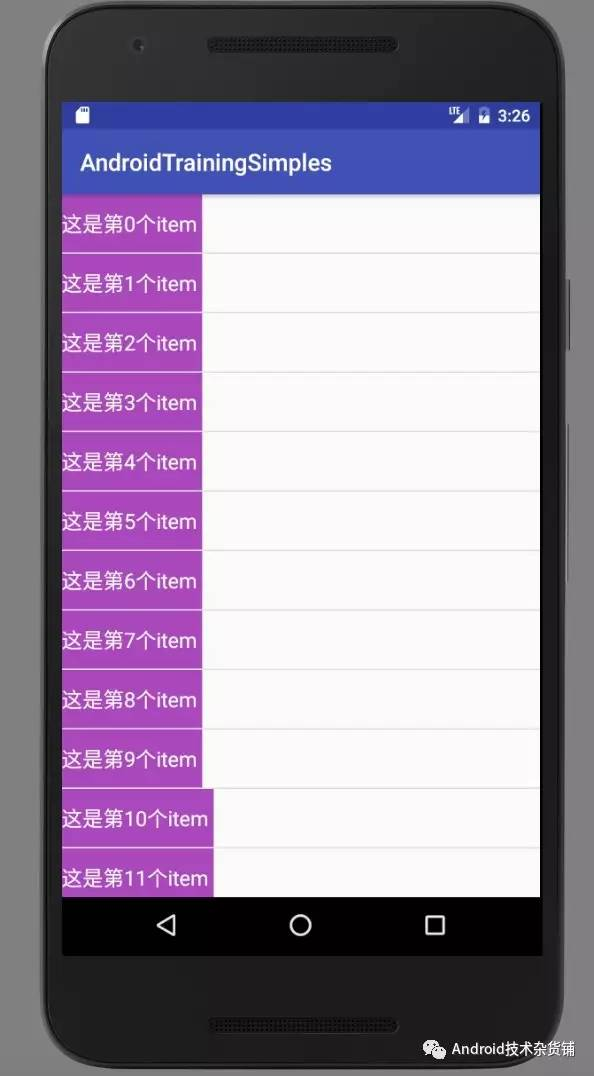
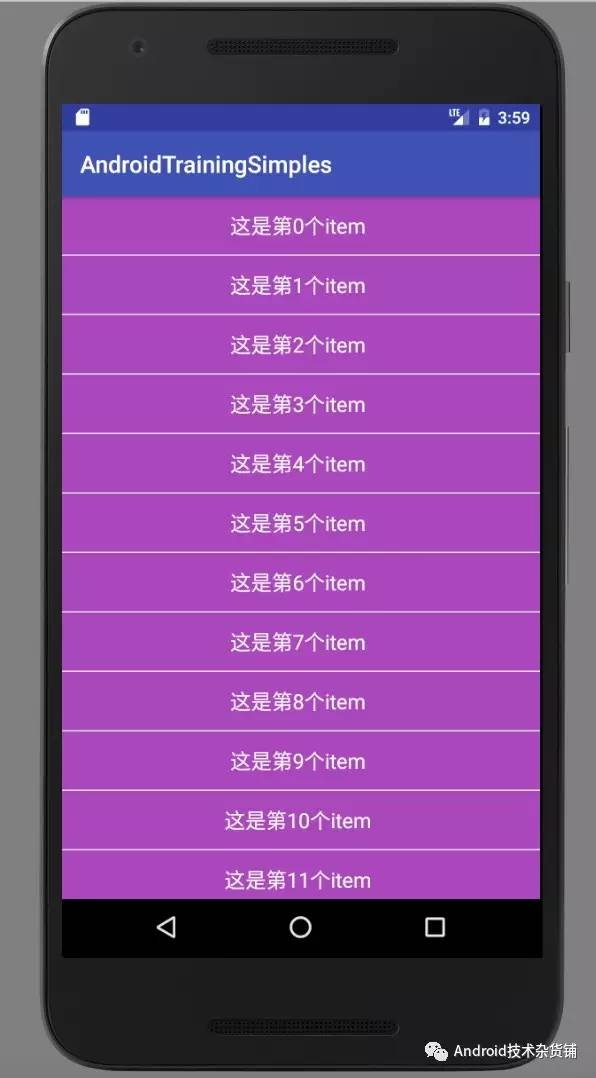
运行效果一看,这是什么鬼?右边空出来这么大一块?一看就觉得是item的布局写错了,难道item的宽写成wrap_content? 那就去改一下嘛。进入item布局一看: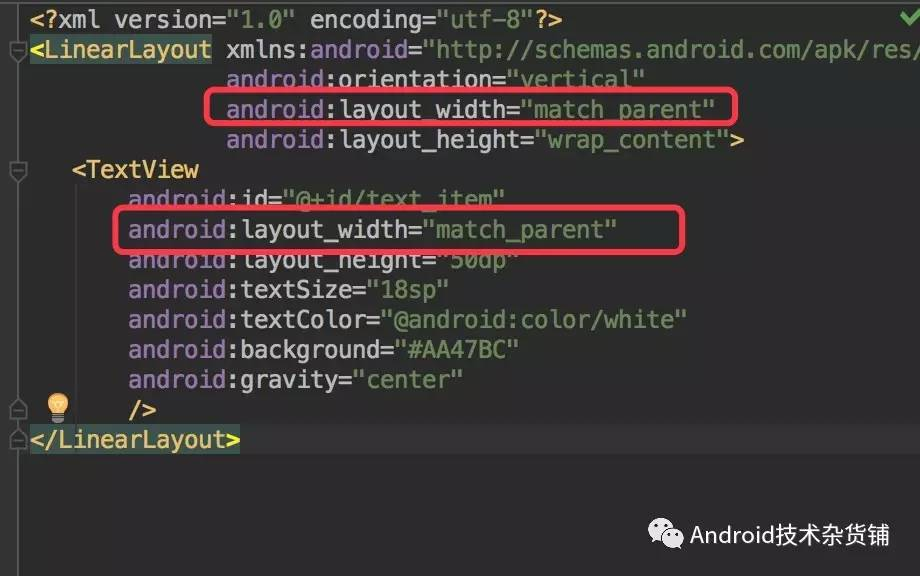
不对啊,明明布局的宽写的是match_parent,为什么运行的结果就是包裹内容的呢?然后就想着既然LinearLayout作为根布局宽失效了,那就换其他几种布局方式试一下呢?
根布局换为FrameLayout,其他不变: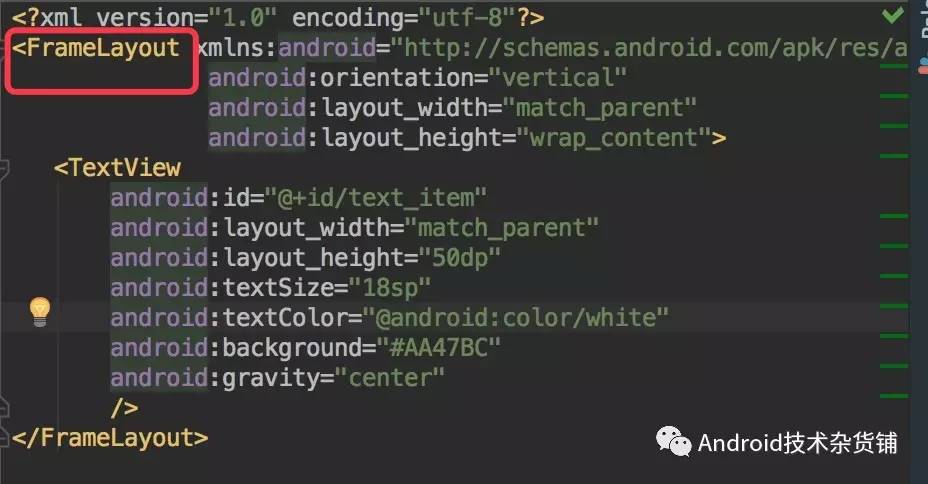
运行效果如下:
效果和LinearLayout一样,还是不行,那再换成RelativeLayout试一下:
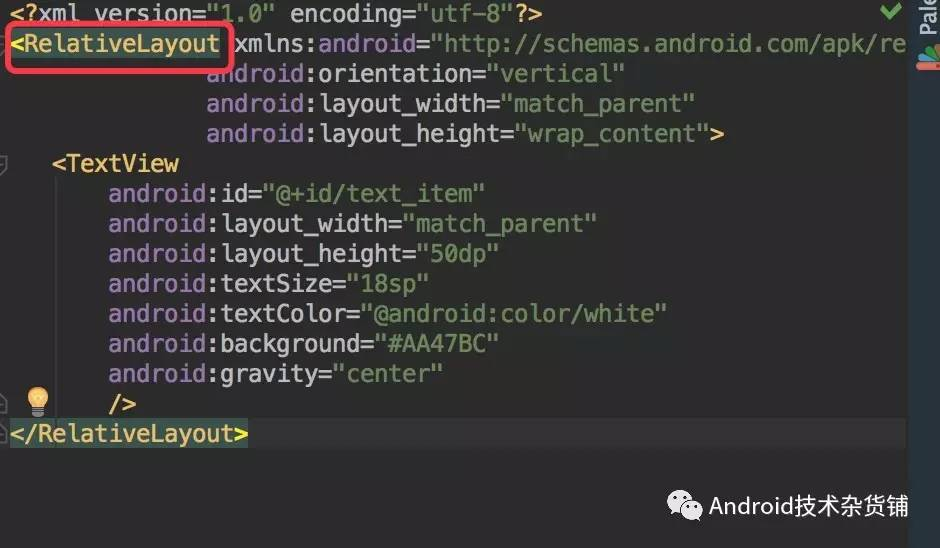
看一下运行效果:
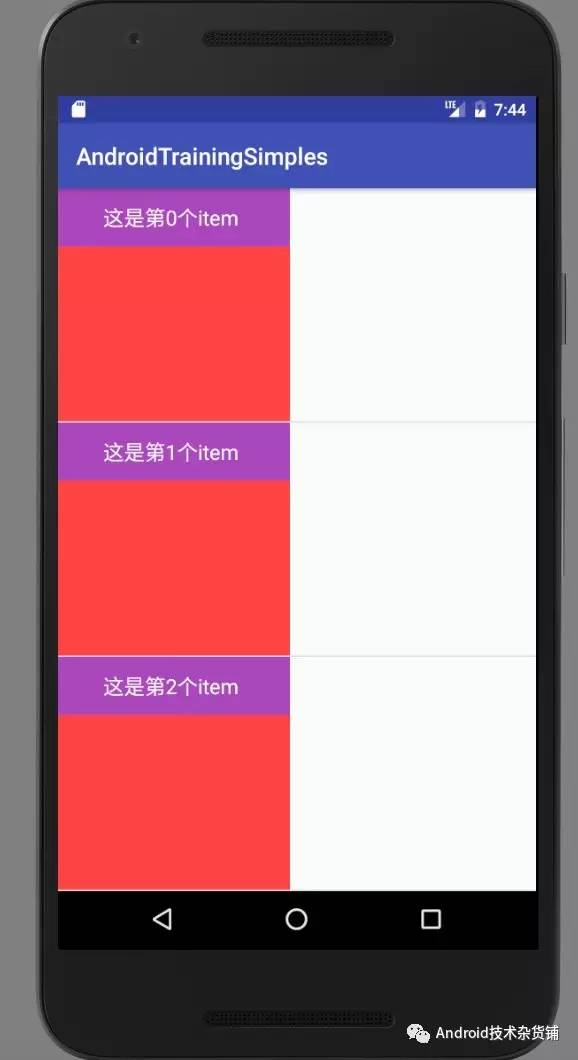
换成RelativeLayout后,运行的效果,好像就是我们想要的了,曾经一度以后只要将跟布局换成RelativeLayout,就没有宽高失效的问题了。为了验证这个问题,我改变了高度再来测试,如下:
<?xml version="1.0" encoding="utf-8"?>
<RelativeLayout xmlns:android="http://schemas.android.com/apk/res/android"
              android:orientation="vertical"
              android:layout_width="200dp"
              android:layout_height="200dp"
              android:background="@android:color/holo_red_light"
    >
   <TextView
       android:id="@+id/text_item"
       android:layout_width="match_parent"
       android:layout_height="50dp"
       android:textSize="18sp"
       android:textColor="@android:color/white"
       android:background="#AA47BC"
       android:gravity="center"
/>将布局的宽和高固定一个确定的值200dp,然后再来看一下运行效果。
如上,并没有什么卵用,宽和高都失效了。然后又在固定宽高的情况下将布局换为原来的LinearLayout和FrameLayout,效果和前面一样,包裹内容。
因此,不管用什么布局作为根布局都会出现宽高失效的问题,那就得另找原因。到底是什么原因呢?想到以前写了这么多的列表,也没有出现宽高失效的问题啊?于是就去找以前的代码来对比一下:
通过对比,发现宽高失效与不失效的区别在与Adapter中创建ViewHolder是加载布局的方式不同:
LayoutInflater.from(parent.getContext()).inflate(R.layout.inflate_test_item,null)以上这种加载方式Item宽高失效。
LayoutInflater.from(parent.getContext()).inflate(R.layout.inflate_test_item,parent,false)以上这种方式加载布局item不会出现宽高失效。,效果如下(宽和高都为200dp):
问题我们算是定位到了,就是加载布局的方式不一样,那么这两种加载布局的写法到底有什么区别呢?这个我们就需要去深入了解inflate这个方法了
inflate 加载布局几种写法的区别
上面我们定位到了RecyclerView item 布局宽高失效的原因在于使用inflate 加载布局时的问题,那么我们就看一下inflate这个方法:
从上图可以看到 inflate 方法有四个重载方法,有两个方法第一个参数接收的是一个布局文件id,另外两个接收的是XmlPullParse,看源码就知道,接收布局文件的inflate方法里面调用的是接收XmlPullParse的方法。
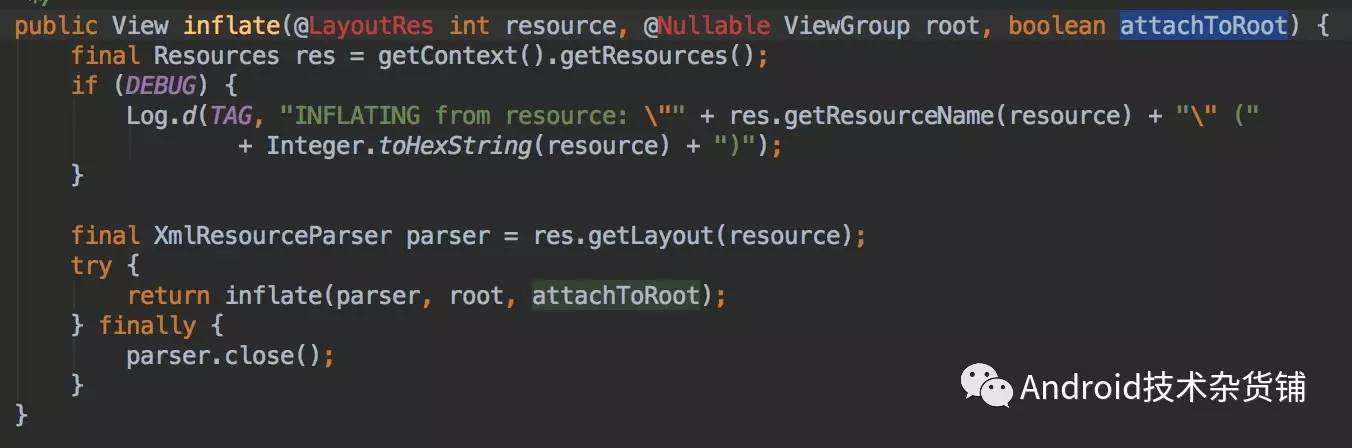
因此,我们一般只调用接收布局文件ID的inflate方法。两个重载方法的区别在于有无第三个参数attachToRoot, 而从源码里里面可以看到,两个参数的方法最终调用的是三个参数的inflate方法:

第三个参数的值是根据第二个参数的值来判断的。
因此我们只需要分析一下三个参数的inflate方法,看一下这个方法的定义:
 /**
     * Inflate a new view hierarchy from the specified xml resource. Throws
     * {@link InflateException} if there is an error.
     *
     * @param resource ID for an XML layout resource to load (e.g.,
     *        <code>R.layout.main_page</code>)
     * @param root Optional view to be the parent of the generated hierarchy (if
     *        <em>attachToRoot</em> is true), or else simply an object that
     *        provides a set of LayoutParams values for root of the returned
     *        hierarchy (if <em>attachToRoot</em> is false.)
     * @param attachToRoot Whether the inflated hierarchy should be attached to
     *        the root parameter? If false, root is only used to create the
     *        correct subclass of LayoutParams for the root view in the XML.
     * @return The root View of the inflated hierarchy. If root was supplied and
     *         attachToRoot is true, this is root; otherwise it is the root of
     *         the inflated XML file.
     */
    public View inflate(@LayoutRes int resource, @Nullable ViewGroup root, boolean attachToRoot)
解释:从指定的xml资源文件加载一个新的View,如果发生错误会抛出InflateException异常。
参数解释:
resource:加载的布局文件资源id,如:R.layout.main_page。
root:如果attachToRoot(也就是第三个参数)为true, 那么root就是为新加载的View指定的父View。否则,root只是一个为返回View层级的根布局提供LayoutParams值的简单对象。
attachToRoot: 新加载的布局是否添加到root,如果为false,root参数仅仅用于为xml根布局创建正确的LayoutParams子类(列如:根布局为LinearLayout,则用LinearLayout.LayoutParam)。
了解了这几个参数的意义后,我们来看一下前面提到的两种写法
第一种:root 为null
View view = LayoutInflater.from(parent.getContext()).inflate(R.layout.inflate_test_item,null)这可能是我们用得比较多的一种方式,直接提供一个布局,返回一个View,根据上面的几个参数解释就知道,这种方式,没有指定新加载的View添加到哪个父容器,也没有root提供LayoutParams布局信息。这个时候,如果调用view.getLayoutParams() 返回的值为null。通过上面的测试,我们知道这种方式会导致RecyclerView Item 布局宽高失效。具体原因稍后再分析。
第二种:root不为null,attachToRoot为false
View view = LayoutInflater.from(parent.getContext()).inflate(R.layout.inflate_test_item,parent,false)这种方式加载,root不为null,但是attachToRoot 为 false,因此,加载的View不会添加到root,但是会用root生成的LayoutParams信息。这种方式就是上面我们说的 RecyclerView Item 宽高不会失效的加载方式。
那么为什么第一种加载方式RecyclerView Item 布局宽高会失效?而第二种加载方式宽高不会失效呢?我们接下来从原来来分析一下。
源码分析宽高失效原因
1,首先我们来分析一下inflate 方法的源码:
          ....
          //前面省略
          //result是最终返回的View
          View result = root;
          try {
               ...
               // 省略部分代码
               final String name = parser.getName();
               if (DEBUG) {
                    System.out.println("**************************");
                    System.out.println("Creating root view: "
                            + name);
                    System.out.println("**************************");
                }
               if (TAG_MERGE.equals(name)) {
                   if (root == null || !attachToRoot) {
                       throw new InflateException("<merge /> can be used only with a valid "
                                + "ViewGroup root and attachToRoot=true");
                    }

                    rInflate(parser, root, inflaterContext, attrs, false);
                } else {
                    // 重点就在这个else代码块里了
                    //解释1:首先创建了xml布局文件的根View,temp View

                    final View temp = createViewFromTag(root, name, inflaterContext, attrs);

                    ViewGroup.LayoutParams params = null;
                    // 解释2:判断root是否为null,不为null,就通过root生成LayoutParams
                    if (root != null) {
                    if (DEBUG) {
                            System.out.println("Creating params from root: " +
                                    root);
                        }
                        // Create layout params that match root, if supplied
                        params = root.generateLayoutParams(attrs);
                        // 解释3:如果在root不为null, 并且attachToRoot为false,就为temp View(也就是通过inflate加载的根View)设置LayoutParams.
                        if (!attachToRoot) {
                            // Set the layout params for temp if we are not
                            // attaching. (If we are, we use addView, below)
                            temp.setLayoutParams(params);
                        }
                    }
                    if (DEBUG) {
                        System.out.println("-----> start inflating children");
                    }
                    //解释4:加载根布局temp View 下面的子View

                    rInflateChildren(parser, temp, attrs, true);
                    if (DEBUG) {
                        System.out.println("-----> done inflating children");
                    }
                    //解释5: 注意这一步,root不为null ,并且attachToRoot 为true时,才将从xml加载的View添加到root.
                    if (root != null && attachToRoot) {
                        root.addView(temp, params);
                    }
                    // 解释6:最后,如果root为null,或者attachToRoot为false,那么最终inflate返回的值就是从xml加载的View(temp),否则,返回的就是root(temp已添加到root)
                    if (root == null || !attachToRoot) {
                        result = temp;
                    }
                }

            }

            ...
           //省略部分代码
            return result;
        }
从上面这段代码就能很清楚的说明前面提到的两种加载方式的区别了。
第一种加载方式 root为 null :源码中的代码在 解释1 和 解释6 直接返回的就是从xml加载的temp View。
第二种加载方式 root不为null ,attachToRoot 为false: 源码中在 解释3 和解释5 ,为temp 设置了通过root生成的LayoutParams信息,但是没有add 添加到root 。
2,RecyclerView 部分源码分析
分析了inflate的源码,那么接下来我们就要看一下RecyclerView 的源码了,看一下是怎么加载item 到 RecyclerView 的。由于RecyclerView的代码比较多,我们就通过关键字来找,主要找holer.itemView ,加载的布局就是ViewHolder中的itemView.
通过源码我们找到了一个方法tryGetViewHolderForPositionByDeadline,其中有一段代码如下:
            //1,重点就在这里了,获取itemView 的LayoutParams
            final ViewGroup.LayoutParams lp = holder.itemView.getLayoutParams();
            final LayoutParams rvLayoutParams;
            if (lp == null) {
            // 2,如果itemView获取到的LayoutParams为null,就生成默认的LayoutParams
                rvLayoutParams = (LayoutParams) generateDefaultLayoutParams();
                holder.itemView.setLayoutParams(rvLayoutParams);
            } else if (!checkLayoutParams(lp)) {
                rvLayoutParams = (LayoutParams) generateLayoutParams(lp);
                holder.itemView.setLayoutParams(rvLayoutParams);
            } else {
                rvLayoutParams = (LayoutParams) lp;
            }

            rvLayoutParams.mViewHolder = holder;
            rvLayoutParams.mPendingInvalidate = fromScrapOrHiddenOrCache && bound;
            return holder;
其实重点就在这个方法里面了,看一下我注释的两个地方,先获取itemView的LayoutParams,如果获取到的LayoutPrams为null 的话,那么就生成默认的LayoutParams。我们看一下生成默认LayoutParams的方法generateDefaultLayoutParams:
    @Override
    protected ViewGroup.LayoutParams generateDefaultLayoutParams() {
    if (mLayout == null) {            throw new IllegalStateException("RecyclerView has no LayoutManager");
        }        return mLayout.generateDefaultLayoutParams();
}注意,里面又调用了mLayout的 generateDefaultLayoutParams方法,这个mLayout其实就是RecyclerView 的布局管理器LayoutManager.
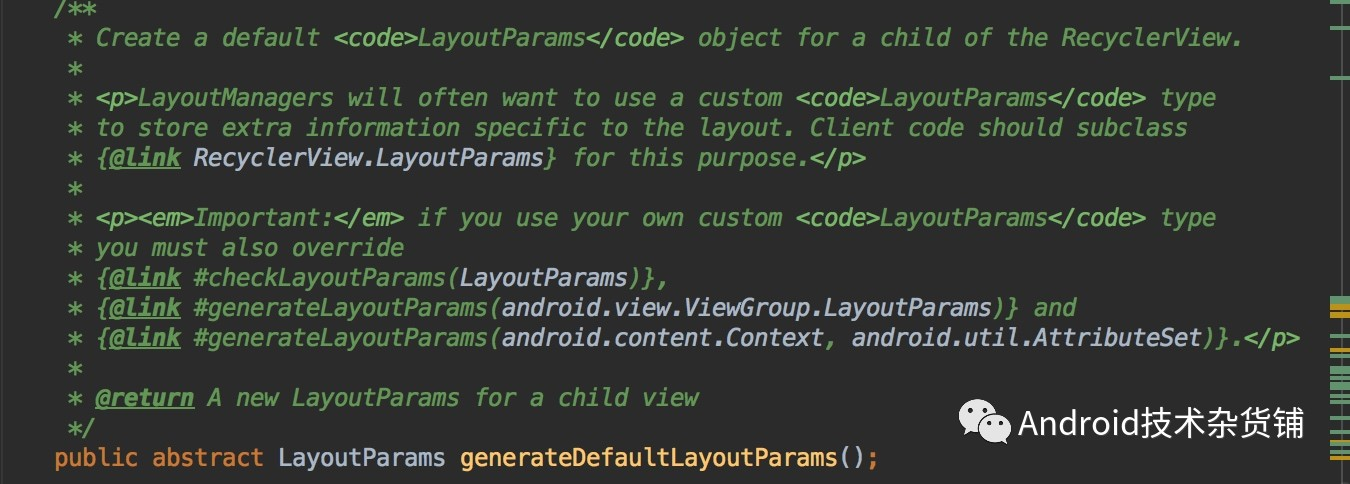

可以看到generateDefaultLayoutParams是一个抽象方法,具体的实现由对应的LayoutManager实现,我们用的是LinearLayoutManager,因此我们看一下LinearLayoutManager 的实现。
   /**
     * {@inheritDoc}
     */
    @Override
    public LayoutParams generateDefaultLayoutParams() {
       return new LayoutParams(ViewGroup.LayoutParams.WRAP_CONTENT,
                ViewGroup.LayoutParams.WRAP_CONTENT);
}卧槽,看到这儿大概就明白了item布局的宽高为什么会失效了,如果使用了默认生成LayoutParams这个方法,宽高都是WRAP_CONTENT。也就是说不管外面你的item根布局 宽高写的多少最终都是包裹内容。
那么前面说的两种方式哪一种用了这个方法呢?其实按照前面的分析和前面的结果来看,我们推测第一种加载方式(root为null)使用了这个方法,而第二种加载方式(root不为null,attachToRoot为false)则没有使用这个方法。因此我们断点调试看一下:
第一种加载方式:
View view = LayoutInflater.from(parent.getContext()).inflate(R.layout.inflate_test_item,null)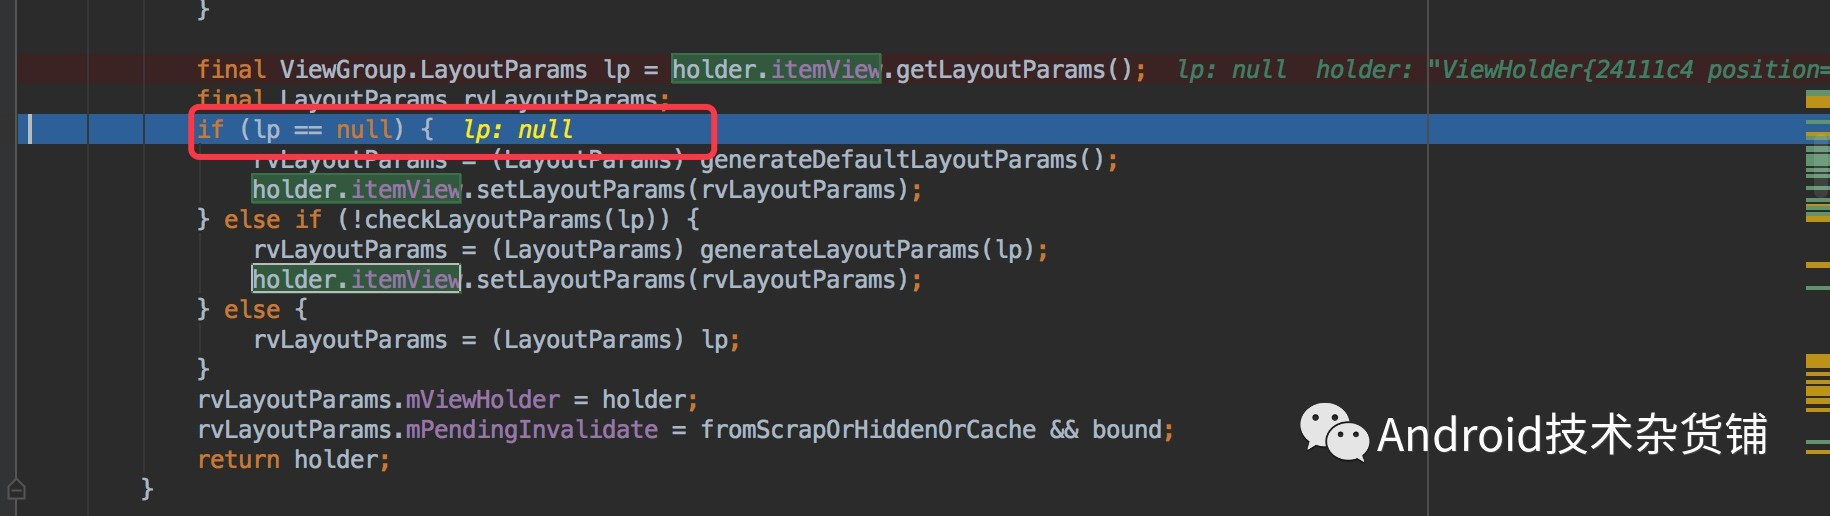
通过断点调试如上图,从itemView 中获取的layoutParams为null,因此会调用generateDefaultLayoutParams方法。因此会生成一个宽高都是wrap_content的LayoutParams,最后导致不管外面的item根布局设置的宽高是多少都会失效。
第二种加载方式:
View view = LayoutInflater.from(parent.getContext()).inflate(R.layout.inflate_test_item,parent,false)断点调试如下图: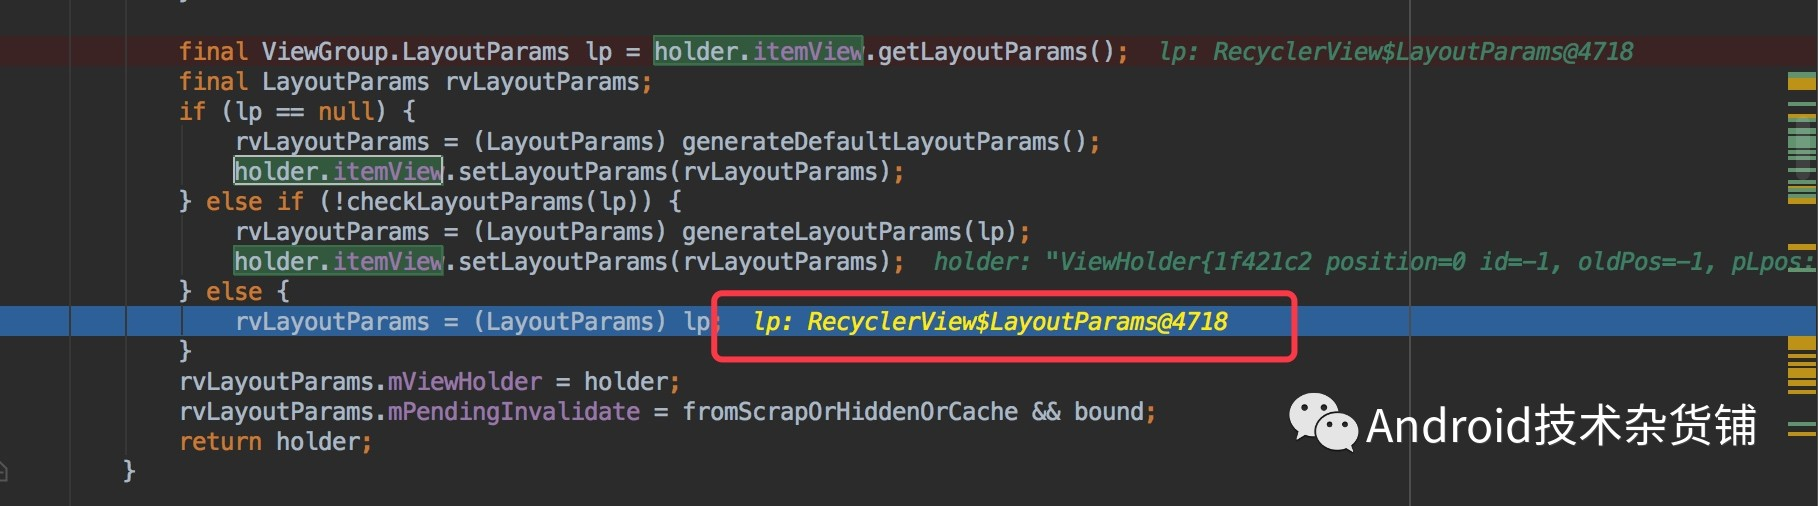
从上图可以看出,这种加载方式从itemView是可以获取LayoutParams的,为RecyclerView的LayoutParams,因此就不会生成默认的LayoutParams,布局设置的宽高也就不会失效。
总结
本文了解了infalte 加载布局的几种写法,也解释了每个参数的意义。最后通过源码解释了两种加载布局的方式在RecyclerView 中为什么一种宽高会失效,而另一种则不会失效。因此在使用RecyclerView写列表的时候,我们应该使用item布局不会失效的这种方式:
View view = LayoutInflater.from(parent.getContext()).inflate(R.layout.inflate_test_item,parent,false)可能有的同学会问,如果加载布局时第三个参数设置为true呢?结果会一样吗?你会发现,一运行就会崩溃
为什么呢?因为相当于 addView 了两次.RecyclerView中不应该这样使用。
好了,以上就是全部内容,如有问题,欢迎指正。
推荐阅读Android中使用RecyclerView + SnapHelper实现类似ViewPager效果
RecyclerView Adapter 优雅封装,一个Adapter搞定所有列表