defload_image(filename, max_size=None):
image = PIL.Image.open(filename)
if max_size isnotNone:
# Calculate the appropriate rescale-factor for# ensuring a max height and width, while keeping# the proportion between them.
factor = max_size / np.max(image.size)
# Scale the image's height and width.
size = np.array(image.size) * factor
# The size is now floating-point because it was scaled.# But PIL requires the size to be integers.
size = size.astype(int)
# Resize the image.
image = image.resize(size, PIL.Image.LANCZOS)
# Convert to numpy floating-point array.return np.float32(image)
将图像保存成一个jpeg文件。给到的图像是一个包含0到255像素值的numpy数组。
defsave_image(image, filename):# Ensure the pixel-values are between 0 and 255.
image = np.clip(image, 0.0, 255.0)
# Convert to bytes.
image = image.astype(np.uint8)
# Write the image-file in jpeg-format.with open(filename, 'wb') as file:
PIL.Image.fromarray(image).save(file, 'jpeg')
这个函数绘制出一张大的图像。给到的图像是一个包含0到255像素值的numpy数组。
defplot_image_big(image):# Ensure the pixel-values are between 0 and 255.
image = np.clip(image, 0.0, 255.0)
# Convert pixels to bytes.
image = image.astype(np.uint8)
# Convert to a PIL-image and display it.
display(PIL.Image.fromarray(image))
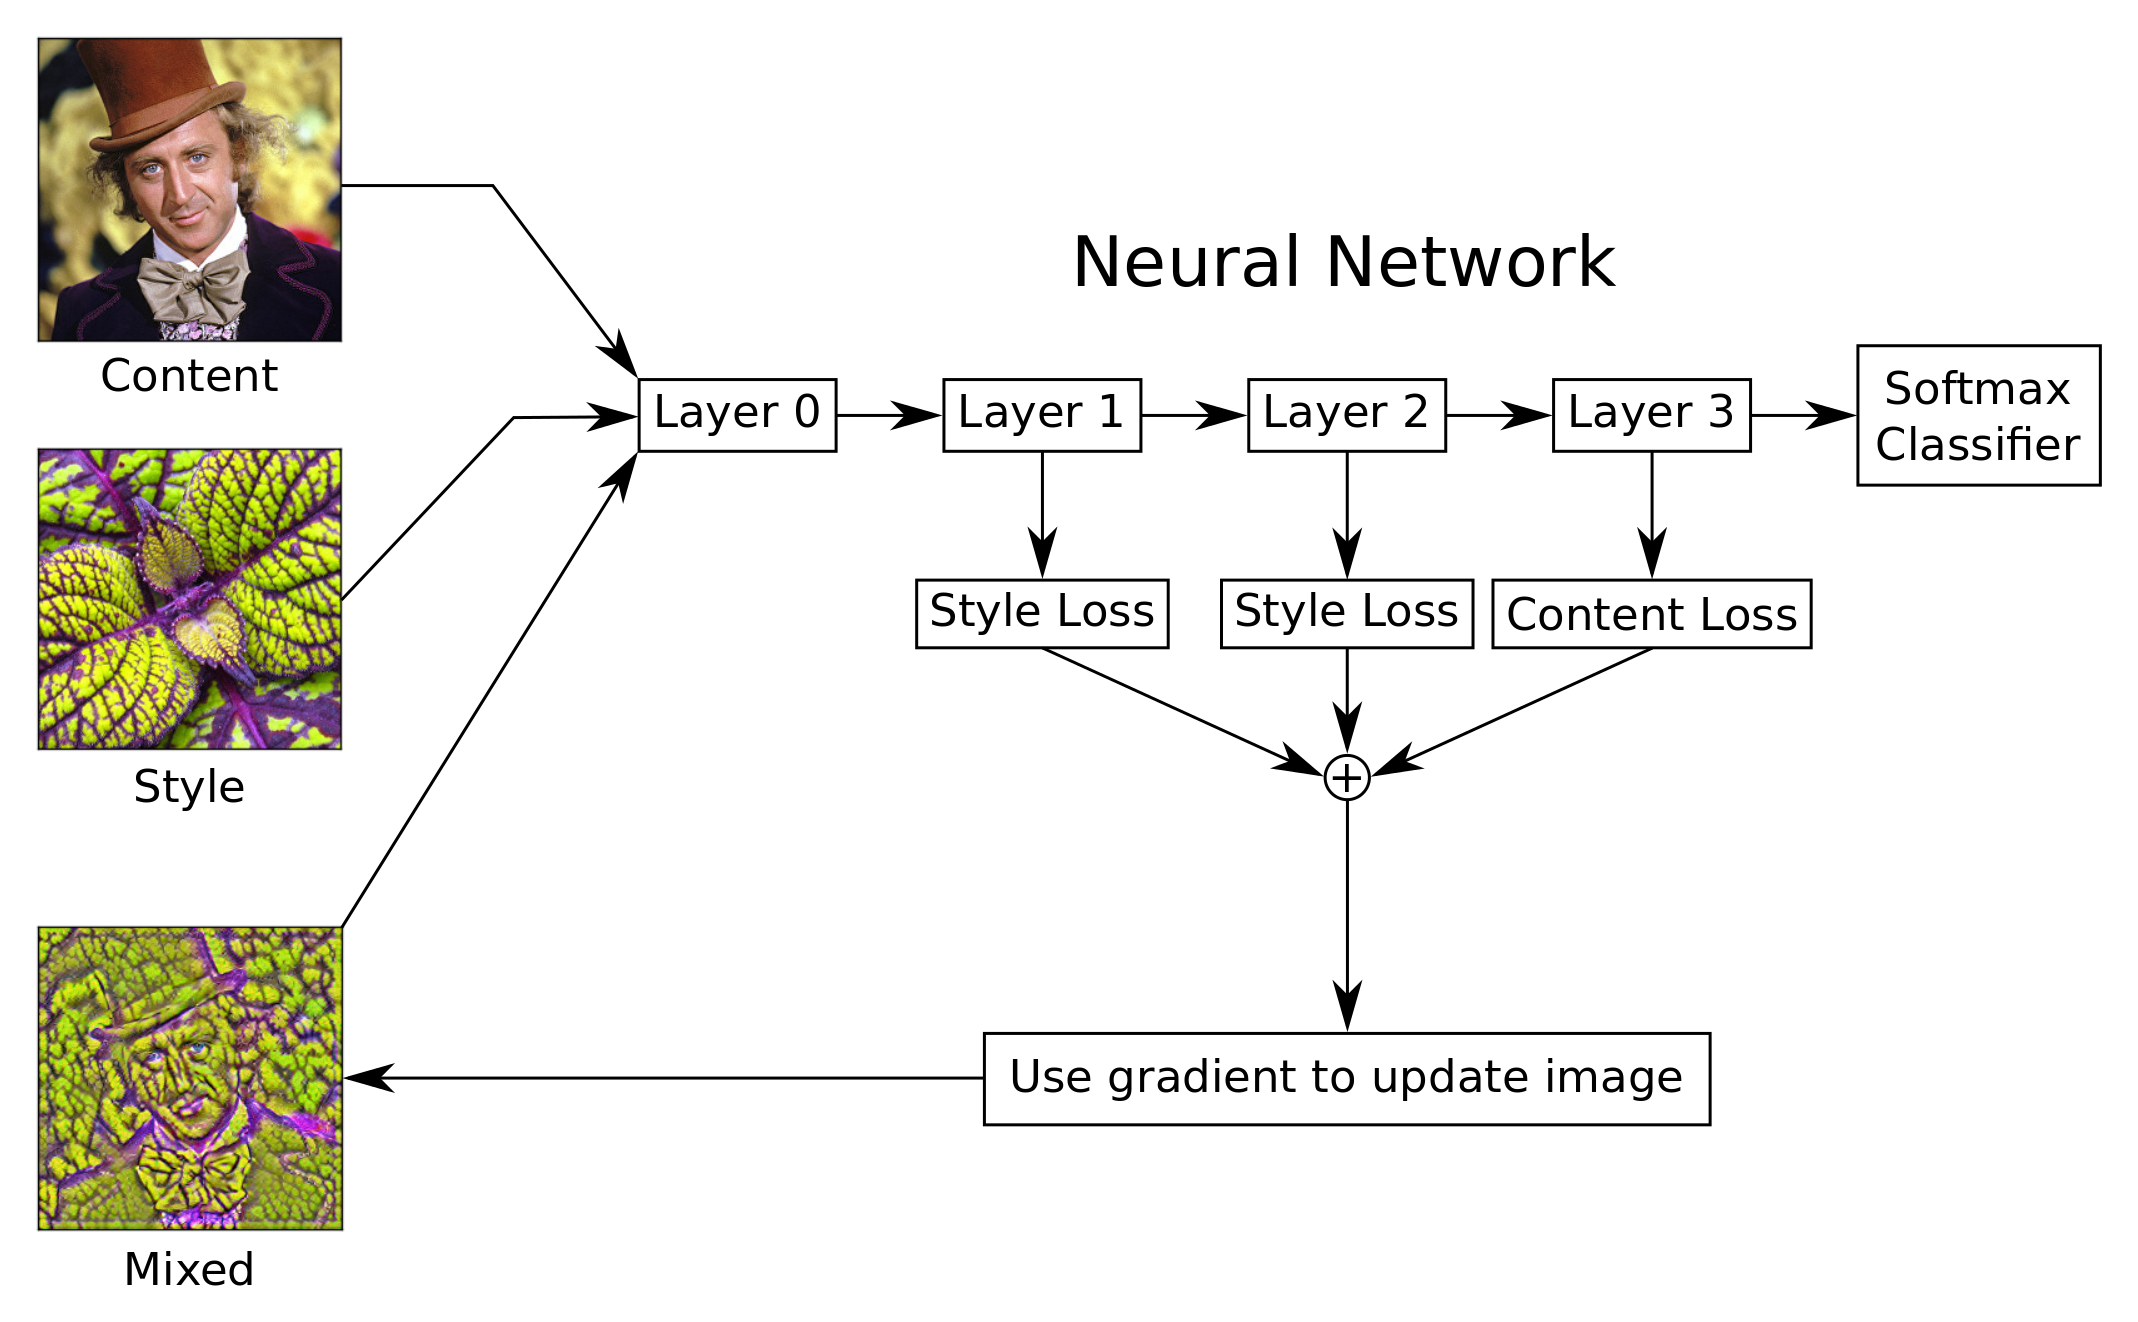
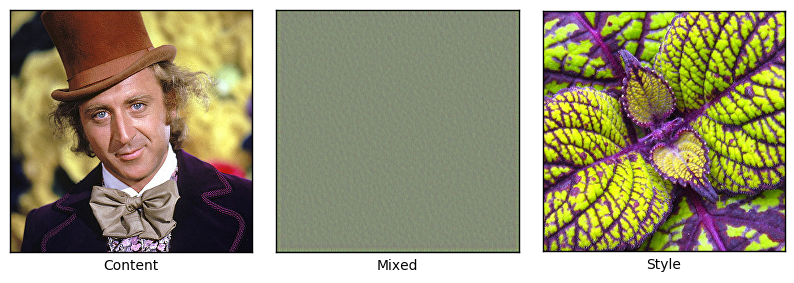
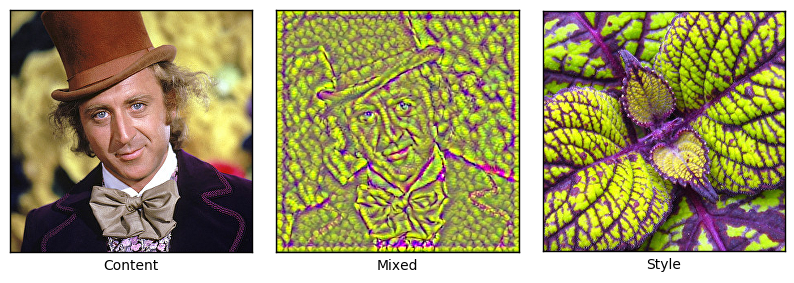
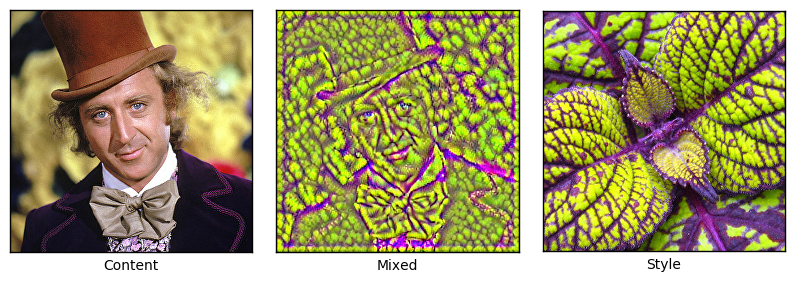
这个函数画出内容图像,混合图像以及风格图像。
defplot_images(content_image, style_image, mixed_image):# Create figure with sub-plots.
fig, axes = plt.subplots(1, 3, figsize=(10, 10))
# Adjust vertical spacing.
fig.subplots_adjust(hspace=0.1, wspace=0.1)
# Use interpolation to smooth pixels?
smooth = True# Interpolation type.if smooth:
interpolation = 'sinc'else:
interpolation = 'nearest'# Plot the content-image.# Note that the pixel-values are normalized to# the [0.0, 1.0] range by dividing with 255.
ax = axes.flat[0]
ax.imshow(content_image / 255.0, interpolation=interpolation)
ax.set_xlabel("Content")
# Plot the mixed-image.
ax = axes.flat[1]
ax.imshow(mixed_image / 255.0, interpolation=interpolation)
ax.set_xlabel("Mixed")
# Plot the style-image
ax = axes.flat[2]
ax.imshow(style_image / 255.0, interpolation=interpolation)
ax.set_xlabel("Style")
# Remove ticks from all the plots.for ax in axes.flat:
ax.set_xticks([])
ax.set_yticks([])
# Ensure the plot is shown correctly with multiple plots# in a single Notebook cell.
plt.show()
defcreate_content_loss(session, model, content_image, layer_ids):"""
Create the loss-function for the content-image.
Parameters:
session: An open TensorFlow session for running the model's graph.
model: The model, e.g. an instance of the VGG16-class.
content_image: Numpy float array with the content-image.
layer_ids: List of integer id's for the layers to use in the model.
"""# Create a feed-dict with the content-image.
feed_dict = model.create_feed_dict(image=content_image)
# Get references to the tensors for the given layers.
layers = model.get_layer_tensors(layer_ids)
# Calculate the output values of those layers when# feeding the content-image to the model.
values = session.run(layers, feed_dict=feed_dict)
# Set the model's graph as the default so we can add# computational nodes to it. It is not always clear# when this is necessary in TensorFlow, but if you# want to re-use this code then it may be necessary.with model.graph.as_default():
# Initialize an empty list of loss-functions.
layer_losses = []
# For each layer and its corresponding values# for the content-image.for value, layer in zip(values, layers):
# These are the values that are calculated# for this layer in the model when inputting# the content-image. Wrap it to ensure it# is a const - although this may be done# automatically by TensorFlow.
value_const = tf.constant(value)
# The loss-function for this layer is the# Mean Squared Error between the layer-values# when inputting the content- and mixed-images.# Note that the mixed-image is not calculated# yet, we are merely creating the operations# for calculating the MSE between those two.
loss = mean_squared_error(layer, value_const)
# Add the loss-function for this layer to the# list of loss-functions.
layer_losses.append(loss)
# The combined loss for all layers is just the average.# The loss-functions could be weighted differently for# each layer. You can try it and see what happens.
total_loss = tf.reduce_mean(layer_losses)
return total_loss
defgram_matrix(tensor):
shape = tensor.get_shape()
# Get the number of feature channels for the input tensor,# which is assumed to be from a convolutional layer with 4-dim.
num_channels = int(shape[3])
# Reshape the tensor so it is a 2-dim matrix. This essentially# flattens the contents of each feature-channel.
matrix = tf.reshape(tensor, shape=[-1, num_channels])
# Calculate the Gram-matrix as the matrix-product of# the 2-dim matrix with itself. This calculates the# dot-products of all combinations of the feature-channels.
gram = tf.matmul(tf.transpose(matrix), matrix)
return gram
defcreate_style_loss(session, model, style_image, layer_ids):"""
Create the loss-function for the style-image.
Parameters:
session: An open TensorFlow session for running the model's graph.
model: The model, e.g. an instance of the VGG16-class.
style_image: Numpy float array with the style-image.
layer_ids: List of integer id's for the layers to use in the model.
"""# Create a feed-dict with the style-image.
feed_dict = model.create_feed_dict(image=style_image)
# Get references to the tensors for the given layers.
layers = model.get_layer_tensors(layer_ids)
# Set the model's graph as the default so we can add# computational nodes to it. It is not always clear# when this is necessary in TensorFlow, but if you# want to re-use this code then it may be necessary.with model.graph.as_default():
# Construct the TensorFlow-operations for calculating# the Gram-matrices for each of the layers.
gram_layers = [gram_matrix(layer) for layer in layers]
# Calculate the values of those Gram-matrices when# feeding the style-image to the model.
values = session.run(gram_layers, feed_dict=feed_dict)
# Initialize an empty list of loss-functions.
layer_losses = []
# For each Gram-matrix layer and its corresponding values.for value, gram_layer in zip(values, gram_layers):
# These are the Gram-matrix values that are calculated# for this layer in the model when inputting the# style-image. Wrap it to ensure it is a const,# although this may be done automatically by TensorFlow.
value_const = tf.constant(value)
# The loss-function for this layer is the# Mean Squared Error between the Gram-matrix values# for the content- and mixed-images.# Note that the mixed-image is not calculated# yet, we are merely creating the operations# for calculating the MSE between those two.
loss = mean_squared_error(gram_layer, value_const)
# Add the loss-function for this layer to the# list of loss-functions.
layer_losses.append(loss)
# The combined loss for all layers is just the average.# The loss-functions could be weighted differently for# each layer. You can try it and see what happens.
total_loss = tf.reduce_mean(layer_losses)
return total_loss
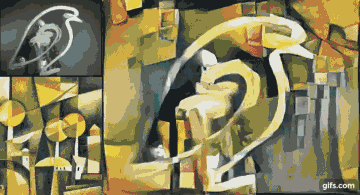
defstyle_transfer(content_image, style_image,
content_layer_ids, style_layer_ids,
weight_content=1.5, weight_style=10.0,
weight_denoise=0.3,
num_iterations=120, step_size=10.0):"""
Use gradient descent to find an image that minimizes the
loss-functions of the content-layers and style-layers. This
should result in a mixed-image that resembles the contours
of the content-image, and resembles the colours and textures
of the style-image.
Parameters:
content_image: Numpy 3-dim float-array with the content-image.
style_image: Numpy 3-dim float-array with the style-image.
content_layer_ids: List of integers identifying the content-layers.
style_layer_ids: List of integers identifying the style-layers.
weight_content: Weight for the content-loss-function.
weight_style: Weight for the style-loss-function.
weight_denoise: Weight for the denoising-loss-function.
num_iterations: Number of optimization iterations to perform.
step_size: Step-size for the gradient in each iteration.
"""# Create an instance of the VGG16-model. This is done# in each call of this function, because we will add# operations to the graph so it can grow very large# and run out of RAM if we keep using the same instance.
model = vgg16.VGG16()
# Create a TensorFlow-session.
session = tf.InteractiveSession(graph=model.graph)
# Print the names of the content-layers.
print("Content layers:")
print(model.get_layer_names(content_layer_ids))
print()
# Print the names of the style-layers.
print("Style layers:")
print(model.get_layer_names(style_layer_ids))
print()
# Create the loss-function for the content-layers and -image.
loss_content = create_content_loss(session=session,
model=model,
content_image=content_image,
layer_ids=content_layer_ids)
# Create the loss-function for the style-layers and -image.
loss_style = create_style_loss(session=session,
model=model,
style_image=style_image,
layer_ids=style_layer_ids)
# Create the loss-function for the denoising of the mixed-image.
loss_denoise = create_denoise_loss(model)
# Create TensorFlow variables for adjusting the values of# the loss-functions. This is explained below.
adj_content = tf.Variable(1e-10, name='adj_content')
adj_style = tf.Variable(1e-10, name='adj_style')
adj_denoise = tf.Variable(1e-10, name='adj_denoise')
# Initialize the adjustment values for the loss-functions.
session.run([adj_content.initializer,
adj_style.initializer,
adj_denoise.initializer])
# Create TensorFlow operations for updating the adjustment values.# These are basically just the reciprocal values of the# loss-functions, with a small value 1e-10 added to avoid the# possibility of division by zero.
update_adj_content = adj_content.assign(1.0 / (loss_content + 1e-10))
update_adj_style = adj_style.assign(1.0 / (loss_style + 1e-10))
update_adj_denoise = adj_denoise.assign(1.0 / (loss_denoise + 1e-10))
# This is the weighted loss-function that we will minimize# below in order to generate the mixed-image.# Because we multiply the loss-values with their reciprocal# adjustment values, we can use relative weights for the# loss-functions that are easier to select, as they are# independent of the exact choice of style- and content-layers.
loss_combined = weight_content * adj_content * loss_content + \
weight_style * adj_style * loss_style + \
weight_denoise * adj_denoise * loss_denoise
# Use TensorFlow to get the mathematical function for the# gradient of the combined loss-function with regard to# the input image.
gradient = tf.gradients(loss_combined, model.input)
# List of tensors that we will run in each optimization iteration.
run_list = [gradient, update_adj_content, update_adj_style, \
update_adj_denoise]
# The mixed-image is initialized with random noise.# It is the same size as the content-image.
mixed_image = np.random.rand(*content_image.shape) + 128for i in range(num_iterations):
# Create a feed-dict with the mixed-image.
feed_dict = model.create_feed_dict(image=mixed_image)
# Use TensorFlow to calculate the value of the# gradient, as well as updating the adjustment values.
grad, adj_content_val, adj_style_val, adj_denoise_val \
= session.run(run_list, feed_dict=feed_dict)
# Reduce the dimensionality of the gradient.
grad = np.squeeze(grad)
# Scale the step-size according to the gradient-values.
step_size_scaled = step_size / (np.std(grad) + 1e-8)
# Update the image by following the gradient.
mixed_image -= grad * step_size_scaled
# Ensure the image has valid pixel-values between 0 and 255.
mixed_image = np.clip(mixed_image, 0.0, 255.0)
# Print a little progress-indicator.
print(". ", end="")
# Display status once every 10 iterations, and the last.if (i % 10 == 0) or (i == num_iterations - 1):
print()
print("Iteration:", i)
# Print adjustment weights for loss-functions.
msg = "Weight Adj. for Content: {0:.2e}, Style: {1:.2e}, Denoise: {2:.2e}"
print(msg.format(adj_content_val, adj_style_val, adj_denoise_val))
# Plot the content-, style- and mixed-images.
plot_images(content_image=content_image,
style_image=style_image,
mixed_image=mixed_image)
print()
print("Final image:")
plot_image_big(mixed_image)
# Close the TensorFlow session to release its resources.
session.close()
# Return the mixed-image.return mixed_image
# The VGG16-model has 13 convolutional layers.# This selects all those layers as the style-layers.# This is somewhat slow to optimize.
style_layer_ids = list(range(13))
# You can also select a sub-set of the layers, e.g. like this:# style_layer_ids = [1, 2, 3, 4]