

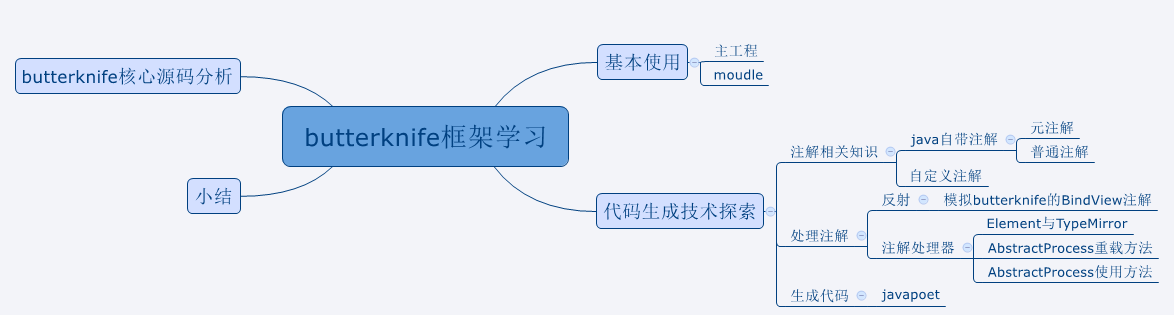
本篇博文主要介绍butterknife使用及其背后的技术点,行文结构如下
0x00 butterknife
项目地址: github.com/JakeWharton…
github原文是这样介绍的
Field and method binding for Android views which uses annotation processing to generate boilerplate code for you.
翻译过来就是:
用注解处理器为程序在编译期生成一些样板代码,用于把一些属性字段和回调方法绑定到 Android 的 View,即专门为Android View设计的绑定注解,专业解决各种findViewById。
0x01 基本使用
具体可以参看demo 地址github.com/xsfelvis/Bu…
配置
在主工程中
dependencies {
    compile 'com.jakewharton:butterknife:8.8.1'
    annotationProcessor 'com.jakewharton:butterknife-compiler:8.8.1'
}
在Library中使用
首先需要 在项目buildscript中增加
buildscript {
  repositories {
    mavenCentral()
   }
  dependencies {
    classpath 'com.jakewharton:butterknife-gradle-plugin:8.8.1'
  }
}
然后在moudle中
apply plugin: 'com.android.library'
apply plugin: 'com.jakewharton.butterknife'
并且使用R2而不是R
class ExampleActivity extends Activity {
  @BindView(R2.id.user) EditText username;
  @BindView(R2.id.pass) EditText password;
    ...
}
Tips:使用R2在Library中是由于在Library中R不是final的,但是注解如BindView需要R里面的id为final的。
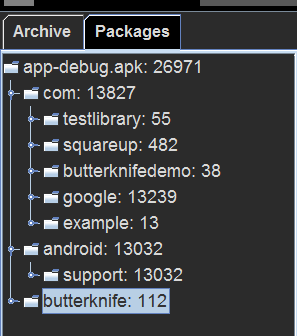
而且通过classShark分析来看,该库的方法数比较少,仅有112个
常规使用
- Actvity中
对一个成员变量使用@BindView注解,并传入一个View ID, ButterKnife 就能够帮你找到对应的View,并自动的进行转换(将View转换为特定的子类):
- 资源绑定
绑定资源到类成员上可以使用@BindBool、@BindColor、@BindDimen、@BindDrawable、@BindInt、@BindString。使用时对应的注解需要传入对应的id资源,例如@BindString你需要传入R.string.id_string的字符串的资源id。
- 布局绑定
Butter Knife提供了bind的几个重载,只要传入跟布局,便可以在任何对象中使用注解绑定,通常使用在fragment和adapter
-
Fragment中
public class FancyFragment extends Fragment { @BindView(R.id.button1) Button button1; @BindView(R.id.button2) Button button2; @Override public View onCreateView(LayoutInflater inflater, ViewGroup container, Bundle savedInstanceState) { View view = inflater.inflate(R.layout.fancy_fragment, container, false); ButterKnife.bind(this, view); // TODO Use fields... return view; } } } -
Adapter中
public class MyAdapter extends BaseAdapter { @Override public View getView(int position, View view, ViewGroup parent) { ViewHolder holder; if (view != null) { holder = (ViewHolder) view.getTag(); } else { view = inflater.inflate(R.layout.whatever, parent, false); holder = new ViewHolder(view); view.setTag(holder); } holder.name.setText("John Doe"); // etc... return view; } static class ViewHolder { @BindView(R.id.title) TextView name; @BindView(R.id.job_title) TextView jobTitle; public ViewHolder(View view) { ButterKnife.bind(this, view); } } } -
监听器绑定
监听器能够自动的绑定到特定的执行方法上:
//单个绑定
@OnClick(R.id.submit)
public void submit(View view) {
  // TODO submit data to server...
}

//多个绑定
@OnClick({R.id.btnJumpToLib, R.id.btnOne, R.id.btnTwo})
void responseClick(View view) {
    switch (view.getId()) {
        case R.id.btnJumpToLib:
            jumpToLib();
            break;
        case R.id.btnOne:
            Toast.makeText(this, "click btnOne", Toast.LENGTH_SHORT).show();
            break;
        case R.id.btnTwo:
            Toast.makeText(this, "click btnTwo", Toast.LENGTH_SHORT).show();
            break;
        default:
            break;
    }

}
- 重置绑定
Fragment的生命周期与Activity不同。在Fragment中,如果你在onCreateView中使用绑定,那么你需要在onDestroyView中设置所有view为null。为此,ButterKnife返回一个Unbinder实例以便于你进行这项处理。在合适的生命周期回调中调用unbind函数就可完成重置。
public class FancyFragment extends Fragment {
    @BindView(R.id.button1)
    Button button1;
    @BindView(R.id.button2)
    Button button2;
    private Unbinder unbinder;

    @Override
    public View onCreateView(LayoutInflater inflater, ViewGroup container, Bundle savedInstanceState) {
        View view = inflater.inflate(R.layout.fancy_fragment, container, false);
        unbinder = ButterKnife.bind(this, view); // TODO Use fields...
        return view;
    }

    @Override
    public void onDestroyView() {
        super.onDestroyView();
        unbinder.unbind();
    }
}
- 可选绑定
在默认情况下, @bind和监听器的绑定都是必须的,如果目标view没有找到的话,Butter Knife将会抛出个异常。
如果你并不想使用这样的默认行为而是想创建一个可选的绑定,那么你只需要在变量上使用@Nullable注解或在函数上使用@Option注解。
注意事项
- 在Activity中 ButterKnife.bind(this);必须在setContentView()之后,且父类bind绑定后,子类不需要再bind
- 在Fragment中使用 ButterKnife.bind(this, mRootView);
- 属性布局不能用private or static 修饰,否则会报错
- setContentView() 不能通过注解实现。
- ButterKnife已经更新到版本8.0.7了,以前的版本中叫做@InjectView了,而现在改用叫@Bind,更加贴合语义。
- 在Fragment生命周期中,onDestoryView也需要Butterknife.unbind(this)
- 在Libbray中使用R2.id.xxx
0x02 代码生成技术探索
从上面的使用我们可以看出,一个注解就可以将相关联的代码自动生成如demo中的实现了Unbinder接口的MainActivity_ViewBinding文件(build/generated/source/apt/)。这里涉及到3个核心技术
- 编译期注解
- APT(注解处理器)
- javaPoet(自动生成代码)
在分析ButterKnife源码之前首先需要了解以上3个技术点,下面将逐一介绍这三个技术点,最后再聊聊
注解
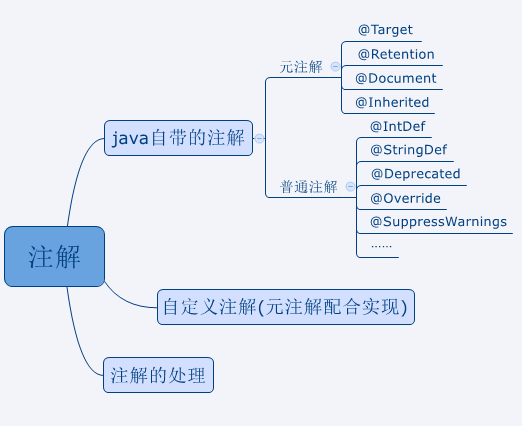
Java自带的注解
主要分类两大类
-
元注解
-
普通注解
元注解(meta-annotation)
翻译一下就是“注解的注解”,即注解用来注解其他注解的注解,公有4个,常用于自定义注解
- @Target
Target描述了这个注解的使用范围,使用方法如@Target(ElementType.TYPE),ElementType的取值有七种,如下:
ElemenetType.CONSTRUCTOR 构造器声明
ElemenetType.FIELD 域声明(包括 enum 实例)
ElemenetType.LOCAL_VARIABLE 局部变量声明
ElemenetType.METHOD 方法声明
ElemenetType.PACKAGE 包声明
ElemenetType.PARAMETER 参数声明
ElemenetType.TYPE 类,接口(包括注解类型)或enum声明
- @Retention
Retention用来描述这个注解的生命周期,英文意思为“保留、保持”、,即注解的“存活时间”,使用方法如下
@Retention(RetentionPolicy.RUNTIME)
保存策略总共有3种
SOURCE:  Annotation只保留在原代码中,当编译器编译的时候就会抛弃它。(即源文件保留)
CLASS:   编译器将把Annotation记录在Class文件中,不过当java程序执行的时候,JVM将抛弃它。(即class保留)
RUNTIME: 在Retationpolicy.CLASS的基础上,JVM执行的时候也不会抛弃它,所以我们一般在程序中可以通过反射来获得这个注解,然后进行处理。
Tips:
- 我们知道,Java代码会有源代码(java)经过编译器编译成class文件(二进制字节码),然后由JVM虚拟机去解释执行,Retention用于描述注解在这个阶段存活的时间,因此根据注解不同的生命周期会有不同的处理注解的方式,这一点非常重要。之前注解往往被人诟病使用反射速度慢,其实使用的是Runtime策略的注解,而butterKnife一些使用的是class策略的注解,仅仅会影响编译期速度,但是由于仅仅保存在字节码中,因此需要通过其他的手段把注解信息保留下来传递到虚拟机去执行,通常使用的是自定义注解处理器
- 首先要明确生命周期长度 SOURCE < CLASS < RUNTIME ,所以前者能作用的地方后者一定也能作用。一般如果需要在运行时去动态获取注解信息,那只能用 RUNTIME 注解;如果要在编译时进行一些预处理操作,比如生成一些辅助代码(如 ButterKnife),就用 CLASS注解;如果只是做一些检查性的操作,比如 @Override 和 @SuppressWarnings,则可选用 SOURCE 注解。
- @Document
Document标记这个注解应该被 javadoc工具记录。默认情况下,Javadoc是不包括注解的。
- @Inherited
Inherited译为可继承的,如果一个使用了@Inherited 修饰的 annotation类型 被用于一个 class,则这个 annotation 将被用于该class的子类。
普通注解
用于描述代码的注解
自定义注解
通过使用元注解可以实现我们自己的注解,使用@interface自定义注解时,不能继承其他的注解或接口。@interface用来声明一个注解,其中的每一个方法实际上是声明了一个配置参数。方法的名称就是参数的名称,返回值类型就是参数的类型,其中可以通过default来声明参数的默认值。,看下butterknife中的自定义注解BindeView
    @Retention(CLASS) @Target(FIELD)
    public @interface BindView {
      /** View ID to which the field will be bound. */
      @IdRes int value();
    }
使用
@BindView(R.id.title) TextView title;
处理注解
具体例子请参看Demo
处理注解的方式跟元注解 @Retention 相关,再次强调一下
由于不同注解策略带来的注解生命周期长度 SOURCE < CLASS < RUNTIME ,所以前者能作用的地方后者一定也能作用。一般如果需要在运行时去动态获取注解信息,那只能用 RUNTIME 注解;如果要在编译时进行一些预处理操作,比如生成一些辅助代码(如 ButterKnife),页面路由信息等,就用 CLASS注解;如果只是做一些检查性的操作,比如 @Override 和 @SuppressWarnings,则可选用
SOURCE 注解。
@Retention(SOURCE)
源码注解(RetentionPolicy.SOURCE)的生命周期只存在Java源文件这一阶段,是3种生命周期中最短的注解。基本无需刻意去做处理,如@InDef、@StringDef等
@Retention(Class)
使用APT去处理注解
@Retention(RunTime)
生命周期最长通常可以使用反射,也可以使用自定义注解器
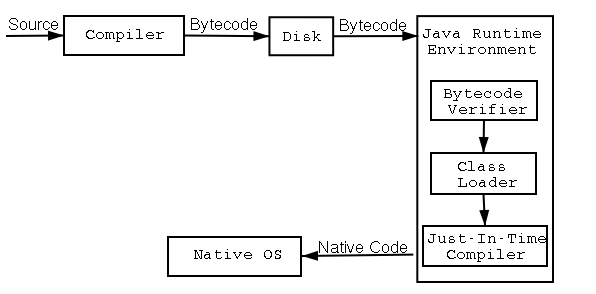
下面详细介绍一下实现一个用APT处理@Retention(Class)策略的注解,在介绍之前首先得看下一java中处理注解的流程
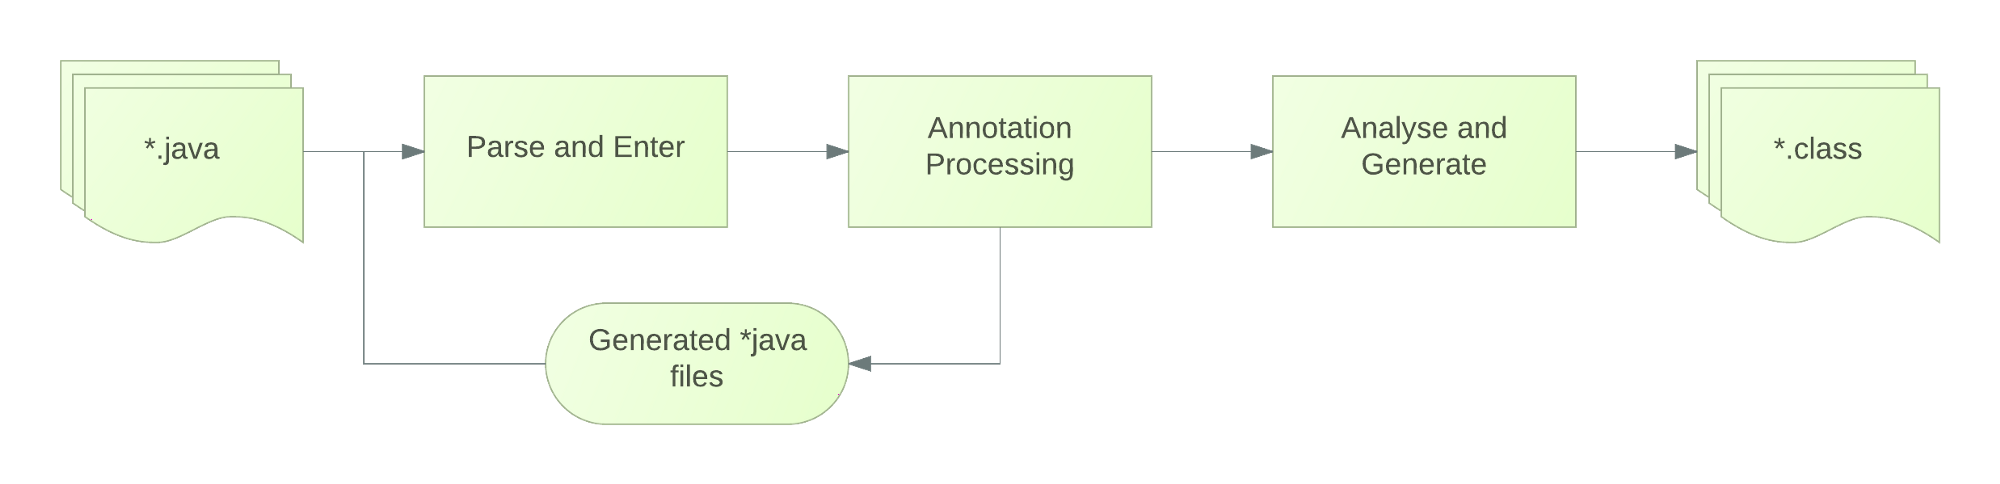
Annotation processing 是javac中用于编译时扫描和解析Java注解的工具
你可以定义注解,并且自定义解析器来处理他们,Annotation processing是在编译阶段执行的,它的原理就是读入Java源代码,解析注解,然后生成新的Java代码。新生成的Java代码最后被编译成Java字节码,注解解析器(Annotation Processor)不能改变读入的Java 类,比如不能加入或删除Java方法
因为需要引用apt插件,所以需要在 buildscript加入
classpath 'com.neenbedankt.gradle.plugins:android-apt:1.8'
那么什么是android-apt呢?官网有这么一段描述:
The android-apt plugin assists in working with annotation processors in combination with Android Studio. It has two purposes:
1、Allow to configure a compile time only annotation processor as a dependency, not including the artifact in the final APK or library 2、Set up the source paths so that code that is generated from the annotation processor is correctly picked up by Android Studio
大体来讲它有两个作用:
- 能在编译时期去依赖注解处理器并进行工作,但在生成 APK 时不会包含任何遗留的东西
- 能够辅助 Android Studio 在项目的对应目录中存放注解处理器在编译期间生成的文件
自定义注解器需要继承AbstractProcessor,然后实现如下重要方法:
- init()
初始化,得到Elements、Types、Filer等工具类 - getSupportedAnnotationTypes()
描述注解处理器需要处理的注解 - process()
扫描分析注解,生成代码
并且在生成文件时使用到了javaPoet来自动生成代码,javaPoet主要是用来
JavaPoet is a Java API for generating .java source files.
具体使用可以参考github.com/square/java…,这里就不展开说明了。
不过引入了butterknife之后就无需引入apt了,因为之前引入了一个annotationprocessor,这几个库都是jakewarton写的,因此就直接免除了,如果继续引入会报Using incompatible plugins for the annotation processing,具体解决方案可以参看stackoverflow.com/questions/4…
0x03 butterKnife核心源码分析
有了上面的基础现在可以好好分析一下了,现在再次回忆下上面提到注解处理流程图,
butterknife的核心思路就是
在编译源文件时,会分析扫描注解,当扫描到butterknife定义的@BindView、@OnClick等注解时,会使用JavaPoet来生成代码。生成后的文件会再次分析,直到没有分析到需要处理的注解位置。
千万不要说成用注解+反射哦~
分析源码主要分为以下两步:
- apt 自动生成的类
- 生成的类是如何关联到butterknife内部框架
自动生成的类
先看下demo中自动生成的类的部分代码
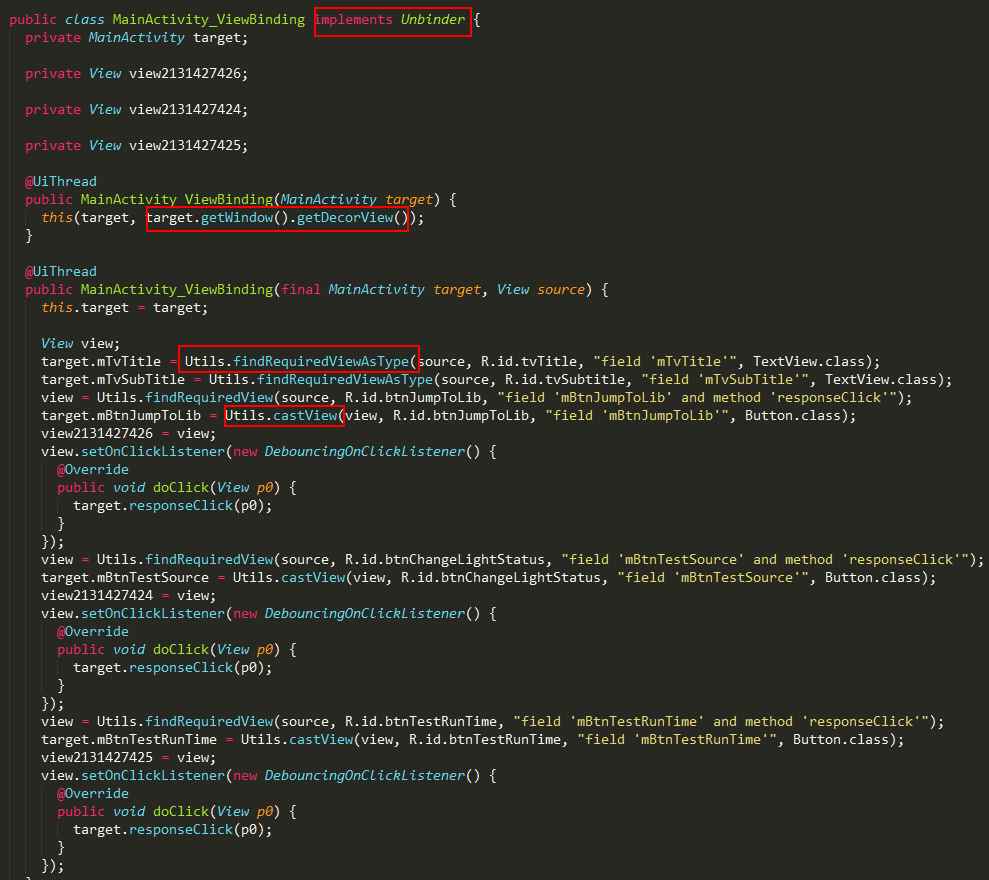
从这个生成类我们可以获取如下信息:
-
butterknife通过注解生成了一些辅助代码,从它的框架层面帮我们屏蔽了繁琐的细节
-
需要获取decorview才能对相关Id的view进行操作(这也印证了之前的一个点,在Activity中 ButterKnife.bind(this);必须在setContentView()之后)
Tips:
- 作为应用程序的主线程,ActivityThread负责处理各种核心事件,如AMS通知应用进程去启动一个Activity这个任务,最终将转化为ActvityThread所管理的LAUNCH_ACTIVITY消息,然后调用handleLaunchActivity,这是整个ViewTree建立流程的起点
- 该函数主要生成一个Activity对象,并调用他们的attach方法,然后通过mInstrumentation.callActivityOnCreate调用Activity.onCreate,从而得到一个PhoneWindow对象。其中window对象在Activity中可以被看成“界面的框架”,因此有了框架之后还需要生成具体的内容,即Activity的mDecor(而产生DecorView则是由setContentView发起的)
- Activity的setContentView只是一个中介,它将通过对应的Window对象来完成DecorView的构造,具体参看PhoneWindow#setContentView#installDecor()
- 从Zygote进程fork出应用进程之后,会通过反射来调用ActivityThread的main方法.具体是通过RuntimeInit的invokeStaticMain方法中
如何消除了fidviewById的强转?
在生成代码中可以看到如下代码
target.mTvTitle = Utils.findRequiredViewAsType(source, R.id.tvTitle, "field 'mTvTitle'", TextView.class);
Utils#findRequiredViewAsType,其中source就是之前传入的taget.getWindow.getDecoreView
  public static <T> T findRequiredViewAsType(View source, @IdRes int id, String who,
      Class<T> cls) {
    View view = findRequiredView(source, id, who); //找到view
    return castView(view, id, who, cls);//强转 如(TexteView)mTextView之类
  }


  public static View findRequiredView(View source, @IdRes int id, String who) {
    View view = source.findViewById(id); //从decoreView中执行findViewById
    if (view != null) {
      return view;
    }
    ……
  }

  public static <T> T castView(View view, @IdRes int id, String who, Class<T> cls) {
    try {
      return cls.cast(view);
    } catch (ClassCastException e) {
    ……
    }
  }
MainActivity如何知晓框架为它生成的MainActivity_ViewBind这个辅助类并实例化?
还记得在使用之前需要使用bind函数,以activity为例,
ButterKnife.bind(this);
ButterKnife#bind
    @NonNull @UiThread
  public static Unbinder bind(@NonNull Activity target) {
    View sourceView = target.getWindow().getDecorView(); //获取devoreView
    return createBinding(target, sourceView); //执行绑定操作
  }
继续看下绑定操作做了什么
ButterKnife#createBinding
 private static Unbinder createBinding(@NonNull Object target, @NonNull View source) {
    Class<?> targetClass = target.getClass();
    if (debug) Log.d(TAG, "Looking up binding for " + targetClass.getName());
    Constructor<? extends Unbinder> constructor = findBindingConstructorForClass(targetClass);//查找合适的构造器

    if (constructor == null) {
      return Unbinder.EMPTY;
    }

    //noinspection TryWithIdenticalCatches Resolves to API 19+ only type.
    try {
    //通过反射创建的实例 MainActivity_ViewBinding(final MainActivity target, View source)
      return constructor.newInstance(target, source);
    } catch (IllegalAccessException e) {
        ……
    }
  }
这个函数就是先找到对应的构造器,然后创建实例,核心点进一步交到了findBindingConstructorForClass函数中
  @Nullable @CheckResult @UiThread
  private static Constructor<? extends Unbinder> findBindingConstructorForClass(Class<?> cls) {
    //
    Constructor<? extends Unbinder> bindingCtor = BINDINGS.get(cls);
    if (bindingCtor != null) {
      if (debug) Log.d(TAG, "HIT: Cached in binding map.");
      return bindingCtor;
    }
    String clsName = cls.getName();
    //过滤掉系统相关的类
    if (clsName.startsWith("android.") || clsName.startsWith("java.")) {
      if (debug) Log.d(TAG, "MISS: Reached framework class. Abandoning search.");
      return null;
    }
    try {
      //获得到对应的viebindind类,文件的命名规则是类名 + "_ViewBinding"
      Class<?> bindingClass = cls.getClassLoader().loadClass(clsName + "_ViewBinding");
      //noinspection unchecked
      bindingCtor = (Constructor<? extends Unbinder>) bindingClass.getConstructor(cls, View.class);
      if (debug) Log.d(TAG, "HIT: Loaded binding class and constructor.");
    } catch (ClassNotFoundException e) {
      if (debug) Log.d(TAG, "Not found. Trying superclass " + cls.getSuperclass().getName());
      bindingCtor = findBindingConstructorForClass(cls.getSuperclass());
    } catch (NoSuchMethodException e) {
      throw new RuntimeException("Unable to find binding constructor for " + clsName, e);
    }
    //将得到的Constructor缓存起来,避免反射的性能问题。
    BINDINGS.put(cls, bindingCtor);
    return bindingCtor;
  }
如何处理注解然后对应的代码辅助文件
先看下butterKnife工程结构
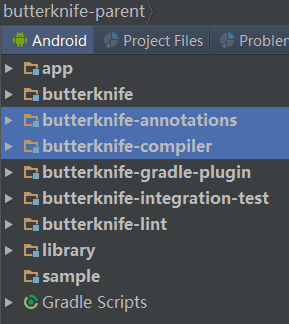
所有涉及到的注解都在butterknife-annotations中,butterknife-complier就是自定义的注解处理器(处理Class策略的注解),然后生成对应的代码辅助文件
正如之前提到的 注解处理器里包含下面几个重要的方法:
- init()
初始化,得到Elements、Types、Filer等工具类 - getSupportedAnnotationTypes()
描述注解处理器需要处理的注解 - process()
扫描分析注解,生成代码
因此核心点都在注解处理器的process()函数中,要抓住重点
ButterKnifeProcessor#process
  @Override public boolean process(Set<? extends TypeElement> elements, RoundEnvironment env) {
    //获取bing信息,重点!
    Map<TypeElement, BindingSet> bindingMap = findAndParseTargets(env);

    for (Map.Entry<TypeElement, BindingSet> entry : bindingMap.entrySet()) {
      TypeElement typeElement = entry.getKey();
      BindingSet binding = entry.getValue();
      //自动生成代码
      JavaFile javaFile = binding.brewJava(sdk, debuggable);
      try {

        javaFile.writeTo(filer);
      } catch (IOException e) {
        error(typeElement, "Unable to write binding for type %s: %s", typeElement, e.getMessage());
      }
    }

    return false;
  }
可以看到核心函数十分简练,分工明确,找到工程中所有bind的信息,然后生成对应的文件
先看找绑定信息函数 ButterKnifeProcessor#findAndParseTargets,这个函数超长,主要是解析定义的各种注解,我们这里截取解析BindeView一段来看,其他原理都一样
private Map<TypeElement, BindingSet> findAndParseTargets(RoundEnvironment env) {
    Map<TypeElement, BindingSet.Builder> builderMap = new LinkedHashMap<>();
    Set<TypeElement> erasedTargetNames = new LinkedHashSet<>();

    scanForRClasses(env);


    // Process each @BindView element.
    for (Element element : env.getElementsAnnotatedWith(BindView.class)) {
      // we don't SuperficialValidation.validateElement(element)
      // so that an unresolved View type can be generated by later processing rounds
      try {
        //重点在这里,
        parseBindView(element, builderMap, erasedTargetNames);
      } catch (Exception e) {
        logParsingError(element, BindView.class, e);
      }
    }
    ……
    return bindingMap;
  }
这个方法里是处理各种注解的主方法,多余的我都删掉了,这个方法主要是获取所有的注解,然后解析注解,把注解的所有信息封装到BindingSet中,那么解析的具体操作应该就在parseBindView(element, builderMap, erasedTargetNames)中,接着往下看:
butterknife#parseBindView 解析BindView注解的方法
private void parseBindView(Element element, Map<TypeElement, BindingSet.Builder> builderMap,
      Set<TypeElement> erasedTargetNames) {
    TypeElement enclosingElement = (TypeElement) element.getEnclosingElement();
    ……
    // Assemble information on the field.
    //这里开始看到解析BindView注解所标记的id
    int id = element.getAnnotation(BindView.class).value();

    BindingSet.Builder builder = builderMap.get(enclosingElement);
    QualifiedId qualifiedId = elementToQualifiedId(element, id);
    ……
    String name = simpleName.toString();
    TypeName type = TypeName.get(elementType);
    boolean required = isFieldRequired(element);
    // id作为属性放入到BindSet中
    builder.addField(getId(qualifiedId), new FieldViewBinding(name, type, required));

    // Add the type-erased version to the valid binding targets set.
    erasedTargetNames.add(enclosingElement);
  }
其他注解类似处理,
代码生成-应用javaPoet框架
代码生成入口是在butterknife#process,使用了javaPoet的JavaFile
 JavaFile javaFile = binding.brewJava(sdk, debuggable);
      try {
        javaFile.writeTo(filer);//生成代码
      } catch (IOException e) {
        error(typeElement, "Unable to write binding for type %s: %s", typeElement, e.getMessage());
      }
调用函数链
brewJava->createType
  private TypeSpec createType(int sdk, boolean debuggable) {
    //生成类名,修饰符是pblic
    TypeSpec.Builder result = TypeSpec.classBuilder(bindingClassName.simpleName())
        .addModifiers(PUBLIC);
    if (isFinal) {
      result.addModifiers(FINAL);
    }
    // 继承关系和应用接口信息
    if (parentBinding != null) {
      result.superclass(parentBinding.bindingClassName);
    } else {
      //private static final ClassName UNBINDER = ClassName.get("butterknife", "Unbinder");因此生成类最终实现Unbider接口
      result.addSuperinterface(UNBINDER);
    }
    ……
    // 根据类型,添加不一样的构造方法
    if (isView) {
      result.addMethod(createBindingConstructorForView());
    } else if (isActivity) {
      //activity构造函数默认构造函数,一个参数
      result.addMethod(createBindingConstructorForActivity());
    } else if (isDialog) {
      result.addMethod(createBindingConstructorForDialog());
    }
    if (!constructorNeedsView()) {
      // Add a delegating constructor with a target type + view signature for reflective use.
      result.addMethod(createBindingViewDelegateConstructor());
    }
    //操作绑定view的一些函数,默认构造函数会调用这个构造函数,若对这句话不好理解,可阅读生成代码2个构造函数
    result.addMethod(createBindingConstructor(sdk, debuggable));
    if (hasViewBindings() || parentBinding == null) {
    //创建unbinder函数
      result.addMethod(createBindingUnbindMethod(result));
    }
    return result.build();
  }
  //生成activy中的构造函数
  private MethodSpec createBindingConstructorForActivity() {
    MethodSpec.Builder builder = MethodSpec.constructorBuilder()
        .addAnnotation(UI_THREAD)
        .addModifiers(PUBLIC)
        .addParameter(targetTypeName, "target");
    if (constructorNeedsView()) {
      builder.addStatement("this(target, target.getWindow().getDecorView())");
    } else {
      builder.addStatement("this(target, target)");
    }
    return builder.build();
  }
该函数负责生成诸多函数,如主要构造函数,包含findView的绑定的多个构造函数,解绑定unbinder函数等等
这里我们可以看出生成类的规范,如实现了Unbinder接口,也看到了之前MainActivity_ViewBinding类默认构造函数自动生成的代码,这里只是一个类的大概,只生成了一个参数的构造函数,具体涉及到内部的各种view,id的操作的构造函数还在上面的result.addMethod(createBindingConstructor(sdk, debuggable));函数中完成,
  private MethodSpec createBindingConstructor(int sdk, boolean debuggable) {
     // 创建构造方法,方法修饰符为 public ,并且添加注解为UiThread
    MethodSpec.Builder constructor = MethodSpec.constructorBuilder()
        .addAnnotation(UI_THREAD)
        .addModifiers(PUBLIC);
    ……
    // 如果有注解的 View
    if (constructorNeedsView()) {
      constructor.addParameter(VIEW, "source");
    } else {
      // 否则添加 Context context 参数
      constructor.addParameter(CONTEXT, "context");
    }
    ……
    // 如果有 View 绑定
    if (hasViewBindings()) {
      if (hasViewLocal()) {
        // Local variable in which all views will be temporarily stored.
        constructor.addStatement("$T view", VIEW);
      }
      for (ViewBinding binding : viewBindings) {
        // 为 View 绑定生成类似于 findViewById 之类的代码!!!
        addViewBinding(constructor, binding, debuggable);
      }
      for (FieldCollectionViewBinding binding : collectionBindings) {
        constructor.addStatement("$L", binding.render(debuggable));
      }

      if (!resourceBindings.isEmpty()) {
        constructor.addCode("\n");
      }
    }
    ……
    return constructor.build();
  }
可以看到生成代码的逻辑,其中有个重要的那些findView的方法,addViewBinding,代码解析如下
private void addViewBinding(MethodSpec.Builder result, ViewBinding binding) {
    if (binding.isSingleFieldBinding()) {
        // Optimize the common case where there's a single binding directly to a field.
        FieldViewBinding fieldBinding = binding.getFieldBinding();
        // 注意这里直接使用了 target. 的形式,所以属性肯定是不能 private 的
        CodeBlock.Builder builder = CodeBlock.builder()
                .add("target.$L = ", fieldBinding.getName());
        // 下面都是 View 绑定的代码
        boolean requiresCast = requiresCast(fieldBinding.getType());
        if (!requiresCast && !fieldBinding.isRequired()) {
            builder.add("source.findViewById($L)", binding.getId().code);
        } else {
            builder.add("$T.find", UTILS);
            builder.add(fieldBinding.isRequired() ? "RequiredView" : "OptionalView");
            if (requiresCast) {
                builder.add("AsType");
            }
            builder.add("(source, $L", binding.getId().code);
            if (fieldBinding.isRequired() || requiresCast) {
                builder.add(", $S", asHumanDescription(singletonList(fieldBinding)));
            }
            if (requiresCast) {
                builder.add(", $T.class", fieldBinding.getRawType());
            }
            builder.add(")");
        }
        result.addStatement("$L", builder.build());
        return;
    }

    List requiredBindings = binding.getRequiredBindings();
    if (requiredBindings.isEmpty()) {
        result.addStatement("view = source.findViewById($L)", binding.getId().code);
    } else if (!binding.isBoundToRoot()) {
        result.addStatement("view = $T.findRequiredView(source, $L, $S)", UTILS,
                binding.getId().code, asHumanDescription(requiredBindings));
    }

    addFieldBinding(result, binding);
    // OnClick 等监听事件绑定
    addMethodBindings(result, binding);
}
至此代码生成部分分析结束~
0x04 小结
- 本篇博文主要依托butetrknife框架,介绍它的使用,在分析源码之前铺垫了其核心技术,注解的一些高级玩法、自定义注解处理器、javapoet自动生成代码,进而深入分析了butterknife源码;
- 其中apt+javaPoet目前也是应用比较广泛,在一些大的开源库,如EventBus3.0+,页面路由 ARout、Dagger、Retrofit等均有使用的身影
- 注解不仅仅是通过反射一种方式来使用,也可以使用APT在编译期处理
最后希望大家能够有所收获,周末愉快~
