

使用AccountManager和AbstractAccountAuthenticator建立账户系统
为什么要使用AccountManager和AccountAuthenticatr
建立账户管理系统,可以使用SharedPreference来存储、更新、删除AuthToken,也可以用来存储、更新、删除账户和密码。既然这样,为什么还要使用AccountManager和AccountAuthenticator?
原因有一下几点:
1.AccountManager是Android系统提供的账户管理框架,十分强大和方便,可以管理不同类型账户,不同类型AuthenToken
2.AccountAuthenticator把账户的验证过程、AuthToken的获取过程分离出来,降低程序的耦合性
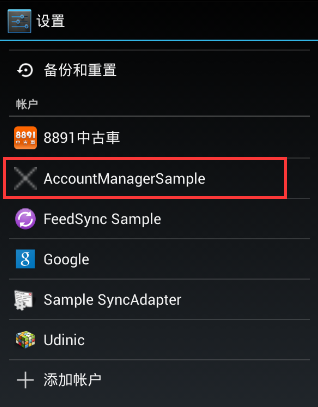
3.使用AccountAuthenticator会在”设置”中添加一个账户入口,感觉很酷炫。
AccountManager和Authenticator之间的关系
AccountManager和Authenticator的方法相对应,比如,AccountManager的addAccount()方法会调用Authenticator的addAccount()方法,Authenticator的方法会返回一个Bundle给AccountManager处理。具体细节后面会介绍。
使用AccountManager管理账号
顾名思义,AccountManager是用来管理用户账户。使用AccountManager有两个要点:Bundle key常量的含义、如何使用账户管理方法。 AccountManager定义了许多Bundle Key常量,可以用作Intent的key用于Activity之间传递参数;也可以作为Authenticator返回Bundle的Key,这种情况,AccountManager会根据Key的情况作出相应操作,比如,跳转到验证身份页面,返回Accont Type,AuthToken,Account Name(getAuthenToken()有返回AuthToken时必须返回Account Type和Account Name,不然会提示“the type and name should not be empty”)等。
介绍一些常用Bundle key:
| Key | 含义 |
|---|---|
| AccountManager.KEY_ACCOUNT_AUTHENTICATOR_RESPONSE | 可以调用onResult()和onError()来相应用户提供的信息 |
| AccountManager.KEY_INTENT | 开启新Activity和用户进行交互 |
| AccountManager.KEY_AUTHTOKEN | 令牌 |
| AccountManager.KEY_ACCOUNT_TYPE | 账户类型 |
| AccountManager.KEY_ACCOUNT_NAME | 账户名 |
| AccountManager.KEY_ERROR_CODE | 错误码(必须大于0) |
| AccountManager.KEY_ERROR_MESSAGE | 错误信息(必须和错误码一起使用) |
介绍一些常用AccountManager管理账户方法: 获取AuthToken:
@param account 账户
@param authTokenType token类型
@param options 额外的数据
@param activity 用来开启另外的Activity
@param callback 结果回调
@param 回调的线程,null时为主线程
public AccountManagerFuture<Bundle> getAuthToken(
            final Account account, final String authTokenType, final Bundle options,
            final Activity activity, AccountManagerCallback<Bundle> callback, Handler handler)
获取账户列表:
@param type 账户列表类型
public Account[] getAccountsByType(String type)
从AccountManager的缓存中移除AuthToken:
@param accountType 账户类型
@param authToken 令牌
public void invalidateAuthToken(final String accountType, final String authToken)
获取密码:
@param account 账户
public String getPassword(final Account account)
接下来是重点,创建自己的Authenticator,用来验证用户信息或者与从服务器获取信息。
创建Authenticator
步骤:
1.继承AbstractAcccountAuthenticator
2.重写addAccount(),getAuthenToken()方法。如果有需要还可以重写其他方法
重写addAccount()方法:
 @Override
    public Bundle addAccount(AccountAuthenticatorResponse response, String accountType, String authTokenType, String[] requiredFeatures, Bundle options) throws NetworkErrorException {
        Intent intent=new Intent(mContext,AuthenticatorActivity.class);
        intent.putExtra(AccountManager.KEY_ACCOUNT_AUTHENTICATOR_RESPONSE,response);
        Bundle bundle=new Bundle();
        bundle.putParcelable(AccountManager.KEY_INTENT,intent);
        return bundle;
    }
重写getAuthenToken()方法,要注意,如果之前成功获取过AuthenToken会缓存,之后不会在调用getAuthenToken()方法,除非调用invalidateAuthenToken():
@Override
    public Bundle getAuthToken(AccountAuthenticatorResponse response, Account account, String authTokenType, Bundle options) throws NetworkErrorException {
        //可以请求服务器获取token,这里为了简单直接返回
        Bundle bundle;
        if(!authTokenType.equals(Constants.AUTH_TOKEN_TYPE)){
            bundle=new Bundle();
            //没有error_code的情况,不会抛出异常
            //bundle.putInt(AccountManager.KEY_ERROR_CODE,1);
            bundle.putString(AccountManager.KEY_ERROR_MESSAGE,"invalid authToken");
            return bundle;
        }

        AccountManager am=AccountManager.get(mContext);
        String psw=am.getPassword(account);
        if(!TextUtils.isEmpty(psw)){
            //链接服务器获取token
            Random random=new Random();
            bundle=new Bundle();
            bundle.putString(AccountManager.KEY_AUTHTOKEN,random.nextLong()+"");
            //不返回name和type会报错“the type and name should not be empty”
            bundle.putString(AccountManager.KEY_ACCOUNT_TYPE,account.type);
            bundle.putString(AccountManager.KEY_ACCOUNT_NAME,account.name);
            return bundle;
        }


        bundle=new Bundle();
        Intent intent=new Intent(mContext,AuthenticatorActivity.class);
        bundle.putParcelable(AccountManager.KEY_INTENT,intent);
        intent.putExtra(AccountManager.KEY_ACCOUNT_TYPE,account.type);
        intent.putExtra(AccountManager.KEY_ACCOUNT_NAME,account.name);
        intent.putExtra(AccountManager.KEY_ACCOUNT_AUTHENTICATOR_RESPONSE,response);
        return bundle;
    }
3.为Authenticator创建Service
public class AuthenticatorService extends Service{
    private MyAuthenticator mAuthenticator=new MyAuthenticator(this);

    @Nullable
    @Override
    public IBinder onBind(Intent intent) {
        return mAuthenticator.getIBinder();
    }
}
4.为了把Authenticator组件添加到账户管理框架,需要添加Metadata文件描述组件,在res/xml/目录下声明组件
<account-authenticator xmlns:android="http://schemas.android.com/apk/res/android"
    android:accountType="com.lm.example.accountmanagersample"
    android:icon="@drawable/ic_delete"
    android:smallIcon="@drawable/ic_delete"
    android:label="@string/app_name"
/>
accountType很重要,用来唯一标识Authenticator,AccountManager的方法中有accountType的参数需要和此处保持一致。
5.在Manifest文件声明之前创建的Service
<service android:name=".AuthenticatorService">
            <intent-filter>
                <action
                    android:name="android.accounts.AccountAuthenticator" />
            </intent-filter>
            <meta-data
                android:name="android.accounts.AccountAuthenticator"
                android:resource="@xml/authenticator"/>
        </service>
源码分析
从源码角度分析AccountManager和Authenticator之间的关系,主要介绍AccountManager的addAccount()和getAuthToken()方法。 首先分析addAccount(),addAccount()源码如下。
/* @param accountType The type of account to add; must not be null
     * @param authTokenType The type of auth token (see {@link #getAuthToken})
     *     this account will need to be able to generate, null for none
     * @param requiredFeatures The features (see {@link #hasFeatures}) this
     *     account must have, null for none
     * @param addAccountOptions Authenticator-specific options for the request,
     *     may be null or empty
     * @param activity The {@link Activity} context to use for launching a new
     *     authenticator-defined sub-Activity to prompt the user to create an
     *     account; used only to call startActivity(); if null, the prompt
     *     will not be launched directly, but the necessary {@link Intent}
     *     will be returned to the caller instead
     * @param callback Callback to invoke when the request completes,
     *     null for no callback
     * @param handler {@link Handler} identifying the callback thread,
     *     null for the main thread
     * @return An {@link AccountManagerFuture} which resolves to a Bundle with
     *     these fields if activity was specified and an account was created:
     * <ul>
     * <li> {@link #KEY_ACCOUNT_NAME} - the name of the account created
     * <li> {@link #KEY_ACCOUNT_TYPE} - the type of the account
     * </ul>
     */
public AccountManagerFuture<Bundle> addAccount(final String accountType,
            final String authTokenType, final String[] requiredFeatures,
            final Bundle addAccountOptions,
            final Activity activity, AccountManagerCallback<Bundle> callback, Handler handler) {
        if (accountType == null) throw new IllegalArgumentException("accountType is null");
        final Bundle optionsIn = new Bundle();
        if (addAccountOptions != null) {
            optionsIn.putAll(addAccountOptions);
        }
        optionsIn.putString(KEY_ANDROID_PACKAGE_NAME, mContext.getPackageName());

        return new AmsTask(activity, handler, callback) {
            public void doWork() throws RemoteException {
                mService.addAccount(mResponse, accountType, authTokenType,
                        requiredFeatures, activity != null, optionsIn);
            }
        }.start();
    }
新建了个AmsTask实例,重写了dowork()方法, doWrok()中AccountManagerService实例调用了addAccount()方法,有个参数mResponse是AmTask实例的成员变量。先看下AmsTask主要实现。
private abstract class AmsTask extends FutureTask<Bundle> implements AccountManagerFuture<Bundle> {
        final IAccountManagerResponse mResponse;
        final Handler mHandler;
        final AccountManagerCallback<Bundle> mCallback;
        final Activity mActivity;
        public AmsTask(Activity activity, Handler handler, AccountManagerCallback<Bundle> callback) {
            super(new Callable<Bundle>() {
                public Bundle call() throws Exception {
                    throw new IllegalStateException("this should never be called");
                }
            });

            mHandler = handler;
            mCallback = callback;
            mActivity = activity;
            mResponse = new Response();
        }
}
AmsTask继承FutureTask,当setException(Throwable t)被调用后,调用get()方法会抛出该异常。
AccountManagerService的addAccount()方法的主要实现如下。
@Override
public void addAccount(final IAccountManagerResponse response, final String accountType,final String authTokenType, final String[] requiredFeatures,final boolean expectActivityLaunch, final Bundle optionsIn) {
    ......
    new Session(accounts, response, accountType, expectActivityLaunch,
        true /* stripAuthTokenFromResult */, null /* accountName */,
        false /* authDetailsRequired */,true /*updateLastAuthenticationTime */) {
            @Override
            public void run() throws RemoteException {
                mAuthenticator.addAccount(this, mAccountType,                          authTokenType, requiredFeatures,options);
                }

                @Override
                protected String toDebugString(long now) {
                    return super.toDebugString(now) + ", addAccount"
                            + ", accountType " + accountType
                            + ", requiredFeatures "
                            + (requiredFeatures != null
                              ? TextUtils.join(",", requiredFeatures)
                              : null);
                }
            }.bind();
    ......
}
看到重点了,Session实例重写run()方法中调用了Authenticator的addAccount()方法,并且绑定Authenticator的Service。接下来看看Authenticator的addAccount()方法(并不是我们重写的addAccount()方法)。
public void addAccount(IAccountAuthenticatorResponse response, String accountType,String authTokenType, String[] features, Bundle options)
throws RemoteException {
    ......
    try {
        final Bundle result=
        AbstractAccountAuthenticator.this.addAccount(
            new AccountAuthenticatorResponse(response),
            accountType, authTokenType, features, options);
        ......
        if (result != null) {
            response.onResult(result);
        }
    } catch (Exception e) {
        handleException(response, "addAccount", accountType, e);
        }
}
这里才正真调用了我们重写的addAccount()方法,会返回Bundle,Session的onResult()方法会先处理Bundle,满足条件(mExpectActivityLaunch && result != null&& result.containsKey(AccountManager.KEY_INTENT))还可能调用response的onError()或onResult方法,这里的onError()方法和onResult()方法是IAccountManagerResponse.Stub实现的方法。先看看Session的onResult()方法。
@Override
public void onResult(Bundle result) {
    Bundle.setDefusable(result, true);
    mNumResults++;
    Intent intent = null;
    if (result != null&& (intent = result.getParcelable(AccountManager.KEY_INTENT)) != null) {
    checkKeyIntent(Binder.getCallingUid(),intent);
    // Omit passwords if the caller isn't permitted to see them.
    if (!mIsPasswordForwardingAllowed) {
        result.remove(AccountManager.KEY_PASSWORD);
        }
    }
    IAccountManagerResponse response;
    if (mExpectActivityLaunch && result != null
        && result.containsKey(AccountManager.KEY_INTENT)) {
        response = mResponse;
        } else {
            response = getResponseAndClose();
        }
        if (response == null) {
            return;
        }
        if (result == null) {
            if (Log.isLoggable(TAG, Log.VERBOSE)) {
                Log.v(TAG, getClass().getSimpleName() + " calling onError() on response "+ response);
            }
            sendErrorResponse(response,AccountManager.ERROR_CODE_INVALID_RESPONSE,"null bundle returned");
            return;
        }

        if ((result.getInt(AccountManager.KEY_ERROR_CODE, -1) > 0) && (intent == null)) {
            // All AccountManager error codes are greater
            // than 0
            sendErrorResponse(response,result.getInt(AccountManager.KEY_ERROR_CODE),result.getString(AccountManager.KEY_ERROR_MESSAGE));
                return;
        }

        // Strip auth token from result.
        result.remove(AccountManager.KEY_AUTHTOKEN);

        if (Log.isLoggable(TAG, Log.VERBOSE)) {
            Log.v(TAG,getClass().getSimpleName() + " calling onResult() on response " + response);
        }

        // Get the session bundle created by authenticator. The
        // bundle contains data necessary for finishing the session
        // later. The session bundle will be encrypted here and
        // decrypted later when trying to finish the session.
        Bundle sessionBundle = result.getBundle(AccountManager.KEY_ACCOUNT_SESSION_BUNDLE);
        if (sessionBundle != null) {
        String accountType = sessionBundle.getString(AccountManager.KEY_ACCOUNT_TYPE);
            if (TextUtils.isEmpty(accountType)
                || !mAccountType.equalsIgnoreCase(accountType)) {
                Log.w(TAG, "Account type in session bundle doesn't match request.");
            }
            // Add accountType info to session bundle. This will
            // override any value set by authenticator.
            sessionBundle.putString(AccountManager.KEY_ACCOUNT_TYPE, mAccountType);

            // Encrypt session bundle before returning to caller.
            try {
                CryptoHelper cryptoHelper = CryptoHelper.getInstance();
                    Bundle encryptedBundle = cryptoHelper.encryptBundle(sessionBundle);
                    result.putBundle(AccountManager.KEY_ACCOUNT_SESSION_BUNDLE, encryptedBundle);
                } catch (GeneralSecurityException e) {
                    if (Log.isLoggable(TAG, Log.DEBUG)) {
                        Log.v(TAG, "Failed to encrypt session bundle!", e);
                    }
                    sendErrorResponse(response, AccountManager.ERROR_CODE_INVALID_RESPONSE,
                            "failed to encrypt session bundle");
                    return;
                }
            }

        sendResponse(response, result);
    }
}
Session的onResult()方法看到KEY_ERROR_CODE大于0才会setException()。
IAccountManagerResponse.Stub的具体实现。
/** Handles the responses from the AccountManager */
private class Response extends IAccountManagerResponse.Stub {
    public void onResult(Bundle bundle) {
        Intent intent = bundle.getParcelable(KEY_INTENT);
            if (intent != null && mActivity != null) {
            // since the user provided an Activity we will silently start intents
            // that we see mActivity.startActivity(intent);
            // leave the Future running to wait for the real response to this request
            } else if (bundle.getBoolean("retry")) {
                try {
                    doWork();
                } catch (RemoteException e) {
                    // this will only happen if the system process is dead, which means
                    // we will be dying ourselves
                }
            } else {
                set(bundle);
                }
    }

    public void onError(int code, String message) {
        if (code == ERROR_CODE_CANCELED ||
        code == ERROR_CODE_USER_RESTRICTED
        || code == ERROR_CODE_MANAGEMENT_DISABLED_FOR_ACCOUNT_TYPE) {
            // the authenticator indicated that this request was canceled or we were
            // forbidden to fulfill; cancel now
            cancel(true /* mayInterruptIfRunning */);
            return;
        }
        setException(convertErrorToException(code, message));
    }
}
addAccount流程如图
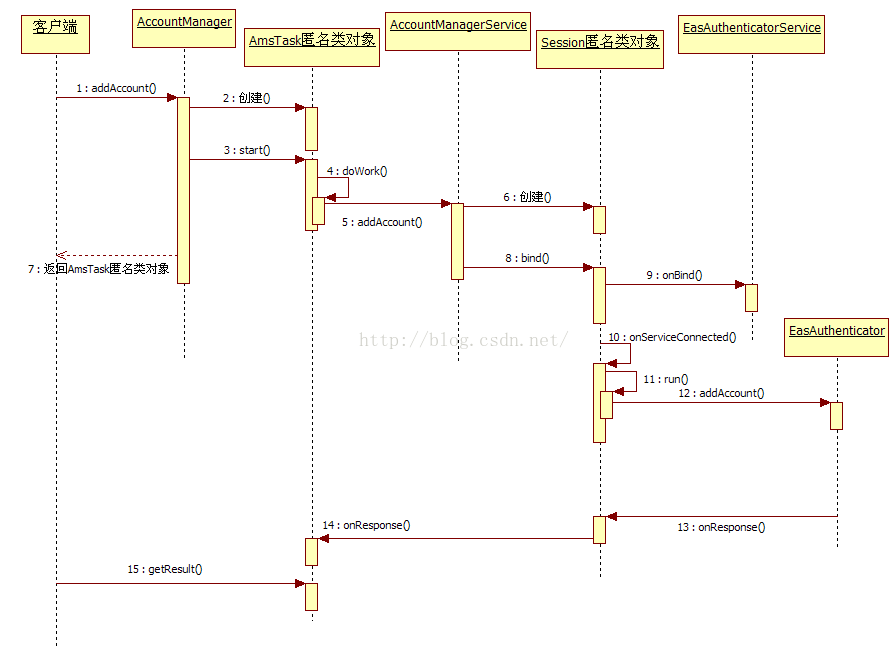
getAhthToken的流程和addAccount流程差不多,可自行分析。
demo地址:
github.com/wslaimin/Ac…
