写这篇文章前得先来了解一下activity.getWindow().getDecorView()获取到的DecorView视图
首先我们通过强大的Android Studio开发神器,获取我们当前app界面的布局层次(结构)来帮助
我们了解DecorView是个什么?
依次点击菜单Tools——>Android——>Layout Inspector然后选择一个app所在的进程就可以抓取界面的布局结构了一览无余。
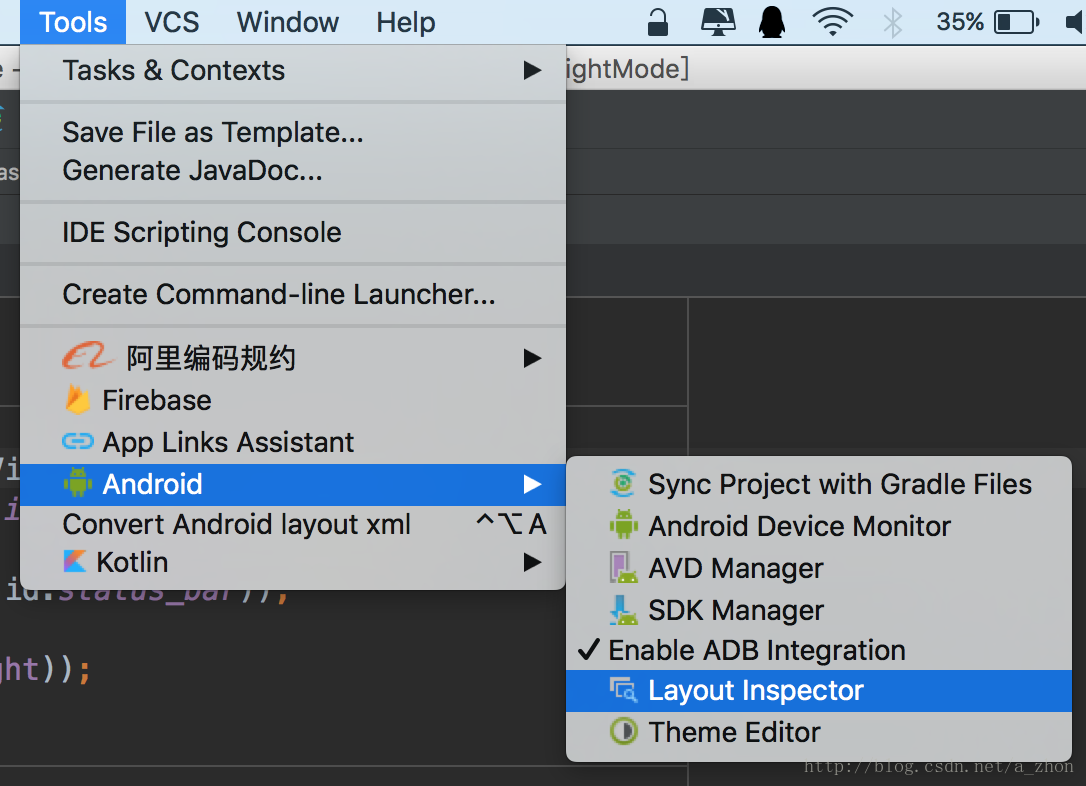
分析界面的布局结构
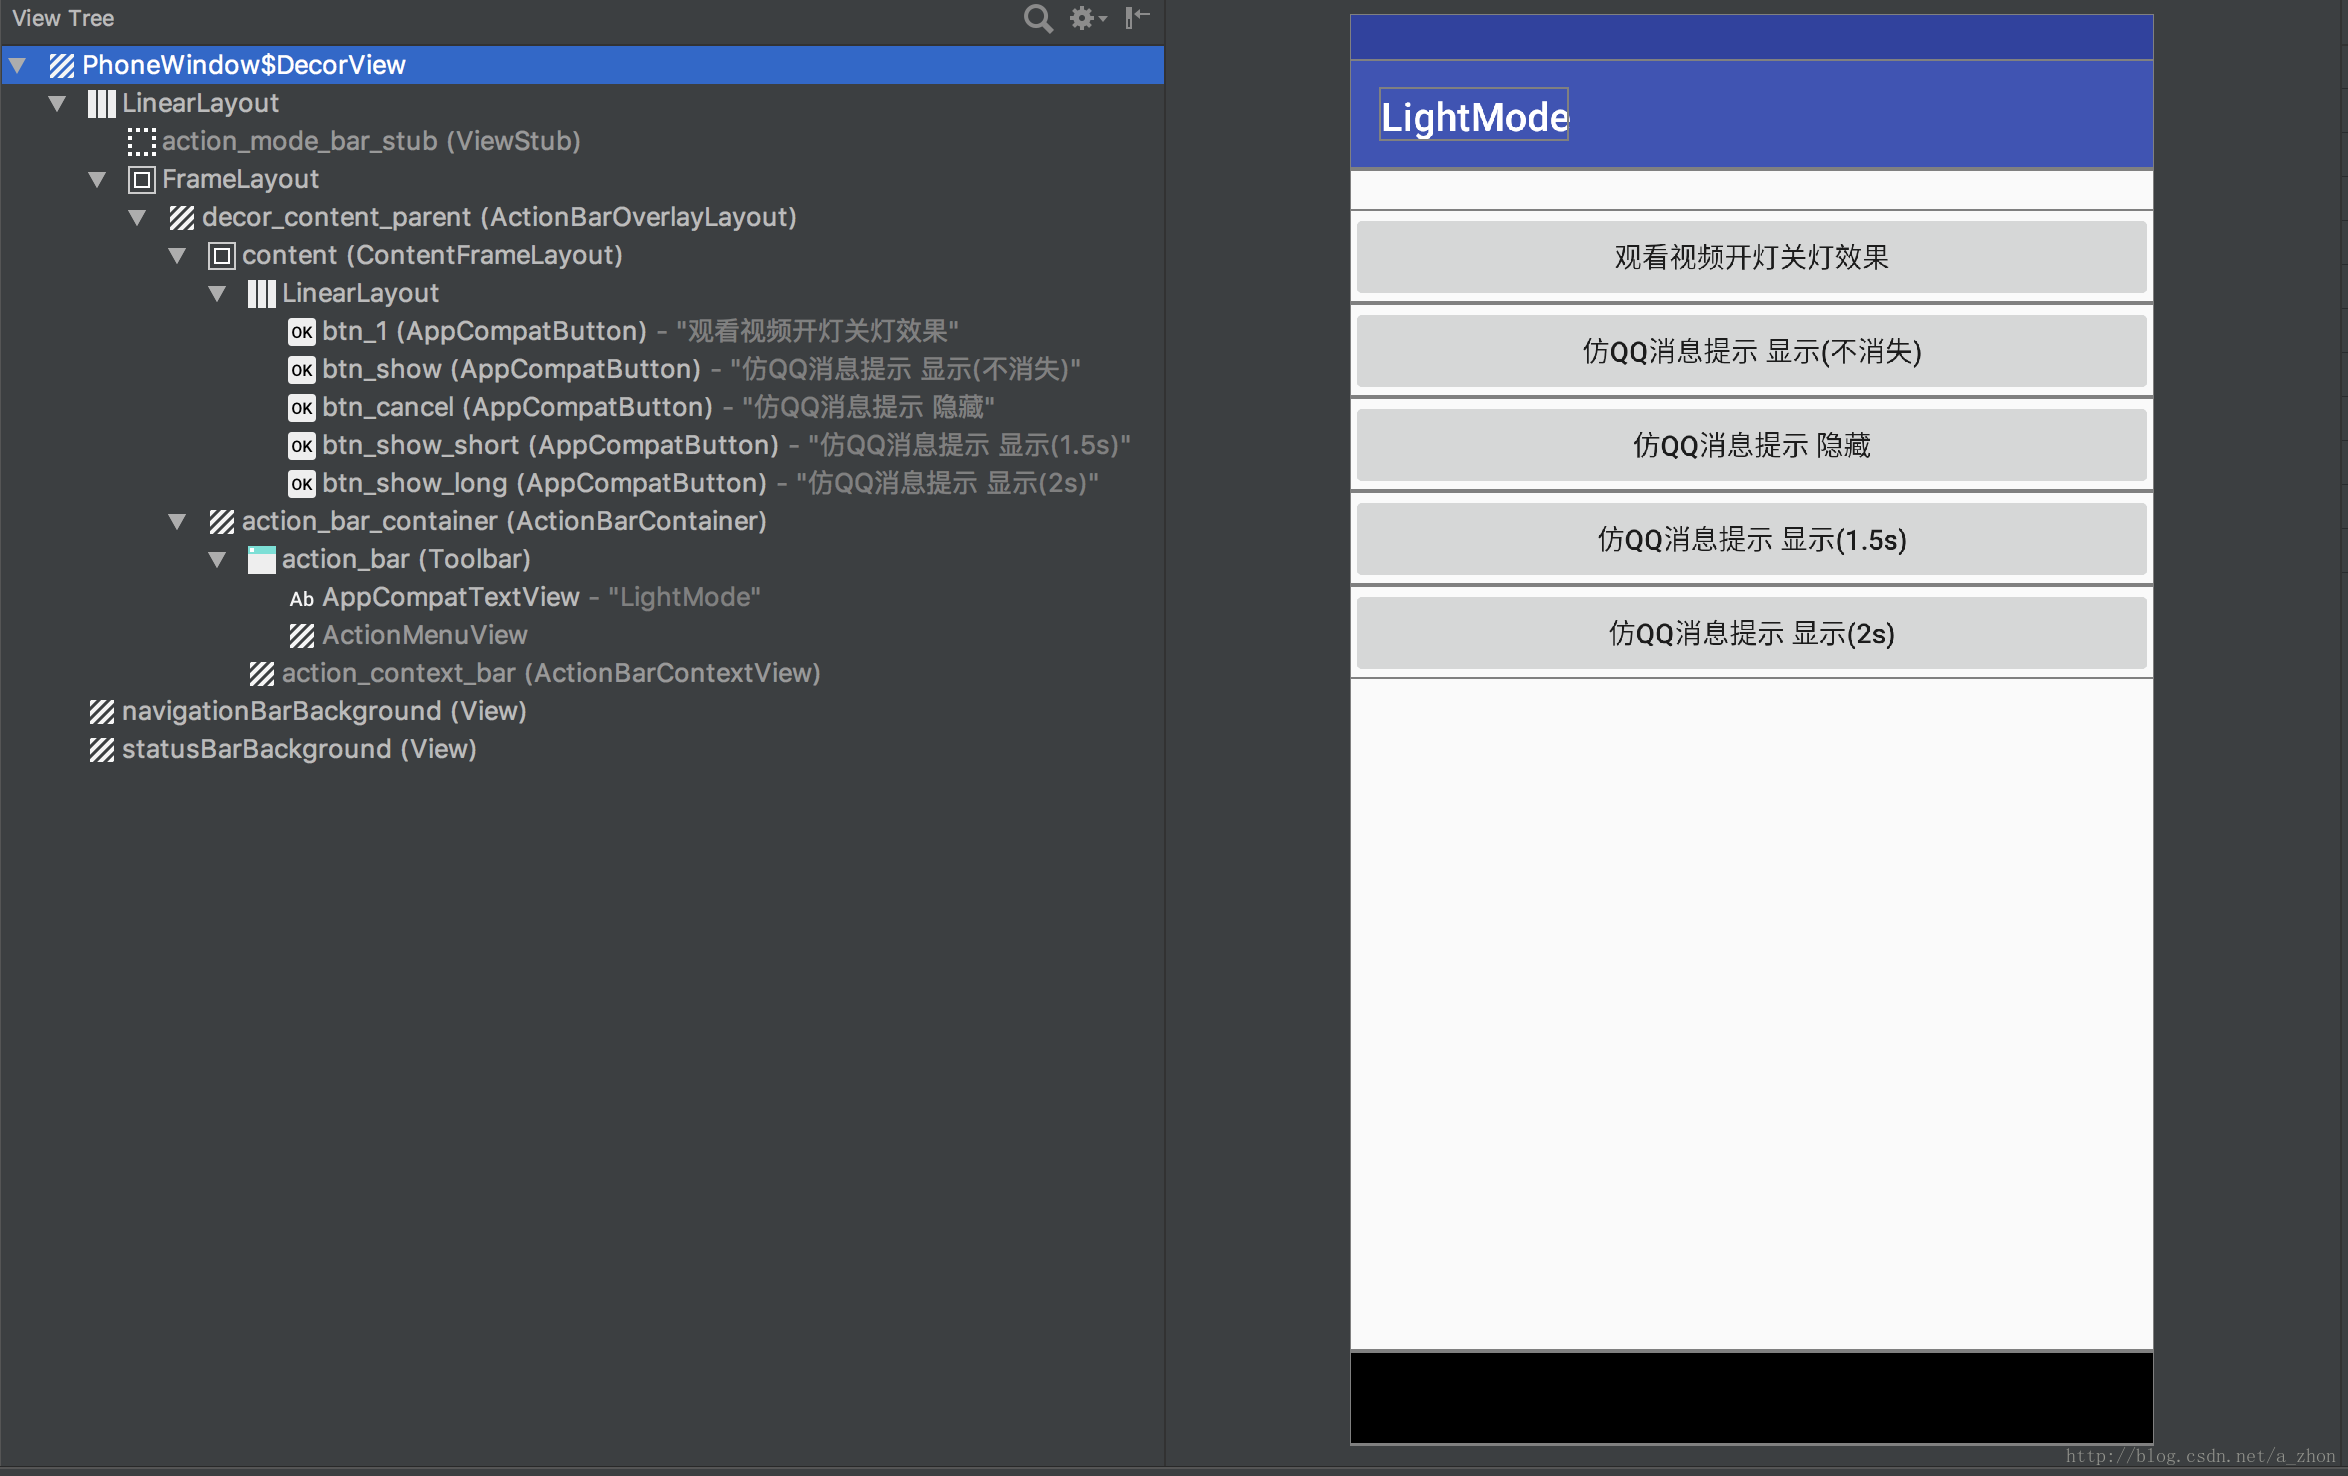
通过上面截图我们发现最顶层的视图就是
PhoneWindow中的DecorView了,也就是这篇文章使用到的重点。
DecorView是一个FrameLayout不信你instanceof一下
我们每次通过Activity的setContentView()函数加载布局时,都是加在图中的content(ContentFrameLayout)中
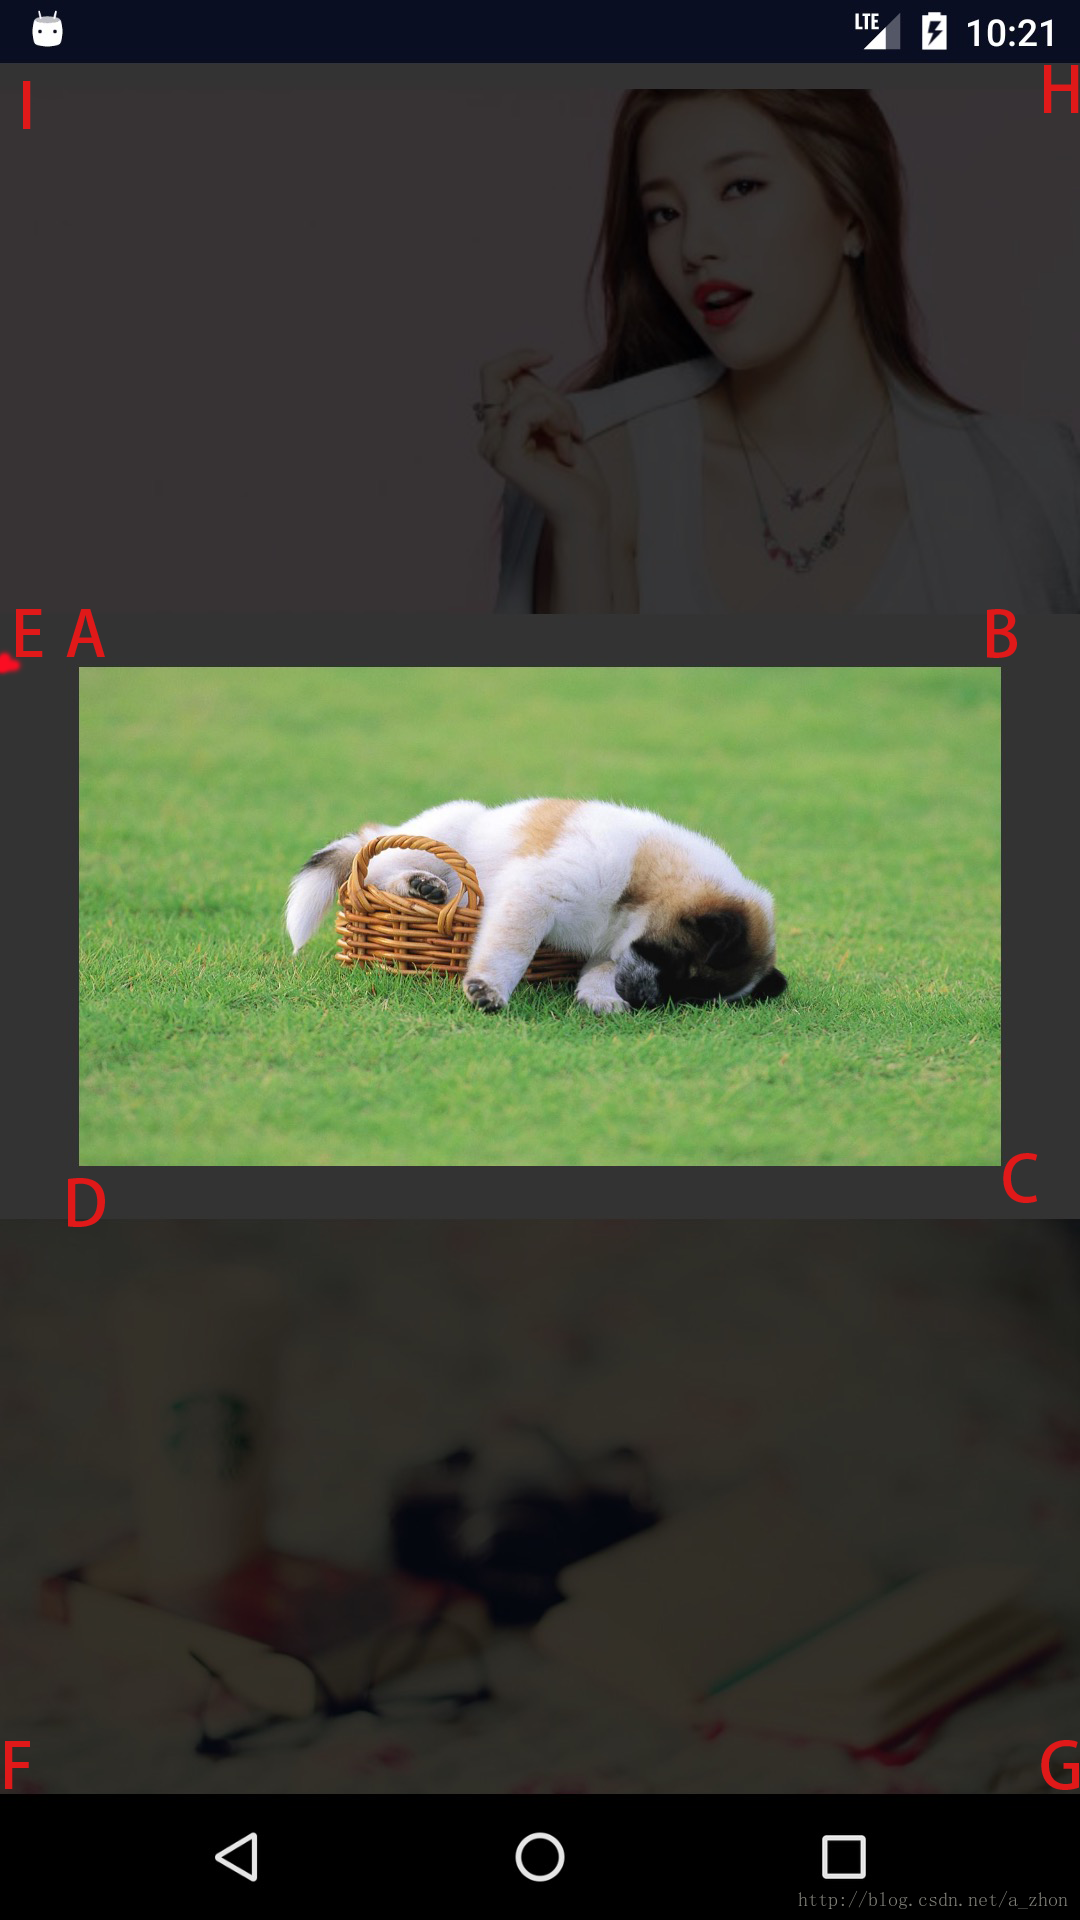
咳咳咳废话不多说了,直接进入今天要说的仿QQ消息提示框ActionBarToast(名字瞎起的不要在意),楼下放效果图

实现的思路:
- 首先获取DecorView根视图
- 初始化展示的视图 高度为顶部状态栏的高度加上ActionBar(标题栏)的高度
让显示的视图在ActionBar中垂直居中(布局放一个高度为状态栏高度的View占位即可) - 往DecorView根视图 添加/移除 我们要展示的视图(使用属性动画)
1.首先获取DecorView根视图
//仅需一行代码即可获取
ViewGroup decorView = (ViewGroup) activity.getWindow().getDecorView();
2. 初始化展示的视图
我们要展示的布局item_toast.xml
<?xml version="1.0" encoding="utf-8"?>
<android.support.constraint.ConstraintLayout xmlns:android="http://schemas.android.com/apk/res/android"
    xmlns:app="http://schemas.android.com/apk/res-auto"
    android:layout_width="match_parent"
    android:layout_height="wrap_content"
    android:background="@android:color/white">

    <!--用来占位(状态栏高度)
    这样让显示的内容正好在actionBar的中间-->
    <View
        android:id="@+id/status_bar"
        android:layout_width="match_parent"
        android:layout_height="1dp"
        app:layout_constraintTop_toTopOf="parent" />

    <ImageView
        android:id="@+id/icon"
        android:layout_width="24dp"
        android:layout_height="24dp"
        android:layout_marginLeft="16dp"
        android:src="@drawable/icon"
        app:layout_constraintBottom_toBottomOf="parent"
        app:layout_constraintLeft_toLeftOf="parent"
        app:layout_constraintTop_toBottomOf="@+id/status_bar" />

    <TextView
        android:layout_width="wrap_content"
        android:layout_height="wrap_content"
        android:layout_marginLeft="12dp"
        android:text="每天最多给她点10个赞哦。"
        android:textColor="#131313"
        android:textSize="14sp"
        app:layout_constraintBottom_toBottomOf="parent"
        app:layout_constraintLeft_toRightOf="@+id/icon"
        app:layout_constraintTop_toBottomOf="@+id/status_bar" />
</android.support.constraint.ConstraintLayout>
获取状态栏和ActionBar的高度
/**
 * 获取状态栏 + 标题栏 的高度
 */
private int getHeight(Context context, View v) {
    //标题栏
    TypedArray values = context.getTheme().obtainStyledAttributes(new int[]{android.R.attr.actionBarSize});
    int actionBarHeight = values.getDimensionPixelSize(0, 0);
    values.recycle();
    //状态栏
    int statusBarHeight = 0;
    int resourceId = context.getResources().getIdentifier("status_bar_height", "dimen", "android");
    if (resourceId > 0) {
        //设置布局 占位视图的高度
        statusBarHeight = context.getResources().getDimensionPixelSize(resourceId);
        v.setLayoutParams(new ConstraintLayout.LayoutParams(
                ConstraintLayout.LayoutParams.MATCH_PARENT, statusBarHeight));
    }
    return actionBarHeight + statusBarHeight;
}
初始化好要展示的视图
View view = LayoutInflater.from(activity).inflate(R.layout.item_toast, null);
//设置View的高度
int totalHeight = getHeight(activity, view.findViewById(R.id.status_bar));
view.setLayoutParams(new ViewGroup.LayoutParams(
        ViewGroup.LayoutParams.MATCH_PARENT, totalHeight));
3. 往DecorView根视图 添加/移除 我们要展示的视图(使用属性动画)
/**
 * 显示
 *
 * @param duration 显示时长
 */
public void showToast(@Duration int duration) {
    if (!showing) {
        showing = true;
        decorView.addView(view);
        ObjectAnimator animator = ObjectAnimator.ofFloat(view, "translationY", -totalHeight, 0f);
        animator.setDuration(animationDuration);
        animator.start();
        if (duration != LENGTH_SHOW) {
            //一段时间后隐藏
            view.postDelayed(runnable, duration);
        }
    }
}
/**
* 延时执行取消操作
*/
private Runnable runnable = new Runnable() {
@Override
public void run() {
cancel();
}
};重要的操作也就上面这些,主要还是实现的思路。
ActionBarToast完整源码(使用方法可以下载文末Demo查看)
同样使用DecorView实现一个观看视频时 开灯/关灯 的效果,如下图:

实现的思路:
- 往DecorView添加自定义的视图(黑色蒙版)
- 获取我们不加蒙版View在屏幕上的坐标(左上角)
- 使用path进行绘制蒙版区域
- 移除蒙版
添加我们自定义的View蒙版,设置大小充满屏幕,获取View在屏幕上的坐标。
public class MaskView extends View {

    /**
     * activity 根视图
     */
    private ViewGroup decorView;
    /**
     * 不加遮罩的视图
     */
    private View brightView;
    /**
     * 遮罩画笔
     */
    private Paint paint;
    /**
     * 不遮罩的view
     */
    private RectF brightRectF;
    /**
     * 遮罩的路径
     */
    private Path path;

    /**
     * 是否已经添加了
     */
    private boolean showing = false;

    public MaskView(Context context) {
        super(context);
        init(context);
    }

    private void init(Context context) {
        //获取activity顶层视图
        decorView = (ViewGroup) ((Activity) context).getWindow().getDecorView();
        //初始化蒙版视图,充满全屏幕
        setLayoutParams(new ViewGroup.LayoutParams(
                ViewGroup.LayoutParams.MATCH_PARENT,
                ViewGroup.LayoutParams.MATCH_PARENT));
        paint = new Paint();
        //设置为黑色 在加点透明度
        paint.setColor(Color.argb(230, 0, 0, 0));
        path = new Path();

    }

    @Override
    protected void onDraw(Canvas canvas) {
        super.onDraw(canvas);
        if (decorView == null || brightView == null) {
            return;
        }
        //路径恢复
        path.reset();
        //A
        path.moveTo(brightRectF.left, brightRectF.top);
        //B
        path.lineTo(brightRectF.right, brightRectF.top);
        //C
        path.lineTo(brightRectF.right, brightRectF.bottom);
        //D
        path.lineTo(brightRectF.left, brightRectF.bottom);
        //A
        path.lineTo(brightRectF.left, brightRectF.top);
        //E
        path.lineTo(0, brightRectF.top);
        //F
        path.lineTo(0, decorView.getHeight());
        //F
        path.lineTo(decorView.getWidth(), decorView.getHeight());
        //H
        path.lineTo(decorView.getWidth(), 0);
        //I
        path.lineTo(0, 0);
        //E
        path.lineTo(0, brightRectF.top);
        //A
        path.lineTo(brightRectF.left, brightRectF.top);
        //闭合曲线
        path.close();
        canvas.drawPath(path, paint);
    }

    /**
     * 添加不加蒙版的View
     *
     * @param view 视图
     */
    public void attachView(View view) {
        if (!showing) {
            this.brightView = view;
            //没有添加,才可以添加
            initMask();
        }
    }

    /**
     * 移除遮罩
     */
    public void removeMask() {
        if (!showing) {
            //没有添加
            return;
        }
        //使用动画消失
        AlphaAnimation animation = new AlphaAnimation(1f, 0f);
        animation.setDuration(500);
        animation.setAnimationListener(new Animation.AnimationListener() {
            @Override
            public void onAnimationStart(Animation animation) {
            }

            @Override
            public void onAnimationEnd(Animation animation) {
                ViewParent parent = MaskView.this.getParent();
                if (parent != null && parent instanceof ViewGroup) {
                    ((ViewGroup) parent).removeView(MaskView.this);
                    showing = false;
                }
            }

            @Override
            public void onAnimationRepeat(Animation animation) {

            }
        });
        startAnimation(animation);

    }

    /**
     * 初始化不加遮罩view的位置
     */
    private void initMask() {
        int[] location = new int[2];
        //获取view在屏幕上的坐标
        brightView.getLocationOnScreen(location);
        brightRectF = new RectF(location[0], location[1], location[0] + brightView.getWidth(),
                location[1] + brightView.getHeight());
        //添加蒙版到Activity之上
        decorView.addView(this);
        invalidate();
        showing = true;
    }

    /**
     * 是否已经添加
     *
     * @return
     */
    public boolean isShowing() {
        return showing;
    }
}
使用当然也是很简单的了
MaskView maskView = new MaskView(this);
maskView.attachView(view);
//maskView.removeMask();为了更好理解onDraw()里的每个点,这里做了张图来辅助理解: