

SBLayout 一行代码搞定任意难度的AutoLayout
简介:
SBLayout是基于Swift4 封装系统的约束而成的单文件约束框架,总代码700多行,支持iOS9及其以上版本,一行代码可以搞定任意难度的AutoLayout约束
使用方法如下:
实例:
let redView = UIView()
redView.backgroundColor = .red
self.view.addSubview(redView)
//使用SBLayout约束
//默认的优先级是最高的,set开头可以设置优先级
redView.height(100).width(200).centerX(equalTo: view.sb_centerX).top(equalTo: view.sb_top, constant: 100).setWidth(400, priority: .defaultLow).end()
效果图如下:
 WX20180115-161340.png
以上实例如果使用Snapkit的话会用到闭包,然后再make一大堆,显得很精简,也很多余。所以在无奈之下,就自己写了SBLayout,一行代码搞定。
视图和父视图顶部约束,SBLayout只需如下操作:
exampleView.top(equalTo: fatherView.sb_top)
视图和父视图底部约束,SBLayout只需如下操作:
exampleView.bottom(equalTo: fatherView.sb_bottom)
视图和父视图左边约束,SBLayout只需如下操作:
exampleView.left(equalTo: view.sb_left)
视图和父视图右边约束,SBLayout只需如下操作:
exampleView.right(equalTo: view.sb_right)
视图宽高的赋值,SBLayout只需如下操作:
exampleView.width(constant)
exampleView.height(constant)
视图和父视图X或者Y轴居中约束,SBLayout只需如下操作:
exampleView.centerX(equalTo: view.sb_centerX)
exampleView.centerY(equalTo: view.sb_centerY)
因为SBLayout每个点约束后返回的是UIView,所以所有的约束点都可以继续在语句后面添加任意想添加的约束,如下:
exampleView.top(equalTo: view.sb_top).left(equalTo: view.sb_left).right(equalTo: view.sb_right).bottom(equalTo: view.sb_bottom).end()
SBLayout约束结束后需在最后添加.end()或者.sb()以结束约束
使用SBLayout实现动画功能:
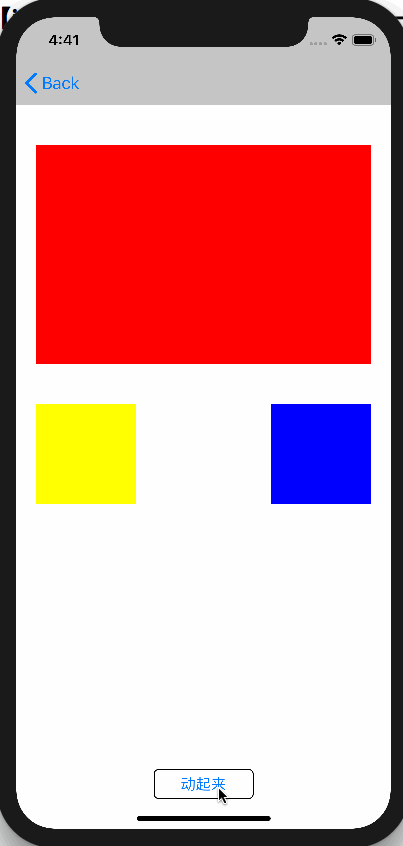 Untitled1.gif
以上图为例,首先约束红黄蓝视图,代码如下:
        view.addSubview(redView)

        view.addSubview(blueView)

        view.addSubview(button)

        //使用SBLayout约束。结束语用sb()或者end()
        redView.top(equalTo: view.sb_top, constant: 40).left(equalTo: view.sb_left, constant: 20).right(equalTo: view.sb_right, constant: -20).height(200).sb()
        //set开头还可以设置优先级,默认的优先级最高(优先级的大小关系:defaultLow < defaultHigh < required)
        view.addSubview(yellowView)
        yellowView.left(equalTo: view.sb_left, constant: 20).top(equalTo: redView.sb_bottom, constant: 40).setTop(equalTo: view.sb_top, priority: .defaultLow).width(100).height(100).end()

        blueView.right(equalTo: view.sb_right, constant: -20).top(equalTo: redView.sb_bottom, constant: 40).width(100).height(100).end()

        button.centerX(equalTo: view.sb_centerX).bottom(equalTo: view.sb_bottom, constant: -30).width(100).end()
然后再添加动画:
        //重新约束前需解除之前的约束   解除约束激活
        NSLayoutConstraint.deactivate(self.redView.constraints)
        //重新约束
        //第一种改变高度(重写所有约束):
        //self.redView.top(equalTo: self.view.sb_top, constant: 40).left(equalTo: self.view.sb_left, constant: 20).right(equalTo: self.view.sb_right, constant: -20).height(350).sb()
        //第二种改变高度(单独改变高度约束):
        self.redView.height(350).sb()

        UIView.animate(withDuration: 2, delay: 0, options: [.curveEaseInOut,.autoreverse,.repeat], animations: {
            self.view.layoutIfNeeded()
        }, completion: nil)
重新约束前需使用NSLayoutConstraint.deactivate()方法将原来的约束解除掉
使用SBLayout约束不同高cell上,效果图如下:
 WX20180115-165441.png
自定义Cell里面使用SBLayout约束代码如下:
        contentView.addSubview(imgView)
        contentView.addSubview(contentLabel)
        //使用SBLayout对imgView进行约束
        imgView.top(equalTo: contentView.sb_top, constant: 10).left(equalTo: contentView.sb_left, constant: 8).right(equalTo: contentLabel.sb_left, constant: -8).height(50).width(50).end()
        //使用SBLayout对contentLabel进行约束
        contentLabel.top(equalTo: contentView.sb_top, constant: 10).left(equalTo: imgView.sb_right, constant: 8).right(equalTo: contentView.sb_right, constant: -8).bottom(equalTo: contentView.sb_bottom, constant: -8).height(greaterThanOrEqualTo: imgView.sb_height).end()
由此可见,项目中使用SBLayout轻量级约束框架,不仅可以在AutoLayout时事半功倍,而且在使用起来也非常简单易懂!更多功能需大家仔细探索!
SBLayout导入项目中的方法
CocoaPods:
导入项目中的方法:
第一步:Podfile中添加
pod 'SBLayout', '~>4.4'
并使用命令pod install完成导入
第二步:
import SBLayout
或者直接拖拽SBLayout.swift到项目中不需导入头文件即可使用。
Github源码: SBLayout(一行代码搞定无论多复杂的约束)
