

This blog post is part of a multi-part series:
Part 1 – Fundamentals of OAuth2, its roles, and Grant types
Part 2 – Setting up a starter Project with REST API endpoints
Part 3 – Adding Spring Security and OAuth2 to protect REST API endpoints
Part 4 – Authenticating user against the credentials stored in the database (this post)
Part 5 – Persisting Client registration and auth tokens in the database
In this post we are going to learn:
- Persisting user credentials in the database
- Configuring Spring Security to access the users and roles from the database
- Defining Method Level Security
- Obtaining information about the current user
- Installing H2 database
Persisting user credentials in the database:
We are going to provide an endpoint for the users to sign up for our application so that registered users can access our API endpoints. Let’s start with creating a domain object.
Create a class called User under the package com.stl.crm.domain and add the following code into it.
package com.stl.crm.domain;

import java.util.List;

import javax.persistence.CascadeType;
import javax.persistence.Entity;
import javax.persistence.FetchType;
import javax.persistence.GeneratedValue;
import javax.persistence.GenerationType;
import javax.persistence.Id;
import javax.persistence.OneToMany;
import javax.persistence.Table;

@Entity
@Table(name = "USERS")
public class User {
	@Id
	@GeneratedValue(strategy = GenerationType.AUTO)
	private Long id;

	private String username;

	private String password;

	@OneToMany(fetch = FetchType.EAGER, cascade=CascadeType.ALL)
	private List<UserRole> roles;

	User() {
	}

	public User(String username, String password, List<UserRole> roles) {
		this.username = username;
		this.password = password;
		this.roles = roles;
	}

	public String getUsername() {
		return username;
	}

	public void setUsername(String username) {
		this.username = username;
	}

	public String getPassword() {
		return password;
	}

	public void setPassword(String password) {
		this.password = password;
	}

	public List<UserRole> getRoles() {
		return roles;
	}

	public void setRoles(List<UserRole> roles) {
		this.roles = roles;
	}

}
As you can see, the User entity class has just 3 attributes: username, password, and roles. But it could contain lot other attributes like first name, last name, email, etc. Each user can have multiple roles that are defined as a one-to-many
relationship between the User and UserRole classes.
Let’s create another class called UserRole under the package com.stl.crm.domain and add the following code into it.
package com.stl.crm.domain;

import javax.persistence.Entity;
import javax.persistence.GeneratedValue;
import javax.persistence.GenerationType;
import javax.persistence.Id;
import javax.persistence.Table;

@Entity
@Table(name="USER_ROLES")
public class UserRole {
	@Id
	@GeneratedValue(strategy = GenerationType.AUTO)
	private Long id;

	private String name;

	UserRole() {
	}

	public UserRole(String name) {
		this.name = name;
	}

	public String getName() {
		return name;
	}

	public void setName(String name) {
		this.name = name;
	}
}
Next, create a JPA repository interface.
Create an interface called UserRepository under the package com.stl.crm.repository and add the following code into it.
package com.stl.crm.repository;

import org.springframework.data.repository.CrudRepository;

import com.stl.crm.domain.User;

public interface UserRepository extends CrudRepository<User, Long> {

	User findByUsername(String username);

}
In the preceding class, the CrudRepository interface is linked to the domain object User and the type of primary key Long. We provide a custom finder method named findByUsername. Spring Data JPA would provide
a runtime implementation so that the findByUsername method retrieves a user based on the given username. Let’s wire this repository into the service class.
Create a class called SignupService under the package com.stl.crm.service and add the following code into it.
package com.stl.crm.service;

import java.util.Arrays;

import javax.annotation.PostConstruct;

import org.springframework.beans.factory.annotation.Autowired;
import org.springframework.security.crypto.password.PasswordEncoder;
import org.springframework.stereotype.Service;
import org.springframework.transaction.annotation.Transactional;

import com.stl.crm.domain.User;
import com.stl.crm.domain.UserRole;
import com.stl.crm.repository.UserRepository;

@Service
@Transactional
public class SignupService {

	@Autowired
	private UserRepository userRepository;

	@Autowired
	PasswordEncoder passwordEncoder;

	public User addUser(User user) {
		user.setPassword(passwordEncoder.encode(user.getPassword()));
		return userRepository.save(user);
	}

	/**
	 *
	 * set up a default user with two roles USER and ADMIN
	 *
	 */
	@PostConstruct
	private void setupDefaultUser() {
		//-- just to make sure there is an ADMIN user exist in the database for testing purpose
		if (userRepository.count() == 0) {
			userRepository.save(new User("crmadmin",
									passwordEncoder.encode("adminpass"),
									Arrays.asList(new UserRole("USER"), new UserRole("ADMIN"))));
		}
	}


}
We should never store passwords in plain text. Spring Security supports BCryptPasswordEncoder which uses the BCrypt encode algorithm. PasswordEncoder is an interface which is implemented by BCryptPasswordEncoder. As you can see in the preceding class, we are auto wiring PasswordEncoder and using that to encrypt the password. We will see in a bit how this BCryptPasswordEncoder bean is created.
Next, let’s provide an endpoint so that the user can signup or register themselves in our application.
Create a class called SignupController under the package com.stl.crm.controller and add the following code into it.
package com.stl.crm.controller;

import java.util.Arrays;

import org.springframework.beans.factory.annotation.Autowired;
import org.springframework.http.HttpStatus;
import org.springframework.http.ResponseEntity;
import org.springframework.web.bind.annotation.RequestBody;
import org.springframework.web.bind.annotation.RequestMapping;
import org.springframework.web.bind.annotation.RequestMethod;
import org.springframework.web.bind.annotation.RestController;

import com.stl.crm.domain.User;
import com.stl.crm.domain.UserRole;
import com.stl.crm.service.SignupService;

@RestController
public class SignupController {

	@Autowired
	private SignupService signupService;

    /**
     *
     * user signup
     * @param user
     * @return
     */
    @RequestMapping(value = "/signup", method = RequestMethod.POST)
    public ResponseEntity<?> signup(@RequestBody User user) {
   		user.setRoles(Arrays.asList(new UserRole("USER")));
    	User newUser = signupService.addUser(user);
    	return new ResponseEntity<>(HttpStatus.CREATED);
    }

}
So far, we have created an endpoint(/signup), a service class, a repository interface, and domain classes. If any of the code is not familiar to you, take a look at this blog post.
Now that we have set up the infrastructure needed for creating our application users, let’s continue with Configuring Spring Security.
Configuring Spring Security to access users and roles:
We need to tell Spring Security where and how users and roles are persisted so it can access this data on itself and process authentication. In order to perform an authentication, Spring Security needs to compare the submitted user credentials
with an application user stored in the database. Spring Security uses org.springframework.security.core.userdetails.UserDetailsService to retrieve user information from the backend database. We need to provide an implementation for
the UserDetailsService interface.
Create a class called CrmUserDetailsService under the package com.stl.crm.security and add the following code into it.
package com.stl.crm.security;

import org.springframework.beans.factory.annotation.Autowired;
import org.springframework.security.core.userdetails.UserDetails;
import org.springframework.security.core.userdetails.UserDetailsService;
import org.springframework.security.core.userdetails.UsernameNotFoundException;
import org.springframework.stereotype.Service;

import com.stl.crm.domain.User;
import com.stl.crm.repository.UserRepository;

@Service
public class CrmUserDetailsService implements UserDetailsService {

	@Autowired
	private UserRepository userRepository;

    @Override
    public UserDetails loadUserByUsername(String userName) throws UsernameNotFoundException {
        User user = userRepository.findByUsername(userName);
        if(user == null){
            throw new UsernameNotFoundException("UserName "+userName+" not found");
        }
        return new CrmUserDetails(user);
    }

}
The CrmUserDetailsService class makes use of UserRepository to retrieve User information from the database.
The Spring Security infrastructure expects the loadUserByUsername method to return an instance of type UserDetails. Think of UserDetails as the adapter between your own database and what Spring Security needs inside the SecurityContextHolder.
UserDetails is an interface in Spring Security which provides core user information. Let’s provide an implementation to this interface.
Create a class called CrmUserDetails class under the package com.stl.crm.security and add the following code into it.
package com.stl.crm.security;

import java.util.ArrayList;
import java.util.Collection;
import java.util.List;

import org.springframework.security.core.GrantedAuthority;
import org.springframework.security.core.authority.SimpleGrantedAuthority;
import org.springframework.security.core.userdetails.UserDetails;

import com.stl.crm.domain.User;
import com.stl.crm.domain.UserRole;

public class CrmUserDetails implements UserDetails {

	private static final long serialVersionUID = 1L;
	private Collection<? extends GrantedAuthority> authorities;
	private String password;
	private String username;

	public CrmUserDetails(User user) {
		this.username = user.getUsername();
		this.password = user.getPassword();
		this.authorities = translate(user.getRoles());
	}

	private Collection<? extends GrantedAuthority> translate(List<UserRole> roles) {
		List<GrantedAuthority> authorities = new ArrayList<>();
		for (UserRole role : roles) {
			String name = role.getName().toUpperCase();
			if (!name.startsWith("ROLE_")) {
				name = "ROLE_" + name;
			}
			authorities.add(new SimpleGrantedAuthority(name));
		}
		return authorities;
	}

	@Override
	public Collection<? extends GrantedAuthority> getAuthorities() {
		return authorities;
	}

	@Override
	public String getPassword() {
		return password;
	}

	@Override
	public String getUsername() {
		return username;
	}

	@Override
	public boolean isAccountNonExpired() {
		return true;
	}

	@Override
	public boolean isAccountNonLocked() {
		return true;
	}

	@Override
	public boolean isCredentialsNonExpired() {
		return true;
	}

	@Override
	public boolean isEnabled() {
		return true;
	}

}
CrmUserDetails creates a set of GrantedAuthority instances that represent roles that the user has in the system. In Spring Security, GrantedAuthority reflects the permissions granted to the user. SimpleGrantedAuthority is an implementation
of GrantedAuthority interface provided by Spring Framework.
We assign the roles as strings like ADMIN, USER, GUEST, etc. Spring Security identifies the roles when the string has a prefix of ‘ROLE_’. We handle these in the translate method.
Once Spring Security successfully verified the submitted credentials with the application user stored in the database, it creates an Authentication object and then puts it into the SecurityContextHolder.
Customizing Spring Security’s behavior:
Open the SecurityConfig class under the com.stl.crm.security package.
Comment out the globalUserDetails method and add the code as follows. Make sure to import the CrmUserDetailsService class.
	@Autowired
	private CrmUserDetailsService crmUserDetailsService;

    @Override
	protected void configure(AuthenticationManagerBuilder auth) throws Exception {
    	auth.userDetailsService(crmUserDetailsService)
    		.passwordEncoder(passwordEncoder());
	}

	/*
	@Autowired
    public void globalUserDetails(AuthenticationManagerBuilder auth) throws Exception {
        auth.inMemoryAuthentication()
        .withUser("crmadmin").password("crmpass").roles("ADMIN","USER").and()
        .withUser("crmuser").password("pass123").roles("USER");
    }
	*/
In the SecurityConfig class, we have added the crmUserDetailsService property, which is annotated with @Autowired. Spring framework takes responsibility of populating this field at runtime.
We override the configure method that takes an AuthenticationManagerBuilder as a parameter. In our method implementation, we use the AuthenticationManagerBuilder to add the CrmUserDetailsService instance. This is how we tell Spring Security where and how to retrieve the application user from the database.
Remember, we encrypted the passwords when saving the user credentials in the database using BCrypt algorithm. We provided an instance of BCryptPasswordEncoder to AuthenticationManagerBuilder, so the Spring Security will use the password encoder to compare the plain string provided by the user with the encrypted hash stored in the database.
Add the following code towards the end of the SecurityConfig class, which creates a BCryptPasswordEncoder bean.
	@Bean
	public PasswordEncoder passwordEncoder() {
	    return new BCryptPasswordEncoder();
	}
We need to update the AuthorizationServerConfig class as well.
Open the AuthorizationServerConfig class under the com.stl.crm.security package.
Declare the crmUserDetailsService attribute as follows.
Add the following code after the authenticationManager attribute in the AuthorizationServerConfig class.
	@Autowired
	private CrmUserDetailsService crmUserDetailsService;
Replace the configure(AuthorizationServerEndpointsConfigurer endpoints) method with the following code.
	@Override
	public void configure(AuthorizationServerEndpointsConfigurer endpoints) throws Exception {
		endpoints.tokenStore(tokenStore).userApprovalHandler(userApprovalHandler)
		.authenticationManager(authenticationManager)
		.userDetailsService(crmUserDetailsService);
	}
That’s all with the coding! Save all the changes, make a build, and deploy to the Tomcat Server.
Signing up:
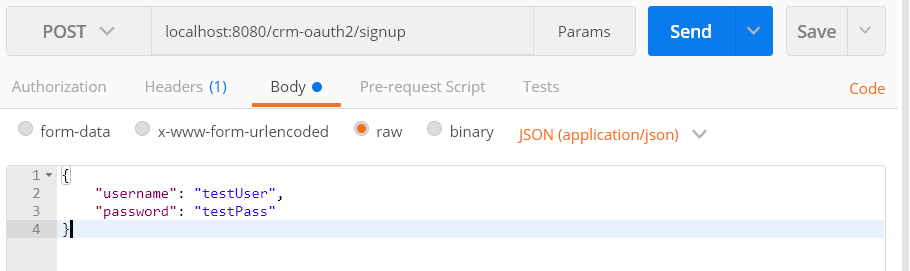
In the Postman app, enter the following HTTP POST URL:
localhost:8080/crm-oauth2/signup
Add the following JSON data as the body.
{
	"username": "testUser",
	"password": "testPass"
}
Your screen should match with the following screen. Click on the Send button and verify the response.
You should get the response similar to the following.
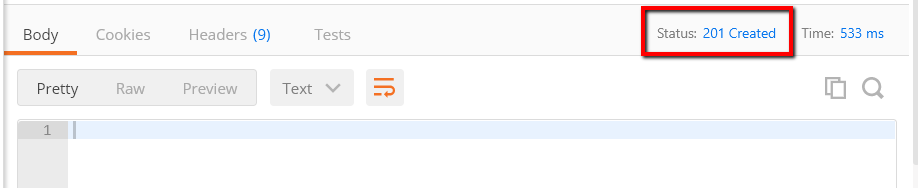
We have successfully saved the user in the database. We will look into the database directly to see how the user data is stored, particularly how the password is stored in the database later in this post.
Getting the Auth token using the newly created user credentials:
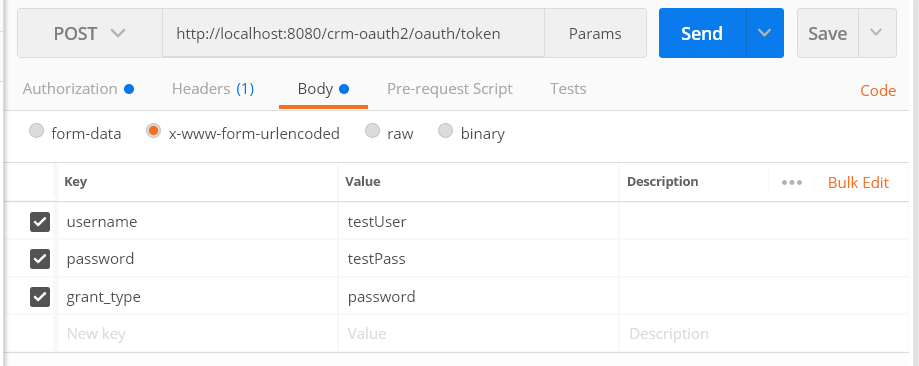
Let’s get back to the Postman app and enter the following URL, which is the OAuth2 token endpoint.
http://localhost:8080/crm-oauth2/oauth/token
Select the HTTP method as POST.
Change the Authorization Type to ‘Basic Auth’ and enter the following username & password.
Username: crmClient1
Password: crmSuperSecret
Select the Body tab and click on the x-www-form-urlencoded radio button. Enter the following key-value pairs:
username: testUser
password: testPass
grant_type: password
Click the Send button. You should get the response similar to the following:
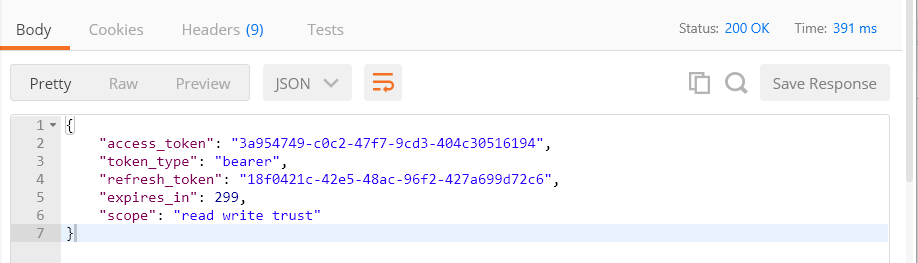
Now you can test all the endpoints (add, get, update, and delete) using the new access_token. Also, try using the Refresh token to get a new access token. See the previous articles for more info.
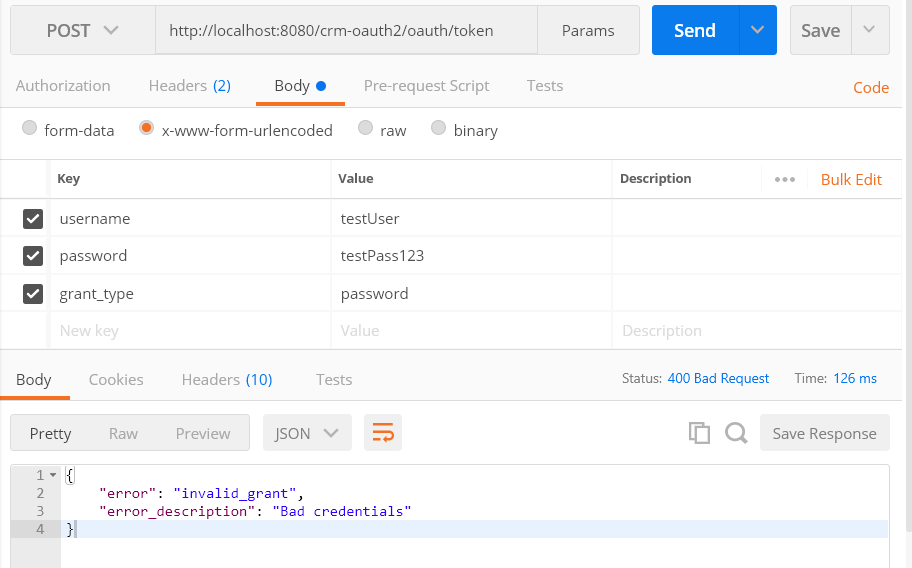
Testing with the wrong password:
Let’s see what happens when we try to get the token using the wrong password. In our example earlier, we saved the username/password as testUser/testPass. If we enter a wrong password, we get the ‘Bad Credentials’ error like you see it below.
Defining Method Level Security:
When the user signs up, we assign the role as ‘USER’, as you can see in the SignupController class.

The signed up user can now add, get, update, and delete Customers. Let’s come up with the security requirement that only allows users with ‘ADMIN’ role to delete a Customer. How do you restrict the deleteCustomer method from the CustomerController class for the user with a ‘USER’ role?
To implement this requirement, we will apply Spring Security’s method level security on the deleteCustomer method. Spring’s method level security can be enabled using EnableGlobalMethodSecurity annotation.
Create a class called MethodSecurityConfig class under the package com.stl.crm.security and add the following code into it.
package com.stl.crm.security;

import org.springframework.context.annotation.Configuration;
import org.springframework.security.access.expression.method.MethodSecurityExpressionHandler;
import org.springframework.security.config.annotation.method.configuration.EnableGlobalMethodSecurity;
import org.springframework.security.config.annotation.method.configuration.GlobalMethodSecurityConfiguration;
import org.springframework.security.oauth2.provider.expression.OAuth2MethodSecurityExpressionHandler;

@Configuration
@EnableGlobalMethodSecurity(prePostEnabled = true)
public class MethodSecurityConfig extends GlobalMethodSecurityConfiguration {

    @Override
    protected MethodSecurityExpressionHandler createExpressionHandler() {
        return new OAuth2MethodSecurityExpressionHandler();
    }
}
Open the CustomerController class under the com.stl.crm.controller package.
Add the following PreAuthorize annotation to the above deleteCustomer method.
@PreAuthorize(“hasAuthority(‘ROLE_ADMIN’)”)
After adding the PreAuthorize annotation, the deleteCustomer method code looks as follows.
    @RequestMapping(value = "/customers/{customerId}", method = RequestMethod.DELETE)
    @PreAuthorize("hasAuthority('ROLE_ADMIN')")
    public ResponseEntity<?> deleteCustomer(@PathVariable long customerId) {
    	Customer customer = customerService.getCustomer(customerId);
    	customerService.deleteCustomer(customer);
    	return new ResponseEntity<>(HttpStatus.OK);
    }
Adding the PreAuthorize annotation to a method would then limit the access to that method accordingly.
Save all changes, make a build, and deploy to the Tomcat Server.
Delete a Customer:
Let’s try to delete a Customer. To do that, we need a customer Id. Let’s run through the following steps:
#1) Get the Auth token using the user credentials testUser/testPass or any other newly created user credentials
http://localhost:8080/crm-oauth2/oauth/token
#2) Get the Customers
http://localhost:8080/crm-oauth2/api/customers
#3) Delete the customer by using the customer id
http://localhost:8080/crm-oauth2/api/customers/<id>
Did you get a response similar to the following?
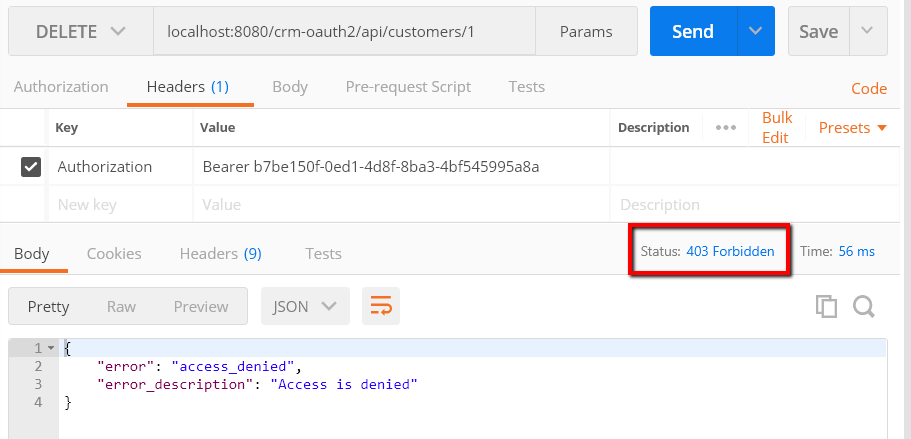
This proves that the regular user now can’t delete a Customer. Only the user with the ‘ADMIN’ role should able to delete a Customer. Let’s try to delete the Customer by using the Admin user.
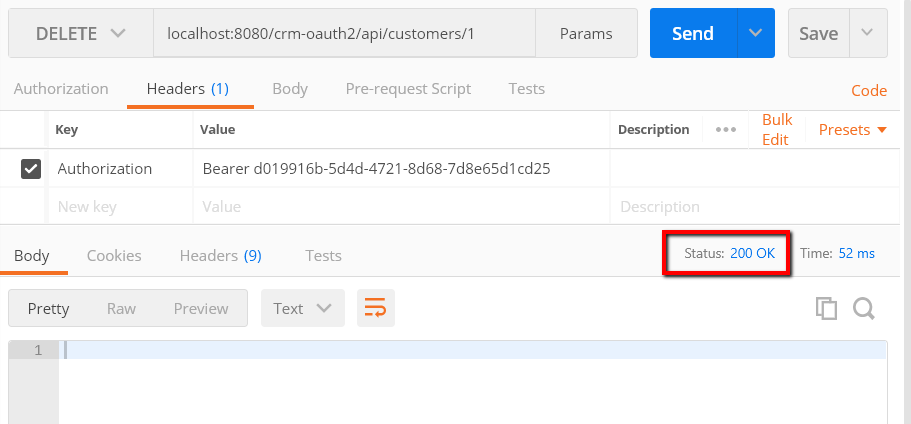
Get the Auth token by using the user credentials crmadmin/adminpass, which is the default ADMIN user in our sample application that is defined in the SignupService class. Delete the Customer by using the new token with the admin user credentials. You should get a successful delete message as follows.
Obtaining information about the current user:
Let’s assume that we have a lot of users signed up and they are doing a lot of operations using our API and we would like to know which user is doing what – for the purpose of logging or auditing.
As we know, signed up users log in once to get the token, which they use to access the API endpoints. So how do we get the username? Let’s find out.
Open the CustomerController class from com.stl.crm.controller package and update the getCustomers() method as follows.
	@RequestMapping(value="/customers", method = RequestMethod.GET)
	public ResponseEntity<?> getCustomers() {

		/**
		 * Obtaining information about the current user
		 */
        Authentication authentication = SecurityContextHolder.getContext().getAuthentication();
        CrmUserDetails principal = (CrmUserDetails) authentication.getPrincipal();
        System.out.println("logged in user name:: " + principal.getUsername());

		Iterable<Customer> customerList = customerService.getCustomers();
		return new ResponseEntity<>(customerList, HttpStatus.OK);
	}
In the preceding code, we added lines #7 to #9 to the existing method. Make sure CrmUserDetails is imported from the com.stl.crm.security package. Save it, make a build, and deploy it to the Tomcat Server. Get the new
token and run the Get Customers. Check the Tomcat server console, where you should see the “logged in user name” printed with the user who accessed the /customers endpoint.
Next, let’s look at how the user credentials are stored in the database.
Installing H2 database:
Download the latest stable version of H2 database from the following link.
www.h2database.com/html/downlo…
After downloading the zip file from the ‘Platform-Independent Zip’ link, extract it into a folder of your choice. Your extracted folder should look similar to the following screenshot.

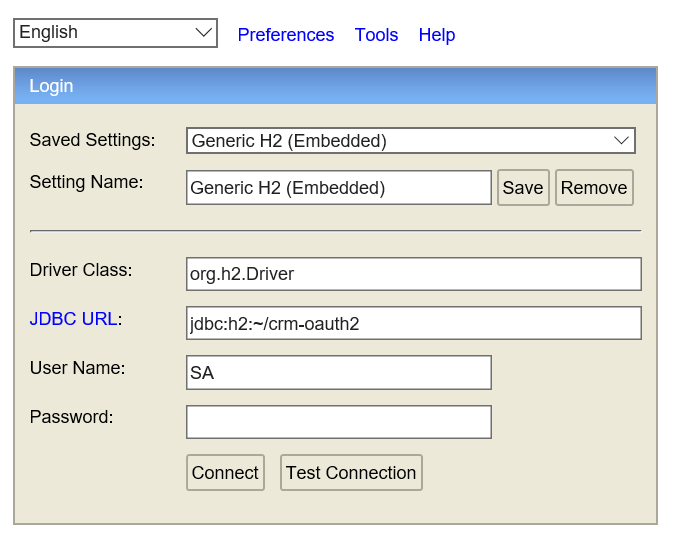
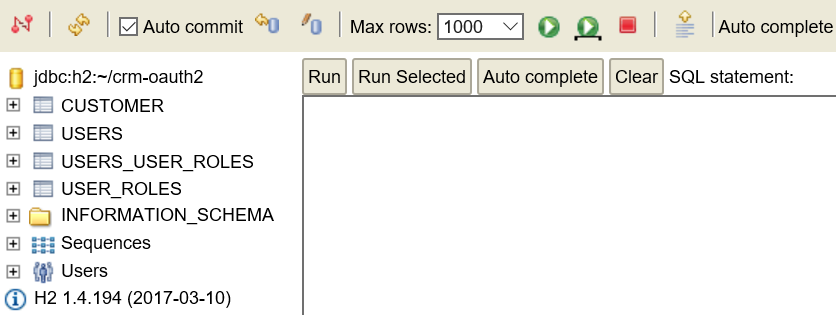
Open the Command Prompt window and navigate to the bin folder under h2 and run the h2.bat file. The H2 login screen should pop up from your default browser. Update the JDBC URL to jdbc:h2:~/crm-oauth2 as seen in the following screen and click on ‘Connect’.
You should get the following screen.
Issue the following ‘select’ SQL statement and click the Run button.
select * from USERS;
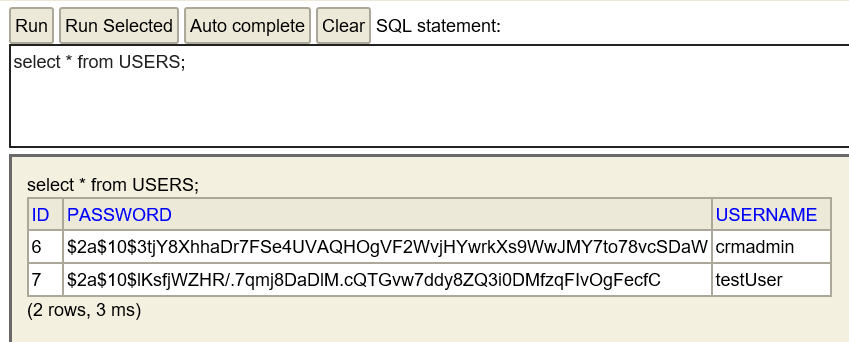
As you can see, the encrypted password is saved in the database.
An important note to remember is that the way we are accessing the H2 database is through single user access. Your application can’t connect while you keep the connection open from the browser, which is launched from the Command Prompt. So as soon as you are done with looking at the data, disconnect it by clicking on the first icon.

After disconnecting it from the database, if your application is throwing any errors, then close the browser tab and press CTRL-C from the Command Prompt.
Conclusion
In this post, we learned how to Persist the user in the database, Configure Spring Security to access the users and roles from the database, define Method Level Security to restrict user with certain roles, Obtain information about the current user, and install the H2 database to see how the encrypted password is stored in the database.
What’s Next in this series?
You may have noticed that every time we deploy or re-start the application server we are getting the new token by providing the user credentials. Even though the refresh token is valid for 30 days in our setup, once the server is stopped and restarted, the refresh token is not valid because we store tokens in memory by using InMemoryTokenStore. In real world applications, however, this is not a realistic scenario. In the next part of this series, we will use a database to store tokens.
The source code used for this post is available on GitHub.
Share this post: on Twitter on Facebook on Google+
