

参考:github.com/spring-guid… 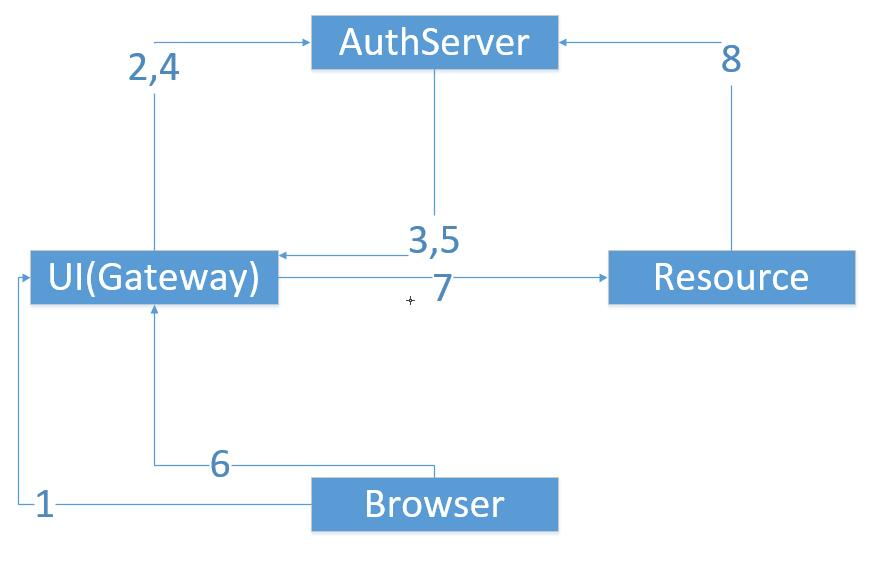
1.浏览器向UI服务器点击触发要求安全认证
2.跳转到授权服务器获取授权许可码
3.从授权服务器带授权许可码跳回来
4.UI服务器向授权服务器获取AccessToken
5.返回AccessToken到UI服务器
6.发出/resource请求到UI服务器
7.UI服务器将/resource请求转发到Resource服务器
8.Resource服务器要求安全验证,于是直接从授权服务器获取认证授权信息进行判断后(最后会响应给UI服务器,UI服务器再响应给浏览中器)
一.先创建OAuth2授权服务器
1.使用spring Initializrt生成初始项目,选使用spring boot 1.3.3生成maven项目,根据需要填写group,artifact,依赖选Web和Security两块,点生成按钮即可.
2.加入OAuth2依赖到pom.xml
<dependency>
   <groupId>org.springframework.security.oauth</groupId>
    <artifactId>spring-security-oauth2</artifactId>
</dependency>
修改主类(这里同时也作为资源服务器)
@SpringBootApplication
@RestController
@EnableAuthorizationServer
@EnableResourceServer
public class AuthserverApplication {

    @RequestMapping("/user ")
    public Principal user(Principal user) {
        return user;
    }

    public static void main(String[] args) {
        SpringApplication.run(AuthserverApplication.class, args);
    }

}
同时修改servlet容器的port,contextPath,注册一个测试用户与客户端,加入配置:application.properties
server.port: 9999
server.contextPath: /uaa
security.user.password: password
security.sessions: if-required
security.oauth2.client.clientId: acme
security.oauth2.client.clientSecret: acmesecret
security.oauth2.client.authorized-grant-types: authorization_code,refresh_token,password
security.oauth2.client.scope: openid
基于spring boot的security的session创建策略默认是STATELESS,至于几个选项意义,可看
org.springframework.security.config.http.SessionCreationPolicy启动授权服务器后,可测试了:
a.打开浏览器输入地址
http://localhost:9999/uaa/oauth/authorize?response_type=code&client_id=acme&redirect_uri=http://example.com发出请求,然后根据以上配置,输入用户名/密码,点同意,获取返回的授权许可码
b.在Linux的bash或mac的terminal输入
[root@dev ~]#curl acme:acmesecret@192.168.1.115:9999/uaa/oauth/token \
-d grant_type=authorization_code -d client_id=acme \
-d redirect_uri=http://example.com -d code=fjRdsL
回车获取access token,其中fjRdsL替换上步获取的授权许可码.返回结果类似如下:
{
  "access_token ": "8eded27d-b849-4473-8b2d-49ae49e17943 ",
  "token_type ": "bearer ",
  "refresh_token ": "5e9af75c-c442-433f-81ba-996eb2c00f53 ",
  "expires_in ": 43199,
  "scope ": "openid "
}
从返回结果复制access_token,继续:
[root@dev ~]# TOKEN=8eded27d-b849-4473-8b2d-49ae49e17943
[root@dev ~]# curl -H “Authorization: Bearer $TOKEN” 192.168.1.115:9999/uaa/user
其中上面的8eded27d-b849-4473-8b2d-49ae49e17943是access_token,根据实际情况替换,第二个命令返回结果类似如下:
{
  "details ": {
    "remoteAddress ": "192.168.1.194 ",
    "sessionId ": null,
    "tokenValue ": "8eded27d-b849-4473-8b2d-49ae49e17943 ",
    "tokenType ": "Bearer ",
    "decodedDetails ": null
  },
  "authorities ": [
    {
      "authority ": "ROLE_USER "
    }
  ],
  "authenticated ": true,
  "userAuthentication ": {
    "details ": {
      "remoteAddress ": "0:0:0:0:0:0:0:1 ",
      "sessionId ": "3943F6861E0FE31C29568542730342F6 "
    },
    "authorities ": [
      {
        "authority ": "ROLE_USER "
      }
    ],
    "authenticated ": true,
    "principal ": {
      "password ": null,
      "username ": "user ",
      "authorities ": [
        {
          "authority ": "ROLE_USER "
        }
      ],
      "accountNonExpired ": true,
      "accountNonLocked ": true,
      "credentialsNonExpired ": true,
      "enabled ": true
    },
    "credentials ": null,
    "name ": "user "
  },
  "oauth2Request ": {
    "clientId ": "acme ",
    "scope ": [
      "openid "
    ],
    "requestParameters ": {
      "response_type ": "code ",
      "redirect_uri ": "http://example.com ",
      "code ": "QzbdLe ",
      "grant_type ": "authorization_code ",
      "client_id ": "acme "
    },
    "resourceIds ": [],
    "authorities ": [
      {
        "authority ": "ROLE_USER "
      }
    ],
    "approved ": true,
    "refresh ": false,
    "redirectUri ": "http://example.com ",
    "responseTypes ": [
      "code "
    ],
    "extensions ": {},
    "grantType ": "authorization_code ",
    "refreshTokenRequest ": null
  },
  "credentials ": " ",
  "principal ": {
    "password ": null,
    "username ": "user ",
    "authorities ": [
      {
        "authority ": "ROLE_USER "
      }
    ],
    "accountNonExpired ": true,
    "accountNonLocked ": true,
    "credentialsNonExpired ": true,
    "enabled ": true
  },
  "clientOnly ": false,
  "name ": "user "
}
从结果来看,使用access token访问资源一切正常,说明授权服务器没问题.
二.再看分离的资源服务器(改动也不少)
不再使用Spring Session从Redis抽取认证授权信息,而是使用ResourceServerTokenServices向授权服务器发送请求获取认证授权信息.
因些没用到Spring Session时可移除,同时application.properties
配置
security.oauth2.resource.userInfoUri
或
security.oauth2.resource.tokenInfoUri
中的一个,
主类修改如下:
@SpringBootApplication
@RestController
@EnableResourceServer
public class ResourceApplication {
    @RequestMapping("/ ")
    public Message home() {
        return new Message("Hello World ");
    }
    public static void main(String[] args) {
        SpringApplication.run(ResourceApplication.class, args);
    }
}
最后运行主类的main方法,开始测试(授权服务器前面启动了,access_token也得到了),于是在使用curl命令:
[root@dev ~]# curl -H “Authorization: Bearer $TOKEN” 192.168.1.115:9000 返回结果类似如下:
{
  "id ": "03af8be3-2fc3-4d75-acf7-c484d9cf32b1 ",
  "content ": "Hello World "
}
可借鉴的经验,我在windows上开发,启动资源服务器,然后资源服务器有配置
server.address: 127.0.0.1,这里限制容器只能是本机访问,
如果使用局域网IP是不可以访问的,比如你在别人的机器或在一台虚拟的linux上使用curl都是不是访问的,注释这行配置,这限制就解除.
跟踪下获取认证授权的信息过程:
1.userInfoRestTemplate Bean的声明在
org.springframework.boot.autoconfigure.security.oauth2.resource.ResourceServerTokenServicesConfiguration.UserInfoRestTemplateConfiguration#userInfoRestTemplate 2.使用前面配置的userInfoUri和上面的userInfoRestTemplate Bean在org.springframework.boot.autoconfigure.security.oauth2.resource.ResourceServerTokenServicesConfiguration.
RemoteTokenServicesConfiguration.
UserInfoTokenServicesConfiguration#userInfoTokenServices
创建UserInfoTokenServices
Bean.
3.在org.springframework.security.oauth2.config.annotation.web.configurers.ResourceServerSecurityConfigurer#configure添加了org.springframework.security.oauth2.provider.authentication.OAuth2AuthenticationProcessingFilter
4.当使用curl -H “Authorization:
Bearer $TOKEN” 192.168.1.115:9000发出请求时,直到被OAuth2AuthenticationProcessingFilter拦截器处理,
org.springframework.security.oauth2.provider.authentication.OAuth2AuthenticationProcessingFilter
#doFilter{
Authentication authentication
= tokenExtractor.extract(request);//抽取Token
Authentication authResult = authenticationManager.authenticate(authentication);//还原解码认证授权信息
}
org.springframework.security.oauth2.provider.authentication.OAuth2AuthenticationManager
#authenticate{
OAuth2Authentication
auth = tokenServices.loadAuthentication(token);//这里的tokenServices就是上面的UserInfoTokenServices Bean,就在这里向授权服务器发出请求.
}
三.UI服务器作为SSO的客户端.
1.同样UI服务器不需要Spring Session,认证如我们所期望的,交给授权服务器,所以使用Spring Security OAuth2依赖替换Spring
Session和Redis依赖
2.当然UI服务器还是API网关的角色,所以不要移除@EnableZuulProxy
在UI服务器主类加上@EnableOAuth2Sso,这个注解会帮我们完成跳转到授权服务器,当然要些配置application.yml
zuul:
  routes:
    resource:
      path: /resource/**
      url: http://localhost:9000
    user:
      path: /user/**
      url: http://localhost:9999/uaa/user
这里将”/user”请求代理到授权服务器
3.继续修改UI主类继承WebSecurityConfigurerAdapter,重写org.springframework.security.config.annotation.web.configuration.WebSecurityConfigurerAdapter
#configure(org.springframework.security.config.annotation.web.builders.HttpSecurity)
目的是为了修改@EnableOAuth2Sso引起的默认Filter链,默认是org.springframework.boot.autoconfigure.security.oauth2.client.OAuth2SsoDefaultConfiguration
#configure,
这个类上面有@Conditional(NeedsWebSecurityCondition.class)意思应该是,没有WebSecurityConfigurerAdapter才会去执行这个config,
因为继承了这个类,所以此config不再执行.
4.作为oauth2的客户端,application.yml下面这几项是少不了的
security:
  oauth2:
    client:
      accessTokenUri: http://localhost:9999/uaa/oauth/token
      userAuthorizationUri: http://localhost:9999/uaa/oauth/authorize
      clientId: acme
      clientSecret: acmesecret
    resource:
      userInfoUri: http://localhost:9999/uaa/user
最后一项,因为也作为资源服务器,所以也加上吧
spring:
  aop:
    proxy-target-class: true
spring aop默认一般都是使用jdk生成代理,前提是要有接口,cglib生成代理,目标类不能是final类,这是最基本的条件.
估计是那些restTemplate没有实现接口,所以不得不在这里使用cglib生成代理.
5.其它的前端微小改变,这里不赘述.把授权服务器,分离的资源服务器和这个UI服务器都启动.准备测试:http://localhost:8080/login
a.经过security的拦截链接中的
org.springframework.security.oauth2.client.filter.OAuth2ClientAuthenticationProcessingFilter.doFilter拦截,
触发了attemptAuthentication方法
    public OAuth2AccessToken getAccessToken() throws UserRedirectRequiredException {
        OAuth2AccessToken accessToken = context.getAccessToken();
        if (accessToken == null || accessToken.isExpired()) {
            try {
                accessToken = acquireAccessToken(context);
            } catch (UserRedirectRequiredException e) {
                context.setAccessToken(null); // No point hanging onto it now
                accessToken = null;
                String stateKey = e.getStateKey();
                if (stateKey != null) {
                    Object stateToPreserve = e.getStateToPreserve();
                    if (stateToPreserve == null) {
                        stateToPreserve = "NONE ";
                    }
                    context.setPreservedState(stateKey, stateToPreserve);
                }
                throw e;
            }
        }
        return accessToken;
    }
acquireAccessToken(context)去获取token的时候触发抛异常.
在org.springframework.security.oauth2.client.token.grant.code.AuthorizationCodeAccessTokenProvider
#getRedirectForAuthorization处理发送的url,
最后这个UserRedirectRequiredException往上抛,
一直往上抛到org.springframework.security.oauth2.client.filter.OAuth2ClientContextFilter#doFilter
    catch (Exception ex) {
        // Try to extract a SpringSecurityException from the stacktrace
        Throwable[] causeChain = throwableAnalyzer.determineCauseChain(ex);
        UserRedirectRequiredException redirect = (UserRedirectRequiredException) throwableAnalyzer
                .getFirstThrowableOfType(
                        UserRedirectRequiredException.class, causeChain);
        if (redirect != null) {
            redirectUser(redirect, request, response);
        } else {
            if (ex instanceof ServletException) {
                throw (ServletException) ex;
            }
            if (ex instanceof RuntimeException) {
                throw (RuntimeException) ex;
            }
            throw new NestedServletException("Unhandled exception ", ex);
        }
    }
终于看到redirectUser(redirect, request, response);进行跳转到授权服务器去了.
授权服务器跳回到UI服务器原来的地址(带回来授权许可码),再次被OAuth2ClientAuthenticationProcessingFilter拦截发送获取accessToken,
经org.springframework.security.oauth2.client.token.OAuth2AccessTokenSupport
#retrieveToken提交POST请求,获取到返回原来发请求处得到OAuth2AccessToken对象.
在org.springframework.security.oauth2.client.OAuth2RestTemplate#acquireAccessToken使用oauth2Context.setAccessToken(accessToken);
对token进行保存.有了accessToken,就可以从授权服务器获取用户信息了.
最后,当用户点logout的时候,授权服务器根本没有退出(销毁认证授权信息)
http://blog.csdn.net/xiejx618/article/details/51039653
