

在上一节的基础上,我们再给项目加入验证码模块,security并没有现成的给我们实现这部分功能,所以我们就需要手写过滤器来实现它。这节题目看上去和第一节没什么关系,但是思想大同小异,希望可以耐心的看,毕竟我尽力的去往清楚的写。看完可能会感觉很乱,这很正常,因为封装的缘故,但是耐下心看完的我相信技术会得道很大的提升。
第一章顺风车:SpringBoot 整合 Security(一)实现用户认证并判断返回json还是view
第二章顺风车:SpringBoot 整合 Security(二)实现验证码登录
好了,开始正文。
再第一节教程的基础上,我们新加了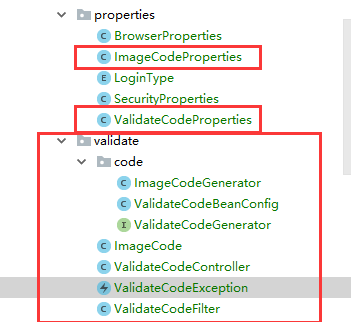
并对核心配置类BrowserSecurityConfig 添加了一些代码。
我像以往一样把各个类先做一大概介绍:
- ImageCodeProperties:
- ValidateCodeProperties:
- 这两个类在properties包下,因为它们是来获取application配置文件中的配置的。
- ImageCodeGenerator:生成验证码实现类
- ValidateCodeBeanConfig:注入ImageCodeGenerator到spring容器。为什么不直接再ImageCodeGenerator上添加@Component注入呢?请看下面详细解释
- ValidateCodeGenerator:生成验证码接口
- ImageCode:验证码实体类
- ValidateCodeController:controller 类,用来将验证码返回给用户
- ValidateCodeException:自定义异常
- ValidateCodeFilter:验证码过滤器
1. 首先我们需要手写一个过滤器
那么问题来了,手写什么样的过滤器呢,过滤器写在项目启动的哪个阶段调用呢?第一节大家能看到,其实在返回UserDetail对象的时候,下面的操作都是security的暗箱操作(基本信息的校验),所以我们必须再此过滤器之前将验证码做一处理(生成和判断),如果验证码不符合要求,直接扔给 登录失败处理 器中,反之亦然。
1.1 我们需要在核心配置类BrowserSecurityConfig 中加一段代码。
        /**
         * 创建 验证码 过滤器 ,并将该过滤器的Handler 设置成自定义登录失败处理器
         */
        ValidateCodeFilter validateCodeFilter = new ValidateCodeFilter();
        validateCodeFilter.setFailureHandler(myFailHandler);
        //将 securityproperties 设置进去
        validateCodeFilter.setSecurityProperties(securityProperties);
        //调用 装配 需要图片验证码的 url 的初始化方法
        validateCodeFilter.afterPropertiesSet();

        http
                //在UsernamePasswordAuthenticationFilter 过滤器前 加一个过滤器 来搞验证码
                .addFilterBefore(validateCodeFilter,UsernamePasswordAuthenticationFilter.class)
                .formLogin()
                ....
首先,我创建了一个ValidateCodeFilter 对象,设置它的失败处理器 和 securityProperties配置类,调用它中的afterPropertiesSet()方法。 总的来说,就是调用了该对象的三个方法。至于方法是干什么,慢慢往下看。
其次,在UsernamePasswordAuthenticationFilter 过滤器前 加一个过滤器 来搞验证码。即:.addFilterBefore(validateCodeFilter,UsernamePasswordAuthenticationFilter.class)
1.2 ValidateCodeFilter .java
package com.fantJ.core.validate;

/**
 * 验证码 过滤器
 * Created by Fant.J.
 */
@Component
public class ValidateCodeFilter  extends OncePerRequestFilter implements InitializingBean{

    private Logger logger = LoggerFactory.getLogger(getClass());

    /**
     * 登录失败处理器
     */
    @Autowired
    private AuthenticationFailureHandler failureHandler;

    /**
     * Session 对象
     */
    private SessionStrategy sessionStrategy = new HttpSessionSessionStrategy();

    /**
     * 创建一个Set 集合 存放 需要验证码的 urls
     */
    private Set<String> urls = new HashSet<>();

    /**
     * security applicaiton  配置属性
     */
    @Autowired
    private SecurityProperties securityProperties;
    /**
     * spring的一个工具类:用来判断 两字符串 是否匹配
     */
    private AntPathMatcher pathMatcher = new AntPathMatcher();

    /**
     * 这个方法是 InitializingBean 接口下的一个方法, 在初始化配置完成后 运行此方法
     */
    @Override
    public void afterPropertiesSet() throws ServletException {
        super.afterPropertiesSet();
        ValidateCodeProperties code = securityProperties.getCode();
        logger.info(String.valueOf(code));
        //将 application 配置中的 url 属性进行 切割
        String[] configUrls = StringUtils.splitByWholeSeparatorPreserveAllTokens(securityProperties.getCode().getImage().getUrl(), ",");
        //添加到 Set 集合里
        urls.addAll(Arrays.asList(configUrls));
        //因为登录请求一定要有验证码 ,所以直接 add 到set 集合中
        urls.add("/authentication/form");
    }

    @Override
    protected void doFilterInternal(HttpServletRequest request, HttpServletResponse response, FilterChain filterChain) throws ServletException, IOException {

        boolean action = false;
        for (String url:urls){
            //如果请求的url 和 配置中的url 相匹配
            if (pathMatcher.match(url,request.getRequestURI())){
                action = true;
            }
        }

        //拦截请求
        if (action){
            logger.info("拦截成功"+request.getRequestURI());
            //如果是登录请求
            try {
                validate(new ServletWebRequest(request));
            }catch (ValidateCodeException exception){
                //返回错误信息给 失败处理器
                failureHandler.onAuthenticationFailure(request,response,exception);
                return;
            }

        }else {
            //不做任何处理,调用后面的 过滤器
            filterChain.doFilter(request,response);
        }
    }

    private void validate(ServletWebRequest request) throws ServletRequestBindingException {
        //从session中取出 验证码
        ImageCode codeInSession = (ImageCode) sessionStrategy.getAttribute(request,ValidateCodeController.SESSION_KEY);
        //从request 请求中 取出 验证码
        String codeInRequest = ServletRequestUtils.getStringParameter(request.getRequest(),"imageCode");

        if (StringUtils.isBlank(codeInRequest)){
            logger.info("验证码不能为空");
            throw new ValidateCodeException("验证码不能为空");
        }
        if (codeInSession == null){
            logger.info("验证码不存在");
            throw new ValidateCodeException("验证码不存在");
        }
        if (codeInSession.isExpried()){
            logger.info("验证码已过期");
            sessionStrategy.removeAttribute(request,ValidateCodeController.SESSION_KEY);
            throw new ValidateCodeException("验证码已过期");
        }
        if (!StringUtils.equals(codeInSession.getCode(),codeInRequest)){
            logger.info("验证码不匹配"+"codeInSession:"+codeInSession.getCode() +", codeInRequest:"+codeInRequest);
            throw new ValidateCodeException("验证码不匹配");
        }
        //把对应 的 session信息  删掉
        sessionStrategy.removeAttribute(request,ValidateCodeController.SESSION_KEY);
    }

    /**
     * 失败 过滤器 getter and setter 方法
     */
    public AuthenticationFailureHandler getFailureHandler() {
        return failureHandler;
    }

    public void setFailureHandler(AuthenticationFailureHandler failureHandler) {
        this.failureHandler = failureHandler;
    }
    /**
     * SecurityProperties 属性类 getter and setter 方法
     */
    public SecurityProperties getSecurityProperties() {
        return securityProperties;
    }

    public void setSecurityProperties(SecurityProperties securityProperties) {
        this.securityProperties = securityProperties;
    }
}
按照 1.1 中 ValidateCodeFilter类 调用三个方法的顺序一一介绍。
validateCodeFilter.setFailureHandler(myFailHandler);
调用 登录失败处理器getter and setter 方法 。
那么问题来了,我们在第一节中有注入这个 登录失败处理器类 ,为什么在这里再进行 设置呢 ?
答案很简单,因为是一个新的过滤器来调用它。而且,这个ValidateCode过滤器 会再 用户验证之前 进行。
validateCodeFilter.setSecurityProperties(securityProperties);
这个其实就是 security applicaiton 配置属性getter and setter 方法
这段代码就不说啥了,道理和上面的一样。因为在核心配置类 BrowserSecurityConfig 里,我们有注入该对象,然后把对象传递。不传应该也可以因为该类中也有注入该对象,但是传了肯定不报错。
-
afterPropertiesSet()方法
这个方法是 InitializingBean 接口下的一个方法, 在初始化配置完成后 运行此方法,该方法的目的是 将我们在业务逻辑中 需要进行验证码验证的 url 做一个集合,然后进行拦截(doFilterInternal() 方法里就是拦截url,然后进一步处理)
然后我把application配置贴出来
#图形验证码配置
fantJ.security.code.image.length = 6
fantJ.security.code.image.width = 100
fantJ.security.code.image.url=/user,/user/*
根据securityProperties.getCode().getImage().getUrl()我们可以看出,我在SecurityProperties下添加了Code对象,Code下添加了Image对象,Image下添加了Url对象。(后面我会把代码完全贴出来)来获取配置中的url,并进行逗号切割,然后放到Set集合中。
- ValidateCodeFilter类中的doFilterInternal()思路介绍
经过调用afterPropertiesSet()方法,我们已经拿到了需要拦截的urls集合,然后我判断 request请求中的uri 是否是集合中的,如果是,拦截请求,调用validate();方法,validate()方法 将会从session中取出 验证码,从request 请求中 取出 验证码。进行对比校验,详情请看注释信息。ImageCode 是验证码实体类。
3. controller类生成验证码
上面提到了从request 请求中 取出 验证码,在此之前我们需要在controller里生成验证码并返回给用户,用户填写提交我们才能从request请求中获取。
package com.fantJ.core.validate;

/**
 * Created by Fant.J.
 */
@RestController
public class ValidateCodeController {

    public static final String SESSION_KEY = "SESSION_KEY_IMAGE_CODE";
    /**
     * 引入 session
     */
    private SessionStrategy sessionStrategy = new HttpSessionSessionStrategy();

    @Autowired
    private ValidateCodeGenerator imageCodeGenerator;

    @GetMapping("/code/image")
    public void createCode(HttpServletRequest request, HttpServletResponse response) throws IOException {
        ImageCode imageCode = imageCodeGenerator.createCode(new ServletWebRequest(request));
        //将随机数 放到Session中
        sessionStrategy.setAttribute(new ServletWebRequest(request),SESSION_KEY,imageCode);
        //写给response 响应
        ImageIO.write(imageCode.getImage(),"JPEG",response.getOutputStream());
    }
}
我们随机生成验证码,放到session中,并返回给response客户端。
4. 生成验证码类
ImageCode .java
package com.fantJ.core.validate;

/**
 * 验证码信息类
 * Created by Fant.J.
 */
public class ImageCode {

    /**
     * 图片
     */
    private BufferedImage image;
    /**
     * 随机数
     */
    private String code;
    /**
     * 过期时间
     */
    private LocalDateTime expireTime;

    public ImageCode(BufferedImage image, String code, LocalDateTime expireTime) {
        this.image = image;
        this.code = code;
        this.expireTime = expireTime;
    }
    public ImageCode(BufferedImage image, String code, int  expireIn) {
        this.image = image;
        this.code = code;
        //当前时间  加上  设置过期的时间
        this.expireTime = LocalDateTime.now().plusSeconds(expireIn);
    }

    public boolean isExpried(){
        //如果 过期时间 在 当前日期 之前,则验证码过期
        return LocalDateTime.now().isAfter(expireTime);
    }

...getter and setter
}
注意这里面有过期时间的处理,我们上传一个参数int expireIn,用当前时间plus这个参数,然后在isExpried()方法中,再用当前时间和 plus后的时间做比较 来判断 验证码是否过期。
ValidateCodeGenerator .java 接口类
/**
 * 验证码生成器
 * Created by Fant.J.
 */
public interface ValidateCodeGenerator {
    /**
     * 创建验证码
     */
    ImageCode  createCode(ServletWebRequest request);
}
为什么要弄一个接口,为了封装性,如果我们以后想写一个更牛逼的验证码生成器,可以不改原来的代码,直接继承接口实现方法就ok。
ImageCodeGenerator.java
package com.fantJ.core.validate.code;

/**
 * Created by Fant.J.
 */
public class ImageCodeGenerator implements ValidateCodeGenerator {
    /**
     * 引入 Security 配置属性类
     */
    private SecurityProperties securityProperties;


    /**
     * 创建验证码
     */
    @Override
    public ImageCode createCode(ServletWebRequest request) {
        //如果请求中有 width 参数,则用请求中的,否则用 配置属性中的
        int width = ServletRequestUtils.getIntParameter(request.getRequest(),"width",securityProperties.getCode().getImage().getWidth());
        //高度(宽度)
        int height = ServletRequestUtils.getIntParameter(request.getRequest(),"height",securityProperties.getCode().getImage().getHeight());
        //图片验证码字符个数
        int length = securityProperties.getCode().getImage().getLength();
        //过期时间
        int expireIn = securityProperties.getCode().getImage().getExpireIn();

        BufferedImage image = new BufferedImage(width, height, BufferedImage.TYPE_INT_RGB);

        Graphics g = image.getGraphics();

        Random random = new Random();

        g.setColor(getRandColor(200, 250));
        g.fillRect(0, 0, width, height);
        g.setFont(new Font("Times New Roman", Font.ITALIC, 20));
        g.setColor(getRandColor(160, 200));
        for (int i = 0; i < 155; i++) {
            int x = random.nextInt(width);
            int y = random.nextInt(height);
            int xl = random.nextInt(12);
            int yl = random.nextInt(12);
            g.drawLine(x, y, x + xl, y + yl);
        }

        String sRand = "";
        for (int i = 0; i < length; i++) {
            String rand = String.valueOf(random.nextInt(10));
            sRand += rand;
            g.setColor(new Color(20 + random.nextInt(110), 20 + random.nextInt(110), 20 + random.nextInt(110)));
            g.drawString(rand, 13 * i + 6, 16);
        }

        g.dispose();

        return new ImageCode(image, sRand, expireIn);
    }
    /**
     * 生成随机背景条纹
     */
    private Color getRandColor(int fc, int bc) {
        Random random = new Random();
        if (fc > 255) {
            fc = 255;
        }
        if (bc > 255) {
            bc = 255;
        }
        int r = fc + random.nextInt(bc - fc);
        int g = fc + random.nextInt(bc - fc);
        int b = fc + random.nextInt(bc - fc);
        return new Color(r, g, b);
    }

    public SecurityProperties getSecurityProperties() {
        return securityProperties;
    }

    public void setSecurityProperties(SecurityProperties securityProperties) {
        this.securityProperties = securityProperties;
    }
}
最后,注入该类到spring容器。 ValidateCodeBeanConfig.java
package com.fantJ.core.validate.code;

/**
 * 验证码 实体类设置 类
 * Created by Fant.J.
 */
@Configuration
public class ValidateCodeBeanConfig {

    @Autowired
    private SecurityProperties securityProperties;

    @Bean
    @ConditionalOnMissingBean(name = "imageCodeGenerator")
    /**
     *
     *
     *
     * 在触发 ValidateCodeGenerator 之前会检测有没有imageCodeGenerator这个bean。
     */
    public ValidateCodeGenerator imageCodeGenerator(){
        ImageCodeGenerator codeGenerator = new ImageCodeGenerator();
        codeGenerator.setSecurityProperties(securityProperties);
        return codeGenerator;
    }

}
@ConditionalOnMissingBean 该注解其实就相当于我再 ImageCodeGenerator 类上加个 @Component 注解。 他俩的不同是,这个注解是个有条件的注解, 意思是如果 容器中 没有ImageCodeGenerator这个类,我就创建这个类,如果有,就不做操作。
为什么要这样呢?如果我们以后重写了一个更牛b的生成验证码类,我们可以直接给它上面添加@Component注解来注入,就不用来管原来的代码,也不用考虑bean 名称的冲突。
这就是生成验证码用的类。效果如下

5. 异常类和properties类
ValidateCodeException .java
package com.fantJ.core.validate;
import org.springframework.security.core.AuthenticationException;

/**
 * 自定义 验证码异常类
 * Created by Fant.J.
 */
public class ValidateCodeException extends AuthenticationException {
    public ValidateCodeException(String msg) {
        super(msg);
    }
}
SecurityProperties.java
package com.fantJ.core.properties;

import org.springframework.boot.context.properties.ConfigurationProperties;

/**
 * Security 属性 类
 * Created by Fant.J.
 */
@ConfigurationProperties(prefix = "fantJ.security")
public class SecurityProperties {
    /**
     * 浏览器 属性类
     */
    private BrowserProperties browser = new BrowserProperties();

    /**
     * 验证码 属性类
     */
    private ValidateCodeProperties code = new ValidateCodeProperties();

    getter and setter...
}
ValidateCodeProperties.java
package com.fantJ.core.properties;

/**
 * 验证码 配置类
 * Created by Fant.J.
 */
public class ValidateCodeProperties {
    /**
     * 图形验证码 配置属性
     */
    private ImageCodeProperties image = new ImageCodeProperties();

    getter and setter...
}
ImageCodeProperties.java
package com.fantJ.core.properties;

/**
 * 图形验证码  配置读取类
 * Created by Fant.J.
 */
public class ImageCodeProperties {

    /**
     * 验证码宽度
     */
    private int width = 67;
    /**
     * 高度
     */
    private int height = 23;
    /**
     * 长度(几个数字)
     */
    private int length = 4;
    /**
     * 过期时间
     */
    private int expireIn = 60;

    /**
     * 需要图形验证码的 url
     */
    private String url;

  getter and setter ...
}
最后,再附赠大家一个登录页面demo
<!DOCTYPE html>
<html>
<head>
    <meta charset="UTF-8">
    <title>登录</title>
</head>
<body>
<h2>登录</h2>
<h3>表单登录</h3>
<form action="/authentication/form" method="post">
    <table>
        <tr>
            <td>用户名:</td>
            <td><input type="text" name="username"></td>
        </tr>
        <tr>
            <td>密码:</td>
            <td><input type="password" name="password"></td>
        </tr>
        <tr>
            <td>验证码:</td>
            <td>
                <input type="text" name="imageCode">
                <img src="/code/image?width=100">
            </td>
        </tr>
        <tr>
            <td colspan="2"><button type="submit">登录</button></td>
        </tr>
    </table>
</form>

</body>
</html>
效果展示
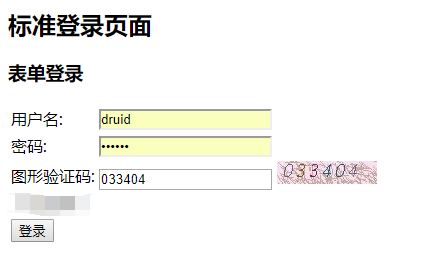 登录页
登录页 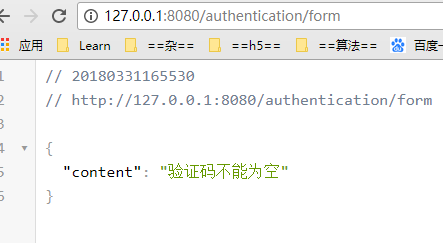 验证码为空
验证码为空 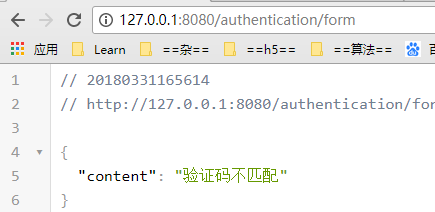 验证码错误
验证码错误