

摘要:
如果你想用Spring的最新和最好的工具开始使用反应式微服务,那么这篇文章就是为你准备的!
我已经在一年前的 Reactive microservices with Spring 5 这篇文章中描述了Spring对反应式的支持。当时,Spring WebFlux项目一直处于积极的发展阶段,现在,在Spring 5正式发布之后,它在这个版本是非常值得关注的。
此外,我们将尝试把反应式微服务放入Spring Cloud组件中,其中包含诸如Eureka服务发现,使用Spring Cloud Commons @LoadBalanced进行负载均衡以及使用Spring Cloud Gateway(也基于WebFlux和Netty)的API网关等元素,。
我们还将以Spring Data Reactive Mongo项目为例,介绍Spring对NoSQL数据库的反应性支持。
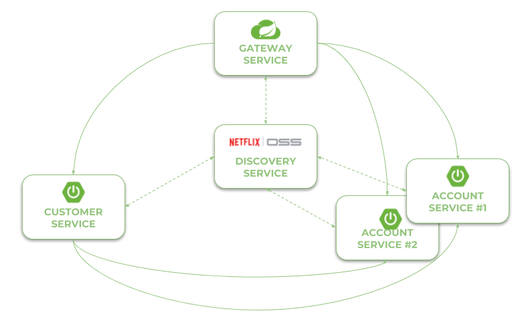
我们的体系结构示例图如下,它包含两个微服务,一个服务发现,一个网关和MongoDB数据库。 源代码sample-spring-cloud-webflux通常在GitHub上的一样可用。
接下来,我们进一步来描述创建上述系统的步骤。
第1步:使用Spring WebFlux构建反应式应用程序
为了在项目中使用库Spring WebFlux,我们应该将spring-boot-starter-webflux添加到依赖关系中。 它包括一些依赖库,如Reactor或Netty服务器。
<dependency>
<groupId>org.springframework.boot</groupId>
<artifactId>spring-boot-starter-webflux</artifactId>
</dependency>
REST控制器看起来与同步Web服务定义的控制器非常相似。 唯一的区别在于返回对象的类型。 如果我们返回单个对象,将使用Mono类的实例,如果我们返回的是多个对象,比如是一个列表,将返回一个Flux类的实例。 由于Spring Data Reactive Mongo,我们不需要做任何事情,只需调用相应接口上的所需方法即可。
实例代码如下:
@RestController
public class AccountController {
 private static final Logger LOGGER = LoggerFactory.getLogger(AccountController.class);
 @Autowired
 private AccountRepository repository;
 @GetMapping("/customer/{customer}")
 public Flux findByCustomer(@PathVariable("customer") String customerId) {
  LOGGER.info("findByCustomer: customerId={}", customerId);
  return repository.findByCustomerId(customerId);
 }
 @GetMapping
 public Flux findAll() {
  LOGGER.info("findAll");
  return repository.findAll();
 }
 @GetMapping("/{id}")
 public Mono findById(@PathVariable("id") String id) {
  LOGGER.info("findById: id={}", id);
  return repository.findById(id);
 }
 @PostMapping
 public Mono create(@RequestBody Account account) {
  LOGGER.info("create: {}", account);
  return repository.save(account);
 }
}
第2步:使用Spring Data Reactive Mongo将应用程序与数据库集成
应用程序和数据库之间的集成实现也非常简单。 首先,我们需要在项目依赖项中添加相关数据库依赖spring-boot-starter-data-mongodb-reactive。
<dependency>
<groupId>org.springframework.boot</groupId>
<artifactId>spring-boot-starter-data-mongodb-reactive</artifactId>
</dependency>
添加依赖过后,Mongo将自动支持响应式应用。 下一步是使用ORM映射声明一个实体。 以下类也作为AccountController的响应返回。
@Document
public class Account {
 @Id
 private String id;
 private String number;
 private String customerId;
 private int amount;
 ...
}
最后,我们可以创建一个扩展ReactiveCrudRepository的接口。 它遵循Spring Data JPA实现的模式,并提供了一些CRUD操作的基本方法。 它还允许我们自定义方法,这些名称会自动映射到查询。 与标准Spring Data JPA库相比唯一的区别在于方法签名。 这些对象将由Mono和Flux进行包装。
public interface AccountRepository extends ReactiveCrudRepository {
 Flux findByCustomerId(String customerId);
}
在这个例子中,我使用了Docker容器在本地运行MongoDB。 因为我使用Docker Toolkit在Windows上运行Docker,所以Docker机器的默认地址是192.168.99.100。 这是application.yml文件中数据源的配置。
spring:
  data:
    mongodb:
      uri: mongodb://192.168.99.100/test
步骤3:使用Eureka启用服务发现
与Spring Cloud Eureka的集成非常类似于传统的REST微服务。 要启用发现客户端功能,我们应该首先将启动器spring-cloud-starter-netflix-eureka-client添加到项目依赖项中。
<dependency>
<groupId>org.springframework.cloud</groupId>
<artifactId>spring-cloud-starter-netflix-eureka-client</artifactId>
</dependency>
然后我们必须使用@EnableDiscoveryClient这个注解来启用它的功能。
@SpringBootApplication
@EnableDiscoveryClient
public class AccountApplication {
 public static void main(String[] args) {
  SpringApplication.run(AccountApplication.class, args);
 }
}
微服务将自动在Eureka注册中心进行注册。 当然,我们可能会运行每个服务的多个实例。 以下是运行account-service实例和customer-service服务实例后的Eureka Dashboard 仪表板界面(http:// localhost:8761)。 这里将不详细讲解使用嵌入式Eureka服务器运行应用程序的细节。
有关详细信息,请参阅我之前的文章,Spring Boot 2.0的微服务快速指南,Eureka和Spring Cloud。 Eureka服务器可作为adiscovery-service模块使用。
第4步:使用WebClient进行反应性微服务之间的服务间通信
Spring WebFlux项目中的WebClient实现了一个服务间通信。 与RestTemplate相同,您应该使用Spring Cloud Commons @LoadBalanced对其进行注解。 它支持使用Netflix OSS Ribbon客户端与服务发现和负载均衡进行集成。 所以,第一步是使用@LoadBalanced注解声明一个客户端构建器。
@Bean
@LoadBalanced
public WebClient.Builder loadBalancedWebClientBuilder() {
 return WebClient.builder();
}
然后我们可以将WebClientBuilder注入到REST控制器中。 通过GET / {id} / with-accounts实现与account-service通信,首先我们使用一个基于响应式的Spring Data repository来搜索客户实体。 它返回Mono对象,而WebClient返回Flux。 现在,我们的主要目的是将这些内容合并到订阅者,并从Flux中返回一个包含帐户列表的Mono对象。 下面的代码片段说明了我如何使用WebClient与另一个微服务进行通信,然后将响应和结果合并到单个Mono对象。
这种合并可以用更“优雅”的方式完成,所以你可以随意创建一个推送请求。
@Autowired
private WebClient.Builder webClientBuilder;
@GetMapping("/{id}/with-accounts")
public Mono findByIdWithAccounts(@PathVariable("id") String id) {
 LOGGER.info("findByIdWithAccounts: id={}", id);
 Flux accounts = webClientBuilder.build().get().uri("http://account-service/customer/{customer}", id).retrieve().bodyToFlux(Account.class);
 return accounts
  .collectList()
  .map(a -> new Customer(a))
  .mergeWith(repository.findById(id))
  .collectList()
  .map(CustomerMapper::map);
}
第5步:使用Spring Cloud Gateway构建API网关
Spring Cloud Gateway是最新的Spring Cloud项目之一。 它建立在Spring WebFlux的基础之上,并且由于这一点,我们可以将它用作基于反应式微服务的入口。 与Spring WebFlux应用程序类似,它在嵌入式Netty服务器上运行。 要使用Spring Boot应用程序启用它,只需在您的项目中包含以下依赖项。
<dependency>
    <groupId>org.springframework.cloud</groupId>
    <artifactId>spring-cloud-starter-gateway</artifactId>
</dependency>
我们还应该启用发现客户端,以便网关能够获取已注册的微服务列表。 但是,不需要在Eureka中注册网关的应用程序。 要禁用注册,可以在application.yml文件中将属性eureka.client.registerWithEureka设置为false。
@SpringBootApplication
@EnableDiscoveryClient
public class GatewayApplication {
 public static void main(String[] args) {
  SpringApplication.run(GatewayApplication.class, args);
 }
}
默认情况下,Spring Cloud Gateway不支持与服务发现的集成。要启用它,我们应该将属性spring.cloud.gateway.discovery.locator.enabled设置为true。现在,应该完成的最后一件事情就是路由器的配置。 Spring Cloud Gateway提供了两种可以在路由中配置的组件:filters(过滤器)和predicates(谓词)。 Predicates用于将HTTP请求与路由进行匹配,而过滤器可用于在发送请求之前或之后修改请求和响应。这是网关的完整配置。它启用服务发现位置,并根据服务注册表中的条目定义两种路由。我们使用Path
Route Predicate工厂来匹配传入的请求,并使用RewritePath GatewayFilter工厂来修改请求的路径,以使其匹配相应的服务格式(端点显示在路径/下,而网关将它们暴露在路径下/account 和/customer下)。
spring:
  cloud:
    gateway:
      discovery:
        locator:
          enabled: true
      routes:
      - id: account-service
        uri: lb://account-service
        predicates:
        - Path=/account/**
        filters:
        - RewritePath=/account/(?.*), /$\{path}
      - id: customer-service
        uri: lb://customer-service
        predicates:
        - Path=/customer/**
        filters:
        - RewritePath=/customer/(?.*), /$\{path}
第6步:测试样本系统
在做一些测试之前,让我们回顾一下我们的示例系统。 我们有两个微服务 - account-service, customer-service - 使用MongoDB作为数据库。 微服务customer-service调用account-service暴露的端点GET / customer / {customer}。 account-service的URL来自Eureka。 整个系统隐藏在网关后面,该网关位于localhost:8090的地址下。
现在,第一步是在Docker容器上运行MongoDB。
执行以下命令后,Mongo在地址192.168.99.100:27017下可用。
$ docker run -d --name mongo -p 27017:27017 mongo
然后我们可以继续运行discovery-service。 Eureka在其默认地址localhost:8761下可用。 您可以使用IDE运行它,或者执行命令java -jar target / discovery-service-1.0-SNAPHOT.jar。 同样的适用于我们的示例微服务。 但是,account-service需要在两个实例中进行通信,所以当使用-Dserver.port VM参数运行第二个实例时,您需要覆盖默认的HTTP端口,例如java -jar -Dserver.port = 2223 target /account-service-1.0-SNAPSHOT.jar。
最后,在运行网关服务之后,我们可以添加一些测试数据。
$ curl --header "Content-Type: application/json" --request POST --data '{"firstName": "John","lastName": "Scott","age": 30}' http://localhost:8090/customer
{"id": "5aec1debfa656c0b38b952b4","firstName": "John","lastName": "Scott","age": 30,"accounts": null}
$ curl --header "Content-Type: application/json" --request POST --data '{"number": "1234567890","amount": 5000,"customerId": "5aec1debfa656c0b38b952b4"}' http://localhost:8090/account
{"id": "5aec1e86fa656c11d4c655fb","number": "1234567892","customerId": "5aec1debfa656c0b38b952b4","amount": 5000}
$ curl --header "Content-Type: application/json" --request POST --data '{"number": "1234567891","amount": 12000,"customerId": "5aec1debfa656c0b38b952b4"}' http://localhost:8090/account
{"id": "5aec1e91fa656c11d4c655fc","number": "1234567892","customerId": "5aec1debfa656c0b38b952b4","amount": 12000}
$ curl --header "Content-Type: application/json" --request POST --data '{"number": "1234567892","amount": 2000,"customerId": "5aec1debfa656c0b38b952b4"}' http://localhost:8090/account
{"id": "5aec1e99fa656c11d4c655fd","number": "1234567892","customerId": "5aec1debfa656c0b38b952b4","amount": 2000}
要测试服务间通信,只需在网关服务上调用端点GET / customer / {id} / with-accounts。 它将请求转发给customer-service,然后customer-service使用响应式WebClient调用由account-service 暴露的端点。 结果如下所示。
结论
Spring 5和Spring Boot 2.0的出现,带来了许多可用的方法来构建基于微服务的体系结构。我们可以使用与Spring Cloud Netflix项目的一对一通信,基于消息代理的消息传递微服务,以及与Spring Cloud Stream的发布/订阅通信模型构建标准同步系统,最后使用Spring实现异步,反应式微服务WebFlux。本文的主要目标是向您展示如何将Spring WebFlux与Spring Cloud项目一起使用,以便为构建在Spring Boot之上的响应式微服务提供服务发现,负载均衡或API网关等机制。在Spring 5之前,缺乏对响应式微服务的支持是Spring框架的缺点之一,但现在,Spring WebFlux已不再是这种情况。不仅如此,我们还可以利用Spring对最受欢迎的NoSQL数据库(如MongoDB或Cassandra)的反应式支持,并轻松地将我们的反应式微服务与同步REST微服务一起放入一个系统中。
