

由于最近工(lan)作(ai)太(wan)忙(qi),已经好久没有更新过文章了,为了防止自己彻底残废,决定先撸一个简单的万能圆形控件练练手。
图片控件首先想到的肯定是ImageView,所以我就在ImageView基础上实现圆形控件,这样做有两个好处,第一可以直接使用系统提供的非常Nice的方法和效果,另一个就可在使用Glide 的时候可以保持队形,不用专门在写一个Glide加载圆形图片的方法了。
老规矩,线上效果图片:
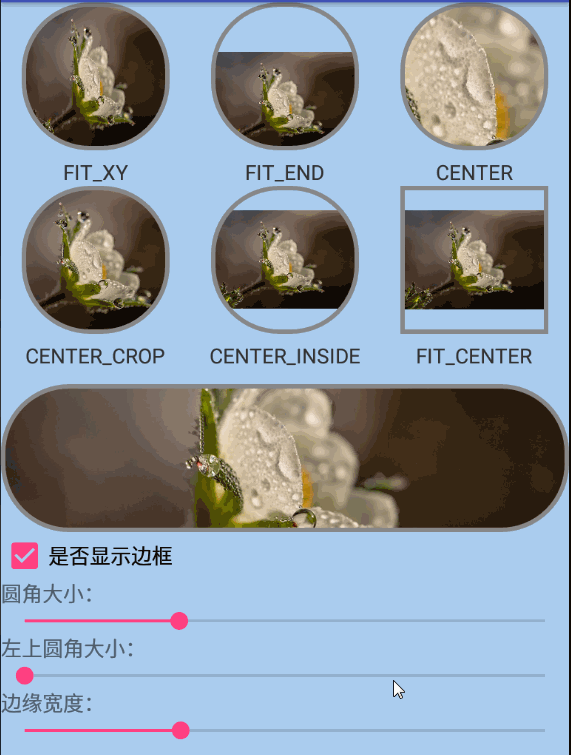 image
image
首先我们先继承 AppCompatImageView 控件,自定义控件离不开onMeasure,onLayout,onDraw 三大法宝,不过由于系统已经进行过处理,这里就不需要在处理onMearch,onLayout两个方法了,只需要重写onDraw 方法即可;
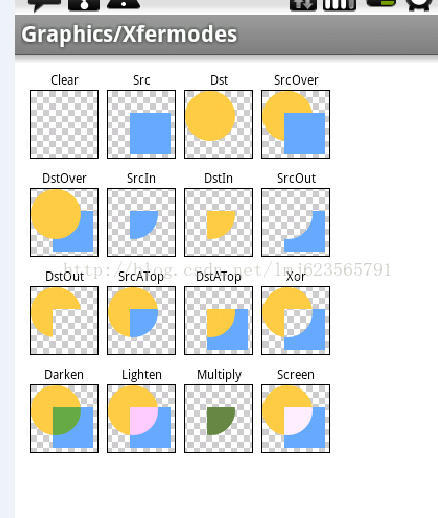
这里通过Xfermodes方法实现圆形图片,这张图片显示了Xfermodes的16中效果,我这里选用 DST_IN 实现;
 image
image
剩下的贴上onDrown方法代码
    @Override
protected void onDraw(Canvas canvas) {
    setLayerType(LAYER_TYPE_HARDWARE, mPaint);
    canvas.save();
    super.onDraw(canvas);
    mPaint.setXfermode(xfermode);

    mPaint.setStyle(Paint.Style.FILL);
    //更改path
    initRadios(getWidth(), getHeight(), borderPath, borderWidth / 2);
    canvas.drawPath(borderPath, mPaint);
    mPaint.setXfermode(null);

    //是否绘制边框
    if (showBorder) {
        mPaint.setStrokeWidth(borderWidth);
        mPaint.setColor(borderColor);
        mPaint.setStyle(Paint.Style.STROKE);
        canvas.drawPath(borderPath, mPaint);
    }
    canvas.restore();
}
上述代码中 initRadios(getWidth(), getHeight(), borderPath, borderWidth /2); 是用来更改path的方法,通过不断的更改path来更改图片形状
private void initRadios(int w, int h, Path borderPath, int borderWidth) {

        borderPath.reset();

        int left = (int) Math.ceil(borderWidth);

        int top = (int) Math.ceil(borderWidth);

        int right = (int) Math.ceil(w - borderWidth);

        int bottom = (int) Math.ceil(h - borderWidth);

        //左上

        borderPath.moveTo(left, top +radiusLeftTop);

        rectLeftTop.left = left;

        rectLeftTop.top = top;

        rectLeftTop.right =radiusLeftTop *2 + left;

        rectLeftTop.bottom = top +radiusLeftTop *2;

        borderPath.arcTo(rectLeftTop, 180, 90);

        //右上

        borderPath.lineTo(right -radiusRightTop, top);

        rectRightTop.left = right -radiusRightTop *2;

        rectRightTop.top = top;

        rectRightTop.right = right;

        rectRightTop.bottom = top +radiusRightTop *2;

        borderPath.arcTo(rectRightTop, 270, 90);

//

//        //右下

        borderPath.lineTo(right, bottom -radiusRightBottom);

        rectRightBottom.left = right -radiusRightBottom *2;

        rectRightBottom.top = bottom -radiusRightBottom *2;

        rectRightBottom.right = right;

        rectRightBottom.bottom = bottom;

        borderPath.arcTo(rectRightBottom, 360, 90);

//

//        //左下

        borderPath.lineTo(left +radiusLeftBottom, bottom);

        rectLeftBottom.left = left;

        rectLeftBottom.top = bottom -radiusLeftBottom *2;

        rectLeftBottom.right =radiusLeftBottom *2 + left;

        rectLeftBottom.bottom = bottom;

        borderPath.arcTo(rectLeftBottom, 90, 90);

        borderPath.lineTo(left, top +radiusLeftTop);

        borderPath.close();

    }
到这里基本主要功能已经实现了,剩下只是一些初始化代码的工具,需要的可以自己下载 源码 看一下
最下边的长图片时一个继承自Fragment的ViewGroup,可以实现圆角布局,原理是一样的,只需要重写dispatchDraw 方法即可
