

一、闲话
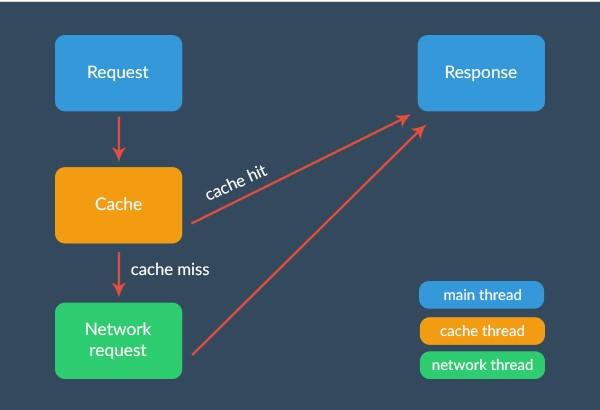
Volley 分析主要讲解其对网络框架的封装,以及其主要涉及到的一些技术细节。二话不说先盗个图来看看。
 Volley.jpeg
 看起来就是个老生常谈的话题,先请求缓存,缓存没有再去请求网络。然而在实际编码过程中发现有很多零零碎碎的细节需要我们去考虑,例如缓存的管理,如何根据请求能找到相应的缓存等很多缓存相关的问题。再比如网络的线程池是如何管理的,缓存什么时候决定是否要去发起网络请求,请求回来的数据又如何处理等诸多的网络问题。如何优雅的解决这些问题,形成封装,并且还可以保持灵活的拓展性,这就是Volley在这里所做的事情了。 秉着向大神学习以及致敬的态度,当然也是为了让自己的代码更有Bigger,就来认认真真的分析分析Volley的源码,学习学习架构以及设计模式等的应用。和其他分析Volley的思路是一致的,以一条Request 发出到得到一个 Response 为线索来进行分析。所谓万事都得开个头,头开好了就能为后面做更多的事情了。对于Volley来说,这个头莫过于就是队列的初始化了。
二、队列的初始化
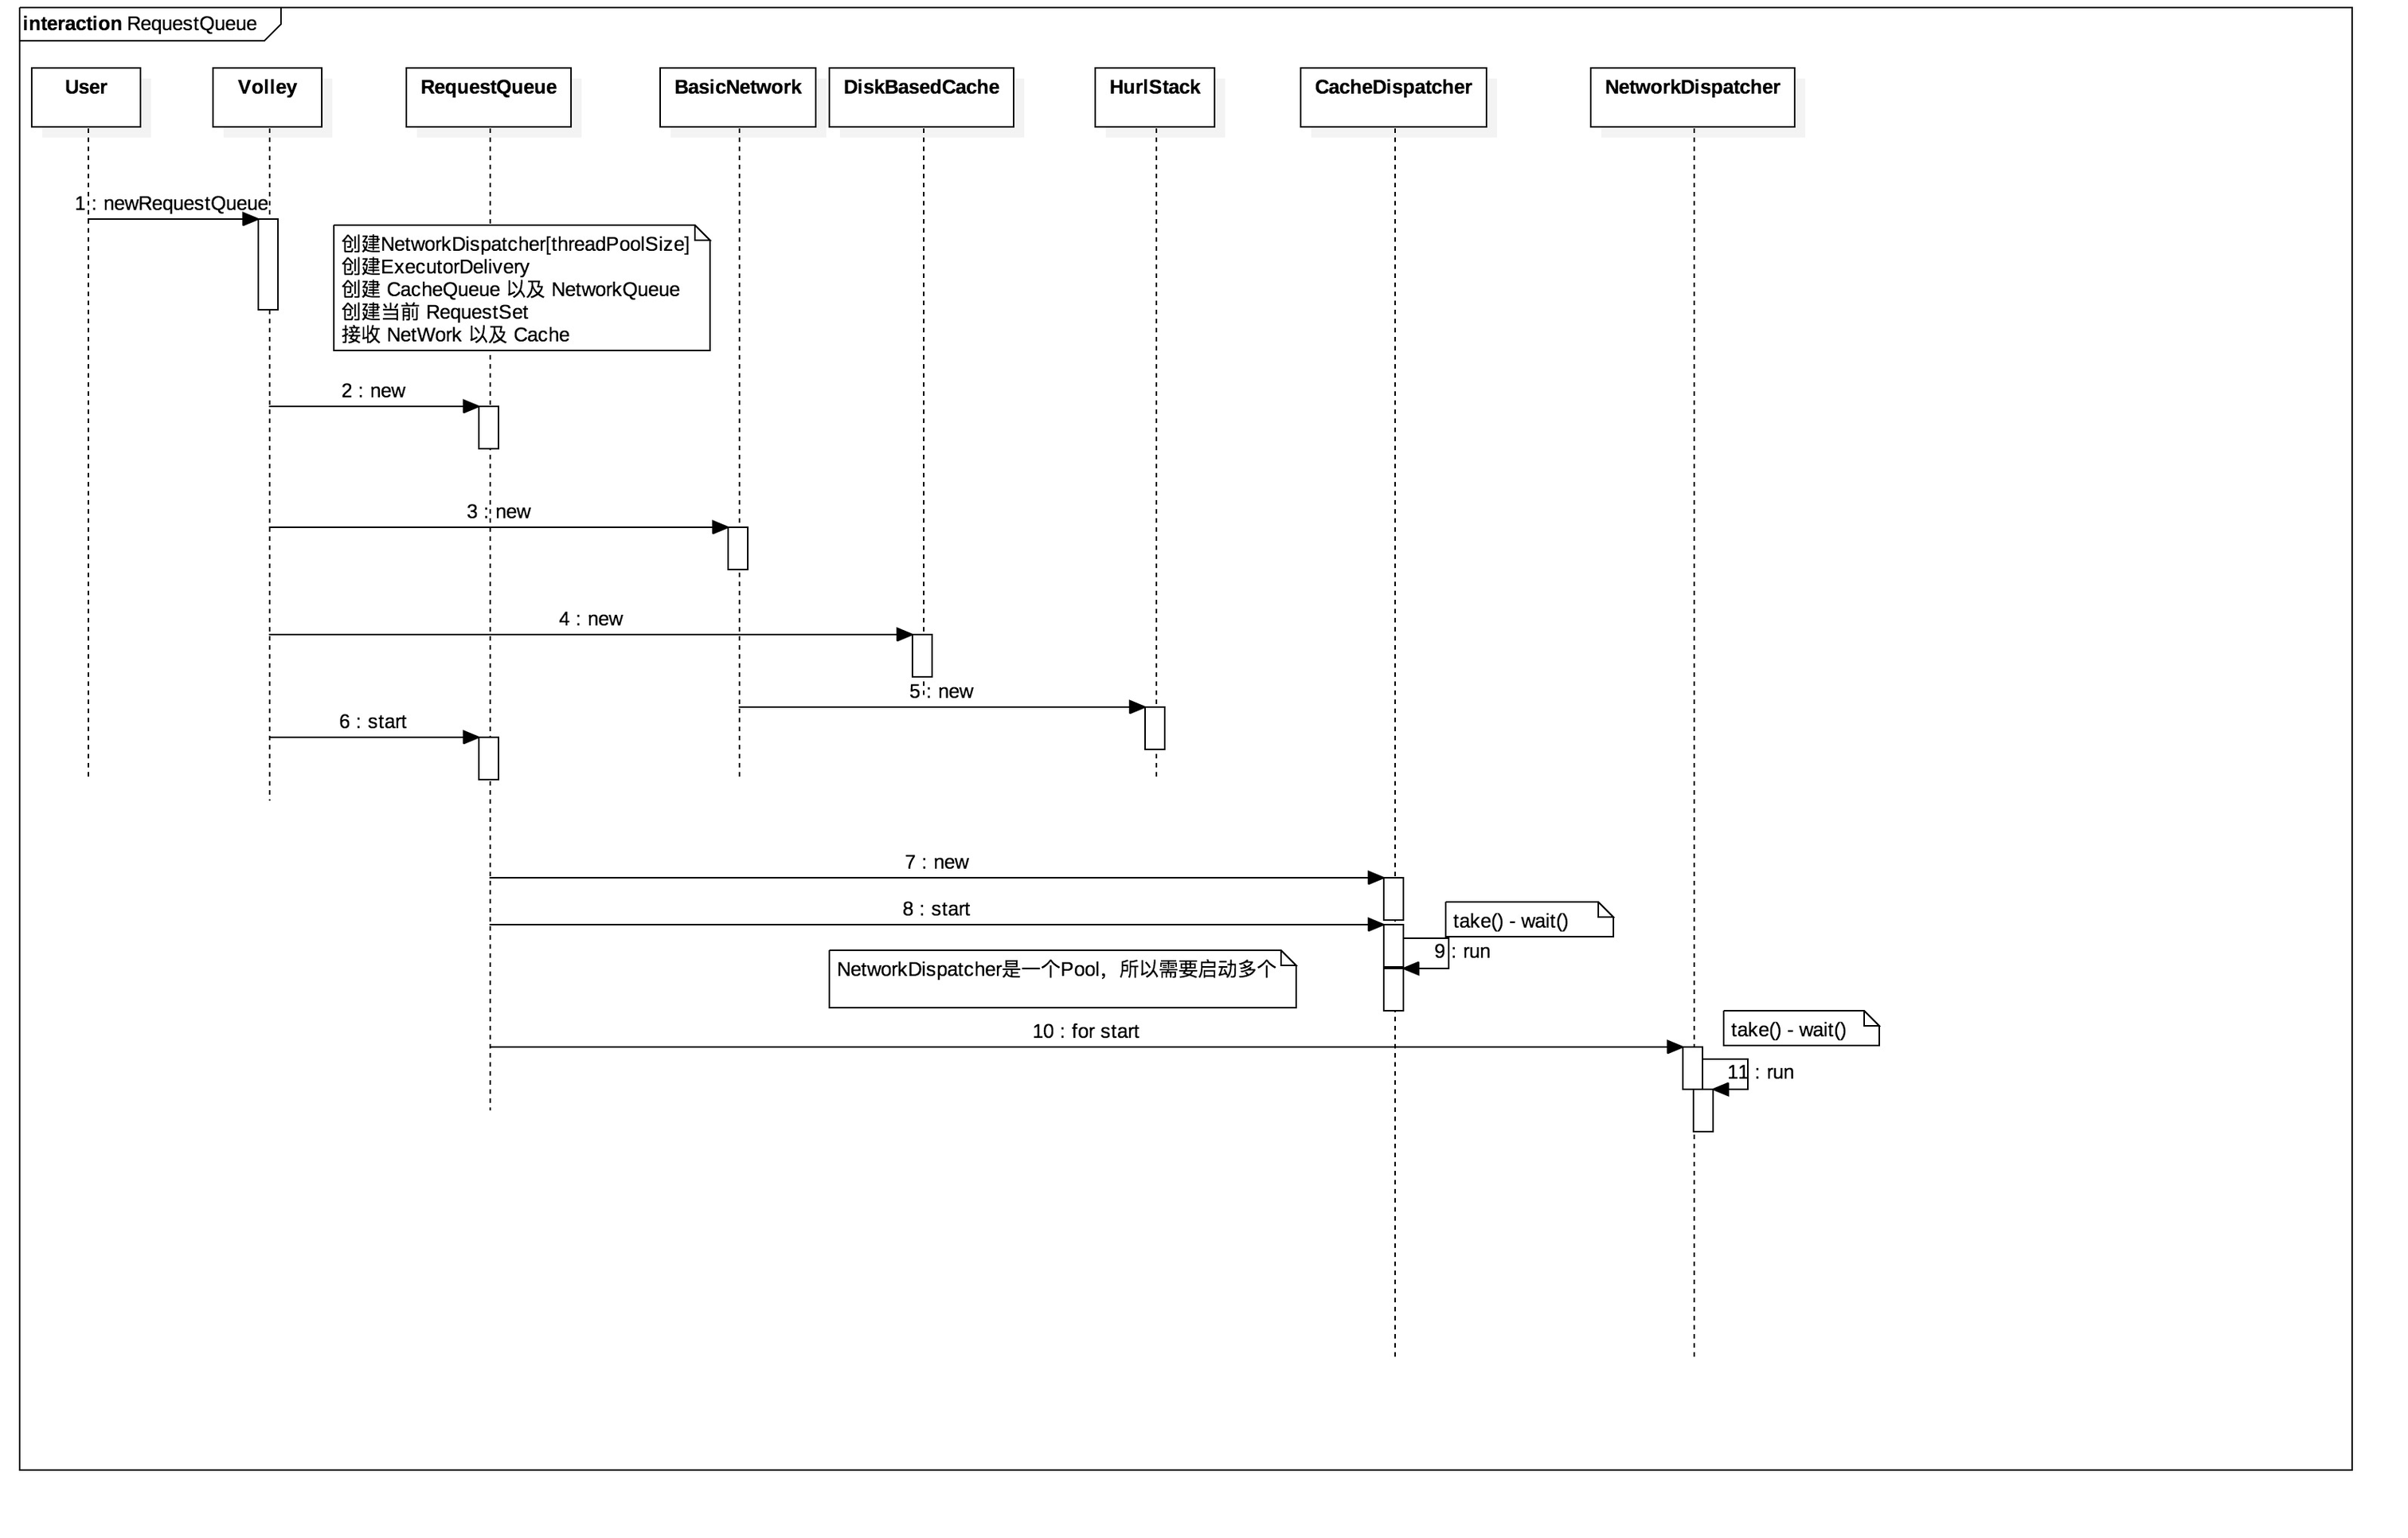
下面这个图是我自己画的,丑是丑了点,但凑合着还是可以看的,看起来想表达的意思还是清楚了的。队列的创建主要初始化缓存管理,缓存分发器,网络分发器,真正执行网络的Network 以及结果返回器。似乎整个架构就这么点事儿了。
 RequestQueue.jpg
 而所谓的初始化,到底初始化了什么?
1.RequestQueue的创建。
RequestQueue是可以创建多个的,每个请求对列里面只有一个缓存分发器,默认情况下只有4个网络分发器。
一般调用的是这个唯一参数为 Context 的 newRequestQueue() 方法
 /**
     * Creates a default instance of the worker pool and calls {@link RequestQueue#start()} on it.
     *
     * @param context A {@link Context} to use for creating the cache dir.
     * @return A started {@link RequestQueue} instance.
     */
    public static RequestQueue newRequestQueue(Context context) {
        return newRequestQueue(context, (BaseHttpStack) null);
    }
而其内部其调用了其私有的 newRequestQueue()。RequestQueue是被直接 new 出来的对象,可见队列是可以被创建多个的。一个进程里不宜创建过多的队列。
private static RequestQueue newRequestQueue(Context context, Network network) {
        File cacheDir = new File(context.getCacheDir(), DEFAULT_CACHE_DIR);
        RequestQueue queue = new RequestQueue(new DiskBasedCache(cacheDir), network);
        queue.start();
上面代码中最后句 start() 就是启动了缓存以及网络的分发器。
 /** Starts the dispatchers in this queue. */
    public void start() {
        stop(); // Make sure any currently running dispatchers are stopped.
        // Create the cache dispatcher and start it.
        mCacheDispatcher = new CacheDispatcher(mCacheQueue, mNetworkQueue, mCache, mDelivery);
        mCacheDispatcher.start();

        // Create network dispatchers (and corresponding threads) up to the pool size.
        for (int i = 0; i < mDispatchers.length; i++) {
            NetworkDispatcher networkDispatcher =
                    new NetworkDispatcher(mNetworkQueue, mNetwork, mCache, mDelivery);
            mDispatchers[i] = networkDispatcher;
            networkDispatcher.start();
        }
    }
2.缓存的创建。
缓存策略用的也是LRU,底层依赖LinkedHashMap来实现。主要是设置了其参数accessorder为true。每访问一次,对应的节点modCount次数就会加1,从而在最后通过过取迭代器时依据modCount排序获得一个排序迭代器。
/** Map of the Key, CacheHeader pairs */
    private final Map<String, CacheHeader> mEntries = new LinkedHashMap<>(16, .75f, true);
3.Network的创建
Network其实是一个Interface。其只有一个唯一的方法performRequest()。这个用户可以自己实现,也就是说用户可以自己设置通过什么方式去真正执行网络连接以获取数据。来看一下默认的实现吧。
public static RequestQueue newRequestQueue(Context context, BaseHttpStack stack) {
        BasicNetwork network;
        if (stack == null) {
            if (Build.VERSION.SDK_INT >= 9) {
                network = new BasicNetwork(new HurlStack());
            } else {
                // Prior to Gingerbread, HttpUrlConnection was unreliable.
                // See: http://android-developers.blogspot.com/2011/09/androids-http-clients.html
                // At some point in the future we'll move our minSdkVersion past Froyo and can
                // delete this fallback (along with all Apache HTTP code).
                String userAgent = "volley/0";
                try {
                    String packageName = context.getPackageName();
                    PackageInfo info =
                            context.getPackageManager().getPackageInfo(packageName, /* flags= */ 0);
                    userAgent = packageName + "/" + info.versionCode;
                } catch (NameNotFoundException e) {
                }

                network =
                        new BasicNetwork(
                                new HttpClientStack(AndroidHttpClient.newInstance(userAgent)));
            }
        } else {
            network = new BasicNetwork(stack);
        }

        return newRequestQueue(context, network);
    }
嗯,就是在创建RequestQueue时,如果用户自己设置了HttpStack就会用用户的HttpStack来包装出一个Network。如果没有则分版本进行,sdk > 9,也就是Android 2.3 时就用 HurlStack ,其实就是 HttpUrlConnection的实现。如果比它还小——这样的系统还在吗,就用封装Apache的AndroidHttpClient。原因呢是因为HttpUrlConnection 对于 keep-alive处理的bug,协议相关,具体后面还会有分析系统原生网络库的文章再说明。后面Andrioid网络库弃用了Apache,建议用HttpUrlConnection或者Volley。而其实Android 4.4 之后,HttpUrlConnection的底层又换成了鼎鼎大名的OkHttp。
4.启动缓存和网络分发器。
对列启动后会启动缓存分发器和网络分发器,而所谓的分发器就是Java的线程。缓存分发器主动从缓存对列里面捞请求,如果没有捞到就会进入await状态。这一底层机制的实现是依赖于PriorityBlockingQueue的实现,其本身就是一个阻塞式队列,其内部实现了生产者与消费者的模型。网络分发器与缓存分发器的实现一致,都是基于PriorityBlockingQueue的实现。流程上来说,一个请求是先进入到了缓存对列,由缓存队列处理完后仍需网络请求或者更新就会进入到网络队列。
private void processRequest() throws InterruptedException {
        // Get a request from the cache triage queue, blocking until
        // at least one is available.
        final Request<?> request = mCacheQueue.take();
        processRequest(request);
    }
上面这点代码拷的缓存分发器的,网络分发器和其非常的雷同。上面主要是调用了PriorityBlockingQueue#take()方法。看看这个take()方法的实现。
public E take() throws InterruptedException {
        final ReentrantLock lock = this.lock;
        lock.lockInterruptibly();
        E result;
        try {
            while ( (result = dequeue()) == null)
                notEmpty.await();
        } finally {
            lock.unlock();
        }
        return result;
    }
上面可以看到,如果队列为空就会进入等待状态notEmpty.await()。再来看一下PriorityBlockingQueue#put()方法
public void put(E e) {
        offer(e); // never need to block
}
public boolean offer(E e) {
        if (e == null)
            throw new NullPointerException();
        final ReentrantLock lock = this.lock;
        lock.lock();
        int n, cap;
        Object[] array;
        while ((n = size) >= (cap = (array = queue).length))
            tryGrow(array, cap);
        try {
            Comparator<? super E> cmp = comparator;
            if (cmp == null)
                siftUpComparable(n, e, array);
            else
                siftUpUsingComparator(n, e, array, cmp);
            size = n + 1;
            notEmpty.signal();
        } finally {
            lock.unlock();
        }
        return true;
    }
put()方法非常简单,其继续调用了 offer()方法。这个方法里面其他乱七八糟的先不管,其最关键的一句是 notEmpty.signal() 。这个信号的发射就唤醒了前面take()因队列为空的await状态。这是一个典型的生产者-消费者模型了吧。
4.稍微扯一下优先级
既然知道了分发器是PriorityBlockingQueue,那也应该知道了为什么Volley能控制网络请求的优先级了,就是这个优先级阻塞队列了。而优先级的依据就是Request的mSequence的值。这就是一个简单的整型值,Request的CompareTo()方法决定了其排序。这个优先级用户可以自行进行设置,如果用户没有设置,那么队列自己会维护一个,每添加一个 Request 到队列就会自增 1。
 /** Gets a sequence number. */
    public int getSequenceNumber() {
        return mSequenceGenerator.incrementAndGet();
    }
环境都初始化好了,接下来发起Request以及返回Response就是水到渠成的事了。
三、发起请求
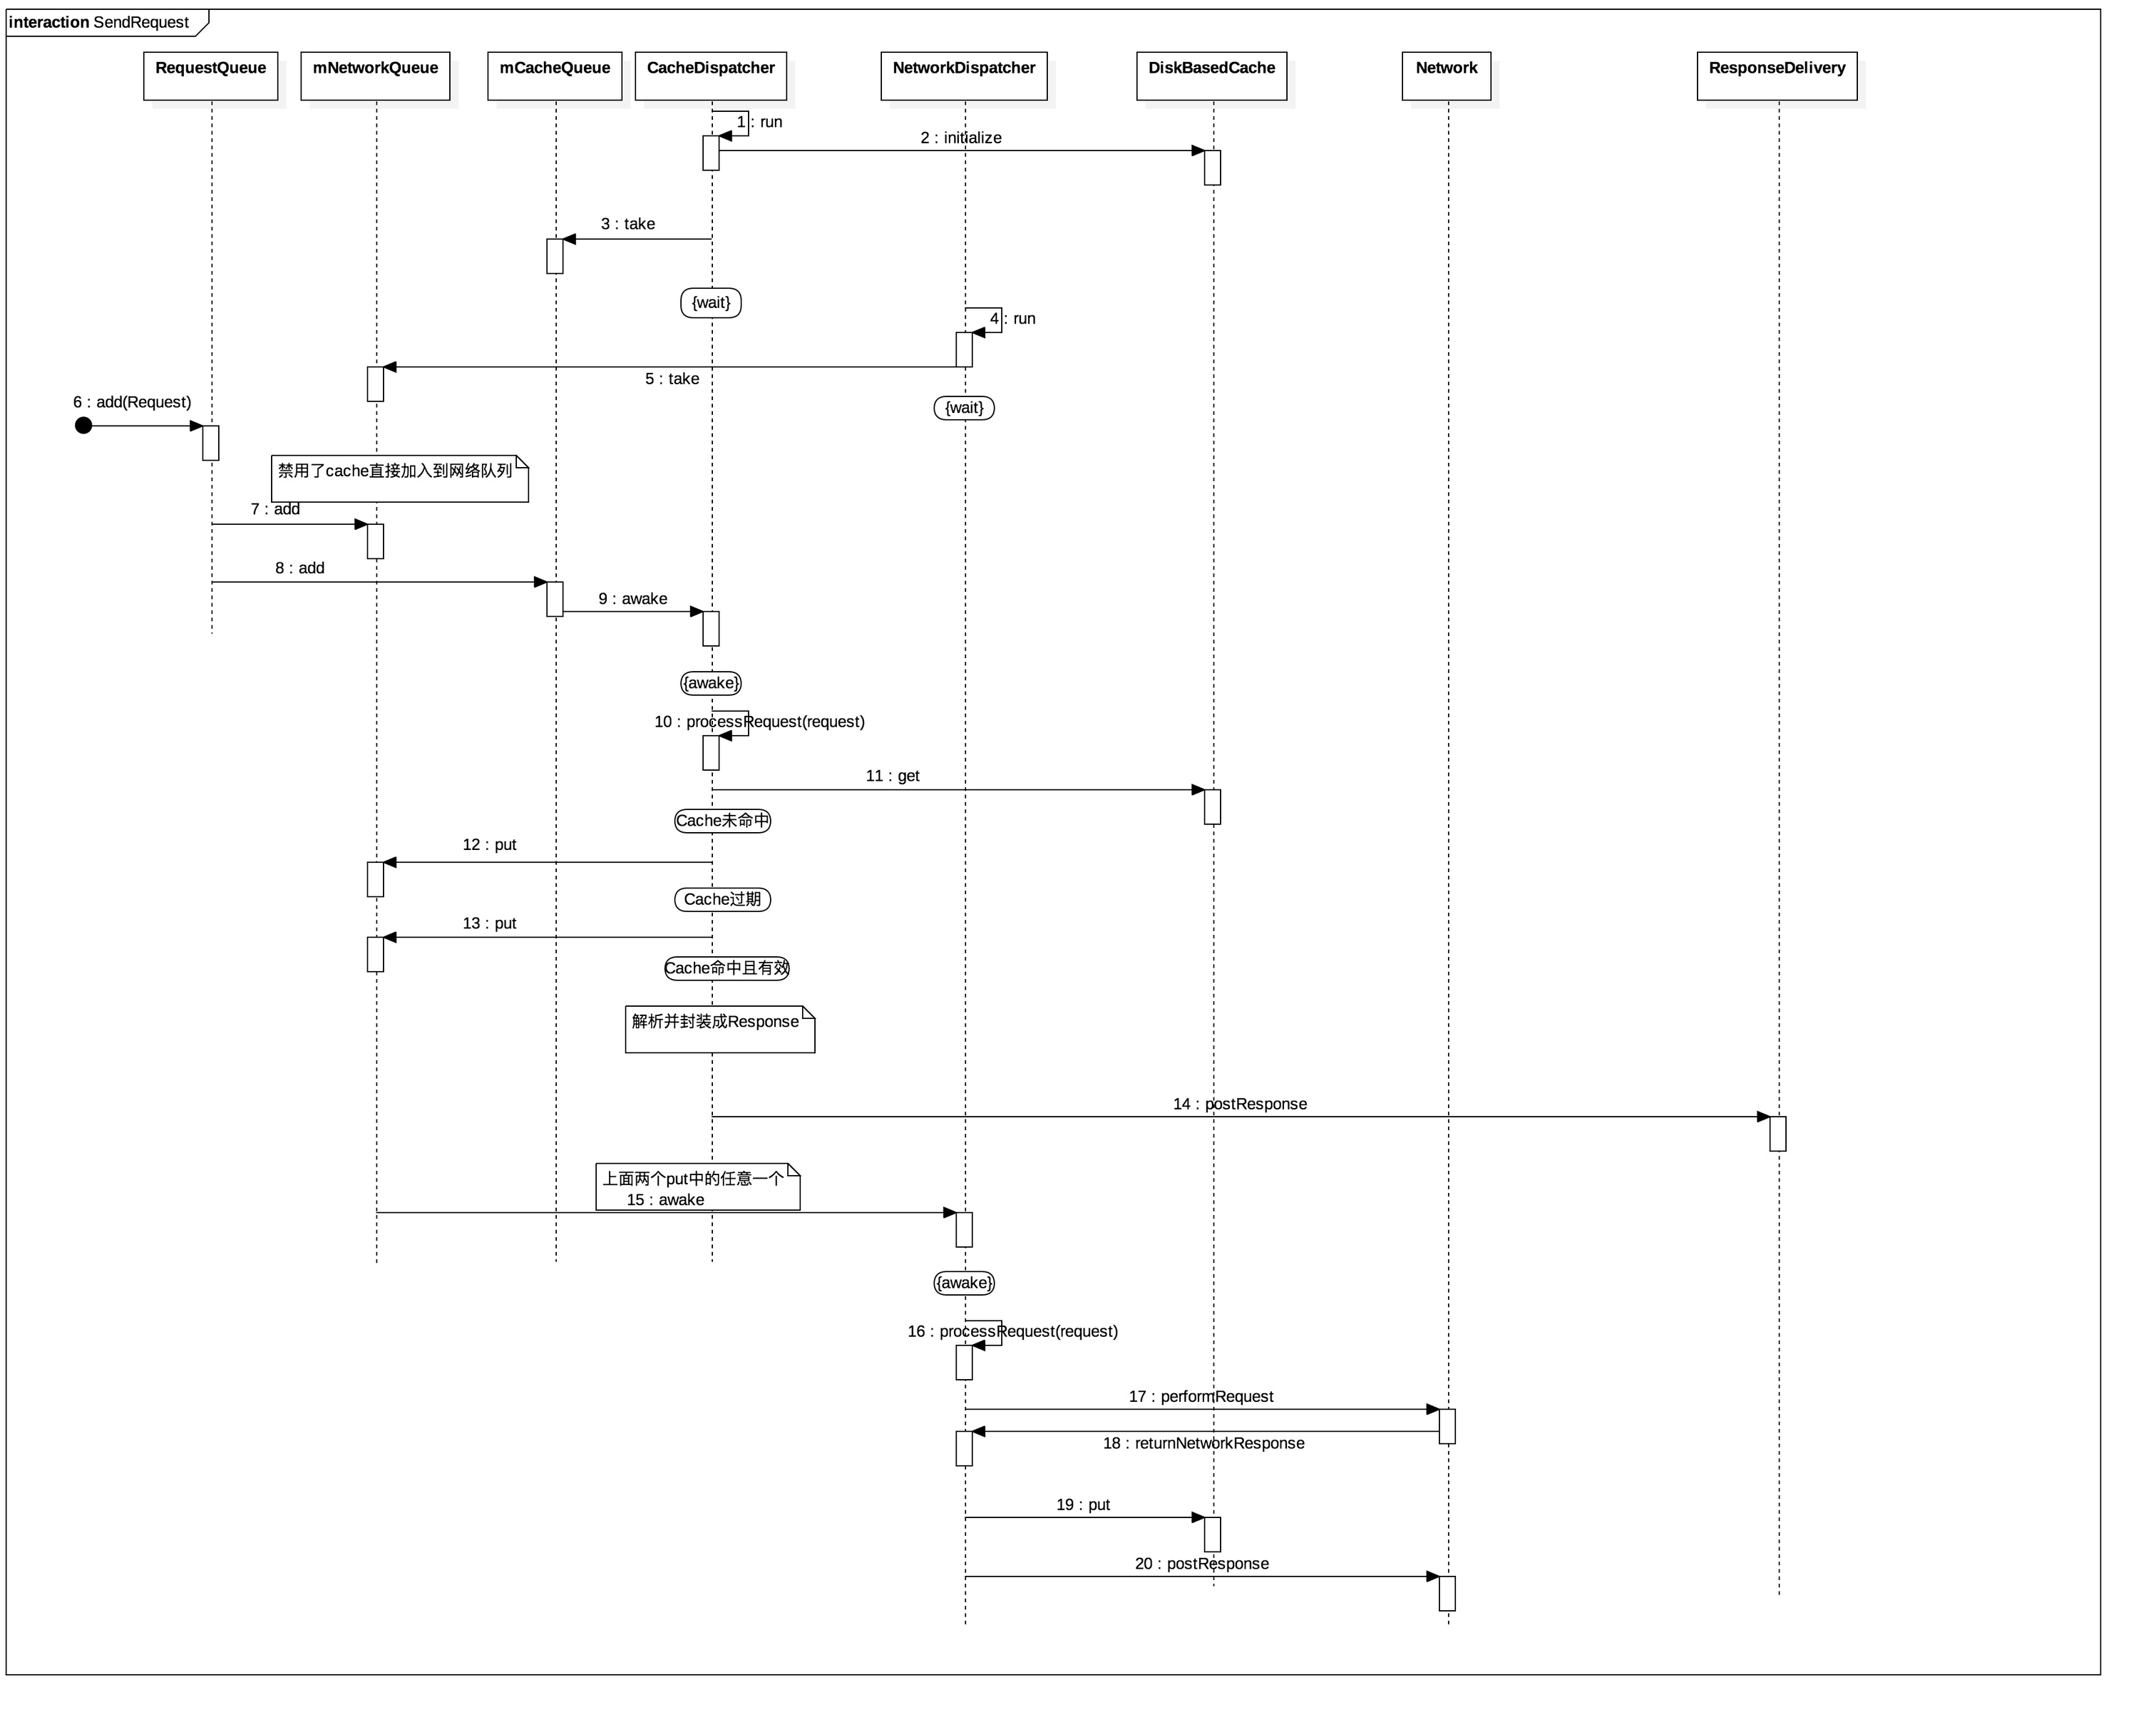
又是一个比较丑的图,而且相比起大神的图来看,很乱的样子,简直就是什么玩意儿呀。乱的原因主要是因为作图的水平确实一般,就跟这个写作水平一样的。 其次是因为加入了生产者-消费者的等待-唤醒模型以及其中的条件判断——懒的画流程图,而且还不连贯。能认真看完还是会有不少收获的。
 SendRequest.jpg
1.缓存的初始化
队列初始化时只是创建了缓存,真正初始化时是在缓存分发器跑起来时。还来看一点代码吧。
@Override
    public synchronized void initialize() {
        if (!mRootDirectory.exists()) {
            if (!mRootDirectory.mkdirs()) {
                VolleyLog.e("Unable to create cache dir %s", mRootDirectory.getAbsolutePath());
            }
            return;
        }
        File[] files = mRootDirectory.listFiles();
        if (files == null) {
            return;
        }
        for (File file : files) {
            try {
                long entrySize = file.length();
                CountingInputStream cis =
                        new CountingInputStream(
                                new BufferedInputStream(createInputStream(file)), entrySize);
                try {
                    CacheHeader entry = CacheHeader.readHeader(cis);
                    // NOTE: When this entry was put, its size was recorded as data.length, but
                    // when the entry is initialized below, its size is recorded as file.length()
                    entry.size = entrySize;
                    putEntry(entry.key, entry);
                } finally {
                    // Any IOException thrown here is handled by the below catch block by design.
                    //noinspection ThrowFromFinallyBlock
                    cis.close();
                }
            } catch (IOException e) {
                //noinspection ResultOfMethodCallIgnored
                file.delete();
            }
        }
    }
代码看起来很多,但其实关键就两点。一方面如果当前缓存文件夹为空则直接返回。另一方面如果当前缓存文件夹不为空则遍历所有的文件将其内容解析成缓存的Entry(理解成一个单位),并put到缓存当中。
2.缓存的key管理
缓存管理中另一个就是这个key的生成,如何保证它的唯一性这个是非常重要的,因为关系到了如何判断一个请求是否有相应的缓存。看看代码。
/** Returns the cache key for this request. By default, this is the URL. */
    public String getCacheKey() {
        String url = getUrl();
        // If this is a GET request, just use the URL as the key.
        // For callers using DEPRECATED_GET_OR_POST, we assume the method is GET, which matches
        // legacy behavior where all methods had the same cache key. We can't determine which method
        // will be used because doing so requires calling getPostBody() which is expensive and may
        // throw AuthFailureError.
        // TODO(#190): Remove support for non-GET methods.
        int method = getMethod();
        if (method == Method.GET || method == Method.DEPRECATED_GET_OR_POST) {
            return url;
        }
        return Integer.toString(method) + '-' + url;
    }
看起来并没有那么的复杂,就是url或者http请求的方法所对应的int加上下划线,再加上url所构成的。url当然唯一了,好像没什么可以叨叨了。但为了安全起见,将url转成MD5是否更合适,而且还能省一些空间呢。
3.缓存的处理流程
其实上面的时序图已经很明显了,缓存未命中或者已经过期就将请求丢给网络队列。网络队列会唤醒网络分发器进行处理。网络分发器有多个,当然是谁空闲谁抢到谁就执行了。缓存的处理逻辑里面还是有东西可以叨叨的,其结合了http协议本身对缓存的处理。先来看看 Entry 中对缓存相关的定义。
 /** ETag for cache coherency. */
        public String etag;

        /** Date of this response as reported by the server. */
        public long serverDate;

        /** The last modified date for the requested object. */
        public long lastModified;

        /** TTL for this record. */
        public long ttl;

        /** Soft TTL for this record. */
        public long softTtl;
所认识的好像就是etag,serverDate(服务器的时间),lastModified(上次修改时间),ttl 以及 softTtl ,有点不明所以。 关于 ttl 以及 softTtl 从下面的代码中可以看到表示的是失效时间和需要刷新的时间。
/** True if the entry is expired. */
        public boolean isExpired() {
            return this.ttl < System.currentTimeMillis();
        }

        /** True if a refresh is needed from the original data source. */
        public boolean refreshNeeded() {
            return this.softTtl < System.currentTimeMillis();
        }
这里其实涉及到http协议缓存相关的东西,不感兴趣其实可以跳过。下面代码也有点长,如果不想看可以直接看代码下面的结论。
public static Cache.Entry parseCacheHeaders(NetworkResponse response) {
        long now = System.currentTimeMillis();

        Map<String, String> headers = response.headers;

        long serverDate = 0;
        long lastModified = 0;
        long serverExpires = 0;
        long softExpire = 0;
        long finalExpire = 0;
        long maxAge = 0;
        long staleWhileRevalidate = 0;
        boolean hasCacheControl = false;
        boolean mustRevalidate = false;

        String serverEtag = null;
        String headerValue;

        headerValue = headers.get("Date");
        if (headerValue != null) {
            serverDate = parseDateAsEpoch(headerValue);
        }

        headerValue = headers.get("Cache-Control");
        if (headerValue != null) {
            hasCacheControl = true;
            String[] tokens = headerValue.split(",", 0);
            for (int i = 0; i < tokens.length; i++) {
                String token = tokens[i].trim();
                if (token.equals("no-cache") || token.equals("no-store")) {
                    return null;
                } else if (token.startsWith("max-age=")) {
                    try {
                        maxAge = Long.parseLong(token.substring(8));
                    } catch (Exception e) {
                    }
                } else if (token.startsWith("stale-while-revalidate=")) {
                    try {
                        staleWhileRevalidate = Long.parseLong(token.substring(23));
                    } catch (Exception e) {
                    }
                } else if (token.equals("must-revalidate") || token.equals("proxy-revalidate")) {
                    mustRevalidate = true;
                }
            }
        }

        headerValue = headers.get("Expires");
        if (headerValue != null) {
            serverExpires = parseDateAsEpoch(headerValue);
        }

        headerValue = headers.get("Last-Modified");
        if (headerValue != null) {
            lastModified = parseDateAsEpoch(headerValue);
        }

        serverEtag = headers.get("ETag");

        // Cache-Control takes precedence over an Expires header, even if both exist and Expires
        // is more restrictive.
        if (hasCacheControl) {
            softExpire = now + maxAge * 1000;
            finalExpire = mustRevalidate ? softExpire : softExpire + staleWhileRevalidate * 1000;
        } else if (serverDate > 0 && serverExpires >= serverDate) {
            // Default semantic for Expire header in HTTP specification is softExpire.
            softExpire = now + (serverExpires - serverDate);
            finalExpire = softExpire;
        }

        Cache.Entry entry = new Cache.Entry();
        entry.data = response.data;
        entry.etag = serverEtag;
        entry.softTtl = softExpire;
        entry.ttl = finalExpire;
        entry.serverDate = serverDate;
        entry.lastModified = lastModified;
        entry.responseHeaders = headers;
        entry.allResponseHeaders = response.allHeaders;

        return entry;
    }
前一部分都是对header中的关键字进行读取以及解析。能够看到有:
"Date":服务器时间
"Cache-Control":缓存控制字段,其下还关注了"no-cache","max-age=","stale-while-revalidate=","must-revalidate"以及"proxy-revalidate"
"Expires":缓存期望失效时间
"Last-Modified":文件上次被修改时间
"ETag":文件是否被修改标记字段
要全部理解这些字段以及它们的优先级需要再花点功夫。这里主要关注一下softTtl 和 ttl 的计算。从代码中可以看到 softTtl = softExpire ,而 ttl = finalExpire.
而这两者的计算情况是:
(1) 有 cache-control字段的情况下——说明它的优先级比其他缓存字段要高
softExpire = 现在开始 + 缓存最大能存活的时间
finalExpire = softExpire 或者 softExpire
+ stale-while-revalidate 的时间
(2)没有 cache-control字段,但服务器时间存在,且缓存期望失效时间比服务器时间要大
softExpire = 现在开始 + (缓存失效时间与服务器时间的时间差)
finalExpire = softExpire
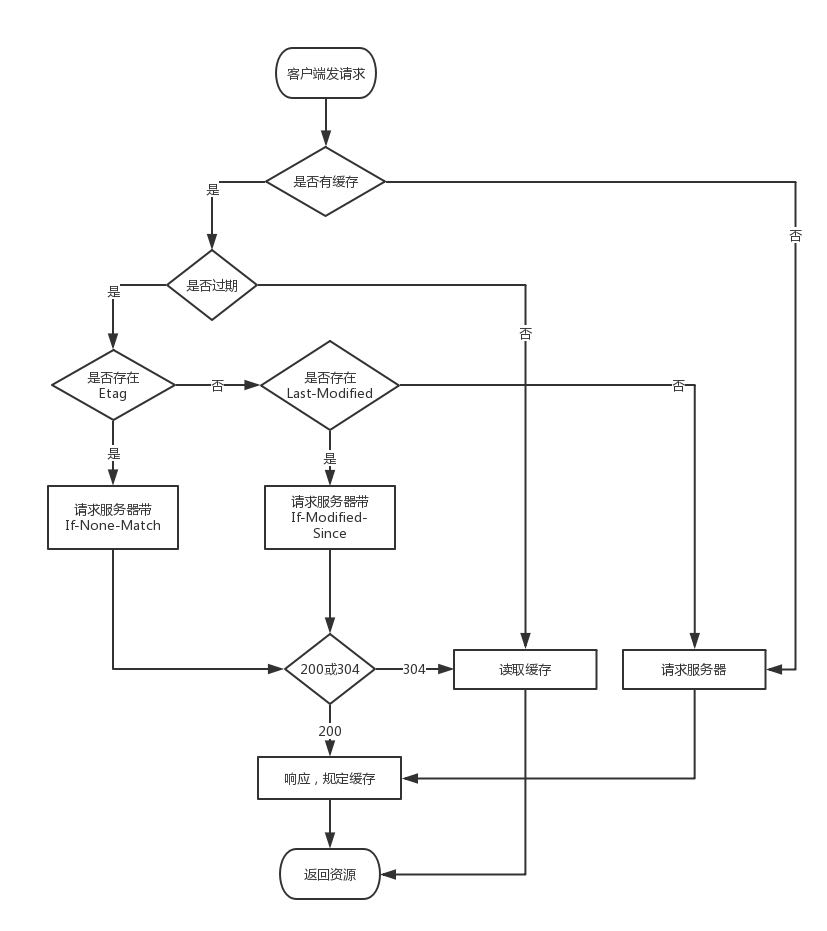
看完了上面这一部分可能还是会有点糊涂,那一张“借”来的请求时缓存处理的流程图吧,说不定看了就会有帮助。
 Cache.jpg
 从上面的分析结果来看,softTtl 以及 ttl 是帮助框架提前判断缓存是否有效以及是否需要更新的。而其他字段如ETag,Last-Modified 等协议字段是在执行真正网络请求时来决定缓存策略的。 缓存的理解与应用都是难点,所以花的篇幅有点长,也不免有点啰嗦了。还是继续网络的分发吧。
4.网络分发器的处理
前面已经说过,缓存未命中或者缓存已经过期就会将请求送往网络队列,网络队列收到请求后就会依赖于PriorityBlockingQueue底层的实现机制唤醒网络分发器继续处理。
private void processRequest() throws InterruptedException {
        // Take a request from the queue.
        Request<?> request = mQueue.take();
        processRequest(request);
    }
上面即是网络分发器去捞请求,如果没捞到就会进入等待状态。捞到了就会继续处理请求。
void processRequest(Request<?> request) {
        long startTimeMs = SystemClock.elapsedRealtime();
        try {
            request.addMarker("network-queue-take");

            // If the request was cancelled already, do not perform the
            // network request.
            if (request.isCanceled()) {
                request.finish("network-discard-cancelled");
                request.notifyListenerResponseNotUsable();
                return;
            }

            addTrafficStatsTag(request);

            // Perform the network request.
            NetworkResponse networkResponse = mNetwork.performRequest(request);
            request.addMarker("network-http-complete");

            // If the server returned 304 AND we delivered a response already,
            // we're done -- don't deliver a second identical response.
            if (networkResponse.notModified && request.hasHadResponseDelivered()) {
                request.finish("not-modified");
                request.notifyListenerResponseNotUsable();
                return;
            }

            // Parse the response here on the worker thread.
            Response<?> response = request.parseNetworkResponse(networkResponse);
            request.addMarker("network-parse-complete");

            // Write to cache if applicable.
            // TODO: Only update cache metadata instead of entire record for 304s.
            if (request.shouldCache() && response.cacheEntry != null) {
                mCache.put(request.getCacheKey(), response.cacheEntry);
                request.addMarker("network-cache-written");
            }

            // Post the response back.
            request.markDelivered();
            mDelivery.postResponse(request, response);
            request.notifyListenerResponseReceived(response);
        } catch (VolleyError volleyError) {
            volleyError.setNetworkTimeMs(SystemClock.elapsedRealtime() - startTimeMs);
            parseAndDeliverNetworkError(request, volleyError);
            request.notifyListenerResponseNotUsable();
        } catch (Exception e) {
            VolleyLog.e(e, "Unhandled exception %s", e.toString());
            VolleyError volleyError = new VolleyError(e);
            volleyError.setNetworkTimeMs(SystemClock.elapsedRealtime() - startTimeMs);
            mDelivery.postError(request, volleyError);
            request.notifyListenerResponseNotUsable();
        }
    }
这段代码看起来多,而关键点其实就那么几点:
(1)请求是否已经被取消,如果已经被取消则终止
(2)通过mNetwork.performRequest(request)发出真正的网络请求。关于Network在RequestQueue初始化的时候已经说过了,可以用户自己设置,也可以用默认的HttpUrlConnection的实现,反正现在底层都是 OkHttp 的实现了。
(3)拿到请求后由相对应的Request自行进行Response解析以得到网络请求的结果。缓存方面,如果需要缓存就先缓存一份,最后和
Request 一起通过 ResponseDelivery将结果传递回去。
(4)再者就是网络出现错误或者其他异常,也是通过ResponseDelivery给传递回去。
四、传递返回结果
其实除了ResponseDelivery会返回传递结果,还有一个Request#notifyListenerResponseReceived()也是返回结果的。它们各返回给谁呢?先看一个比较丑的图。
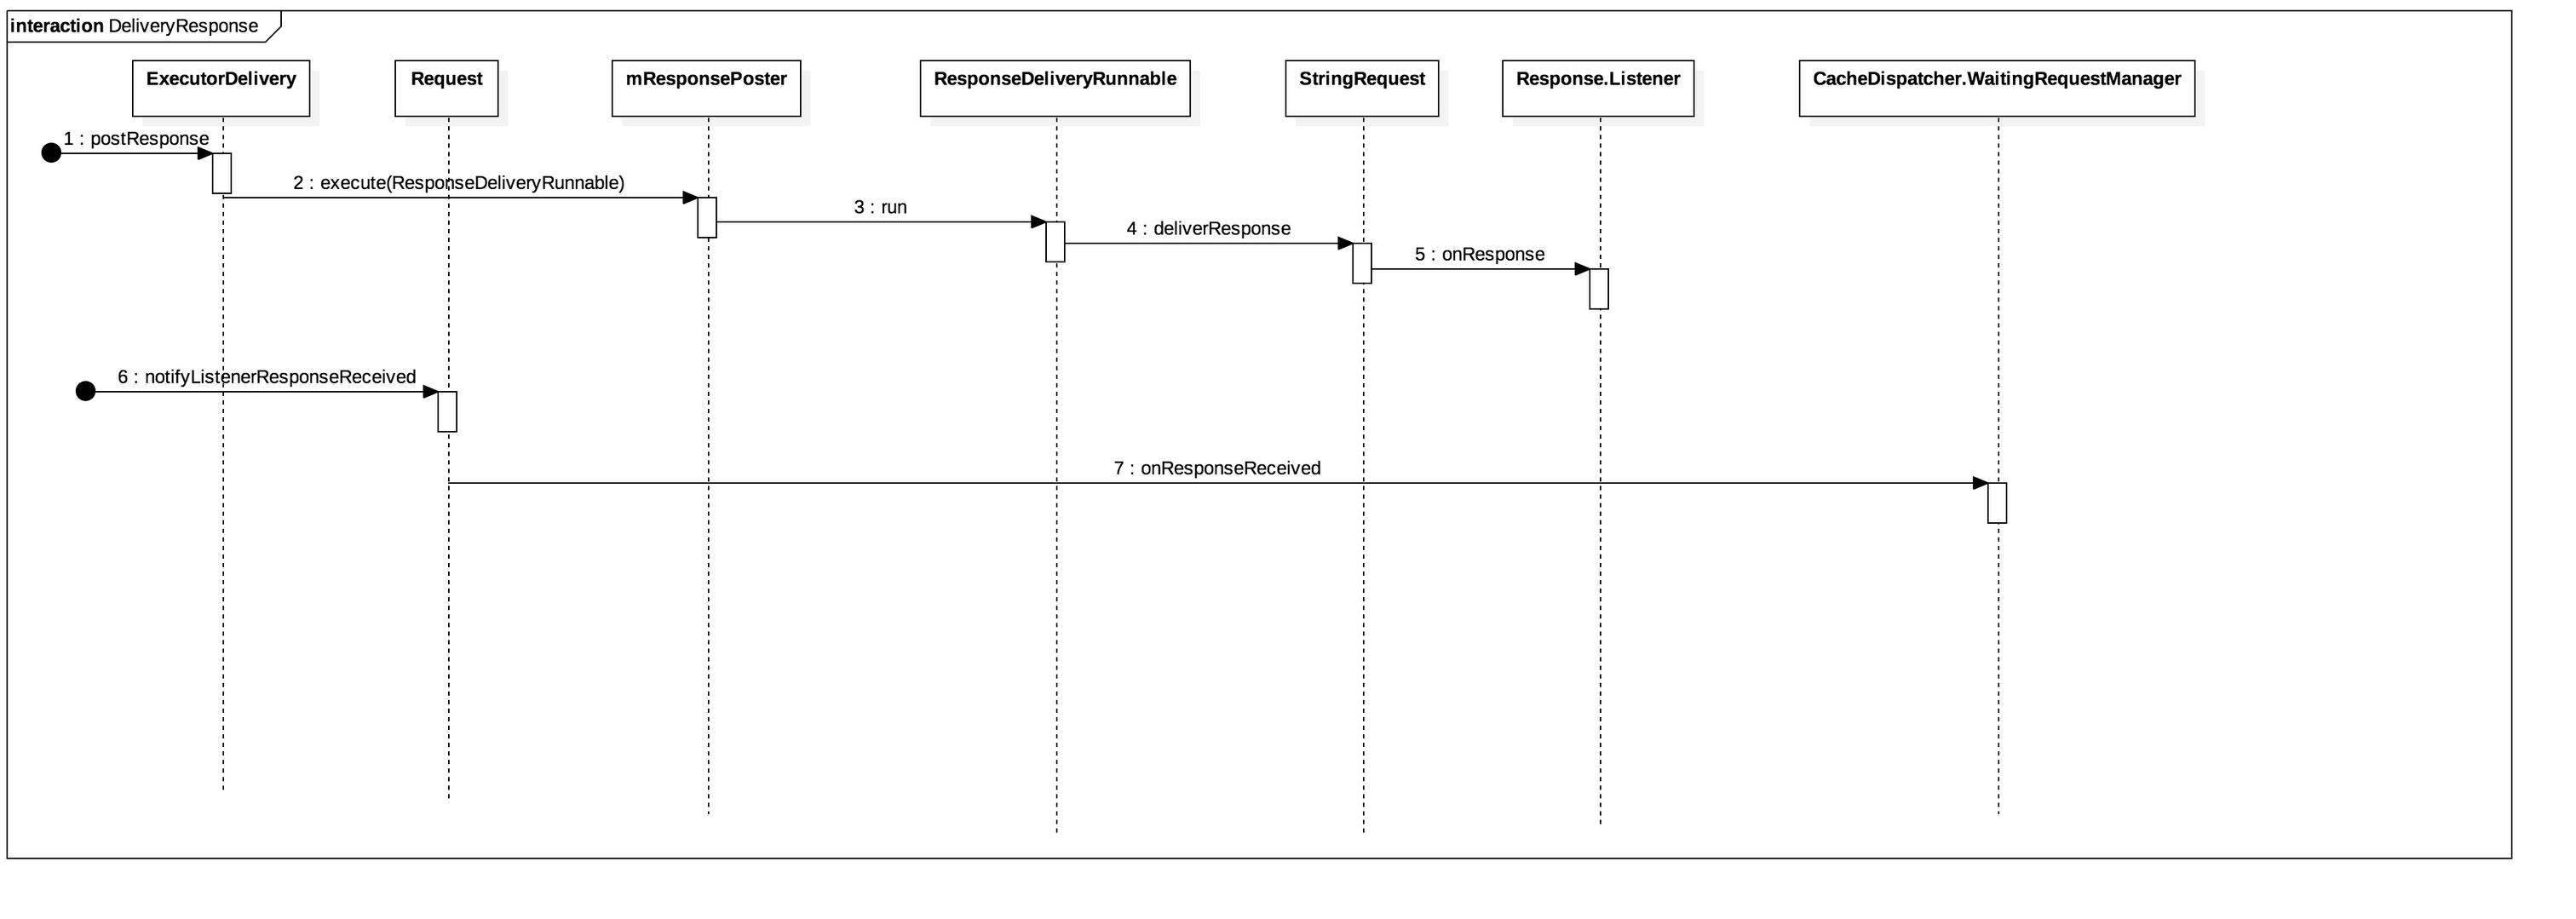 DeliveryResponse.jpg
(1) ResponseDelivery只是一个Interface,它的实现者是 ExecutorDelivery。
public ExecutorDelivery(final Handler handler) {
        // Make an Executor that just wraps the handler.
        mResponsePoster =
                new Executor() {
                    @Override
                    public void execute(Runnable command) {
                        handler.post(command);
                    }
                };
    }
从它的初始化可以看到,其内部又包含了一个 mResponsePoster,这个就是一个Executor,其实就是希望通过一个线程池来进行发送。而最关键的就是这个参数 Handler,也就是说结果最后是返回给了相应的接收 Handler。而这个Handler默认情况下包装的就是 MainLooper,如下代码,又回到了RequestQueue的初始化。前面的RequestQueue其实会间接地调用到这个版本的构造函数。
public RequestQueue(Cache cache, Network network, int threadPoolSize) {
        this(
                cache,
                network,
                threadPoolSize,
                new ExecutorDelivery(new Handler(Looper.getMainLooper())));
    }
被这个Handler处理的其实是ResponseDeliveryRunnable。在它的run()方法里面才真正地调用了对应Request的deliverResponse()。这里借用了一个StringRequest类,不然这戏都没法演了。 (2)再来看Request#notifyListenerResponseReceived()方法。其最终调用的是CacheDispatcher#WaitingRequestManager.onResponseReceived()方法。
public void onResponseReceived(Request<?> request, Response<?> response) {
            if (response.cacheEntry == null || response.cacheEntry.isExpired()) {
                onNoUsableResponseReceived(request);
                return;
            }
            String cacheKey = request.getCacheKey();
            List<Request<?>> waitingRequests;
            synchronized (this) {
                waitingRequests = mWaitingRequests.remove(cacheKey);
            }
            if (waitingRequests != null) {
                if (VolleyLog.DEBUG) {
                    VolleyLog.v(
                            "Releasing %d waiting requests for cacheKey=%s.",
                            waitingRequests.size(), cacheKey);
                }
                // Process all queued up requests.
                for (Request<?> waiting : waitingRequests) {
                    mCacheDispatcher.mDelivery.postResponse(waiting, response);
                }
            }
        }
这个通知主要是通过缓存分发器通知所有和当前具有同一 cache key的请求结果已经返回了。
五、总结
按照写文章的流程,最后应该要总结一下吧。至于优缺点什么的,坦白说我没有在项目中用过Volley,我就是学习一下大神的风采,顺便来装一下Bigger的,所以我的分析也没法那么的入木三分,说不定还有不少错误呢。就对这个分析总结几个关键点吧。
(1)Volley库是一个比较完善的封装,编码具有比较高的Bigger,简单,清晰,可扩展性强,而又不失强大的功能。
(2)RequestQueue是整个库的核心,从发起请求-缓存处理-执行网络请求-解析结果-返回结果,一条龙服务。一个进程里面是可以有多个RequestQueue实例的。
(3)Cache是这个库的一大亮点,其实现了Http协议的缓存,而Cache内容到闪存上所用的也是类DiskLRUCache算法。但其依赖的LinkedHashMap的实现,利用它的排序功能实现了LRU算法。
(4)最关键的队列其实只有两个,一个缓存队列,一个网络队列。缓存队列由缓存分发器处理,网络队列由网络分发器处理。缓存队列处理完之后才会视情况交给网络队列来处理。
