

一、前言
时间过得可真是快,距离上一次更新已经将近 2 个月了,这之间竟然没有任何的文章更新。原因呢,无非就是工作与生活变得紧张了,渐渐的就把这个给落下了。趁着 Flag 还没倒下,咱得把它扶起来不是。
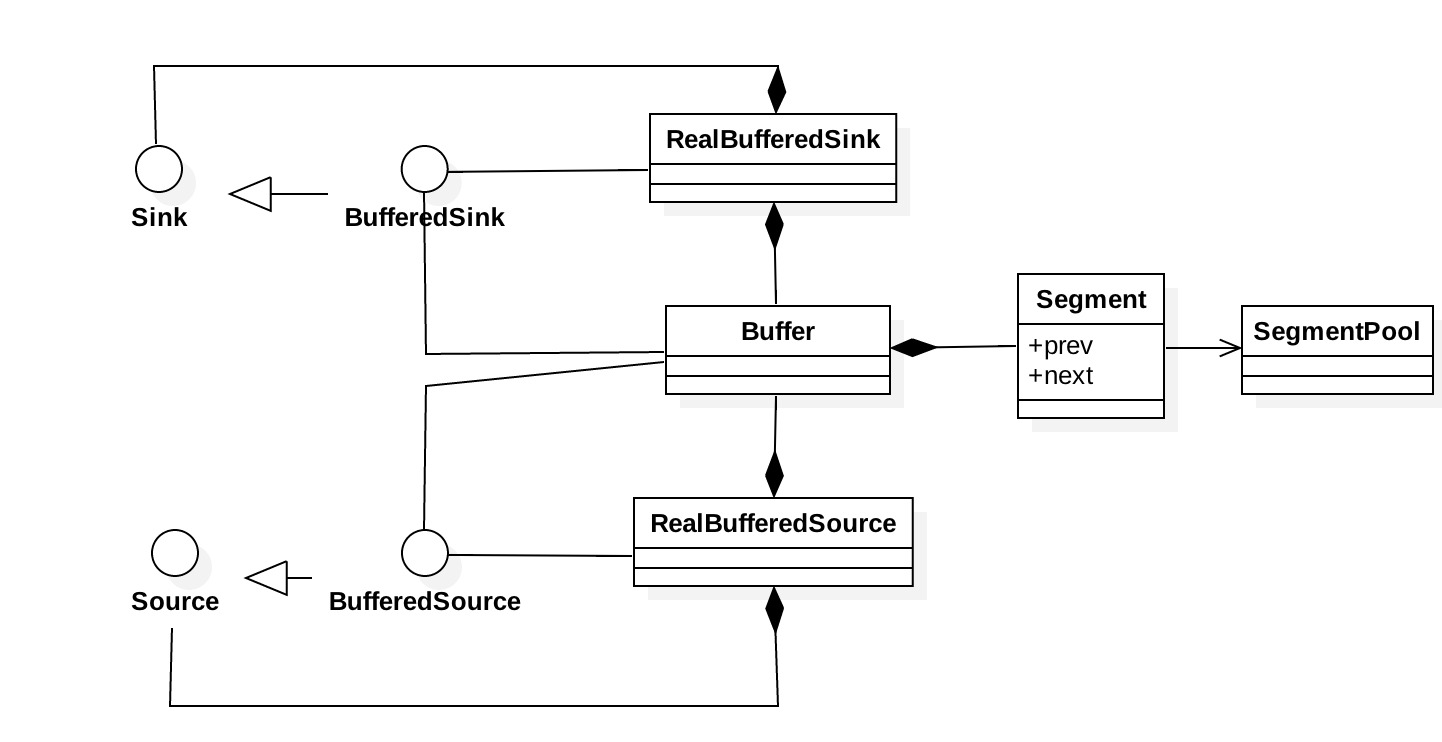
Okio深入分析——基础使用部分主要了解了Okio这个库的特性,以及最基本的使用。但正如最后所说,我们还不知道它为什么好,为什么快。但是在分析之前,我们先过一遍其主体类的框架图,以便我们对其整体有一个粗略的认识。
 OkioFramework.jpg
这个图看上去是不是有点简单啊,都不好意思说是一个框架。确实如此,所以说它是短小精悍呀。言归正传,我们还是来展开一下。
(1) Sink 和 Source 分别定义了写入和读取。
(2) BufferedSink 和 BufferedSource 分别定义了各种写入方法和读取方法,同时还定义了 buffer() 方法应该返回一个实际的 Buffer 用于操作写入与读取。
(3) Buffer 兼具实现了读和写的功能,Buffer 中又进一步将读写单元划分成了 Segment。各个
Segment 之间通过 prev 节点以及 next 节点构成一个双向链表。SegmentPool 是避免为了过多的分配 Segment 对象,用以循环利用 Segment。
(4) RealBufferSink 和 RealBufferSource 是唯一返回给用户的写入与读取实例。其分别由 Sink + Buffer 和 Source + Buffer 的组合模式而成,用以完成真正的写入与读取。
二、写入
案例分析
在分析源码之前,我们还是得先来个 demo 的案例分析 。这次我们的 demo 得先做一个对比,使其看起来更有意思些。
通过 Okio 的 BufferSink 进行的写入代码
private void testSink(File file) {
        if(!file.exists()) {
            try {
                file.createNewFile();
            } catch (IOException e) {
                e.printStackTrace();
            }
        }
        try {
            BufferedSink bufferedSink = Okio.buffer(Okio.sink(file));
            StringBuilder stringBuilder = new StringBuilder();
            for(int k = 0;k < 1000;k++) {
                stringBuilder.append("Buffer Sink Test Sample");
            }
            int i = 0;
            System.out.println("Okio sink test start");
            long ts = System.currentTimeMillis();
            long nts = System.nanoTime();
            while(i++ < 100000) {
                bufferedSink.writeUtf8(stringBuilder.toString());
            }
            bufferedSink.close();
            System.out.println("Okio sink ms time " + (System.currentTimeMillis() - ts));
            System.out.println("Okio sink nano time " + (System.nanoTime() - nts));
            System.out.println("Okio sink test end");
        } catch (FileNotFoundException e) {
            e.printStackTrace();
        } catch (IOException e) {
            e.printStackTrace();
        }
    }
通过 Java 的 BufferedWriter 进行的写入代码
private void testFileOut(File file) {
        if(!file.exists()) {
            try {
                file.createNewFile();
            } catch (IOException e) {
                e.printStackTrace();
            }
        }
        try {
            FileWriter fileWriter = new FileWriter(file);
            BufferedWriter bufferedWriter = new BufferedWriter(fileWriter);
            StringBuilder stringBuilder = new StringBuilder();
            for(int k = 0;k < 1000;k++) {
                stringBuilder.append("Buffer Sink Test Sample");
            }
            int i = 0;
            System.out.println("Java buffered write test start");
            long ts = System.currentTimeMillis();
            long nts = System.nanoTime();
            while(i++ < 100000) {
                bufferedWriter.write(stringBuilder.toString());
            }

            bufferedWriter.close();
            System.out.println("Java buffered write ms time " + (System.currentTimeMillis() - ts));
            System.out.println("Java buffered write time " + (System.nanoTime() - nts));
            System.out.println("Java buffered write test end");
        } catch (IOException e) {
            e.printStackTrace();
        }
    }
这段程序运行之后有 2 个数据是需要我们关注的。
数据大小:通过下面的图,我们可以看到,这个写入数据大小为2.3GB
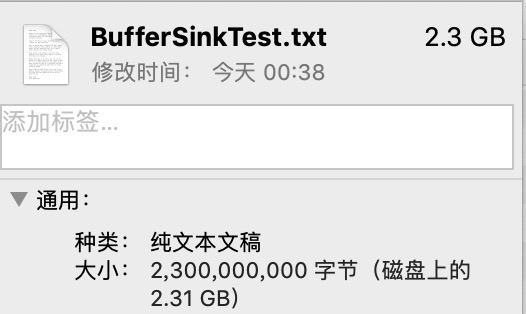 image.png
 写入所花的时间: 如下 BufferSink 与 BufferedWriter 的时间对比,分别进行 10 次读写,应该能很明显的看到 BufferSink 的整体时间分布是要优于 BufferedWriter 的。
| 次序 | BufferSink | BufferedWriter |
|---|---|---|
| 1 | 4637 | 4944 |
| 2 | 4228 | 4299 |
| 3 | 4088 | 4334 |
| 4 | 4383 | 4440 |
| 5 | 4467 | 4375 |
| 6 | 4201 | 4117 |
| 7 | 4385 | 4453 |
| 8 | 4149 | 4439 |
| 9 | 4266 | 4222 |
| 10 | 4363 | 4433 |
上面的结果是PC上跑出来的结果,再来看看手机上的结果。也是基本得到一样的结果。就是 OKIO 的结果基本趋于稳定下降。当然在手机上写10000次太慢了,所以改成了 5000 次。
| 次序 | BufferSink | BufferedWriter |
|---|---|---|
| 1 | 3530 | 3139 |
| 2 | 3085 | 2943 |
| 3 | 2572 | 2137 |
| 4 | 2501 | 3192 |
| 5 | 2462 | 3108 |
| 6 | 3107 | 4081 |
| 7 | 2047 | 2377 |
| 8 | 2044 | 2131 |
| 9 | 2042 | 3557 |
| 10 | 2055 | 2099 |
总结下来就是,Okio 的写入并不总是比 Java 原生 I/O 快。而是在多次反复写入的情况下,Okio 则速度较快,且比较稳定。
源码分析
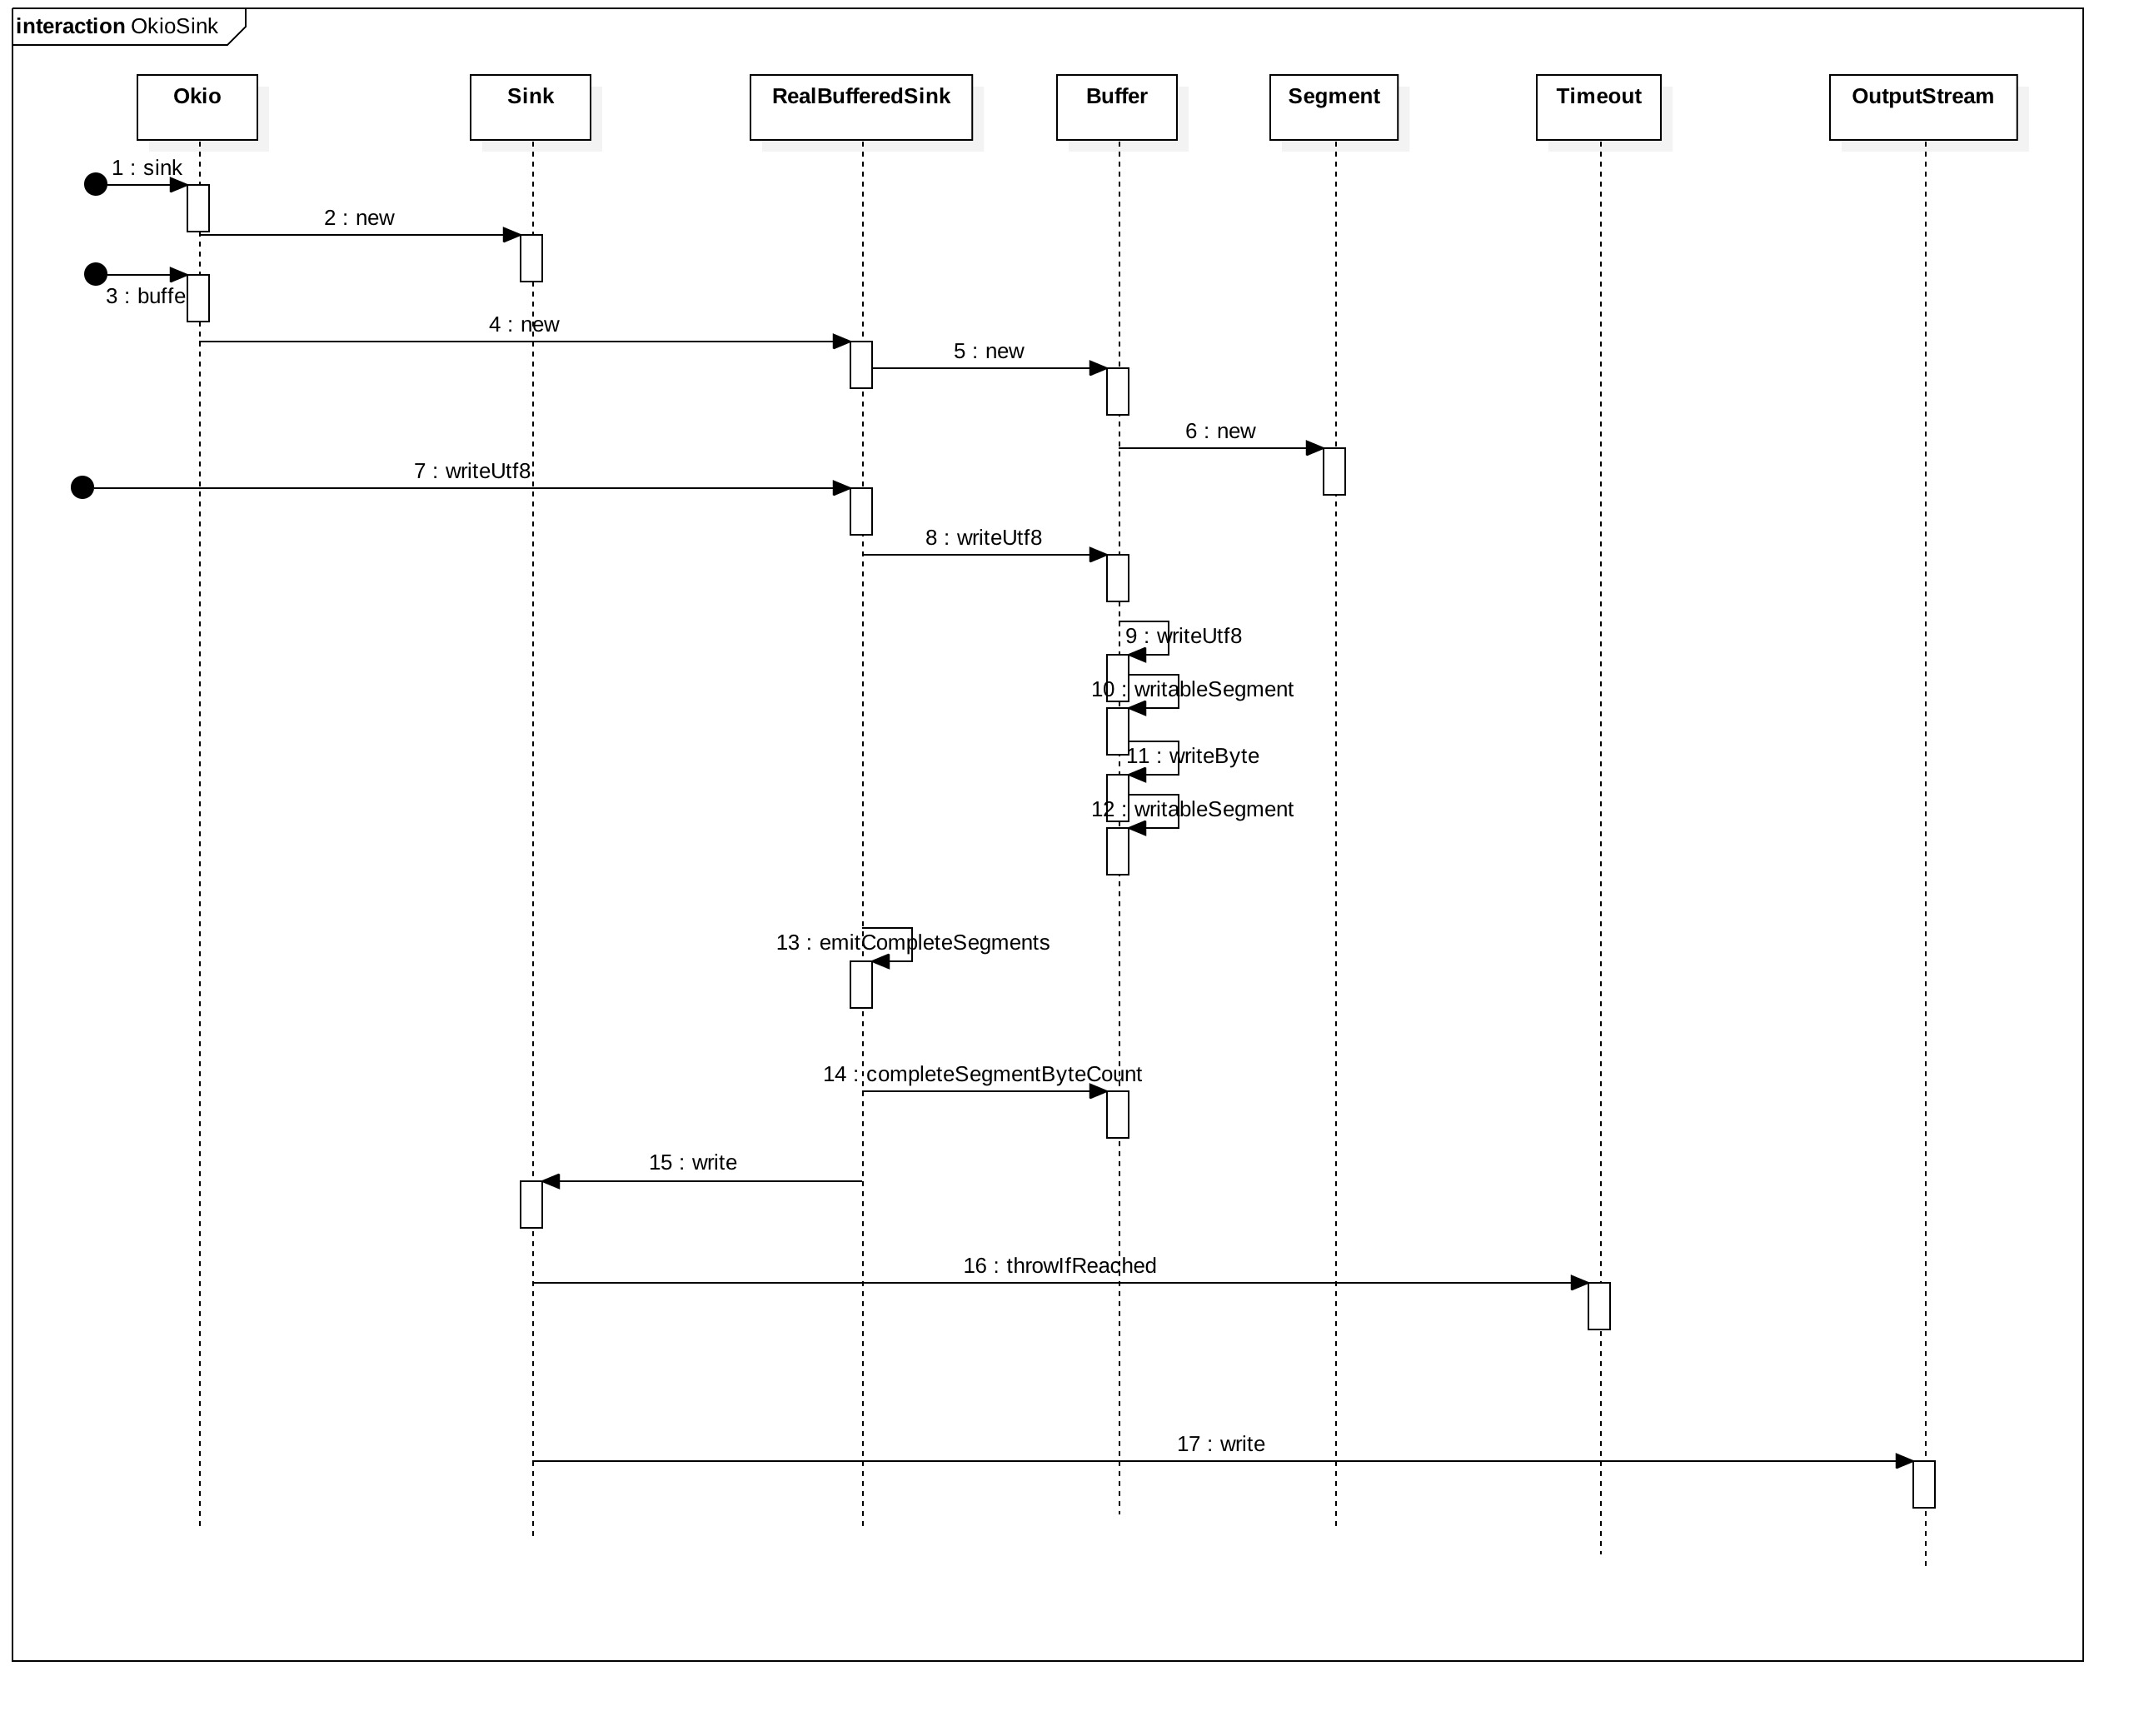
前面的案例分析,更加增强了我们对 Okio 的认知,接下来就是我们的重点,源码分析与理解了。按照 demo ,画出时序图,并逐层进行分解并深入。所以首先我们还是先来看看时序图。
 OkioSink.jpg
构造Sink —— Okio#sink(file)
  /** Returns a sink that writes to {@code file}. */
  // 当传入的是一个文件时所调用的 Sink 构造方法
  public static Sink sink(File file) throws FileNotFoundException {
    if (file == null) throw new IllegalArgumentException("file == null");
    return sink(new FileOutputStream(file));
  }

  /** Returns a sink that writes to {@code out}. */
  // 当传入的是一个 OutputStream 时所调用的 Sink 构建方法
  public static Sink sink(OutputStream out) {
    return sink(out, new Timeout());
  }
  // 这个构建方法是私有的,最终的调用都会来到这里
  private static Sink sink(final OutputStream out, final Timeout timeout) {
    if (out == null) throw new IllegalArgumentException("out == null");
    if (timeout == null) throw new IllegalArgumentException("timeout == null");

    return new Sink() {
      @Override public void write(Buffer source, long byteCount) throws IOException {
        checkOffsetAndCount(source.size, 0, byteCount);
        while (byteCount > 0) {
          timeout.throwIfReached();
          Segment head = source.head;
          int toCopy = (int) Math.min(byteCount, head.limit - head.pos);
          out.write(head.data, head.pos, toCopy);

          head.pos += toCopy;
          byteCount -= toCopy;
          source.size -= toCopy;

          if (head.pos == head.limit) {
            source.head = head.pop();
            SegmentPool.recycle(head);
          }
        }
      }

      @Override public void flush() throws IOException {
        out.flush();
      }

      @Override public void close() throws IOException {
        out.close();
      }

      @Override public Timeout timeout() {
        return timeout;
      }

      @Override public String toString() {
        return "sink(" + out + ")";
      }
    };
  }
上面这段代码中,是构建 Sink 的 3 个重载方法,是Okio 的静态方法,而且他们也是依次调用。第一个告诉了我们其底层的写入也是基于 Java 原生的 I/O ,如 FileOutputStream。第二个加入了 Timeout ,这就使其具备了超时机制。第三个方法是最为关键的,这里才真正生成了 Sink 实例。而在这个实例中,也直接定义出了数据如何写入的,如何关闭流,以及返回哪一个 Timeout 实例。
这一波调用总的来说确定了实际的 Sink 对象,以及 Sink 是如何写入的和其应该返回的超时机制。
以上是 5 个Sink 构造方法中的其中 3 个,还有另外 2 个也一起来看看吧。
  /** Returns a sink that writes to {@code path}. */
  // 通过文件路径构建 Sink 实例
  @IgnoreJRERequirement // Should only be invoked on Java 7+.
  public static Sink sink(Path path, OpenOption... options) throws IOException {
    if (path == null) throw new IllegalArgumentException("path == null");
    return sink(Files.newOutputStream(path, options));
  }
  /**
   * Returns a sink that writes to {@code socket}. Prefer this over {@link
   * #sink(OutputStream)} because this method honors timeouts. When the socket
   * write times out, the socket is asynchronously closed by a watchdog thread.
   */
  // 通过  Socket 进行构建
  public static Sink sink(Socket socket) throws IOException {
    if (socket == null) throw new IllegalArgumentException("socket == null");
    AsyncTimeout timeout = timeout(socket);
    Sink sink = sink(socket.getOutputStream(), timeout);
    return timeout.sink(sink);
  }
上面这 2 个 Sink 构造方法,第一个是以文件路径来进行构建,而第二个则是以 Socket 进行构建,并且对于 Socket 的构建中,其 Timeout 是 AsyncTimeout。这里说明了 2 个其本特性。第一、除了对文件进行支持,同时还支持 Socket,第二、超时机制有同步的 Timeout 以及异步的 AsyncTimeout。关于超时机制,后面还会详细来讲,这里先有个概念即可。
构造BufferedSink——Okio#buffer(sink)
/**
   * Returns a new sink that buffers writes to {@code sink}. The returned sink
   * will batch writes to {@code sink}. Use this wherever you write to a sink to
   * get an ergonomic and efficient access to data.
   */
  public static BufferedSink buffer(Sink sink) {
    return new RealBufferedSink(sink);
  }
该方法就是构建了一个 RealBufferedSink 实例。那就来看看这个类。
final class RealBufferedSink implements BufferedSink {
  public final Buffer buffer = new Buffer();
  public final Sink sink;
  boolean closed;

  RealBufferedSink(Sink sink) {
    if (sink == null) throw new NullPointerException("sink == null");
    this.sink = sink;
  }
......
}
这个类中两个重要的成员变量一个 sink ,由外部传入,一个是 Buffer 由内部直构建。这里的 sink 是前面通过 Okio.sink()方法最终构建的那个匿名类。那么再来看看 Buffer 这个类。
/**
 * A collection of bytes in memory.
 *
 * <p><strong>Moving data from one buffer to another is fast.</strong> Instead
 * of copying bytes from one place in memory to another, this class just changes
 * ownership of the underlying byte arrays.
 *
 * <p><strong>This buffer grows with your data.</strong> Just like ArrayList,
 * each buffer starts small. It consumes only the memory it needs to.
 *
 * <p><strong>This buffer pools its byte arrays.</strong> When you allocate a
 * byte array in Java, the runtime must zero-fill the requested array before
 * returning it to you. Even if you're going to write over that space anyway.
 * This class avoids zero-fill and GC churn by pooling byte arrays.
 */
public final class Buffer implements BufferedSource, BufferedSink, Cloneable {
  private static final byte[] DIGITS =
      { '0', '1', '2', '3', '4', '5', '6', '7', '8', '9', 'a', 'b', 'c', 'd', 'e', 'f' };
  static final int REPLACEMENT_CHARACTER = '\ufffd';

  @Nullable Segment head;
  long size;

  public Buffer() {
  }
Buffer 类中最重要的成员变量 head 是一个 Segment 类型,Buffer 中的数据结构也正是由 Segment 所构成的一个双向链表。除此之外,关于 Buffer 类,这里的解释也极其重要。大概的意思是说:
(1) 这是一个在内存中的字节集合。
(2)将一个 Buffer 中的数据移到另一个 Buffer 中去是非常快的。原因是它并不是通过复制来实现,而是从底层字节数组去改变与 Buffer 这个类的所属关系。
(3)它就是 ArrayList 一样的,容量自动增长的。一开始是很小的,且仅分配它所需要的内存大小。
(4)Buffer池化了它的字节数组。如果直接从Java中分配一个字节数组,使用其必须为其填充 0。而 Buffer 通过池化字节数组从而避免了 0 填充和GC 抖动的情况。
上面详细的说明了 Buffer 的特性,当然也是 Okio 的特性。在后面的章节中我们还会继续分析其特性的实现细节。而关于 Buffer 就先了解到这里,再进一步看看Segment。
package okio;

import javax.annotation.Nullable;

/**
 * A segment of a buffer.
 *
 * <p>Each segment in a buffer is a circularly-linked list node referencing the following and
 * preceding segments in the buffer.
 *
 * <p>Each segment in the pool is a singly-linked list node referencing the rest of segments in the
 * pool.
 *
 * <p>The underlying byte arrays of segments may be shared between buffers and byte strings. When a
 * segment's byte array is shared the segment may not be recycled, nor may its byte data be changed.
 * The lone exception is that the owner segment is allowed to append to the segment, writing data at
 * {@code limit} and beyond. There is a single owning segment for each byte array. Positions,
 * limits, prev, and next references are not shared.
 */
final class Segment {
  /** The size of all segments in bytes. */
// 每个 segment 共 8 K字节
  static final int SIZE = 8192;
  /** Segments will be shared when doing so avoids {@code arraycopy()} of this many bytes. */
// 是否共享底层数据的阈值
  static final int SHARE_MINIMUM = 1024;
// 存放字节的数组
  final byte[] data;
  /** The next byte of application data byte to read in this segment. */
 // 下一个要读的字节的位置
  int pos;
  /** The first byte of available data ready to be written to. */
 // 写入的起始位置
  int limit;
  /** True if other segments or byte strings use the same byte array. */
 // 表明此 segment 是共享的。那什么时候情况下会被共享呢?
  boolean shared;
  /** True if this segment owns the byte array and can append to it, extending {@code limit}. */
// 表明这个段是可以追加数据的,而追回的位置是基于 limit。一般情况下都是为 true 的
  boolean owner;
  /** Next segment in a linked or circularly-linked list. */
// 双向环形链表的下一个节点
  Segment next;
  /** Previous segment in a circularly-linked list. */
// 双向环形链表的前一个节点
  Segment prev;

  Segment() {
    this.data = new byte[SIZE];
    this.owner = true;
    this.shared = false;
  }

  Segment(Segment shareFrom) {
    this(shareFrom.data, shareFrom.pos, shareFrom.limit);
    shareFrom.shared = true;
  }

  Segment(byte[] data, int pos, int limit) {
    this.data = data;
    this.pos = pos;
    this.limit = limit;
    this.owner = false;
    this.shared = true;
  }

  /**
   * Removes this segment of a circularly-linked list and returns its successor.
   * Returns null if the list is now empty.
   */
// 将自己弹出链表
  public @Nullable Segment pop() {
    ......
  }

  /**
   * Appends {@code segment} after this segment in the circularly-linked list.
   * Returns the pushed segment.
   */
// 压入到当前链表
  public Segment push(Segment segment) {
   ......
  }

  /**
   * Splits this head of a circularly-linked list into two segments. The first
   * segment contains the data in {@code [pos..pos+byteCount)}. The second
   * segment contains the data in {@code [pos+byteCount..limit)}. This can be
   * useful when moving partial segments from one buffer to another.
   *
   * <p>Returns the new head of the circularly-linked list.
   */
// 分割,把数据以 [pos,pos + byteCount] 和 [pos + byteCount,limit] 这两段来进行分割。分割出去的数据依据共享阈值决定数据是否被共享
  public Segment split(int byteCount) {
    ......
  }

  /**
   * Call this when the tail and its predecessor may both be less than half
   * full. This will copy data so that segments can be recycled.
   */
// 压缩存储,当处于尾节点和它的前一节点的数据都少于一半时,把数据进行压缩存储到一个,以便可以回收调一个 Segment。
  public void compact() {
    ......
  }
// 移动 byteCount 个字节数据到另一个段中
  /** Moves {@code byteCount} bytes from this segment to {@code sink}. */
  public void writeTo(Segment sink, int byteCount) {
    ......
  }
}
来解读一下 Segment 的特性:
(1) segment 是 Buffer 中的一个组织单元
(2) segment 在 Buffer 中以环形双向链表的数据结构来存储
(3) segment 在 SegmentPool 中以单链接表数据结构来存储
(4) segment 可以在 Buffer 和 ByteStrings 之间进行共享。对于共享的 segment 不可以回收,也不可以修改其中的数据。但例外的是,段的拥有者可以在 limit 之后追回数据。对于这个段来说,底层的字节数组是共享的,但position,limits,prev以及next这些是不共享的。
此外,注释里有对每一个属性的详细解释以及个人的理解。为了方便更容易理解,简单画了一个 Segment 的数据模型图来帮助我们。如下所示。
 image.png
 关于 Segment 就先了解到这里,其中的方法 split(),compact()以及 writeTo() 后面还会详细说明。接下来继续看看 SegmentPool。
package okio;

import javax.annotation.Nullable;

/**
 * A collection of unused segments, necessary to avoid GC churn and zero-fill.
 * This pool is a thread-safe static singleton.
 */
// 主要是用于收集未使用的 Segments,避免了内存抖动以及0填充。同时,这个 Pool 也是一个线程安全的静态单例类。
final class SegmentPool {
  /** The maximum number of bytes to pool. */
  // TODO: Is 64 KiB a good maximum size? Do we ever have that many idle segments?
// 一个池子最大存储 64 KB 字节
  static final long MAX_SIZE = 64 * 1024; // 64 KiB.

  /** Singly-linked list of segments. */
// 表明其是一个单向链表
  static @Nullable Segment next;

  /** Total bytes in this pool. */
// 当前的总数据大小
  static long byteCount;

  private SegmentPool() {
  }

  static Segment take() {
    synchronized (SegmentPool.class) {
      if (next != null) {
        Segment result = next;
        next = result.next;
        result.next = null;
        byteCount -= Segment.SIZE;
        return result;
      }
    }
    return new Segment(); // Pool is empty. Don't zero-fill while holding a lock.
  }

  static void recycle(Segment segment) {
    if (segment.next != null || segment.prev != null) throw new IllegalArgumentException();
    if (segment.shared) return; // This segment cannot be recycled.
    synchronized (SegmentPool.class) {
      if (byteCount + Segment.SIZE > MAX_SIZE) return; // Pool is full.
      byteCount += Segment.SIZE;
      segment.next = next;
      segment.pos = segment.limit = 0;
      next = segment;
    }
  }
}
这个类其实挺简单的,take() 方法中就是获取一个 Segment ,如果池子中有就取一个出来,如果没有就给 new 一个。而 recycle() 方法,如果池子还没涨到 64 KB 的限制,且 Segment 不是共享的,那就把它加到链接里面去。
小结
通过对 Sink 以及 BufferedSink 的构造,可以说是对 Okio 整个使用环境的一个初始化。同时,在这一段也详细介绍了其相关的核心概念,Buffer,Segment,SegmentPool 等。有了这些基本的核心概念,我们就可以进一步分析字节的写入了。
写入数据——RealBufferedSink#writeUtf8()
  @Override public BufferedSink writeUtf8(String string) throws IOException {
    if (closed) throw new IllegalStateException("closed");
    buffer.writeUtf8(string);
    return emitCompleteSegments();
  }
进一步调用了 Buffer 的 writeUtf8() 和 emitCompleteSegments(),那么就往下看Buffer#writeUft8() 方法。代码很长,但关键的是 2 个调用,writableSegment(1) 和 writeByte(),其他的都是 utf-8 编码相关。
  @Override public Buffer writeUtf8(String string) {
    return writeUtf8(string, 0, string.length());
  }

  @Override public Buffer writeUtf8(String string, int beginIndex, int endIndex) {
    ......

    // Transcode a UTF-16 Java String to UTF-8 bytes.
    for (int i = beginIndex; i < endIndex;) {
      int c = string.charAt(i);
      if (c < 0x80) {
        Segment tail = writableSegment(1);
        byte[] data = tail.data;
        int segmentOffset = tail.limit - i;
        int runLimit = Math.min(endIndex, Segment.SIZE - segmentOffset);

        // Emit a 7-bit character with 1 byte.
        data[segmentOffset + i++] = (byte) c; // 0xxxxxxx

        // Fast-path contiguous runs of ASCII characters. This is ugly, but yields a ~4x performance
        // improvement over independent calls to writeByte().
        while (i < runLimit) {
          c = string.charAt(i);
          if (c >= 0x80) break;
          data[segmentOffset + i++] = (byte) c; // 0xxxxxxx
        }

        int runSize = i + segmentOffset - tail.limit; // Equivalent to i - (previous i).
        tail.limit += runSize;
        size += runSize;

      } else if (c < 0x800) {
        // Emit a 11-bit character with 2 bytes.
        writeByte(c >>  6        | 0xc0); // 110xxxxx
        writeByte(c       & 0x3f | 0x80); // 10xxxxxx
        i++;

      } else if (c < 0xd800 || c > 0xdfff) {
        // Emit a 16-bit character with 3 bytes.
        writeByte(c >> 12        | 0xe0); // 1110xxxx
        writeByte(c >>  6 & 0x3f | 0x80); // 10xxxxxx
        writeByte(c       & 0x3f | 0x80); // 10xxxxxx
        i++;

      } else {
        // c is a surrogate. Make sure it is a high surrogate & that its successor is a low
        // surrogate. If not, the UTF-16 is invalid, in which case we emit a replacement character.
        int low = i + 1 < endIndex ? string.charAt(i + 1) : 0;
        if (c > 0xdbff || low < 0xdc00 || low > 0xdfff) {
          writeByte('?');
          i++;
          continue;
        }

        // UTF-16 high surrogate: 110110xxxxxxxxxx (10 bits)
        // UTF-16 low surrogate:  110111yyyyyyyyyy (10 bits)
        // Unicode code point:    00010000000000000000 + xxxxxxxxxxyyyyyyyyyy (21 bits)
        int codePoint = 0x010000 + ((c & ~0xd800) << 10 | low & ~0xdc00);

        // Emit a 21-bit character with 4 bytes.
        writeByte(codePoint >> 18        | 0xf0); // 11110xxx
        writeByte(codePoint >> 12 & 0x3f | 0x80); // 10xxxxxx
        writeByte(codePoint >>  6 & 0x3f | 0x80); // 10xxyyyy
        writeByte(codePoint       & 0x3f | 0x80); // 10yyyyyy
        i += 2;
      }
    }

    return this;
  }
Buffer有两个重载版本,第一个调用了第二个,主要就是确定了起始位置为0,而写入的数据为全部数据。而第二个是具体的写入,这段代码比较长,其实不应该贴出来的,但我看到它对 Utf8 的编码十分的优秀,所以还是贴出来,有时间的可以仔细读一读。当然,在这里我们只关注其中最关键的几句即可。 如前面所说,这里面有两个进一步调用的方法分别是 writableSegment(1) 和 writeByte(),而 writeByte() 里面也有对 writableSegment() 的调用。那我们先来看看 writableSegment() 方法的实现。
/**
   * Returns a tail segment that we can write at least {@code minimumCapacity}
   * bytes to, creating it if necessary.
   */
  Segment writableSegment(int minimumCapacity) {
    ......
    if (head == null) {
      head = SegmentPool.take(); // Acquire a first segment.
      return head.next = head.prev = head;
    }
    Segment tail = head.prev;
    if (tail.limit + minimumCapacity > Segment.SIZE || !tail.owner) {
      tail = tail.push(SegmentPool.take()); // Append a new empty segment to fill up.
    }
    return tail;
  }
这个方法的主要含义就是如果head为空,则说明当前的链接还是空的,那么就新建一个节点,此时头尾相等。如果不为空就取出尾节点,即头节点的前向节点。而尾节点的空间不能再装下当前要写入的字节数时,就会创建一个新的节点,并把新建的节点作为尾节点,然后继续写入。再来看看 writeByte()。
  @Override public Buffer writeByte(int b) {
    Segment tail = writableSegment(1);
    tail.data[tail.limit++] = (byte) b;
    size += 1;
    return this;
  }
这里就是把数据写入到 Segment 的 data[] 中。对于一次 writeUtf8() 的调用来看,目前为止是把数据全部都写入到了 Segment 中,同时也是内存中,还没有发生实际的 I/O 的。接下来继续看 RealBufferedSink#emitCompleteSegments()方法。
  @Override public BufferedSink emitCompleteSegments() throws IOException {
    if (closed) throw new IllegalStateException("closed");
    long byteCount = buffer.completeSegmentByteCount();
    if (byteCount > 0) sink.write(buffer, byteCount);
    return this;
  }
这里先是调用了 Buffer#completeSegmentByteCount()确定需要从 buffer 中实际取多少字节写入到实际的输出流中。
  /**
   * Returns the number of bytes in segments that are not writable. This is the
   * number of bytes that can be flushed immediately to an underlying sink
   * without harming throughput.
   */
  public long completeSegmentByteCount() {
    long result = size;
    if (result == 0) return 0;

    // Omit the tail if it's still writable.
    Segment tail = head.prev;
    if (tail.limit < Segment.SIZE && tail.owner) {
      result -= tail.limit - tail.pos;
    }

    return result;
  }
上面代码的意思是用当前总的 size 大小 减去 尾节点已写入的字节数,也就是除尾节点,其他的都会被立即写入到底层的输出流中。这说明了不足 8K 的数据写入,在 close() 之前是不会发生实际 I/O 的。 接下来,进一步调用了 sink#write()。这个 sink 就是我们在前面通过 Okio#sink() 方法所创建出来的匿名类。 为了连贯性,我们还是把写入相关的代码再贴一下以便于进一步的阅读与分析。
@Override public void write(Buffer source, long byteCount) throws IOException {
        ......
        while (byteCount > 0) { // 循环,直到数据全部写入
          timeout.throwIfReached(); // 超时判断
          Segment head = source.head; // 总是取头结点
         // 确定当次需要写入的字节数,当前 segment 中可写入的数据与剩余字节数,取最小的那个
          int toCopy = (int) Math.min(byteCount, head.limit - head.pos);
          out.write(head.data, head.pos, toCopy);//写入数据到输出流

         // 更新各位置
          head.pos += toCopy; // 读指针往前移 toCopy 个
          byteCount -= toCopy; // 写入字节数减 toCopy 个
          source.size -= toCopy; // Buffer 中大小减 toCopy 个
          // 如果当前 segment 的数据已经全部写入到输出流,那么将其弹出双向循环链接,并将其回收到 SegmentPool 中
          if (head.pos == head.limit) {
            source.head = head.pop();
            SegmentPool.recycle(head);
          }
        }
贴出来的代码中,已经作了非常详细的说明,因为这里的每一句都很重要,都需要我们去理解。当然,总的来说其实也只有 2 个关键点。 其一,超时机制。
/**
   * Throws an {@link InterruptedIOException} if the deadline has been reached or if the current
   * thread has been interrupted. This method doesn't detect timeouts; that should be implemented to
   * asynchronously abort an in-progress operation.
   */
  public void throwIfReached() throws IOException {
    if (Thread.interrupted()) {
      throw new InterruptedIOException("thread interrupted");
    }

    if (hasDeadline && deadlineNanoTime - System.nanoTime() <= 0) {
      throw new InterruptedIOException("deadline reached");
    }
  }
根据这里的注释,以及分析 hasDeadLine 和 deadlineNanoTime 的赋值情况来看,超时的检测只应该发生在异步的情况下。纳尼!!!也就是说同步超时机制是不检查的。 其二,就是数据的写入以及各位位置标记的置位和Segment的回收。
关闭——RealBufferedSink#close()
@Override public void close() throws IOException {
    if (closed) return;

    // Emit buffered data to the underlying sink. If this fails, we still need
    // to close the sink; otherwise we risk leaking resources.
    Throwable thrown = null;
    try {
      if (buffer.size > 0) {
        sink.write(buffer, buffer.size);
      }
    } catch (Throwable e) {
      thrown = e;
    }

    try {
      sink.close();
    } catch (Throwable e) {
      if (thrown == null) thrown = e;
    }
    closed = true;

    if (thrown != null) Util.sneakyRethrow(thrown);
  }
close() 也就是将 buffer 中剩余的数据都写入到底层输出流中,最后再调用 sink#close()关闭底层的输出流。 至此,写入数据可以说大致分析完了。因为与 writeUtf8() 同级别的其他 write方法,其基本原理都是类似的。通过分析我们知道,其是先将数据都写入到 Buffer 中,然后才将数据写入到实际的 I/O 中,以此减少实际的 I/O。而分析到这里,我们应该也注意到,前面所说的 Segment 的 splite,compact以及share 这些优化内存的方法都没有被提及过。这就接下来要分析的读取与另一不同级别的写入。
三、读取
案例分析
关于读取,我们同样也从案例分析开始。先来看看读取的代码。
通过 Okio 的 BufferSource 进行的读取代码
private void testSource(File file) {
        try {
            BufferedSource bufferedSource = Okio.buffer(Okio.source(file));

            System.out.println("Okio source test start");
            long ts = System.currentTimeMillis();
            byte[] buffer = new byte[8 * 1024];

            while(bufferedSource.read(buffer) > 0) {

            }

            bufferedSource.close();
            System.out.println("Okio source test end");
            System.out.println(" source test " + (System.currentTimeMillis() - ts));

        } catch (FileNotFoundException e) {
            e.printStackTrace();
        } catch (IOException e) {
            e.printStackTrace();
        }
    }
通过 Java 的 BufferedReader 进行的读取代码
private void testJava(File file) {

        try {
            BufferedReader bufferedReader = new BufferedReader(new FileReader(file));

            System.out.println("java test start");
            long ts = System.currentTimeMillis();

            char buffer[] = new char[8 * 1024];

            while(bufferedReader.read(buffer) > 0) {
            }
            System.out.println("java test end");
            System.out.println("java test " + (System.currentTimeMillis() - ts));
            bufferedReader.close();
        } catch (FileNotFoundException e) {
            e.printStackTrace();
        } catch (IOException e) {
            e.printStackTrace();
        }
    }
同样来看看测试结果,不过这里偷了个懒,只测试了PC端的,没有测试手机端。因为平台不影响结果。文件就是上面写入的文件,大小 2.3 G。
| 次序 | BufferSource | BufferedReader |
|---|---|---|
| 1 | 1117 | 2391 |
| 2 | 986 | 2458 |
| 3 | 979 | 2252 |
| 4 | 980 | 2232 |
| 5 | 976 | 2225 |
| 6 | 977 | 2202 |
| 7 | 983 | 2252 |
| 8 | 968 | 2218 |
| 9 | 979 | 2223 |
| 10 | 977 | 2221 |
对比结果很明显,Okio#BufferSource 的读取速度明显大于 Java 原生的2 倍多。但是,为什么呢?另外有一个细节,上面的 buffer 大小只设置了 8 * 1024 ,也就是 8KiB,这是因为 Okio 的 segment 为 8 KiB,其一次读取最大也只读取 8 KiB
源码分析
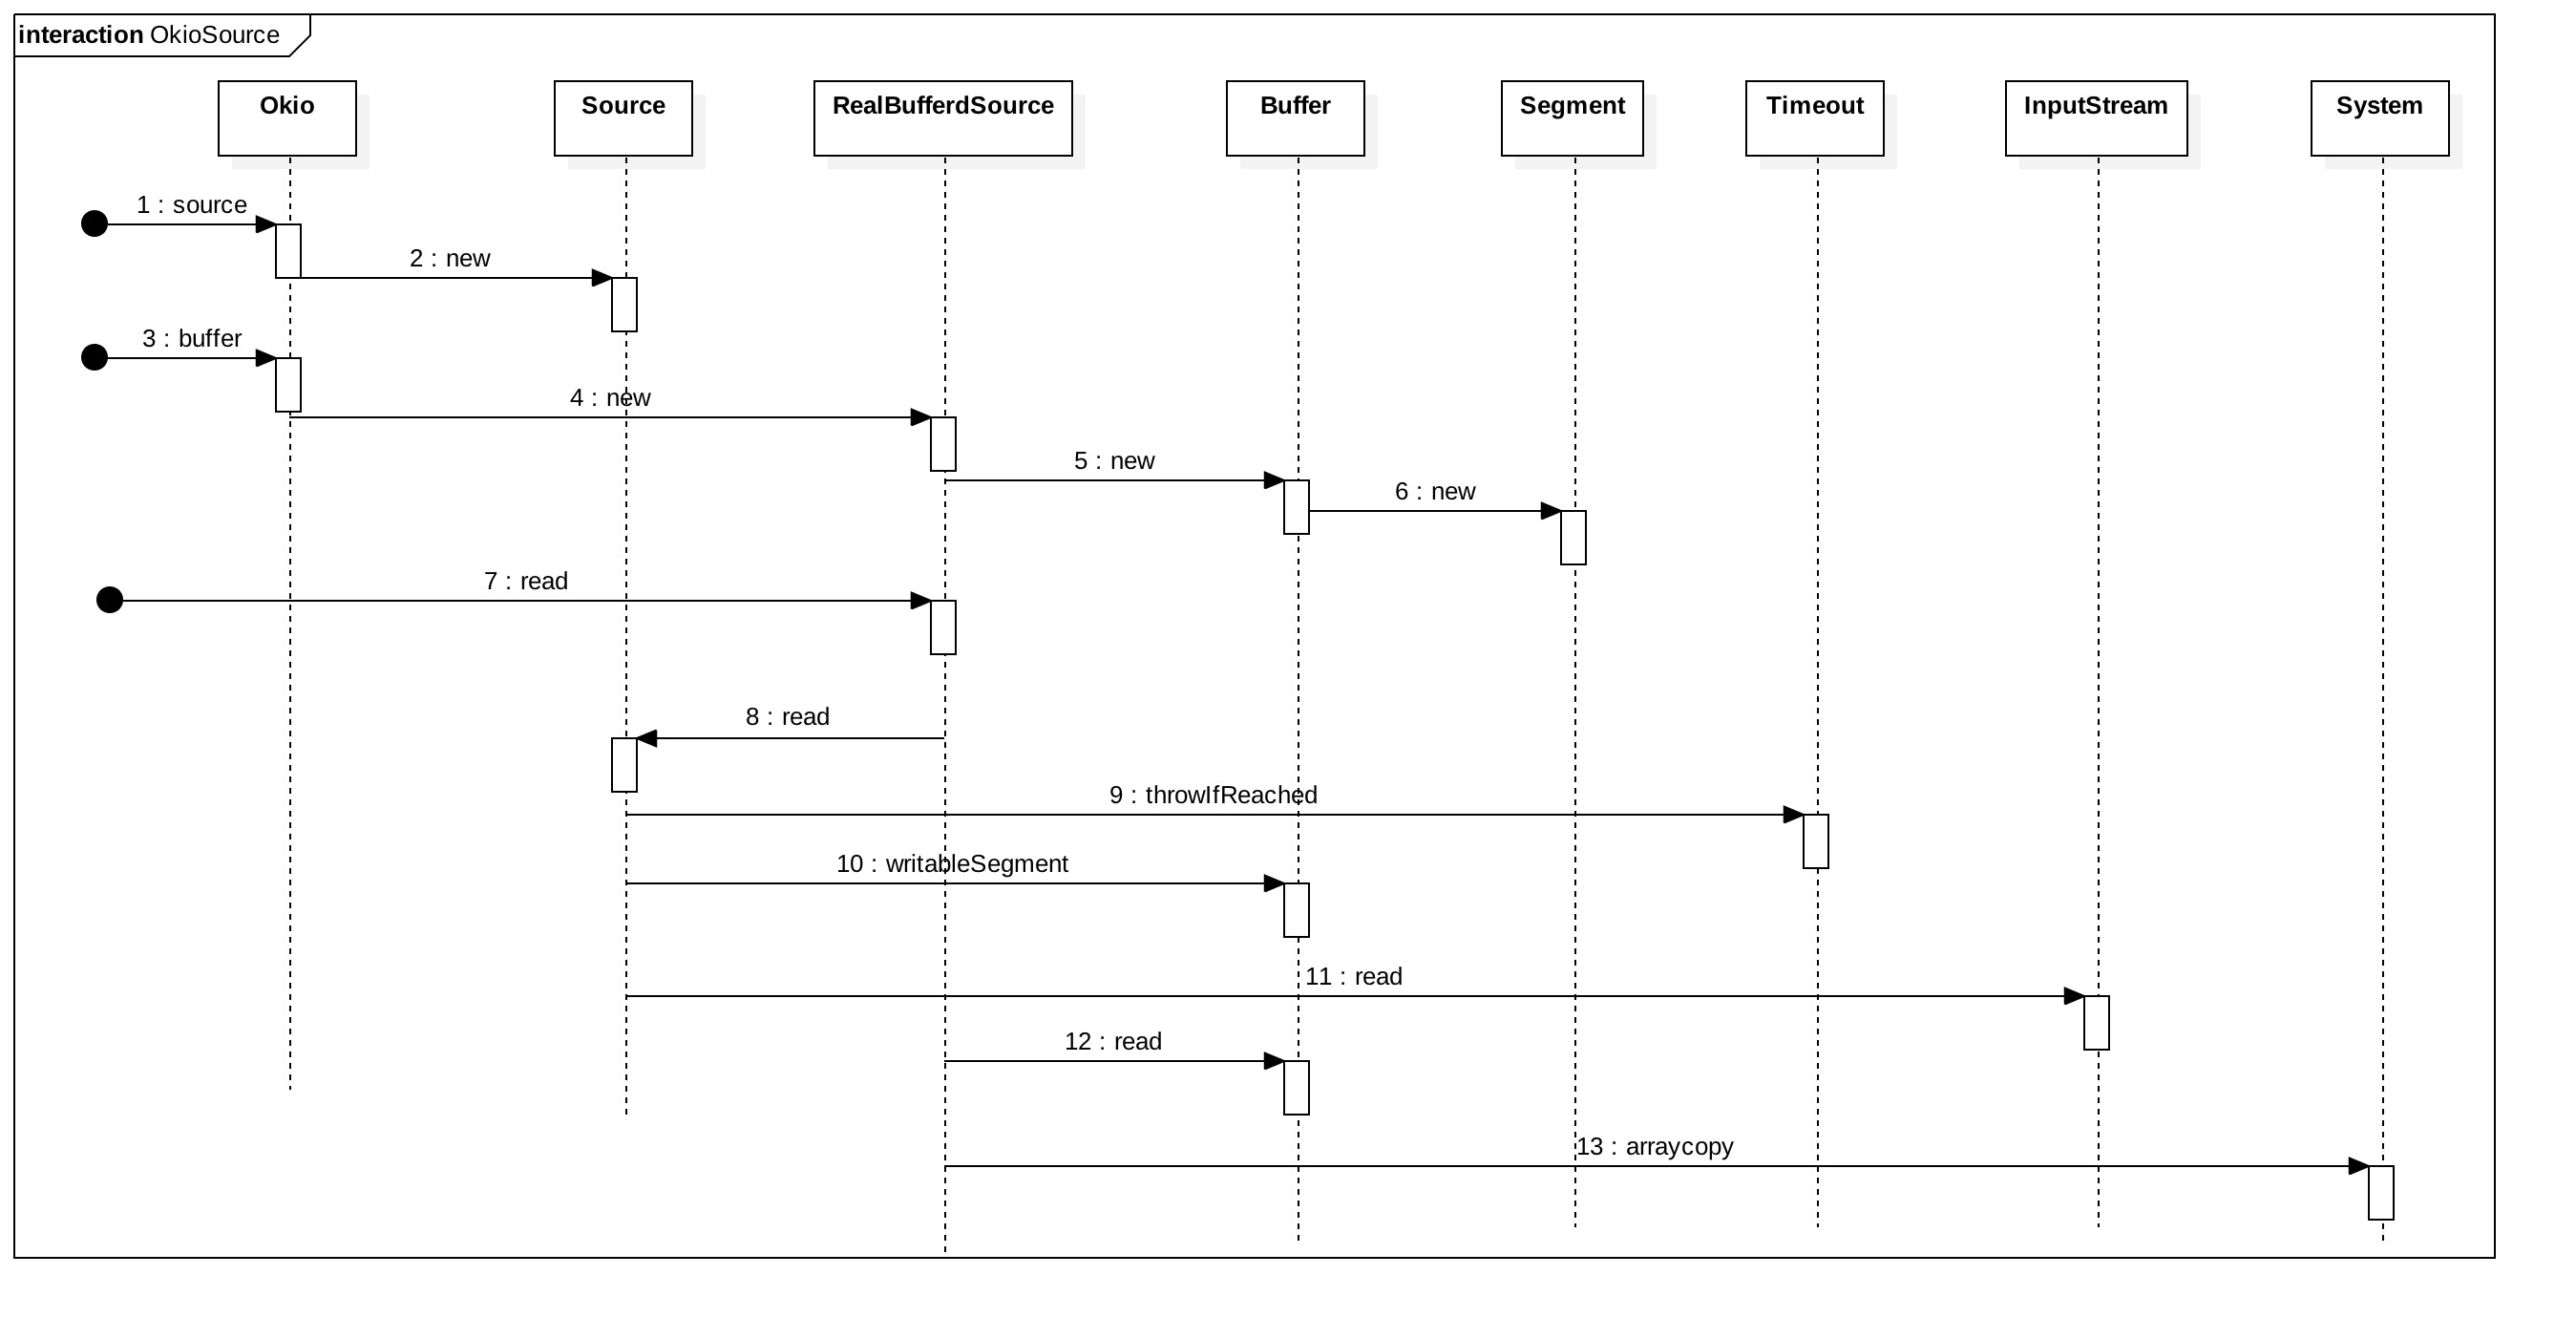
有了前面案例分析的基本认知,接下来就是我们的源码分析与理解了。同样,先画出时序图,再逐层进行分解并深入。
 OkioSource.jpg
从时序图上可以看到,前面几个步骤都是相同的,如 Buffer,Segment,Timeout 这些概念和构造都是一样的。就不重复介绍了。主要看看 Source 和 RealBufferSource 的构造吧。
构造Source——Okio#source(file)
  /** Returns a source that reads from {@code file}. */
  public static Source source(File file) throws FileNotFoundException {
    if (file == null) throw new IllegalArgumentException("file == null");
    return source(new FileInputStream(file));
  }
  /** Returns a source that reads from {@code in}. */
  public static Source source(InputStream in) {
    return source(in, new Timeout());
  }
private static Source source(final InputStream in, final Timeout timeout) {
    if (in == null) throw new IllegalArgumentException("in == null");
    if (timeout == null) throw new IllegalArgumentException("timeout == null");

    return new Source() {
      @Override public long read(Buffer sink, long byteCount) throws IOException {
        if (byteCount < 0) throw new IllegalArgumentException("byteCount < 0: " + byteCount);
        if (byteCount == 0) return 0;
        try {
          timeout.throwIfReached();
          Segment tail = sink.writableSegment(1);
          int maxToCopy = (int) Math.min(byteCount, Segment.SIZE - tail.limit);
          int bytesRead = in.read(tail.data, tail.limit, maxToCopy);
          if (bytesRead == -1) return -1;
          tail.limit += bytesRead;
          sink.size += bytesRead;
          return bytesRead;
        } catch (AssertionError e) {
          if (isAndroidGetsocknameError(e)) throw new IOException(e);
          throw e;
        }
      }

      @Override public void close() throws IOException {
        in.close();
      }

      @Override public Timeout timeout() {
        return timeout;
      }

      @Override public String toString() {
        return "source(" + in + ")";
      }
    };
  }
上面的代码看着多,但和 Sink 的构造几乎一样。这里的重点也构造了一个匿名的 Source 接口的实例,以完成实际从输入中的读取。同样的,Source 也是支持 Socket 的,顺便也一起来看看吧。
/**
   * Returns a source that reads from {@code socket}. Prefer this over {@link
   * #source(InputStream)} because this method honors timeouts. When the socket
   * read times out, the socket is asynchronously closed by a watchdog thread.
   */
  public static Source source(Socket socket) throws IOException {
    if (socket == null) throw new IllegalArgumentException("socket == null");
    AsyncTimeout timeout = timeout(socket);
    Source source = source(socket.getInputStream(), timeout);
    return timeout.source(source);
  }
支持 Socket 也是比较简单的,即从 socket 中获取输入流以便读取数据,同时这里也设定了 Timeout 为 AsyncTimeout。关于 AsyncTimeout 就放到后面专门的分节里来讲解。
构造 BufferdSource —— Okio#buffer(Source)
  /**
   * Returns a new source that buffers reads from {@code source}. The returned
   * source will perform bulk reads into its in-memory buffer. Use this wherever
   * you read a source to get an ergonomic and efficient access to data.
   */
  public static BufferedSource buffer(Source source) {
    return new RealBufferedSource(source);
  }
构造 RealBufferedSource 实例,继续看。
final class RealBufferedSource implements BufferedSource {
  public final Buffer buffer = new Buffer();
  public final Source source;
  boolean closed;

  RealBufferedSource(Source source) {
    if (source == null) throw new NullPointerException("source == null");
    this.source = source;
  }
......
同样是组合了 Source 和 Buffer 这两个实例。Source 就是前面通过 Okio.source()方法最终构建的那个匿名类。而 Buffer 和其内部聚合的 Segment 都已经介绍过了。所以直接来看 read() 方法吧。
读取数据——RealBufferedSource#read()
  @Override public int read(byte[] sink) throws IOException {
    return read(sink, 0, sink.length);
  }

 @Override public int read(byte[] sink, int offset, int byteCount) throws IOException {
    checkOffsetAndCount(sink.length, offset, byteCount);

    if (buffer.size == 0) {
      long read = source.read(buffer, Segment.SIZE);
      if (read == -1) return -1;
    }

    int toRead = (int) Math.min(byteCount, buffer.size);
    return buffer.read(sink, offset, toRead);
  }
read() 是个重载方法,我们调用的是第一个,然后它会进一步调用指定参数 offset 和 byteCount 的 read() 方法。
在这个方法里,buffer.size 为 0 说明当前 buffer 中为没有数据,即数据已经被从buffer 中读出来了。如果不为0,说明 buffer 中还有数据那么就进一步读取剩下的或者剩余的数据。这里最初肯定是要走为 0 的情况。这里调用的是 source.read(),也即前面匿名类 Source 的。注意,这里传入的参数中除了 buffer
,还有 Segment.SIZE,即 8KiB。
这里为了方便分析,也重复贴一下 read() 方法的相关代码。
@Override public long read(Buffer sink, long byteCount) throws IOException {
       .....
       ......
        try {
          timeout.throwIfReached();
          Segment tail = sink.writableSegment(1);
          int maxToCopy = (int) Math.min(byteCount, Segment.SIZE - tail.limit);
          int bytesRead = in.read(tail.data, tail.limit, maxToCopy);
          if (bytesRead == -1) return -1;
          tail.limit += bytesRead;
          sink.size += bytesRead;
          return bytesRead;
        } catch (AssertionError e) {
          if (isAndroidGetsocknameError(e)) throw new IOException(e);
          throw e;
        }
      }
同步 Timeout.throwIfReached() 前面已经分析过了,是不起作用的,其实现在来看看也能明白过来,不管是在读还是写的时候,它都没有设置起始时间,那它又如何能计算出所消耗的时间呢?而 Buffer#writeableSegment() 在前面也分析过了,主要是返回一个 Segment。然后就是实际从文件读出数据并只保存在 Segment 里面。
在 RealBufferedSource#read() 中,走了不为 0 的情况后,就是将Buffer中的数据按需要读到内存中返回给调用者。
有了前面写入的分析,再来看读取显然要简单的多了。至此,读取和写入的最基本流程都分析完了。Okio 为打包了很多的读取和写入的方法,这里只分析了其中最基本的,当然有了这些最基本的认知后,再来理解基本的就容易许多了。
三、读取到写入,写入自读取
除了基本的读取与写入,还可以将读取与写入直接串起来。也即读取出来数据可以直接送进写入,而写入的内容也可以是来自 Source 。先来看看写入自读取吧。
@Override public long writeAll(Source source) throws IOException {
    if (source == null) throw new IllegalArgumentException("source == null");
    long totalBytesRead = 0;
    for (long readCount; (readCount = source.read(buffer, Segment.SIZE)) != -1; ) {
      totalBytesRead += readCount;
      emitCompleteSegments();
    }
    return totalBytesRead;
  }

  @Override public BufferedSink write(Source source, long byteCount) throws IOException {
    while (byteCount > 0) {
      long read = source.read(buffer, byteCount);
      if (read == -1) throw new EOFException();
      byteCount -= read;
      emitCompleteSegments();
    }
    return this;
  }
上面两段代码就是将数据从 Source 读出,再写入到Buffer 中去。这里需要关注的有两个事情:
source实例 :这里的 Source 是 RealBufferdSource 实例。
关键调用 : 这里的关键调用是 RealBufferdSource#read(Buffer,byteCount)。来看看其实现。
@Override public long read(Buffer sink, long byteCount) throws IOException {
    ......
    return buffer.read(sink, toRead);
  }
调用了 Buffer#read(Buffer,toRead)
  @Override public long read(Buffer sink, long byteCount) {
   ......
    sink.write(this, byteCount);
    return byteCount;
  }
看到这里可能会有点晕,所以强调一下,这里的 sink 是 RealBufferdSink 中的 Buffer,而 this 是 RealBufferedSource 中的 buffer。意思就是将 RealBufferdSource 中的 buffer 的数据写入到 RealBufferdSink 中的 buffer 中去。 下面来看看具体的实现,其实代码并不长,注释就占了一大半,为了完整性,我并没有将其删除去。
@Override public void write(Buffer source, long byteCount) {
    // Move bytes from the head of the source buffer to the tail of this buffer
    // while balancing two conflicting goals: don't waste CPU and don't waste
    // memory.
    //
    //
    // Don't waste CPU (ie. don't copy data around).
    //
    // Copying large amounts of data is expensive. Instead, we prefer to
    // reassign entire segments from one buffer to the other.
    //
    //
    // Don't waste memory.
    //
    // As an invariant, adjacent pairs of segments in a buffer should be at
    // least 50% full, except for the head segment and the tail segment.
    //
    // The head segment cannot maintain the invariant because the application is
    // consuming bytes from this segment, decreasing its level.
    //
    // The tail segment cannot maintain the invariant because the application is
    // producing bytes, which may require new nearly-empty tail segments to be
    // appended.
    //
    //
    // Moving segments between buffers
    //
    // When writing one buffer to another, we prefer to reassign entire segments
    // over copying bytes into their most compact form. Suppose we have a buffer
    // with these segment levels [91%, 61%]. If we append a buffer with a
    // single [72%] segment, that yields [91%, 61%, 72%]. No bytes are copied.
    //
    // Or suppose we have a buffer with these segment levels: [100%, 2%], and we
    // want to append it to a buffer with these segment levels [99%, 3%]. This
    // operation will yield the following segments: [100%, 2%, 99%, 3%]. That
    // is, we do not spend time copying bytes around to achieve more efficient
    // memory use like [100%, 100%, 4%].
    //
    // When combining buffers, we will compact adjacent buffers when their
    // combined level doesn't exceed 100%. For example, when we start with
    // [100%, 40%] and append [30%, 80%], the result is [100%, 70%, 80%].
    //
    //
    // Splitting segments
    //
    // Occasionally we write only part of a source buffer to a sink buffer. For
    // example, given a sink [51%, 91%], we may want to write the first 30% of
    // a source [92%, 82%] to it. To simplify, we first transform the source to
    // an equivalent buffer [30%, 62%, 82%] and then move the head segment,
    // yielding sink [51%, 91%, 30%] and source [62%, 82%].

    if (source == null) throw new IllegalArgumentException("source == null");
    if (source == this) throw new IllegalArgumentException("source == this");
    checkOffsetAndCount(source.size, 0, byteCount);

    while (byteCount > 0) {
      // Is a prefix of the source's head segment all that we need to move?
      if (byteCount < (source.head.limit - source.head.pos)) {
        Segment tail = head != null ? head.prev : null;
        if (tail != null && tail.owner
            && (byteCount + tail.limit - (tail.shared ? 0 : tail.pos) <= Segment.SIZE)) {
          // Our existing segments are sufficient. Move bytes from source's head to our tail.
          source.head.writeTo(tail, (int) byteCount);
          source.size -= byteCount;
          size += byteCount;
          return;
        } else {
          // We're going to need another segment. Split the source's head
          // segment in two, then move the first of those two to this buffer.
          source.head = source.head.split((int) byteCount);
        }
      }

      // Remove the source's head segment and append it to our tail.
      Segment segmentToMove = source.head;
      long movedByteCount = segmentToMove.limit - segmentToMove.pos;
      source.head = segmentToMove.pop();
      if (head == null) {
        head = segmentToMove;
        head.next = head.prev = head;
      } else {
        Segment tail = head.prev;
        tail = tail.push(segmentToMove);
        tail.compact();
      }
      source.size -= movedByteCount;
      size += movedByteCount;
      byteCount -= movedByteCount;
    }
  }
通过注释,可以明白,这个方法的核心是在讲:
(1) 这个方法主要完成的是从 Source 的首部将数据移入到 Sink 的尾部
(2) 移动过程中需要平衡两个重要的指标,优化 CPU 资源,优化内存资源。
(3) 移动数据是通过改变引用指向,而不是数据的复制
(4) Segment 合并,是说前一个 Segment 与当前的 Segment 数据大小之和如果没有超过 100%,那么就会将当前的 Segment 合并到前一个中去。看看下面的代码,你可能会更加的清楚。
/**
   * Call this when the tail and its predecessor may both be less than half
   * full. This will copy data so that segments can be recycled.
   */
  public void compact() {
    if (prev == this) throw new IllegalStateException();
    if (!prev.owner) return; // Cannot compact: prev isn't writable.
    int byteCount = limit - pos;
    int availableByteCount = SIZE - prev.limit + (prev.shared ? 0 : prev.pos);
    if (byteCount > availableByteCount) return; // Cannot compact: not enough writable space.
    writeTo(prev, byteCount);
    pop();
    SegmentPool.recycle(this);
  }
(5) 分割 Segment,对于有一些 Segment ,如果只是部分被读取出来,那么可以通过将其分割成 2 个 Segment ,然后取需要的那个 Segment 加入到当前的 Buffer 中。
/**
   * Splits this head of a circularly-linked list into two segments. The first
   * segment contains the data in {@code [pos..pos+byteCount)}. The second
   * segment contains the data in {@code [pos+byteCount..limit)}. This can be
   * useful when moving partial segments from one buffer to another.
   *
   * <p>Returns the new head of the circularly-linked list.
   */
  public Segment split(int byteCount) {
    if (byteCount <= 0 || byteCount > limit - pos) throw new IllegalArgumentException();
    Segment prefix;

    // We have two competing performance goals:
    //  - Avoid copying data. We accomplish this by sharing segments.
    //  - Avoid short shared segments. These are bad for performance because they are readonly and
    //    may lead to long chains of short segments.
    // To balance these goals we only share segments when the copy will be large.
    if (byteCount >= SHARE_MINIMUM) {
      prefix = new Segment(this);
    } else {
      prefix = SegmentPool.take();
      System.arraycopy(data, pos, prefix.data, 0, byteCount);
    }

    prefix.limit = prefix.pos + byteCount;
    pos += byteCount;
    prev.push(prefix);
    return prefix;
  }
明白了这个方法的主要意图,再来分析具体的代码。分两类情况:
其一,当要读取的数据大小小于 source.head 中的字节数时,如果当前 sink.head 不为 null,则将 source.head 的数据都写入到 sink.tail 中去,当然也是其最后的要读取的数据了,即 soruce.head.writeTo();而当 sink.head 为空时,则先将 source.head 再 byteCount 大小进行数据的分割,再进入到第二种情况。而在分割时,如果需要的数据大于分割的阈值,那么被分割出来的
Segment 就会被共享成同一个 Segment。
其二,当要读取的数据大小大于等于 source.head 字节时,如果当前 sink.head 为 null ,那么就让 source.head 从 source.buffer 中取出,并让 sink.head 直接指向 source.head 即可。而如果当前 sink.head 不为空,则将取出来的 segment 并到当前 sink.buffer 的尾部。根据前面的分析,如果尾部的数据与其前一个数据大小之和没有达到
100% ,那就可以进行合并。
以上便是 Segment 的合并与分割了。Okio 在这里同时考虑到了 CPU 和内存的优化,并且实现的非常微妙。
同时上面有部分也提到了 Segment 的共享,从整个源码以及分析来看,共享主要的场景就是发生在复制时以及可能的分割时。当然,最重要的是分割时了。而关于复制时的共享,其实也是非常符合逻辑了。即使被标记成分享的 Segment 不能再写入,但是对于内存的利用来上讲也是非常优化的。
四、异步的超时机制
异步超时机制主要只是用于 Socket 通信,这里也重复贴一下 Source 的代码,Sink 差不多。
  /**
   * Returns a source that reads from {@code socket}. Prefer this over {@link
   * #source(InputStream)} because this method honors timeouts. When the socket
   * read times out, the socket is asynchronously closed by a watchdog thread.
   */
  public static Source source(Socket socket) throws IOException {
    if (socket == null) throw new IllegalArgumentException("socket == null");
    AsyncTimeout timeout = timeout(socket);
    Source source = source(socket.getInputStream(), timeout);
    return timeout.source(source);
  }
如前面所说,Socket 通信时,主要是拿出了其 InputStream,以便于读取数据。而这里的 Timeout 是其子类 AsyncTimeout。当通过重载方法 source() 构造出了 Source 之后,进一步送进了 AsyncTimeout#source() 方法中
/**
   * Returns a new source that delegates to {@code source}, using this to implement timeouts. This
   * works best if {@link #timedOut} is overridden to interrupt {@code sink}'s current operation.
   */
  public final Source source(final Source source) {
    return new Source() {
      @Override public long read(Buffer sink, long byteCount) throws IOException {
        boolean throwOnTimeout = false;
        enter();
        try {
          long result = source.read(sink, byteCount);
          throwOnTimeout = true;
          return result;
        } catch (IOException e) {
          throw exit(e);
        } finally {
          exit(throwOnTimeout);
        }
      }

      @Override public void close() throws IOException {
        boolean throwOnTimeout = false;
        try {
          source.close();
          throwOnTimeout = true;
        } catch (IOException e) {
          throw exit(e);
        } finally {
          exit(throwOnTimeout);
        }
      }

      @Override public Timeout timeout() {
        return AsyncTimeout.this;
      }

      @Override public String toString() {
        return "AsyncTimeout.source(" + source + ")";
      }
    };
  }
Okio#source()主要是定义了如何读取数据,而AsyncTimeout#source()定义了读取数据的超时机制。在 read() 方法中,主要体现在 enter() 以及 exit() 这两个方法上。
思考一下当前的场景,当前线程正在读取数据,那管理超时必然需要另一个线程。在 AsyncTimeout 中就定义了 WatchDog 线程,来监测超时的读写。
WatchDog 线程,俗名 “看门狗”,其在嵌入式方面应用非常多。而Android系统中的SystemServer是否存在耗时操作的监测也是由一个 WatchDog 线程来实现的。此处的 WatchDog 线程是由第一次 enter() 进入所触发的,起用后便被设置成守护线程运行,并且线程以链表的形式来管理。与此同时, enter() 也会添加一个新的 AsyncTimeout 节点到 WatchDog 线程中。而 exit() 则会检查节点是否还在链表中,否则时间到了不在链表中就会被认为是超时状态了,从而抛出超时的异常。具体我们来看看代码的实现。
public final void enter() {
    if (inQueue) throw new IllegalStateException("Unbalanced enter/exit");
    long timeoutNanos = timeoutNanos();
    boolean hasDeadline = hasDeadline();
    if (timeoutNanos == 0 && !hasDeadline) {
      return; // No timeout and no deadline? Don't bother with the queue.
    }
    inQueue = true;
    scheduleTimeout(this, timeoutNanos, hasDeadline);
  }
同 enter() 调用 scheduleTimeout() ,调度起一个 Timeout。
private static synchronized void scheduleTimeout(
      AsyncTimeout node, long timeoutNanos, boolean hasDeadline) {
    // Start the watchdog thread and create the head node when the first timeout is scheduled.
// 链表为空说明 Watchdog 还没有启动起来,这里添加了头结点,并且启动了 watchdog 线程。
    if (head == null) {
      head = new AsyncTimeout();
      new Watchdog().start();
    }

// 分不同的条件讲计算终止时间
    long now = System.nanoTime();
    if (timeoutNanos != 0 && hasDeadline) {
      // Compute the earliest event; either timeout or deadline. Because nanoTime can wrap around,
      // Math.min() is undefined for absolute values, but meaningful for relative ones.
      node.timeoutAt = now + Math.min(timeoutNanos, node.deadlineNanoTime() - now);
    } else if (timeoutNanos != 0) {
      node.timeoutAt = now + timeoutNanos;
    } else if (hasDeadline) {
      node.timeoutAt = node.deadlineNanoTime();
    } else {
      throw new AssertionError();
    }

// 按剩余时间升序排序
    // Insert the node in sorted order.
    long remainingNanos = node.remainingNanos(now);
    for (AsyncTimeout prev = head; true; prev = prev.next) {
      if (prev.next == null || remainingNanos < prev.next.remainingNanos(now)) {
        node.next = prev.next;
        prev.next = node;
        if (prev == head) {
          AsyncTimeout.class.notify(); // Wake up the watchdog when inserting at the front.
        }
        break;
      }
    }
  }
以上便是插入了一个 AsyncTimeout 的节点。再来看看 Watchdog 线程是如何监测超时的。
private static final class Watchdog extends Thread {
    Watchdog() {
      super("Okio Watchdog");
      setDaemon(true);
    }

    public void run() {
      while (true) {
        try {
          AsyncTimeout timedOut;
          synchronized (AsyncTimeout.class) {
            timedOut = awaitTimeout();

            // Didn't find a node to interrupt. Try again.
            if (timedOut == null) continue;

            // The queue is completely empty. Let this thread exit and let another watchdog thread
            // get created on the next call to scheduleTimeout().
            if (timedOut == head) {
              head = null;
              return;
            }
          }

          // Close the timed out node.
          timedOut.timedOut();
        } catch (InterruptedException ignored) {
        }
      }
    }
  }
重点在 awaitTimeout (),即等待一下,看看是否有 AsyncTimeout 超时了。
/**
   * Removes and returns the node at the head of the list, waiting for it to time out if necessary.
   * This returns {@link #head} if there was no node at the head of the list when starting, and
   * there continues to be no node after waiting {@code IDLE_TIMEOUT_NANOS}. It returns null if a
   * new node was inserted while waiting. Otherwise this returns the node being waited on that has
   * been removed.
   */
  static @Nullable AsyncTimeout awaitTimeout() throws InterruptedException {
    // Get the next eligible node.
    AsyncTimeout node = head.next;

    // The queue is empty. Wait until either something is enqueued or the idle timeout elapses.
    if (node == null) {
      long startNanos = System.nanoTime();
      AsyncTimeout.class.wait(IDLE_TIMEOUT_MILLIS);
      return head.next == null && (System.nanoTime() - startNanos) >= IDLE_TIMEOUT_NANOS
          ? head  // The idle timeout elapsed.
          : null; // The situation has changed.
    }

    long waitNanos = node.remainingNanos(System.nanoTime());

    // The head of the queue hasn't timed out yet. Await that.
    if (waitNanos > 0) {
      // Waiting is made complicated by the fact that we work in nanoseconds,
      // but the API wants (millis, nanos) in two arguments.
      long waitMillis = waitNanos / 1000000L;
      waitNanos -= (waitMillis * 1000000L);
      AsyncTimeout.class.wait(waitMillis, (int) waitNanos);
      return null;
    }

    // The head of the queue has timed out. Remove it.
    head.next = node.next;
    node.next = null;
    return node;
  }
首先找到剩余时间最小的那个节点,按照前面升序排序,也就是 head.next 节点。然后再检查剩余时间是否大于 0 ,说明还没有超时,这时便将等待到其剩余时间,并且返回空,表示并未超时。这里提一下的是 class.wait(time) 方法,如果时间没有到,收到对应 class 的 notify()/notifyAll() 也是会提前被唤醒的。假设这里并没有超时,最后再来看看 exit()。
/**
   * Throws an IOException if {@code throwOnTimeout} is {@code true} and a timeout occurred. See
   * {@link #newTimeoutException(java.io.IOException)} for the type of exception thrown.
   */
  final void exit(boolean throwOnTimeout) throws IOException {
    boolean timedOut = exit();
    if (timedOut && throwOnTimeout) throw newTimeoutException(null);
  }

  /**
   * Returns either {@code cause} or an IOException that's caused by {@code cause} if a timeout
   * occurred. See {@link #newTimeoutException(java.io.IOException)} for the type of exception
   * returned.
   */
  final IOException exit(IOException cause) throws IOException {
    if (!exit()) return cause;
    return newTimeoutException(cause);
  }

  /** Returns true if the timeout occurred. */
  public final boolean exit() {
    if (!inQueue) return false;
    inQueue = false;
    return cancelScheduledTimeout(this);
  }
exit() 方法又重载了 3 个,很显然,前面 2 个主要是调用第 3 个来判断是否超时以便进一步的抛出超异常。这里主要来看看第 3 个。其又进一步调用了 cancelScheduledTimeout() 方法,这是与 scheduledTimeout()相对应的方法。
/** Returns true if the timeout occurred. */
  private static synchronized boolean cancelScheduledTimeout(AsyncTimeout node) {
    // Remove the node from the linked list.
    for (AsyncTimeout prev = head; prev != null; prev = prev.next) {
      if (prev.next == node) {
        prev.next = node.next;
        node.next = null;
        return false;
      }
    }

    // The node wasn't found in the linked list: it must have timed out!
    return true;
  }
从链表中寻找当前结点,如果找到则从链接中移除并表示没有超时。如果没有找到,则表示已经超时了。
至此,异步超时机制分析完毕。如果看前面的分析还有点晕,不防来看看总结:
(1) 管理超时机制的数据结构是一个升序链表,而管理这个链表的是守护线程 Watchdog ,它会每次选择一个节点,并通过剩余时间的等待来等待当前 AsyncTimeout 的超时与否。
(2) 通过 enter() 方法,再经过 scheduleTimeout() 方法添加一个 AsyncTimeout节点
(3) 通过 exit() 方法,再经过 cancleScheduleTimeut()
方法将未超时的 AsyncTimeout 从链表中移除。移除后,当 Watchdog 进入下一次遍历时就不会再遍历到被它等待超时的那个节点了。
五、总结
感谢你能读到并读完这篇文章,对于 Okio 的全部分析到此为止了。文章确实贴了不少的源码,但我仍然觉得是有必要的,它能使我们读起来更加的通畅以及完整。当然,也许还有更好的表述方式。本文并没有分析到了 Okio 所有的方方面面,但我相信能够认真读完并且理解其中大部分的意思,再去分析其他部分应该也非常简单了。最后,由于本人水平有限,在分析过程中难免会有错误,表述上也会存在不尽人意的地方。对于一切问题,欢迎下方留言讨论,不甚感激。
