内容简介:详细介绍了单例模式,从 java 到 Android,用 LayoutInflater 举例,深入探讨单利模式在 Android 中的运用。文章比较长,还需慢下脚步耐心阅读。当然文末必然有总结
目录-
前言
-
懒汉模式
-
饿汉模式
-
对象创建的方式
-
枚举实现
-
容器单例
-
Android中单例使用
-
总结
在开发过程中也经常涉及到设计模式,对设计模式的总结也仅仅是遇到了梳理一下,没有系统总结过,从这篇文章开始就总结一下 java 中的设计模式,并结合 android 做一下分析。
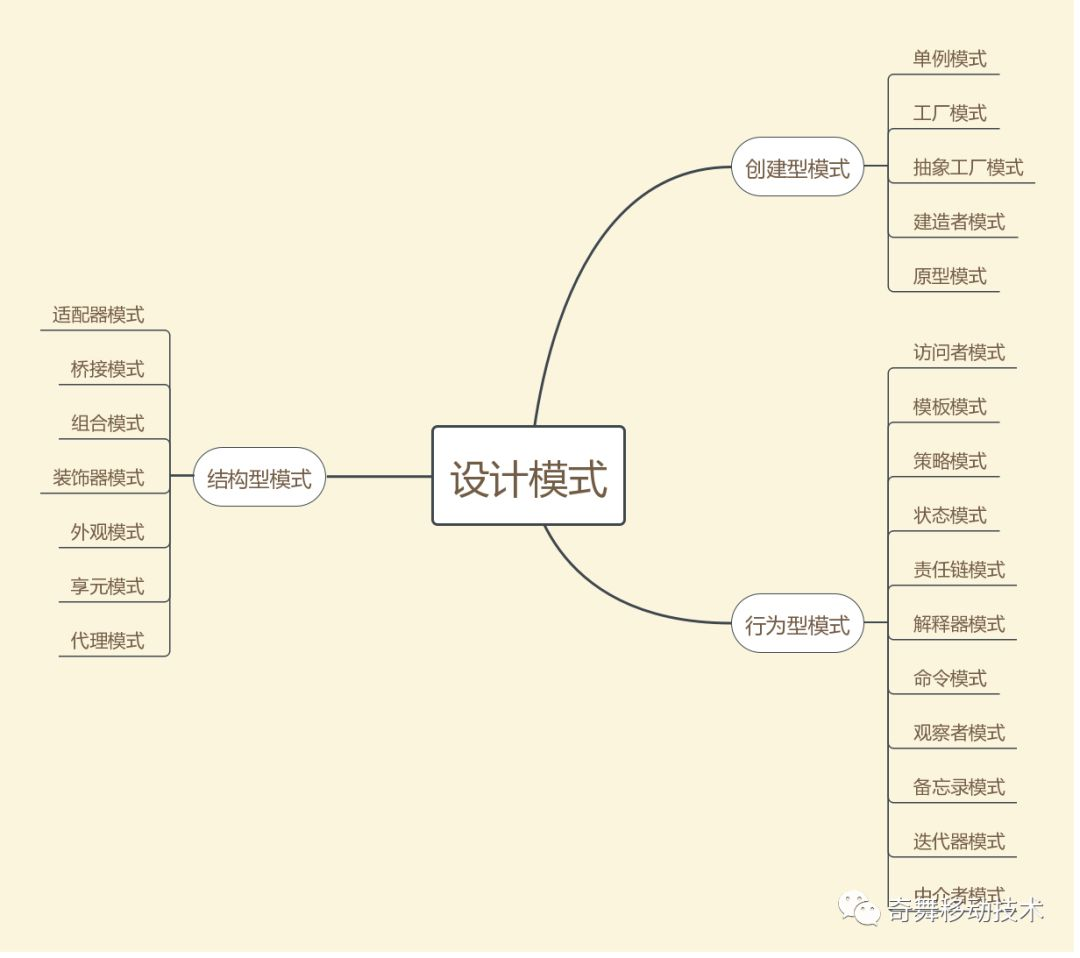
以上为前辈大佬总结的 java 设计模式,分三大类:创建型模式,结构型模式以及行为型模式,后面也会按照以上顺序进行分析。本文先分析开发中经常使用的单例模式。
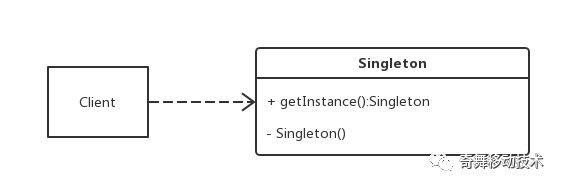
以上为单例模式的 UML ,总结一下,实现单例模式需要有如下关键点:
(1) 构造函数为是私有,不对外公开 (2) 通过一个静态方法或者枚举返回单例对象 (3) 确保单例对象只有一个,尤其是在多线程环境中 (4) 确保在反序列化的过程不会新建单例对象
在开发过程中,通常会关注前3点,第四点常常会被忽略,后面的分析中会对第4点进行分析。
提起单例模式,最熟悉的就是饿汉和懒汉这两个概念了,虽然很熟悉,还是要梳理一下。
懒汉模式懒汉模式实在需要单例对象的时候再创建单例对象的一种模式,有 lazy loading 的效果,在一定层度上提高了内存的使用效率。
public class Singleton {
private static Singleton sInstance = null;
private Singleton() {}
public static Singleton getInstance() {
if (sInstance == null) {
sInstance = new Singleton();
}
return sInstance;
}
}
这种懒汉模式在单线程环境下没有问题,但是在多线程环境中 getInstance 可能会返回多个实例,于是就有了以下改进。
public class Singleton {
private static Singleton sInstance = null;
private Singleton() {}
public static synchronized Singleton getInstance() {
if (sInstance == null) {
sInstance = new Singleton();
}
return sInstance;
}
}
通过对 getInstance 方法加锁,保证了在多线程环境中仅返回同一个实例。但是这样的做法缺点也十分明显,即使 sInstance对象已经被新建,每次调用 getInstance 时都存在加锁与释放锁的操作,这样会消耗不必要的资源。经过改进,就有了以下实现:
public class Singleton {
private static Singleton sInstance = null;
private Singleton() {}
public static Singleton getInstance() {
if (sInstance == null) {
synchronized (Singleton.class) {
if (sInstance == null) {
sInstance = new Singleton();
}
}
}
return sInstance;
}
}
经过改进后,调用 getInstance 不会进行加锁操作,而是会先判断单例对象是否为空,如果为空,则同步去新建单例对象,并在同步新建对象之前再次判断单例对象是否为空,这种方式被称为双重检查锁 (DCL) ,这种方式看似不会出现什么问题了,但分析之后发现还是可能有问题。
sInstance = new Singleton();
以上语句实际上经过了以下3个步骤:
-
为Singleton单例对象分配内存空间
-
调用Singleton构造函数,初始化Singleton单例对象
-
将sInstance引用指向已经分配的内存空间
以上 3 个步骤中,步骤 (2) 和步骤 (3) 可能被重新排序,最终导致执行的顺序可能是 (1)(3)(2) 。
假设在多线程环境中多个线程尝试调用 getInstance 函数获取 Singleton 单例:
线程 1 调用 getInstance 时,sInstance 的对象为空,调用 sInstance=newSingleton( ) 的执行顺序是 (1)(3)(2),线程1执行到步骤 (3) 时。
此时线程 2 也去调用 getInstance ,此时 sIntance 对象不为空,但是 sInstance 指向的对象却是没有被初始化的对象。
在jdk1.5之前会存在以上问题,但是在jdk1.5后, volatile的语义得到增强,只需要使用volatile便可以消除指令重排。eg:
private static volatile Singleton sInstance = null;
饿汉模式
饿汉模式,顾名思义,就是无论现在是否需要单例对象,都要初始化单例对象。
public class Singleton {
private static Singleton sInstance = new Singleton();
private Singleton() {}
public static Singleton getInstance() {
return sInstance;
}
}
以上为经典十分常见的饿汉单例模式,这种创建方式会在类加载的时候就创建实例,没有 lazy loading 的效果,如果 Singleton 实例需要占用很大的内存空间,会导致内存的利用率较低。基于以上原因,优化后的代码如下:
public class Singleton {
private Singleton(){
}
private static class SingletonHolder{
private final static Singleton instance=new Singleton();
}
public static Singleton getInstance(){
return SingletonHolder.instance;
}
}
当第一次加载 Singleton 类时,并不会新建单例对象,当调用 getInstance 方法时,会加载 SingletonHolder 类,这种方法不仅能够确保线程安全,也能保证对象的唯一性,同时也有 lazy loading 的效果。
对象创建的方式前面说过,实现单例需要确保在反序列化的过程不会新建单例对象,说到序列化,先岔开一下,回忆下 java 对象的创建方式:
-
new
-
Class.newInstance
-
Constructor.newInstance
-
clone
-
反序列化
其中使用 (1)(2)(3) 会调用构造函数, (4)(5) 不会调用类的构造函数。
为了验证在 clone 和反序列化过程中不会调用构造函数,可以使用简单的 demo 演示:
public class Singleton implements Cloneable, Serializable {
private static final long serialVersionUID = 1L;
private static Singleton sInstance = null;
private Singleton() {
System.out.println("create a singleton");
}
public static Singleton getInstance() {
if (sInstance == null) {
synchronized (Singleton.class) {
if (sInstance == null) {
sInstance = new Singleton();
}
}
}
return sInstance;
}
public static void main(String [] args) {
try {
Singleton singleton = Singleton.getInstance();
// test clone
Singleton singleton3 = (Singleton) singleton.clone();
System.out.println(singleton == singleton3);
// write single to file
ObjectOutputStream oos = new ObjectOutputStream(new FileOutputStream(new File("test.dat")));
oos.writeObject(singleton);
oos.flush();
oos.close();
// read single from file
ObjectInputStream ois = new ObjectInputStream(new FileInputStream(new File("test.dat")));
Singleton singleton2 = (Singleton) ois.readObject();
ois.close();
if (singleton2 == null) {
System.err.println("can not read singleton from file");
} else {
System.out.println(singleton == singleton2);
}
} catch (Exception e) {
// TODO: handle exception
}
}
}
为了演示,Singleton类实现了Cloneable和Serializable接口,运行程序结果如下:
create a singleton
false
false
从结果中可以看出,使用 clone 和反序列化构建的对象不会执行构造函数,且通过 clone 和反序列化得到的对象并不是调用 getInstance 返回的单例对象。
好在反序列化提供了一个很特别的钩子函数 readResolve ,让开发人员可以去控制反序列化的过程,经过修改后的代码如下:
public class Singleton implements Serializable {
private static final long serialVersionUID = 1L;
private static Singleton sInstance = null;
private Singleton() {
System.out.println("create a singleton");
}
public static Singleton getInstance() {
if (sInstance == null) {
synchronized (Singleton.class) {
if (sInstance == null) {
sInstance = new Singleton();
}
}
}
return sInstance;
}
private Object readResolve() throws ObjectStreamException {
return getInstance();
}
public static void main(String [] args) {
try {
Singleton singleton = Singleton.getInstance();
// write single to file
ObjectOutputStream oos = new ObjectOutputStream(new FileOutputStream(new File("test.dat")));
oos.writeObject(singleton);
oos.flush();
oos.close();
// read single from file
ObjectInputStream ois = new ObjectInputStream(new FileInputStream(new File("test.dat")));
Singleton singleton2 = (Singleton) ois.readObject();
ois.close();
if (singleton2 == null) {
System.err.println("can not read singleton from file");
} else {
System.out.println(singleton == singleton2);
}
} catch (Exception e) {
// TODO: handle exception
}
}
}
程序运行结果如下:
create a singleton
true
通过运行结果可以看到,经过反序列化操作返回的对象和 getInstance 返回的对象是同一个。
枚举实现public enum EnumSingleton {
INSTANCE;
public void enumDo() {
System.out.println("EnumSingleton want to do something");
}
}
使用枚举实现单例,既保证了线程安全,同时也可以防止在反序列化过程中新建单例对象。虽然 Effective Java 中推荐使用这种方式,但在 Android 平台上,这种方式会对内存造成严重的浪费,谷歌官方明确指出
Enums ofter require more than twice as much memory as static constants. You should strictly avoid using enums on Android.
具体可参考
https://blog.csdn.net/xiao_nian/article/details/80002101
因此,枚举单例在Android平台上就不要使用了。
容器单利容器单例,就是将单例对象存放在容器中进行统一管理,这样便于对系统中的单例进行统一管理。
public class SingletonManager {
private SingletonManager() {}
private static HashMap<String, Object> sSingletonManager = new HashMap<>();
public static Object getSingleton(String name) {
return sSingletonManager.get(name);
}
public static void putSingleton(String name, Object singleton) {
if (!sSingletonManager.containsKey(name)) {
sSingletonManager.put(name, singleton);
}
}
}
Android 中单利使用
Android中单例的使用,本文主要从LayoutInflater的创建入手。不同的Activity之间使用的LayoutInflater是不同的实例,但是每个Activity内部使用的LayoutInflater确是同一个实例。接下来就从源码角度去分析一下。
构造LayoutInflater通常有两种方式:
LayoutInflater inflater = LayoutInflater.from(Activity);
LayoutInflater inflater = (LayoutInflater) Activity.getSystemService(Context.LAYOUT_INFLATER_SERVICE)
第一种方式实际上最后也是调用了第二种方式,故后续只分析第二种。直接到 Activity 中找到 getSystemService 函数:
@Override
public Object getSystemService(@ServiceName @NonNull String name) {
......
return super.getSystemService(name);
}
继续跟踪 super.getSystemService(name) ,由于Activity继承 ContextThemeWrapper,执行逻辑如下:
@Override
public Object getSystemService(String name) {
if (LAYOUT_INFLATER_SERVICE.equals(name)) {
if (mInflater == null) {
mInflater = LayoutInflater.from(getBaseContext()).cloneInContext(this);
}
return mInflater;
}
return getBaseContext().getSystemService(name);
}
又回到了 LayoutInflater.from 逻辑。
LayoutInflater.from 逻辑实际上最后又走到了 getSystemService 的逻辑。先看下 getBaseContext( ) 函数返回了什么东西。
getBaseContext 是 ContextThemeWrapper的父类 ContextWrapper中定义的函数, getBaseContext( ) 函数返回了类型为 Context 的 mBase 实例,这个 mBase 是在 ContextWrapper 的 attachBaseContext函数中赋值的, attachBaseContext又是在什么时候调用的呢?
attachBaseContext的调用需要追溯到 ActivityThread类的 performLaunchActivity函数:
private Activity performLaunchActivity(ActivityClientRecord r, Intent customIntent) {
......
ContextImpl appContext = createBaseContextForActivity(r);
Activity activity = null;
try {
java.lang.ClassLoader cl = appContext.getClassLoader();
activity = mInstrumentation.newActivity(
cl, component.getClassName(), r.intent);
......
} catch (Exception e) {
......
}
try {
......
activity.attach(appContext, this, getInstrumentation(), r.token,
r.ident, app, r.intent, r.activityInfo, title, r.parent,
r.embeddedID, r.lastNonConfigurationInstances, config,
r.referrer, r.voiceInteractor, window, r.configCallback);
......
} catch (SuperNotCalledException e) {
throw e;
} catch (Exception e) {
.....
}
return activity;
}
继续跟踪下 activity.attach:
final void attach(Context context, ActivityThread aThread,
Instrumentation instr, IBinder token, int ident,
Application application, Intent intent, ActivityInfo info,
CharSequence title, Activity parent, String id,
NonConfigurationInstances lastNonConfigurationInstances,
Configuration config, String referrer, IVoiceInteractor voiceInteractor,
Window window, ActivityConfigCallback activityConfigCallback) {
attachBaseContext(context);
......
}
可以发现, mBase 就是通过 createBaseContextForActivity(r) 创建的 ContextImpl 类型的实例对象(感兴趣的同学可以跟踪下这个函数),由于每个Activity 都会执行次函数,故不同的 Activity的mBase 是不同的 ContextImpl 类型的实例对象。
解决了 getBaseContext( )返回值的问题,继续回到 LayoutInflater.from(getBaseContext( )) 这个函数,这个函数最终会走到 ContextImpl.getSystemService:
@Override
public Object getSystemService(String name) {
return SystemServiceRegistry.getSystemService(this, name);
}
代码有点深,别着急,再到 SystemServiceRegistry 类中看一下。 SystemServiceRegistry 类中有一个静态块,这个静态块会调用 registerService 方法去注册服务:
registerService(Context.LAYOUT_INFLATER_SERVICE, LayoutInflater.class,
new CachedServiceFetcher<LayoutInflater>() {
@Override
public LayoutInflater createService(ContextImpl ctx) {
return new PhoneLayoutInflater(ctx.getOuterContext());
}});
到这个位置,好像豁然开朗了。继续跟踪一下
SystemServiceRegistry.getSystemService(this,name)
public static Object getSystemService(ContextImpl ctx, String name) {
ServiceFetcher<?> fetcher = SYSTEM_SERVICE_FETCHERS.get(name);
return fetcher != null ? fetcher.getService(ctx) : null;
}
此处的 ctx参数是前面的 mBase, name 是 Context.LAYOUT_INFLATER_SERVICE,由于已经注册了 CachedServiceFetcher ,直接到 CachedServiceFetcher 看下 getService 函数:
static abstract class CachedServiceFetcher<T> implements ServiceFetcher<T> {
private final int mCacheIndex;
CachedServiceFetcher() {
......
mCacheIndex = sServiceCacheSize++;
}
@Override
@SuppressWarnings("unchecked")
public final T getService(ContextImpl ctx) {
// mServiceCache是ContextImpl的变量,用户缓存已经获取过的服务对象
final Object[] cache = ctx.mServiceCache;
final int[] gates = ctx.mServiceInitializationStateArray;
for (;;) {
boolean doInitialize = false;
synchronized (cache) {
// 如果待获取的服务对象已经存在,则直接返回缓存中的对象
T service = (T) cache[mCacheIndex];
if (service != null || gates[mCacheIndex] == ContextImpl.STATE_NOT_FOUND) {
return service;
}
......
}
if (doInitialize) {
// Only the first thread gets here.
T service = null;
@ServiceInitializationState int newState = ContextImpl.STATE_NOT_FOUND;
try {
// 缓存中没有服务对象,则需要执行createService去创建对象
service = createService(ctx);
newState = ContextImpl.STATE_READY;
} catch (ServiceNotFoundException e) {
onServiceNotFound(e);
} finally {
......
}
return service;
}
......
}
}
public abstract T createService(ContextImpl ctx) throws ServiceNotFoundException;
}
至此,Android 同一个 Activity 内 LayoutInflater 为同一个对象的原理从源码角度已经分析完毕。总结一下就是以下流程: Activity ContextImpl 缓存中是否存在 LayoutInflater 对象,如果已经存在,则直接返回缓存的对象,如果没有则新建 LayoutInflater 对象,同时,通过源码分析,也知道 LayoutInflater 的最终实现是 PhoneLayoutInflater 。
总结-
饿汉模式会在类加载时完成单例对象的初始化,虽然确保了线程安全,但是可能会引起内存使用效率降低
-
懒汉模式会在需要使用单例对象时完成单例对象的初始化,有 lazy loading ,提高了内存使用率,但是为了保证线程安全,在新建单例对象时添加了锁机制;多线程环境下,锁机制可能会降低程序运行效率,故引入了DCL,由于存在指令重排的可能,故DCL 机制可能存在失效的情况,为了防止 DCL 失效,jdk1.5 之后需要 volatile 对单例对象进行修饰
-
使用静态内部类的方式实现单例,既有 lazy loading 的效果,又可以利用类的加载机制保证线程安全
-
由于反序列化新建对象不需要执行构造函数,单例模式需要防止反序列化时新建单例对象
-
Activity 对象内部 ContextImpl 会对 LayoutInflater 对象进行缓存,如果已经存在,则直接返回缓存对象
识别二维码,关注我们