

前言
说来也奇怪,高中学代码的时候,整天在刷一些noip的题目,钻研各种算法,什么递归、分治、动态规划。而真正工作后,发现很少用不到,直到这个页面才让我用到算法。其实这个页面,是我前年写的,但是一直偷懒,不想整理发布,去年的时候,在csdn上发布过一些,但是没怎么认真写,今天乘着周末认真给大家讲讲,希望能勾起大家对算法的回忆。
项目需求是一个思维导图、每个节点的个数以及数据由服务端返回,这就需要每一次点击都得计算位置以及绘制布局。
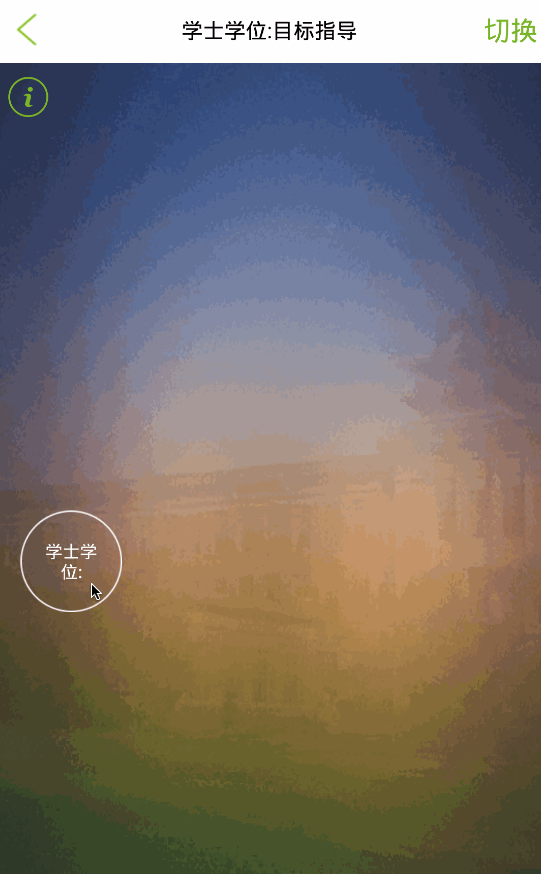
效果
这种思维导图有两种模式,一种是可以无限点击各个节点(上图),不清除之前的节点;另外一种是当点击同级节点时,其他节点的子节点清除(下图)。
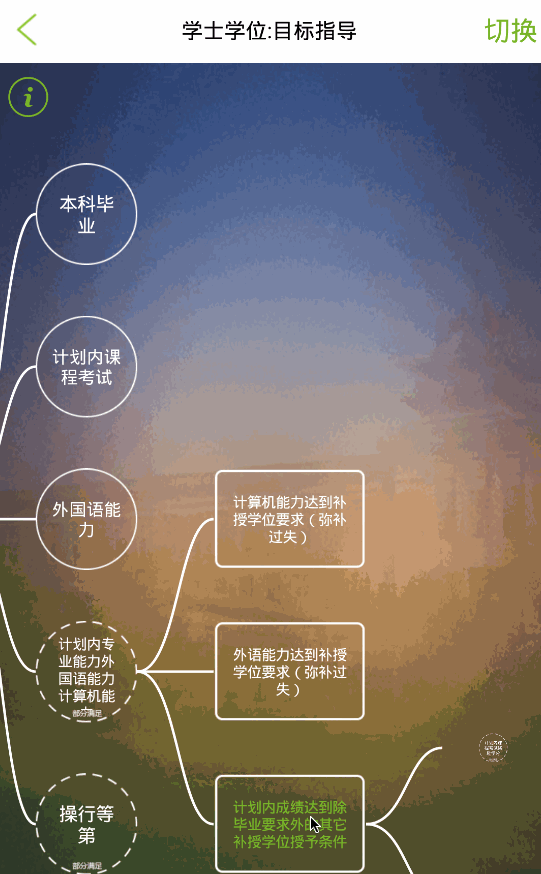
这两种模式,都可以随时随意通过右上角切换按钮进行无缝切换。
思路
1.布局:
这个布局是一张图,可能会很大,支持上下左右拖拽,这个时候,我想到了HVScrollView,只要在里面放一个RelativeLayout,随便设置一个长宽500dp,之后有新节点,像RelativeLayout中addview即可使布局增大,支持各种滚动。当节点需要清除时,调用removeview即可删除布局,减少宽高,节约内存。
2.节点:
暂时先把每个节点看作一个button,绘制的位置是根据数量来计算,其中x位置是前一个节点+某个固定值,y位置为前一个节点y-当前节点数量*每个节点高度/2
x=前一个x+a   //a为节点间距。
y=前一个y-n*b/2 //n为当前节点数量 b为每个节点占位高度。
3.线条
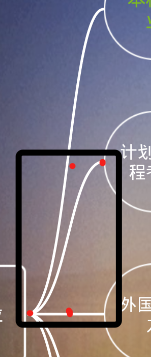
线条是4阶贝塞尔曲线,四个节点分别为下图。
其实第一个版本没有采用贝塞尔曲线,采用的是直线图,导致下级节点可能会重复,所以在程序中不得不加入offset偏移量,便宜量则通过各级节点高度来计算。
4.位置优化
有些节点在绘制的时候,可能高于每个值,或者占了别的节点位置,这个时候就得优化位置,我暂采用,一个数据去计算每级的最高位置,然后只和这个位置进行比较。这种做法有个缺点就是只能向下绘制,即使节点中间有位置,也没办法把下一节点方进去。
5.递归
不难发现代码中每个节点都是由上一个节点绘制出来,所以代码中只要处理一个节点,然后递归调用即可。
6.节点擦除
因为可能会擦除节点,所以要尽可能记录每个节点,这样才方便擦除。这里暂时使用堆栈去记录,你可以理解成它是一个数组。
实现
几个要点讲完了,下面就一步一步实现,主要还是多扯思路。
1.节点开场有个动画,动画代码如下:
        ScaleAnimation animation = new ScaleAnimation(0.0f,1.0f, 0.0f, 1.0f, Animation.RELATIVE_TO_SELF, 0.5f,
                Animation.RELATIVE_TO_SELF, 0.5f);
        animation.setInterpolator(new BounceInterpolator());
        animation.setStartOffset(tree_current == 1 ? 1050 : 50);// 动画秒数。
        animation.setFillAfter(true);
        animation.setDuration(700);
2.定义节点实体类,根据实际需求来定义
    public class nodechild {
        private String id;
        private String name;
        private String buteid;
        private String butetype;
        private String nodetype;
        private String ispass;

        public String getNodetype() {
            return nodetype;
        }

        public void setNodetype(String nodetype) {
            this.nodetype = nodetype;
        }

        public nodechild(String id, String name, String buteid, String butetype, String nodetype) {
            super();
            this.id = id;
            this.name = name;
            this.buteid = buteid;
            this.butetype = butetype;
            this.nodetype = nodetype;

        }

        public nodechild(String id, String name) {
            super();
            this.id = id;
            this.name = name;
        }

        public nodechild(String id, String name, String ispass) {
            super();
            this.id = id;
            this.name = name;
            this.ispass = ispass;
        }

        public String getIspass() {
            return ispass;
        }

        public void setIspass(String ispass) {
            this.ispass = ispass;
        }

        public String getButeid() {
            return buteid;
        }

        public void setButeid(String buteid) {
            this.buteid = buteid;
        }

        public String getButetype() {
            return butetype;
        }

        public void setButetype(String butetype) {
            this.butetype = butetype;
        }

        public String getId() {
            return id;
        }

        public void setId(String id) {
            this.id = id;
        }

        public String getName() {
            return name;
        }

        public void setName(String name) {
            this.name = name;
        }
    }
3.设计drawbutton绘制一个button的方法
public void drawbutton(int button_y, int button_x, int line_x, final int tree_h, final nodechild[] nc,String nodeid) {}button_x为当前节点x坐标
button_y为当前节点的y坐标
line_x为线条x坐标
tree_h为树高,即层级
nc为下层节点
nodeid业务中遇到的,代码中可以忽略。
详细代码如下:
    public void drawbutton(int button_y, int button_x, int line_x, final int tree_current, final nodechild[] nc, String nodeid) {
//        存储线的起点y坐标
        int line_y = button_y;
//        这个只是为了区分业务中偶数层button宽度为300,齐数层为200
        button_x = tree_current % 2 == 1 ? button_x : button_x - 100;
//        得到下一层级需要绘制的数量
        int num = 1;
        if (tree_current != 1) num = nc.length;// 下一层个数
//        得到下一级第一个按钮的y坐标
        button_y = button_y - (num - 1) * bt_width / 2;
        if (button_y < tree_xnum[tree_current]) {
            button_y = tree_xnum[tree_current] + 100;
        }
//        移动当前布局到页面中心
        if (tree_current > 2) hv.scrollTo(button_x - 400, button_y - 100);
        if (tree_xnum[tree_current] < button_y + 200 + (num - 1) * bt_width)
            tree_xnum[tree_current] = button_y + 200 + (num - 1) * bt_width;
//        存储下一级首个button坐标
        final int button_y_f = button_y;
        final int button_x_f = button_x;
        for (int i = 0; i < num; i++) {
            final int bt_paly_y = bt_width;
            int bt_w = tree_current % 2 == 0 ? bt_width : 200;
            int bt_h = 200;
//            定义及设置button属性
            bt[i] = new Button(NodeActivity.this);
            if (tree_current % 2 != 0) {
                bt[i].setBackgroundResource(R.drawable.allokbutton);
            } else {
                bt[i].setBackgroundResource(R.drawable.button33);
            }
            bt[i].setTextColor(Color.WHITE);
            bt[i].setTextSize(15 - (int) Math.sqrt(nc[i].getName().length() - 1));
            bt[i].setText(nc[i].getName());
//            定义及设置出场动画
            final String nc_id = nc[i].getId();
            ScaleAnimation animation = new ScaleAnimation(0.0f, 1.0f, 0.0f, 1.0f, Animation.RELATIVE_TO_SELF, 0.5f,
                    Animation.RELATIVE_TO_SELF, 0.5f);
            animation.setInterpolator(new BounceInterpolator());
            animation.setStartOffset(tree_current == 1 ? 1050 : 50);// 动画秒数。
            animation.setFillAfter(true);
            animation.setDuration(700);
            bt[i].startAnimation(animation);
            final int i1 = i;
//            设置监听
            bt[i].setOnClickListener(new OnClickListener() {
                @Override
                public void onClick(View v) {
//                    如果是擦除模式,擦除其他同级节点及线条
                    if (model) mstack.pop(tree_current);
//                    防止多次点击,偷懒的解决办法
                    if (((Button)v).getHint() != null) {
                        Toast.makeText(getApplicationContext(), ((Button)v).getText(), Toast.LENGTH_LONG).show();
                        return;
                    }
                    ((Button)v).setHint("1");
                    insertLayout.setEnabled(false);
                    int w = button_y_f + i1 * bt_paly_y;
                    int h = button_x_f + bt_paly_y / 2 * 3;
                    getRemoteInfo(w, h, button_y_f + i1 * bt_paly_y, button_x_f, tree_current + 1, nc_id,
                            nc[i1].getButeid());
                }
            });
//            把button通过布局add到页面里
            layoutParams[i] = new RelativeLayout.LayoutParams(bt_w, bt_h);
            layoutParams[i].topMargin = button_y + i * bt_paly_y;
            layoutParams[i].leftMargin = button_x;
            insertLayout.addView(bt[i], layoutParams[i]);

//            把线绘制到页面里
            if (tree_current != 1) {
                if (button_y + 100 + i * 300 - (line_y + 100) >= 0) {//为了优化内存,也是醉了
                    view = new DrawGeometryView(this, 50, 50, button_x + 100 - (line_x + bt_paly_y) + 50 + (tree_current % 2 == 0 ? 100 : 0), button_y + 100 + i * 300
                            - (line_y + 100) + 50, nc[i].getButetype());
                    layoutParams1[i] = new RelativeLayout.LayoutParams(Math.abs(line_x - button_x) + 500, 100 + button_y + i * 300 - line_y);
                    view.invalidate();
                    layoutParams1[i].topMargin = (line_y + 100) - 50;// line_y-600;//Math.min(line_y+100,button_y+100
                    layoutParams1[i].leftMargin = (line_x + bt_paly_y) - 50;// line_x+300;
                    if (tree_current % 2 == 0) layoutParams1[i].leftMargin -= 100;
                    insertLayout.addView(view, layoutParams1[i]);
                } else {
                    view = new DrawGeometryView(this, 50, -(button_y + 100 + i * 300 - (line_y + 100)) + 50, button_x - line_x - 150 + (tree_current % 2 == 0 ? 100 : 0), 50,
                            nc[i].getButetype());
                    layoutParams1[i] = new RelativeLayout.LayoutParams(Math.abs(line_x - button_x) + 500, 100 + Math.abs(button_y + i * 300
                            - line_y));
                    view.invalidate();
                    layoutParams1[i].topMargin = (button_y + 100 + i * 300) - 50;// line_y-600;//Math.min(line_y+100,button_y+100
                    layoutParams1[i].leftMargin = (line_x + bt_paly_y) - 50;// line_x+300;
                    if (tree_current % 2 == 0) layoutParams1[i].leftMargin -= 100;
                    insertLayout.addView(view, layoutParams1[i]);
                }
//                line入栈
                mstack.push(view, tree_current);
            }
//            button入栈
            mstack.push(bt[i], tree_current);
        }
    }
注释写的很全,有一些数值没抽取出来,有点乱,但不影响阅读。
4.划线方法
public class DrawGeometryView extends View {
    private int beginx=0;
    private int beginy=0;
    private int stopx=100;
    private int stopy=100;
    private int offset=0;
    private String word="dd";
    /**
     *
     * @param context
     * @param attrs
     */
    public DrawGeometryView(Context context, AttributeSet attrs) {
        super(context, attrs);
    }

    /**
     *
     * @param context
     */
    public DrawGeometryView(Context context,int beginx,int beginy,int stopx,int stopy,String word) {
        super(context);
        this.beginx=beginx;
        this.beginy=beginy;
        this.stopx=stopx;
        this.stopy=stopy;
        if (word==null) word="";
        this.word=word;

    }
    public int Dp2Px(Context context, float dp) {
        final float scale = context.getResources().getDisplayMetrics().density;
        return (int) (dp * scale + 0.5f);
    }
    @Override
    protected void onDraw(Canvas canvas) {
        super.onDraw(canvas);
        Paint redPaint = new Paint(); // 红色画笔
        redPaint.setAntiAlias(true); // 抗锯齿效果,显得绘图平滑
        redPaint.setColor(Color.WHITE); // 设置画笔颜色
        redPaint.setStrokeWidth(5.0f);// 设置笔触宽度
        redPaint.setStyle(Style.STROKE);// 设置画笔的填充类型(完全填充)
        redPaint.setTextSize(50);//字体

        Path mPath=new Path();
        mPath.reset();
        //起点
        mPath.moveTo(beginx, beginy);
        //贝塞尔曲线
        mPath.cubicTo(beginx+80, beginy, beginx+80, stopy,stopx-100, stopy);
        //画path
        canvas.drawPath(mPath, redPaint);
    }

}
这个方法里还有一些项目里的文字绘制,我删掉了部分代码。
5.堆栈
 public class Mystack {
        View[] v = new View[1500];
        int[] treehigh = new int[1500];
        int size = 0;

        public void push(View view, int treecurrent) {
            size++;
            v[size] = view;
            treehigh[size] = treecurrent;
        }

        public void pop(int treecurrent) {
            while (treehigh[size] > treecurrent && size > 0) {
                if (size > 0) insertLayout.removeView(v[size]);
                size--;
            }
            for (int j = 49; j > treecurrent; j--) {//树高清0
                tree_xnum[j] = 0;
            }
            for (int x = size; x > 0; x--) {
                if (treehigh[x] > treecurrent) {
                    insertLayout.removeView(v[x]);
                }//修复栈顶元素被前一层树元素占用bug,但是会浪费少量内存,考虑到内存很小,暂时不优化吧。
                if (treehigh[x] == treecurrent) {
                    try {
                        ((Button) v[x]).setHint(null);
                    } catch (Exception e) {
                        e.printStackTrace();
                    }
                }
            }
        }
    }
这段代码主要是用一个数组去存view,其实我应该用SparseArray的,当时随手写了普通数组,后来也懒得改。push把view存入数组,pop遍历后把层级高的view清除并移除元素。
5.至于切换模式的代码,那就简单了,就是一个取非操作
        murp_nodemodel_title.setOnClickListener(new OnClickListener() {
            @Override
            public void onClick(View v) {
                Toast.makeText(getApplicationContext(), !model ? "已切换到擦除模式,点击节点会擦除后面节点,赶快试试吧。" : "已切换到正常模式,所有节点在一张图上,赶快试试吧。", Toast.LENGTH_LONG).show();
                model = !model;
            }
        });
总结
总体上实现了思维导图的绘制,但是,还有很多地方值得优化,比如节点宽高没有抽取出来;堆栈也需要优化;计算节点占位高度不够严谨;如果大家有时间,可以折腾下哦。
源码地址github.com/qq273681448…
觉得好的话,记得关注我哦!
