
前言
针对于我们现在常用的RESTful API通常我们需要对请求进行唯一标识,也就是每次都要带上一个请求号,如reqNO。
对于入库这种操作数据库的请求我们一般要保证他的唯一性,一个请求号通常只能用一次,所以需要我们对这种请求加上校验机制。
该需求的实现思路是通过自定义
annotation,只给需要进行校验的接口加上注解。然后通过切面使用了注解的接口将每次请求号存进Redis,每次都进行判断是否存在这个请求号即可。
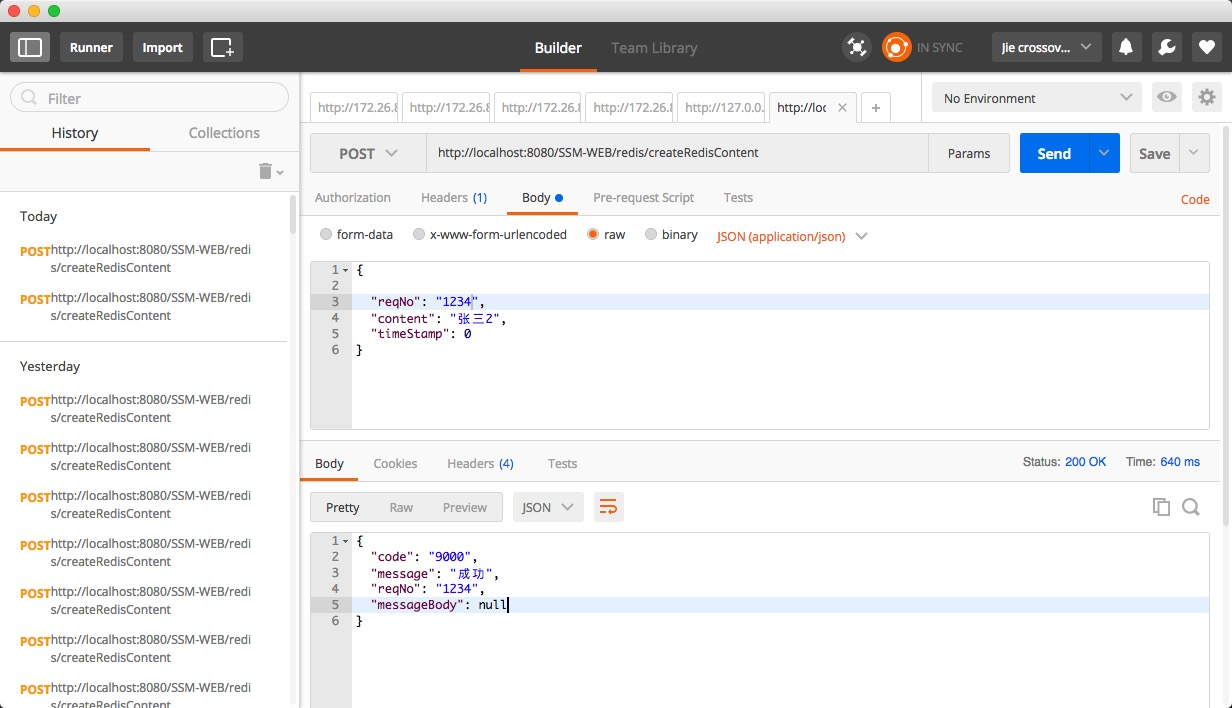
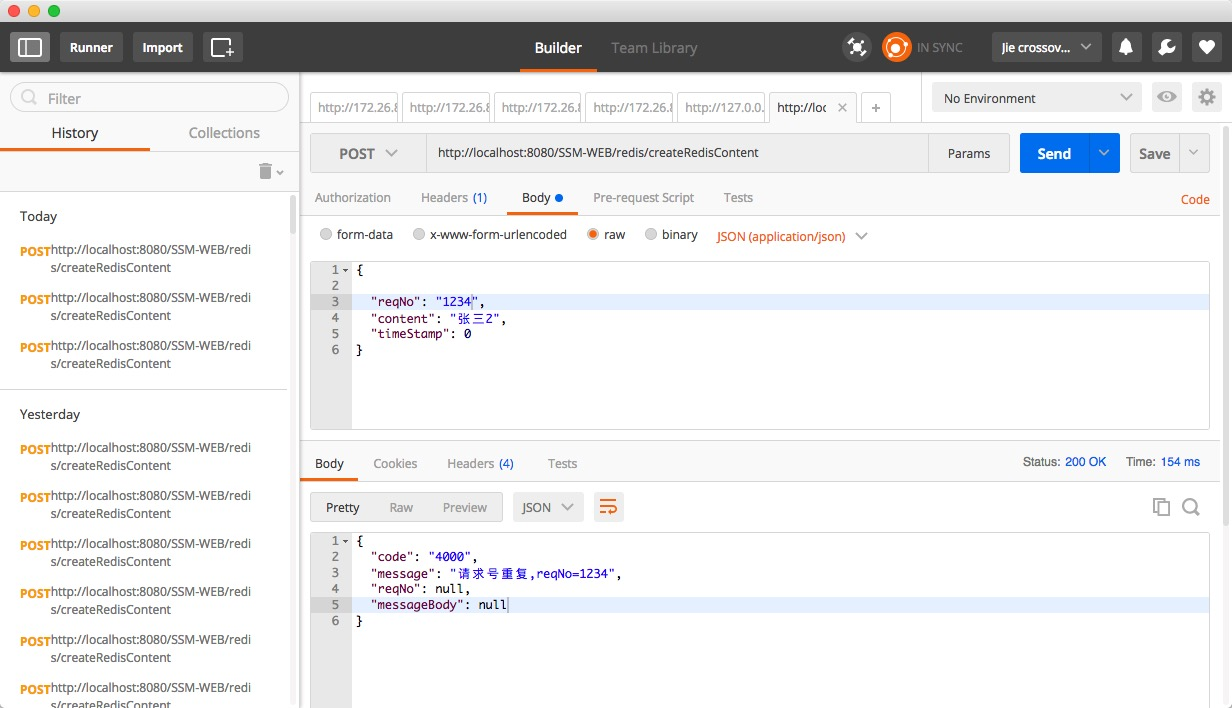
来看下加上本次插件的实际效果:
自定义注解
首先我们要自定义一个注解:
@Target(ElementType.METHOD)
@Retention(RetentionPolicy.RUNTIME)
@Documented
public @interface CheckReqNo {

    String desc() default "";
}
(ps:这里并不过多的讲解注解相关的知识)。
首先使用@interface来声明一个注解。接着利用Java为我们提供的三个元注解来定义CheckReqNo注解。
其中@Target表明这个注解被用于什么地方,使用ElementType.METHOD表明被应用到方法上,还有一些其他值可以查看java.lang.annotation.ElementType这个枚举类型。
@Retention注解表明我们的注解在什么范围内有效,这里配置的RetentionPolicy.RUNTIME表明在运行时可以通过反射来获取。
@Documented看字面意思应该也能猜到是用于生成JavaDoc文档的。
其中定义了一个desc()的方法其实并没有用到,但如果需要在使用注解的时候需要自定义一些filed(域)的需求可以按照这样的方式写到这里,通过反射都可以获取到具体的值。
如:@CheckReqNo(desc = "abc")就可以获取到"abc"的值。
切面注解
按照之前的想法是在对所有使用了该注解的方法进行切面:
@Aspect
@Component
public class ReqNoDrcAspect {
private static Logger logger = LoggerFactory.getLogger(ReqNoDrcAspect.class);
@Value("${redis.prefixReq:reqNo}")
private String prefixReq ;
@Value("${redis.day:1}")
private long day ;
@Autowired
private RedisTemplate<String, String> redisTemplate;
@PostConstruct
public void init() throws Exception {
logger.info("SSM-REQUEST-CHECK init......");
}
@Pointcut("@annotation(com.crossoverJie.request.anotation.CheckReqNo)")
public void checkRepeat(){
}
@Before("checkRepeat()")
public void before(JoinPoint joinPoint) throws Exception {
BaseRequest request;
request = getBaseRequest(joinPoint);
if(request != null){
final String reqNo = request.getReqNo();
if(StringUtil.isEmpty(reqNo)){
throw new RuntimeException("reqNo不能为空");
}else{
try {
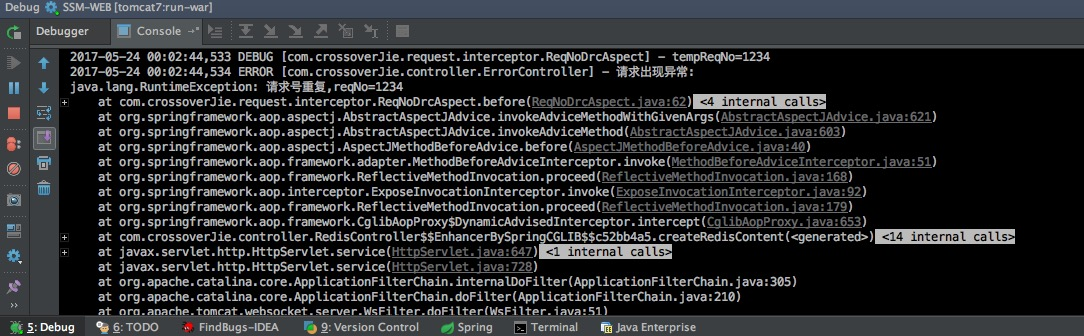
String tempReqNo = redisTemplate.opsForValue().get(prefixReq +reqNo);
logger.debug("tempReqNo="+tempReqNo);
if((StringUtil.isEmpty(tempReqNo))){
redisTemplate.opsForValue().set(prefixReq + reqNo, reqNo, day, TimeUnit.DAYS);
}else{
throw new RuntimeException("请求号重复,reqNo="+reqNo);
}
} catch (RedisConnectionFailureException e){
logger.error("redis操作异常",e);
throw new RuntimeException("need redisService") ;
}
}
}
}
public static BaseRequest getBaseRequest(JoinPoint joinPoint) throws Exception {
BaseRequest returnRequest = null;
Object[] arguments = joinPoint.getArgs();
if(arguments != null && arguments.length > 0){
returnRequest = (BaseRequest) arguments[0];
}
return returnRequest;
}
}使用@Aspect来定义了一个切面。
其中prefixReq,day域可以自定义缓存请求号时的key前缀以及缓存的时间。
最关键的一点是用@Pointcut("@annotation(com.crossoverJie.request.anotation.CheckReqNo)")
定义了一个切入点,这样所有使用@CheckReqNo的注解都会被拦截。
接下来的逻辑就比较简单了,在每次请求之前进行拦截。
先去Redis中查看这个请求号(ps:反射获取)是否存在,如果不存在则通过并将本次的请求号缓存起来。如果存在则抛出异常。
使用注解
可以在jdbc.properties配置文件中自定义前缀和缓存时间
#redis前缀
redis.prefixReq=reqNo
#redis缓存时间 默认单位为天
redis.day=1
不定义也可以,会使用默认值。
由于该注解是需要加到controller层,因此我们得使用CGLIB代理。
这里有一个坑,需要将开启CGLIB的配置配置到我们web.xml中的
<!-- Spring MVC servlet -->
    <servlet>
        <servlet-name>SpringMVC</servlet-name>
        <servlet-class>org.springframework.web.servlet.DispatcherServlet</servlet-class>
        <init-param>
            <param-name>contextConfigLocation</param-name>
            <param-value>classpath:spring-mvc.xml</param-value>
        </init-param>
        <load-on-startup>1</load-on-startup>
        <async-supported>true</async-supported>
</servlet>这里所定义的spring-mvc.xml文件中,不然springMVC所在的子容器是无法被父容器所加载的。
使用实例:
    @CheckReqNo
    @RequestMapping(value = "/createRedisContent",method = RequestMethod.POST)
    @ResponseBody
    public BaseResponse<NULLBody> createRedisContent(@RequestBody RedisContentReq redisContentReq){
        BaseResponse<NULLBody> response = new BaseResponse<NULLBody>() ;

        Rediscontent rediscontent = new Rediscontent() ;
        try {
            CommonUtil.setLogValueModelToModel(redisContentReq,rediscontent);
            rediscontentMapper.insertSelective(rediscontent) ;
            response.setReqNo(redisContentReq.getReqNo());
            response.setCode(StatusEnum.SUCCESS.getCode());
            response.setMessage(StatusEnum.SUCCESS.getMessage());
        }catch (Exception e){
            logger.error("system error",e);
            response.setReqNo(response.getReqNo());
            response.setCode(StatusEnum.FAIL.getCode());
            response.setMessage(StatusEnum.FAIL.getMessage());
        }

        return response ;

    }
统一异常controller
/**
 *
 * ClassName: ErrorController <br/>
 * Function: 错误异常统一处理. <br/>
 * @author crossoverJie
 * @version
 * @since JDK 1.7
 */
@ControllerAdvice
public class ErrorController {
    private Logger logger = LoggerFactory.getLogger(this.getClass());

    @ExceptionHandler(Exception.class)
    @ResponseStatus(HttpStatus.OK)
    @ResponseBody
    public Object processUnauthenticatedException(NativeWebRequest request, Exception e) {
        logger.error("请求出现异常:", e);

        BaseResponse<NULLBody> response = new BaseResponse<NULLBody>();
        response.setCode(StatusEnum.FAIL.getCode());
        if (e instanceof RuntimeException){
            response.setMessage(e.getMessage());

        } else {
            response.setMessage(StatusEnum.FAIL.getMessage());
        }
        return response ;
    }
}
这样当controller层出现异常之后都会进入这里进行统一的返回。
总结
至此整个插件的流程已经全部OK,从中可以看出Spring AOP在实际开发中的各种好处。
之前的几篇文章也有应用到:
不知不觉这个小白入门的SSM系列已经更新了14篇了,在GitHub也有了500多颗星了,期间也和不少朋友有过交流、探讨,感谢大家的支持。
接下来可能不太会更新这个系列了,由于博主现在所在的项目组采用的是目前比较流行的SpringBoot+SpringCloud和Docker的方式来进行架构的,所以之后的重心肯定会移到这方面,用过SpringBoot之后相信大家肯定也回不去了。
所以之后我会继续更新SpringBoot+SpringCloud相关的文章,欢迎持续关注,持续拍砖(ps:这个插件也会用springBoot重写一遍)
个人博客地址:crossoverjie.top。