

今天,我们来搞点事情,自定义一个 LayoutInflate,搞点有意思的东西,实现一个酷炫的动画。
首先,在自定义 LayoutInflate 之前,我们要先分析一下 LayoutInflate 的源码,了解了源码的实现方式,才能定制嘛~~~~
好了,怕你们无聊跑了,先放效果图出来镇贴
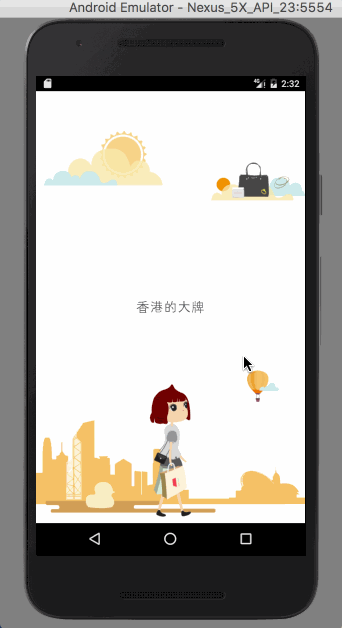
好了,效果看完了,
那就先从LayoutInflate的源码开始吧。
##LayoutInflate
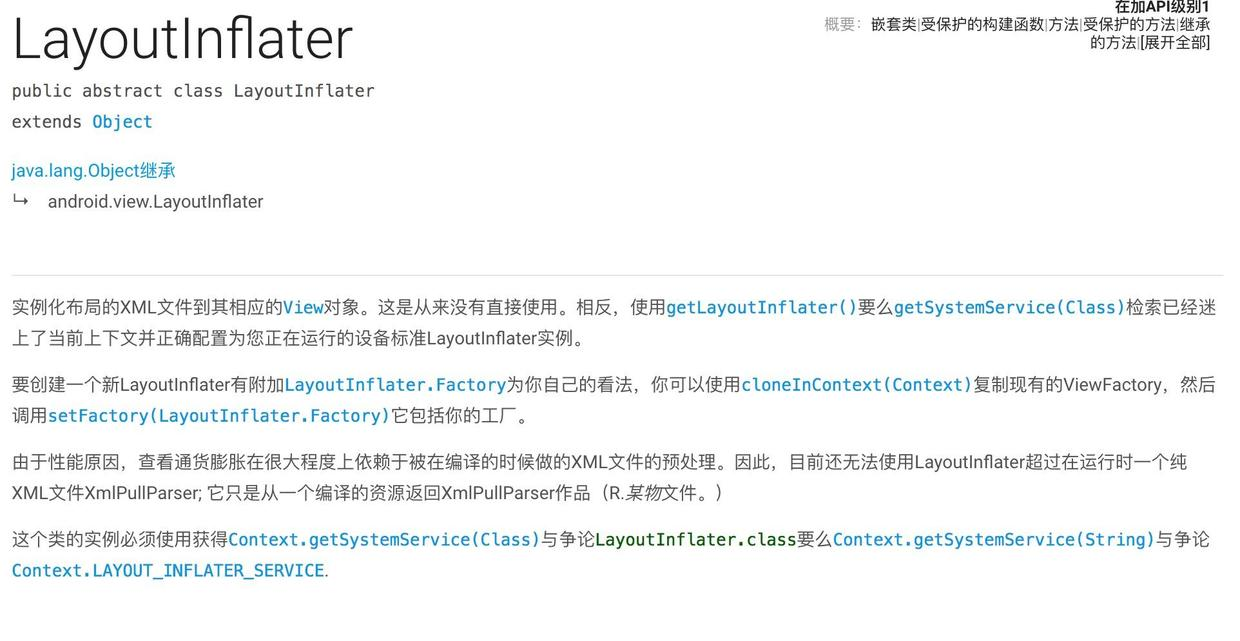
先看看官方文档吧~我英语不好,就不帮大家一句一句翻译了,反正大家也都知道这个类是干嘛的。
还是提取一下关键信息吧。
1.LayoutInflate 可以将 xml 文件解析成 View 对象。获取方式有两种getLayoutInflater()和getSystemService(Class)。
2.如果要创建一个新的 LayoutInflate去解析你自己的 xml,可以使用 cloneInContext,然后调用 setFactor()。
好了,我们先来回顾一下平时我们是怎么把 xml 转换成 View 的吧。
- setContentView()
我们给 Activity 设置 布局 xml 都是调用这个方法,现在我们就来看看这个方法到底干了什么事。
public void setContentView(@LayoutRes int layoutResID) {
  getWindow().setContentView(layoutResID);
  initWindowDecorActionBar();
}
-----以上是 Activity 的方法,调用了 Window 的 steContentView
----手机上的 window 都是 PhoneWindow,就不饶弯了,直接看 PhoneWindow
----的setContentView方法。
public void setContentView(int layoutResID) {
    // Note: FEATURE_CONTENT_TRANSITIONS may be set in the process of installing the window
    // decor, when theme attributes and the like are crystalized. Do not check the feature
    // before this happens.
    if (mContentParent == null) {
        installDecor();
    } else if (!hasFeature(FEATURE_CONTENT_TRANSITIONS)) {
        mContentParent.removeAllViews();
    }

    if (hasFeature(FEATURE_CONTENT_TRANSITIONS)) {
        final Scene newScene = Scene.getSceneForLayout(mContentParent, layoutResID,
                getContext());
        transitionTo(newScene);
    } else {
        mLayoutInflater.inflate(layoutResID, mContentParent);
    }
    mContentParent.requestApplyInsets();
    final Callback cb = getCallback();
    if (cb != null && !isDestroyed()) {
        cb.onContentChanged();
    }
}
----在构造方法里面找到了mLayoutInflater 的赋值
public PhoneWindow(Context context) {
    super(context);
    mLayoutInflater = LayoutInflater.from(context);
}- View.inflate()
同样是调用了LayoutInflate.inflate()方法
public static View inflate(Context context, @LayoutRes int resource, ViewGroup root) {
     LayoutInflater factory = LayoutInflater.from(context);
     return factory.inflate(resource, root);
}- LayoutInflate.from(context).inflate()
同上
我们项目中所有的 Xml 转 View 都离不开这三个方法吧,这三个方法最终调用的都还是 LayoutInflate 的 inflate 方法。
我们再来看看怎么获取到 LayoutInflate 的实例。
上面三个xml 解析成 view 的方法都是用LayoutInflate.from(context)来获取 LayoutInflate 实例的。
 public static LayoutInflater from(Context context) {
    LayoutInflater LayoutInflater =
            (LayoutInflater) context.getSystemService(Context.LAYOUT_INFLATER_SERVICE);
    if (LayoutInflater == null) {
        throw new AssertionError("LayoutInflater not found.");
    }
    return LayoutInflater;
}
看到这个代码有木有觉得很眼熟啊,我们的 ActivityService、WindowService、NotificationService等等各种 Service 是不是都这样获取的。而我们都知道这些系统服务都是单例的,并且在应用启动的时候系统为其初始化的。好了,撤远了~~
回过头来,我们继续看 LayoutInflate 源码。
- inflate(@LayoutRes int resource, @Nullable ViewGroup root)
这个方法就是将xml 文件转换成 View 的方法,我们项目中所有的 xml 解析调用的都是这个方法。第一个参数是 xml 资源 id,第二个方法是解析后的 View 是否要添加到 root view里面去。
通过 Resources 获取 xml 解析器XmlResourceParser。
public View inflate(@LayoutRes int resource, @Nullable ViewGroup root, boolean attachToRoot) {
    final Resources res = getContext().getResources();
    if (DEBUG) {
        Log.d(TAG, "INFLATING from resource: \"" + res.getResourceName(resource) + "\" ("
                + Integer.toHexString(resource) + ")");
    }

    final XmlResourceParser parser = res.getLayout(resource);
    try {
        return inflate(parser, root, attachToRoot);
    } finally {
        parser.close();
    }
}
XmlResourceParser解析 xml,并且返回 view
 public View inflate(XmlPullParser parser, @Nullable ViewGroup root, boolean attachToRoot) {
    synchronized (mConstructorArgs) {
      //写入跟踪信息,用于 Debug 相关,先不关心这个
        Trace.traceBegin(Trace.TRACE_TAG_VIEW, "inflate");

        final Context inflaterContext = mContext;
        //用于读取 xml 节点
        final AttributeSet attrs = Xml.asAttributeSet(parser);
        Context lastContext = (Context) mConstructorArgs[0];
        mConstructorArgs[0] = inflaterContext;
        View result = root;

        try {
            // Look for the root node.
            int type;
            //空信息直接跳过
            while ((type = parser.next()) != XmlPullParser.START_TAG &&
                    type != XmlPullParser.END_DOCUMENT) {
                // Empty
            }
            //防错判断
            if (type != XmlPullParser.START_TAG) {
                throw new InflateException(parser.getPositionDescription()
                        + ": No start tag found!");
            }
            //获取类名,比如说 TextView
            final String name = parser.getName();

            if (DEBUG) {
                System.out.println("**************************");
                System.out.println("Creating root view: "
                        + name);
                System.out.println("**************************");
            }
            //如果标签是merge
            if (TAG_MERGE.equals(name)) {
                if (root == null || !attachToRoot) {
                //merge作为顶级节点的时候必须添加的 rootview
                    throw new InflateException("<merge /> can be used only with a valid "
                            + "ViewGroup root and attachToRoot=true");
                }
   //递归方法去掉不必要的节点,为什么 merge 可以优化布局
                rInflate(parser, root, inflaterContext, attrs, false);
            } else {
                // Temp 是根节点
                final View temp = createViewFromTag(root, name, inflaterContext, attrs);

                ViewGroup.LayoutParams params = null;
   //如果不添加到 rootView 切 rootView 不等于空,则生成 LayoutParams
                if (root != null) {
                    if (DEBUG) {
                        System.out.println("Creating params from root: " +
                                root);
                    }
                    // Create layout params that match root, if supplied
                    params = root.generateLayoutParams(attrs);
                    if (!attachToRoot) {
                        // Set the layout params for temp if we are not
                        // attaching. (If we are, we use addView, below)
                        temp.setLayoutParams(params);
                    }
                }

                if (DEBUG) {
                    System.out.println("-----> start inflating children");
                }

                // 解析子节点
                rInflateChildren(parser, temp, attrs, true);

                if (DEBUG) {
                    System.out.println("-----> done inflating children");
                }

                // 如果要添加到 rootview。。
                // to root. Do that now.
                if (root != null && attachToRoot) {
                    root.addView(temp, params);
                }

                // Decide whether to return the root that was passed in or the
                // top view found in xml.
                if (root == null || !attachToRoot) {
                    result = temp;
                }
            }

        } catch (XmlPullParserException e) {
            InflateException ex = new InflateException(e.getMessage());
            ex.initCause(e);
            throw ex;
        } catch (Exception e) {
            InflateException ex = new InflateException(
                    parser.getPositionDescription()
                            + ": " + e.getMessage());
            ex.initCause(e);
            throw ex;
        } finally {
            // Don't retain static reference on context.
            mConstructorArgs[0] = lastContext;
            mConstructorArgs[1] = null;
        }

        Trace.traceEnd(Trace.TRACE_TAG_VIEW);
        //返回解析结果
        return result;
    }
  }
在这个方法中,判断了是否使用 merge 优化布局,然后通过createViewFromTag解析的顶级 xml 节点的 view,并且处理了是否添加解析的布局到 rootView。调用rInflateChildren方法去解析子 View 并且添加到顶级节点 temp 里面。最后返回解析结果。
我们先来看看 createViewFromTag
 View createViewFromTag(View parent, String name, Context context, AttributeSet attrs,
        boolean ignoreThemeAttr) {
    //获取命名空间
    if (name.equals("view")) {
        name = attrs.getAttributeValue(null, "class");
    }
    // 给 view 设置主题。现在知道为什么colorPrimary等 theme 属性会影响控件颜色了吧
    if (!ignoreThemeAttr) {
        final TypedArray ta = context.obtainStyledAttributes(attrs, ATTRS_THEME);
        final int themeResId = ta.getResourceId(0, 0);
        if (themeResId != 0) {
            context = new ContextThemeWrapper(context, themeResId);
        }
        ta.recycle();
    }
 //让 view 闪烁,可以参考http://blog.csdn.net/qq_22644219/article/details/69367150
    if (name.equals(TAG_1995)) {
        // Let's party like it's 1995!
        return new BlinkLayout(context, attrs);
    }

    try {
        View view;
        优先调用了mFactory2的 oncreateView 方法,创建了 temp View
        if (mFactory2 != null) {
            view = mFactory2.onCreateView(parent, name, context, attrs);
        } else if (mFactory != null) {
            view = mFactory.onCreateView(name, context, attrs);
        } else {
            view = null;
        }

        if (view == null && mPrivateFactory != null) {
            view = mPrivateFactory.onCreateView(parent, name, context, attrs);
        }

        if (view == null) {
            final Object lastContext = mConstructorArgs[0];
            mConstructorArgs[0] = context;
            try {
                if (-1 == name.indexOf('.')) {
                    view = onCreateView(parent, name, attrs);
                } else {
                    view = createView(name, null, attrs);
                }
            } finally {
                mConstructorArgs[0] = lastContext;
            }
        }

        return view;
    } catch (InflateException e) {
        throw e;

    } catch (ClassNotFoundException e) {
        final InflateException ie = new InflateException(attrs.getPositionDescription()
                + ": Error inflating class " + name);
        ie.initCause(e);
        throw ie;

    } catch (Exception e) {
        final InflateException ie = new InflateException(attrs.getPositionDescription()
                + ": Error inflating class " + name);
        ie.initCause(e);
        throw ie;
    }
}
这里我们可以知道,mFactor或者 mFactor 不为 null,则调用mFactor来创建 View,如果mFactor为 null 或者mFactor创建是失败,则最终调用LayoutInflate 的createView方法 来创建 View 的,它传入了 view 的 parent、name、context、 attrs。
接下来继续去看子 View 的解析rInflateChildren
 void rInflate(XmlPullParser parser, View parent, Context context,
        AttributeSet attrs, boolean finishInflate) throws XmlPullParserException, IOException {
 //获取布局层级
    final int depth = parser.getDepth();
    int type;
    //没看懂没事,我们不是来纠结 xml 解析的
    while (((type = parser.next()) != XmlPullParser.END_TAG ||
            parser.getDepth() > depth) && type != XmlPullParser.END_DOCUMENT) {

        if (type != XmlPullParser.START_TAG) {
            continue;
        }

        final String name = parser.getName();
        //requestFocus标签,http://blog.csdn.net/ouyang_peng/article/details/46957281
        if (TAG_REQUEST_FOCUS.equals(name)) {
            parseRequestFocus(parser, parent);
        } else if (TAG_TAG.equals(name)) {
        //tag标签,只能用于 api21以上,给父view 设置一个 tag
            parseViewTag(parser, parent, attrs);
        } else if (TAG_INCLUDE.equals(name)) {
        //include 节点
            if (parser.getDepth() == 0) {
                throw new InflateException("<include /> cannot be the root element");
            }
            parseInclude(parser, context, parent, attrs);
        } else if (TAG_MERGE.equals(name)) {
        //merge 节点
            throw new InflateException("<merge /> must be the root element");
        } else {
           //走了刚刚的那个方法,创建 view 设置 LayoutParams
            final View view = createViewFromTag(parent, name, context, attrs);
            final ViewGroup viewGroup = (ViewGroup) parent;
            final ViewGroup.LayoutParams params = viewGroup.generateLayoutParams(attrs);
            rInflateChildren(parser, view, attrs, true);
            //添加到付 view
            viewGroup.addView(view, params);
        }
    }

    if (finishInflate) {
        parent.onFinishInflate();
    }
}
我们来整理一下思路吧,调用步骤
1.LayoutInflater 的静态方法 form 获取LayoutInflater实力
2.inflate解析 xml 资源
3.inflate 调用createViewFromTag创建了顶级view
4.inflate 调用rInflateChildren 创建所有子 view
5.rInflateChildren递归调用rInflate创建所有子 view。
6.rInflate通过调用createViewFromTag真正创建一个 view。
7.createViewFromTag优先使用 mFactory2、mFactory、mPrivateFactory来创建 View,如果创建失败,则最终调用createView方法来创建。创建的过程中用了parent,name,context,attrs等参数,然后运用反射的方法,创建出 View,
因此,我们所有的 View 的构造方法都是被 LayoutInflate 的Factory调用创建出来的。
如果要自定义 LayoutInflate 解析,只需要给调用LayoutInflate的 setFactory设置我们自定义的 Factory 即可。
但是问题来了,LayoutInflate是系统服务,而且是单例,我们直接调用LayoutInflate的 setFactory 方法,会影响后期所有 view 的创建。
所以我们需要用到LayoutInflate的cloneInContext方法clone一个新的 LayoutInflate,然后再设置自己的 Factory。至于LayoutInflate是一个抽象类,cloneInContext是一个抽象方法,我们根本不用关心,因为我们直接用系统创建好的LayoutInflate即可。
好了,LayoutInflate的源码分析完了,接下来我们来分析动画了。
##动画分析
源码看了很久,我们再来重新看一遍动画吧
1.翻页
2.翻页的时候天上的云,地上的建筑物移动速度和翻页速度不一样
3.不同的背景物移动速度不一样,最后一页背景物上下扩散
4.翻页的过程中,人一直在走路
5.最后一页人要消失。
解决方案:
1.ViewPager
2.给 viewPage设置PageChangeListener,在滚动的时候给各种 背景物体设置setTranslation。
3.不同的背景物设置不同的setTranslation系数。
4.人物走路用帧动画即可,在viewPage滑动处于SCROLL_STATE_DRAGGING状态的时候开启帧动画。
5.这个简单,监听onPageSelected,然后再设置人为 View.GONE即可。
解决方案的问题:
粗略数了一下,6个页面大概有50个左右的背景物。如果要一个一个去获取 id,然后再根据不同的 id,设置不同的滑动速度滑动方向,可能你会疯掉。
因此,我们需要想一个办法,去解决这个问题。可能有的童鞋会说,我写一个自定义 View,设置滑动速度系数属性就行了呀。这个方法可以实现,but,你还是需要一个一个去 findViewbyid。
那么,我们是不是可以给 xml 添加自定义标签,然后自定义解析。比如说,天上的云,滑进来的阻尼系数是0.4,滑出去的阻尼系数是0.6,只需要在 xml 里面设置好这两个参数,然后我们再在合适的时使用这两个参数即可啊。
##自定义LayoutInflater.Factory
咦,怎么变成自定义LayoutInflater.Factory了,哈哈哈,还记得刚刚LayoutInflater的源码分析么,View 的创建全部在createViewFromTag里面,而createViewFromTag优先使用 Factory 来 创建。然后我们来看看Factory到底是干嘛的。
Hook you can supply that is called when inflating from a LayoutInflater.
You can use this to customize the tag names available in your XML layout files.
- 当LayoutInflater在解析布局的时候会被调用
- 可以用来读取 xml 中的自定义标签。
这下迷惑都解开了吧,啊哈哈哈哈~~
现在,我们就来定义这个 Factory
思路很简单。
1.继承LayoutInflater.Factory2
2.实现抽象方法onCreateView
3.在onCreateView里面使用 LayoutInflate 的 createView方法创建View
4.创建成功之后,读取 view 的 attrs 属性,作为 tag 保持到 viewTag。
关键代码如下:
 @Override
public View onCreateView(String name, Context context, AttributeSet attrs) {
 //创建一个 View
    View view = createViewOrFailQuietly(name, context, attrs);

    //实例化完成
    if (view != null) {
        //获取自定义属性,通过标签关联到视图上
        setViewTag(view, context, attrs);
        //所有带有自定义属性的 View 保存起来,供动画切换的时候调用
        mParallaxView.getParallaxViews().add(view);
    }
    return view;
}
创建 view 的方法,这里注意一下,xml 标签里面系统的 view只有类名,自定义 view 是全路径。如:,而可以省略路径的 View 又分为 "android.widget."和"android.view."包下,所以对于只写缩写的 view,需要遍历这两个路径。
 private View createViewOrFailQuietly(String name, Context context,
                                     AttributeSet attrs) {
    //1.自定义控件标签名称带点,所以创建时不需要前缀
    if (name.contains(".")) {
        createViewOrFailQuietly(name, null, context, attrs);
    }
    //2.系统视图需要加上前缀
    for (String prefix : sClassPrefix) {
        View view = createViewOrFailQuietly(name, prefix, context, attrs);
        if (view != null) {
            return view;
        }
    }
    return null;
}
private View createViewOrFailQuietly(String name, String prefix, Context context,
                                     AttributeSet attrs) {
    try {
        //通过系统的inflater创建视图,读取系统的属性
        return inflater.createView(name, prefix, attrs);
    } catch (Exception e) {
        return null;
    }
}
读取 attrs 里面的属性,给含有特点 attrs 属性的 view设置 tag 并保存起来。
 private void setViewTag(View view, Context context, AttributeSet attrs) {
    //所有自定义的属性
    TypedArray a = context.obtainStyledAttributes(attrs, R.styleable.AnimationView);
    if (a != null && a.length() > 0) {
        //获取自定义属性的值
        ParallaxViewTag tag = new ParallaxViewTag();
        tag.xIn = a.getFloat(R.styleable.AnimationView_x_in, 0f);
        tag.xOut = a.getFloat(R.styleable.AnimationView_x_out, 0f);
        tag.yIn = a.getFloat(R.styleable.AnimationView_y_in, 0f);
        tag.yOut = a.getFloat(R.styleable.AnimationView_y_in, 0f);

        //index
        view.setTag(view.getId(), tag);
        a.recycle();
    }

}
好了,我们自定义LayoutInflater.Factory已经结束了,so,我们可以直接调用 LayoutInflate.cloneInContext(context)获取一个新的 LayoutInflate,然后再setFactor(customFactor)就可以了。代码如下:
 @Override
public View onCreateView(LayoutInflater original, ViewGroup container,
                         Bundle savedInstanceState) {
    Bundle args = getArguments();
    int layoutId = args.getInt("layoutId");
    LayoutInflater layoutInflater = original.cloneInContext(getActivity());
    layoutInflater.setFactory(new ParallaxFactory(layoutInflater, this));
    return layoutInflater.inflate(layoutId, null);
}
接下来的代码就不写了吧,就是监听 ViewPager 的滑动事件,获取当前滑出滑进页面的自定义了 attrs 属性的 View 列表,然后再根据滑出屏幕的比例*属性参数做 view 的 TranslationY/TranslationX 操作。
这里我贴一下代码仓库地址吧,有兴趣的小伙伴可以把代码跑起来看一下
看起来好像并没有什么卵用,就是秀了一波骚操作。写一个自定义 view,继承 ImageView,设置几个自定义 attrs 属性,再在构造方法里面把属性读出来保存到类变量,对外提供读取方法,然后同样监听 viewpager 的滑动就行了。
哈哈哈哈~~分享这篇文章的最终目的不是为了实现这个动画,就是想看一下 LayoutInflate 的源码,了解一下 xml 文件是怎么解析成 view的过程。。。。
##已知 bug:
- v4的版本升级到19.1.0之后动画会失效
- 引入appcompat包会报 xml 解析错误。
版本升级引起的 bug,有时间我去找找这两个 bug 的原因,找到之后我会在这里更新。
本次效果来源于动脑学院视频课程,很不错的一套课程,感兴趣的小伙伴可以去学学,适用于有一定基础的 android 程序员,进阶高级很有效果哦。腾讯课堂有免费的公开课,或者去动脑学院学习,官网的课程好像是收费的,当然费用对程序员来说不算高,付不起课程费用的大学生可以去腾讯课堂学习,或者某宝。。。。。。。。
