我从2013年起,使用wordpress搭建了自己的个人博客,四年的时间写了将近50篇文章,记录了自己在日常开发中遇到的一些问题和解决办法,同时做了几个系列的技术分享。虽然博文数量不算很多,但每一篇文章都花了很多的心思在写,最近也一直在思考把写博客坚持下去并保持博客频繁更新的问题。
wordpress是phper最喜欢的博客系统,也是全世界范围内非常流行的CMS管理系统,它的优点是更新迭代频繁,功能强大,有相当多的主题和插件可用。但是不好的地方就是前端渲染比较慢,再加上后台引用了一些被墙的cdn和avatar库,如果不好好配置一番,在后台写文章体验会相当不好。近些年,hexo渐渐崛起,基于其markdown的写作方式和静态发布的特性,成了大部分爱写博客程序员的最爱。基于这几点考虑,我便有了把博客从wordpress迁移到hexo的想法。下面的内容记录了本次的迁移过程。有同样需求的朋友可以作为参考,从wordpress弃坑,投入hexo的怀抱吧~
上传图片到七牛
以前在wordpress写的文章,里面包含的图片都是使用wordpress的多媒体添加的,所以图片的访问链接基本上都是类似http://idoubi.cc/wp-content/uploads/2017/08/01/abc.jpg这样的,所以为了在博客迁移之后能让图片正常显示,需要编写脚本把wordpress媒体空间里面的图片上传到七牛,再批量替换掉文章里面包含的图片链接。
引入七牛sdk
composer require qiniu/php-sdk编写上传本地图片到七牛的脚本
<?php

require_once './vendor/autoload.php';

use Qiniu\Auth;
use Qiniu\Storage\UploadManager;

$accessKey = 'RKassuWW4TB4_xxxxxyyyyyQj2iLEIBq9GSGs8E';
$secretKey = '6iVWfPayYPhosxxxxxyyyyyO909Wp6GsV0oOt';
$bucket = 'idoublog';

$auth = new Auth($accessKey, $secretKey);

$token = $auth->uploadToken($bucket);

$uploadManager = new UploadManager();

// 批量上传图片
$basePath = 'D:/phpStudy/WWW/project/idoubiblog/wp-content/uploads/';
$fileDir = 'D:/phpStudy/WWW/project/idoubiblog/wp-content/uploads';
$files = getUploadFiles($fileDir);

$successCount = 0;
$failCount = 0;
foreach ($files as $k => $v) {
    $key = str_replace($basePath, '', $k);
    $file = mb_convert_encoding($v, 'gbk', 'utf8');            // 对文件路径进行转码,防止文件名为中文时出现的乱码问题

    list($res, $err) = $uploadManager->putFile($token, $key, $file);
    if (empty($err)) {        // 上传成功
        $successCount++;
    } else {                // 上传失败
        $failCount++;
        var_export('上传失败:' . $v);
        echo "\r\n";
    }
}
echo "上传成功:{$successCount}个,上传失败:{$failCount}个";

// 获取所有需要上传的文件
function getUploadFiles($dirPath) {
    $files = array();
    $scanFiles = myScanDir($dirPath);
    foreach ($scanFiles as $ak => $av) {
        if (is_array($av)) {
            foreach ($av as $bk => $bv) {
                if (is_array($bv)) {
                    foreach ($bv as $ck => $cv) {
                        $files[$cv] = $cv;
                    }
                } else {
                    $files[$bv] = $bv;
                }
            }
        } else {
            $files[$av] = $av;
        }
    }
    return $files;
}

// 遍历文件夹下面的文件
function myScanDir($dirPath) {
    $files = array();
    if (is_dir($dirPath)) {
        if ($fp = opendir($dirPath)) {
            while (($file = readdir($fp)) !== false) {
                if ($file != '.' && $file != '..') {
                    $filePath = $dirPath . '/' . $file;
                    if (is_dir($filePath)) {
                        $files[] = myScanDir($filePath);
                    } else {
                        $files[] = iconv('gbk', 'utf-8', $filePath);        // 对文件路径进行转码,防止文件名为中文时出现的乱码问题
                    }
                }
            }
        }
    }
    return $files;
}
导出wordpress数据
批量替换数据库文章中包含的图片地址
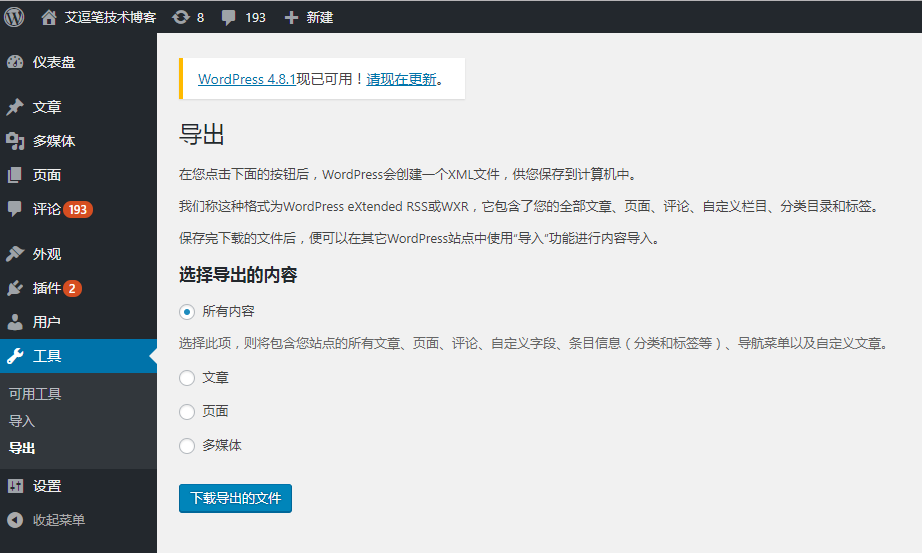
update wp_posts set post_content = replace(post_content, 'http://idoubi.cc/wp-content/uploads/', 'http://qiniu.idoubi.cc/');在wordpress后台导出xml文件

安装hexo
npm i -g hexo-cli
hexo init idoublog
迁移数据到hexo
安装迁移插件
cd idoublog
npm install hexo-migrator-wordpress --save
修改插件(防止导入数据后出现的文章标题乱码问题)
# 在node_modules/hexo-migrator-wordpress/index.js的63行位置加上
if (slug) slug = decodeURI(slug);
导入数据
hexo migrate wordpress /path/to/wordpress.xml
安装主题
fork主题
https://github.com/yscoder/hexo-theme-indigo安装主题
cd idoublog/
git submodule add git@github.com:mikemintang/hexo-theme-indigo.git themes/indigo
修改主题配置并提交到fork的主题仓库
生成内容
hexo generate本地预览
安装浏览器同步插件,可以在写文章的时候同步预览
npm i hexo-browsersync --save带端口预览
hexo s -p8031
发布内容
配置发布环境
deploy:
type: git
repo: https://github.com/mikemintang/idoubi.cc
branch: master
发布内容
# 执行此命令后,博客静态内容会发布到https://github.com/mikemintang/idoubi.cc
hexo deploy
云服务器同步博客内容
初始化用于同步博客内容的项目文件夹
mkdir /idoublog
cd /idoublog
git init
git remote add origin https://github.com/mikemintang/idoubi.cc.git
编写自动同步shell脚本
vi /shell/deploy_idoublog.sh
#!/bin/sh

cd /idoublog
git pull origin master- 定时执行shell脚本
crontab -e
*/1 * * * * /bin/sh /shell/deploy_idoublog.sh经过上面一系列步骤,我的博客成功从wordpress迁移到了hexo。现在我就可以在本地用sublime写好博客,然后执行
hexo deploy --generate命令,博客内容就会自动同步到 idoubi.cc/