

简评:作者从理论到实践演示如何学习使用 WebGL 制作动画。
约束过程
主要使用 three.js 和 GreenSock 库,这些实验都是手动编码的,没有凭借任何 3D 或动画软件。
这个过程包括以编程的方式塑造角色,一次一个方块。在精炼比例上我花费了大多数工夫。通过微调代码中的值来总体渲染位置,然后通过用户输入(大多是移动鼠标,点击,拖动等等)来移动每个部分。
这个过程的优点不是很明显。但它能让我仅仅通过文本编辑器就能创造整个实验,利用 Codepen 提供的实时预览,整个过程非常灵活。
话虽如此,这个过程有自己的一套限制,以保持可管理性:角色必须用尽可能少的部分构建; 每个部分由数量很小的顶点组成; 动画必须针对数量有限的行为。
注意:要清楚一点,这个过程对于我来说是有用的,但如果你熟悉 3D 软件,你可以用它来构建自己的模型。主要是在你自己的技巧和效率中尽可能达到平衡。

Moments of Happiness 是一系列让你开心的 WebGL 体验。
把约束变成机会
这个过程的关键在于找到描述每个行为(舒适,快乐,失望等)的最准确动作。
每个方块和每个动作都要质问:我真的需要吗?这会让体验更好,还是仅仅心血来潮?
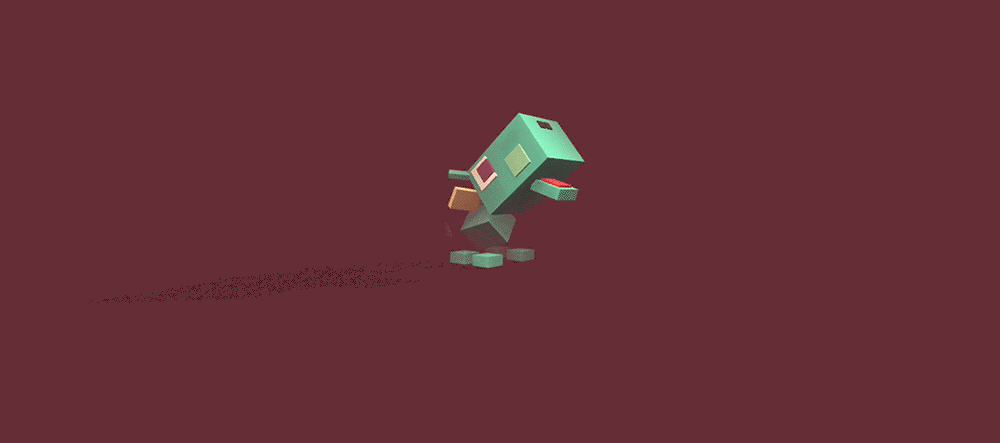
这个角色主要由方块组成—— 甚至是火焰和烟雾!
以编程的方式来动画化东西可能是最大的挑战。不用任何动画软件或者可视化时间线你如何构建自然的动作?如何让动画在响应用户输入的时候仍然保持自然呢?
步骤 1: 观察
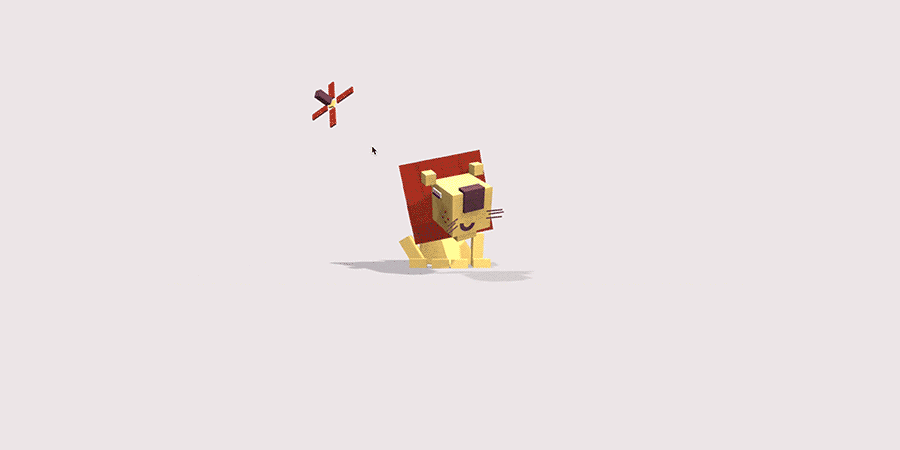
在开始任何实验之前,我都会花一些时间观察,记住我想要传达的感觉。我创造让狮子凉快这个动画的时候,养狗给了我极大的灵感。我观察它如何舒服的闭上眼睛,然后伸长脖子让我帮它挠痒痒。
找到正确的算法,以编程的方式翻译,这是一种同理心和基础数学技巧的混合。
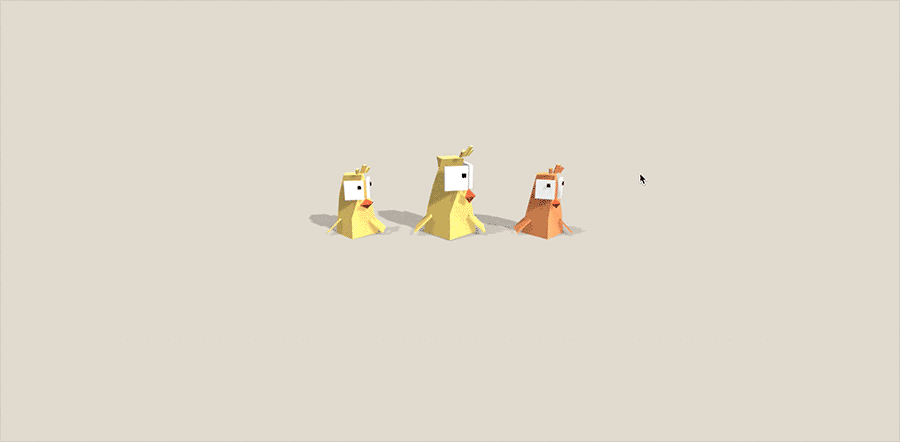
对于“偏执鸟”(下面的),我记住了模仿一个看起来很不舒服的人一瞥的感觉,试图通过弄清楚他的眼睛和头部运动分离了多少时间,使行为看起来令人信服。
但有时候,你不能仅仅依赖于自己的经验,为了抓住一些特质,可视化的灵感有时候是必要的。幸运的是,这有 Giphy,你可以找到任何类型的微妙的表情。我同时还在 YouTube 和 Vimeo 上位了寻找正确的动作花费了许多时间。
观察奔跑周期
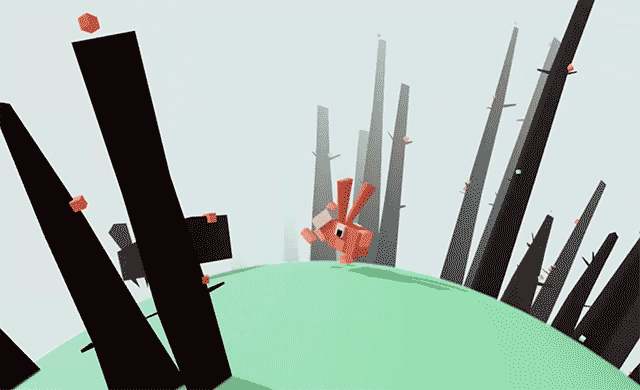
我在 Moments of Happiness 中制作的其中一个最需要技巧的动画是 兔子大逃亡。
要完成这个,首先要理解奔跑周期的原理。我在 Giphy 上找到一个慢放的 GIF。
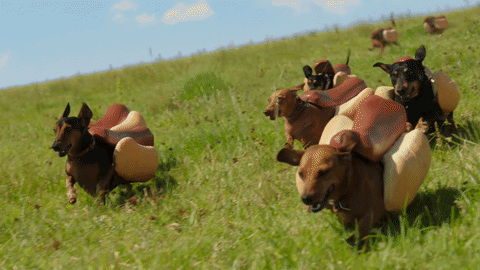
有趣的是这个 GIF 上不仅仅提示了跑动的腿,还有整个身体,包括最细微的部分。
步骤 2: 磨刀不误砍柴工,学习三角函数
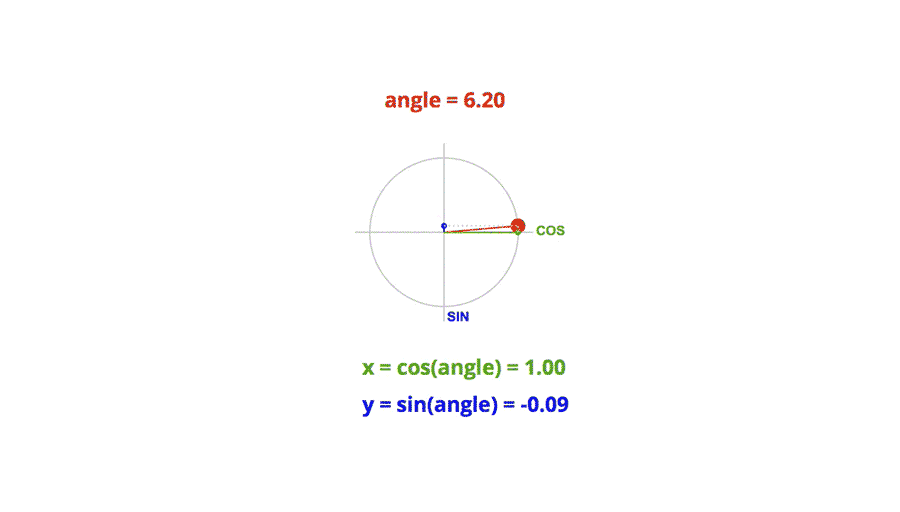
别跑开!这里需要的三角函数类型非常基础。大多数形式看起来就像这样:
x = cos(angle)*distance;
y = sin(angle)*distance;
这基本上用于将点(角度,距离)的极坐标转换为笛卡尔坐标(x,y)。
通过角度变化,我们可以让点围着中心旋转。
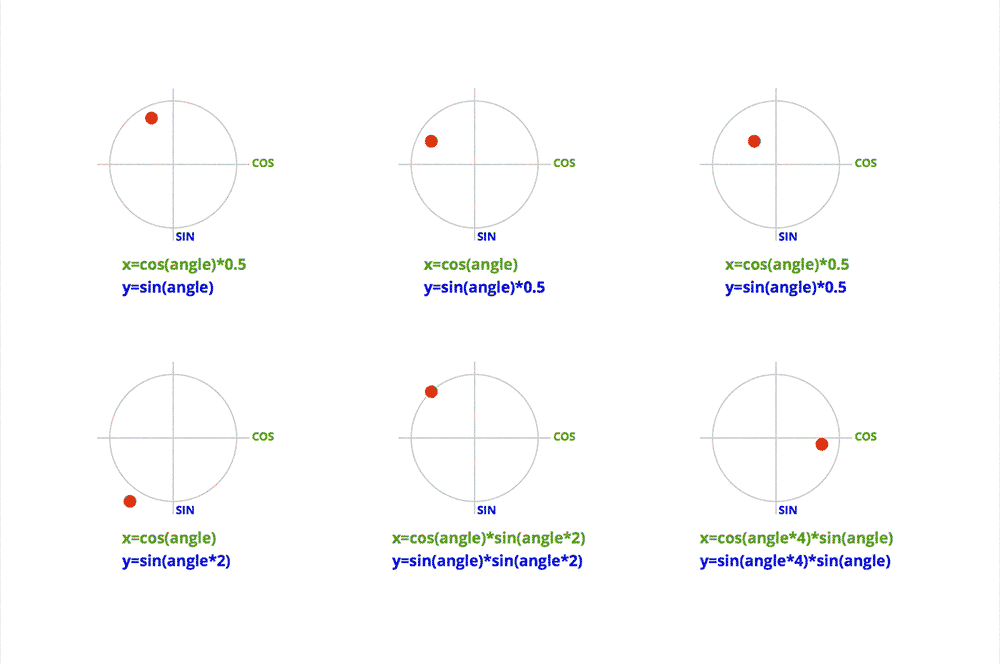
感谢三角函数,我们才可以做许多复杂的动作,只需设置公式的不同值即可。这种技术的漂亮之处在于你从动作中获取的平滑度。
下面是一些案例:
现在,到你了
要理解三角函数,你必须亲自实践。光讲理论仅仅是假把式。
为了实现上面的一些公式,我们需要安装基础环境。用画布,SVG 或者其他任何图形 API,如three.js, PixiJS 或者 BabylonJS 都能完成。
让我们来使用非常基础的 three.js 开始。
首先,下载最新版本的 three.js,然后在 html 头部中导入这个库:
<script type="text/javascript" src="js/three.js"></script>同时,添加一个容器,用来盛放整个实验:
<div id="world"></div>通过添加 CSS 样式来让这个容器覆盖整个屏幕:
#world {
    position: absolute;
    width: 100%;
    height: 100%;
    overflow: hidden;
    background: #ffffff;
}
JavaScript 部分有点长,但也不复杂:
// Initialize variables.
var scene, camera, renderer, WIDTH, HEIGHT;
var PI = Math.PI;
var angle = 0;
var radius = 10;
var cube;
var cos = Math.cos;
var sin = Math.sin;

function init(event) {
  // Get the container that will hold the animation.
  var container = document.getElementById('world');

  // Get window size.
  HEIGHT = window.innerHeight;
  WIDTH = window.innerWidth;

  // Create a three.js scene; set up the camera and the renderer.
  scene = new THREE.Scene();
  camera = new THREE.PerspectiveCamera( 50, WIDTH / HEIGHT, 1, 2000 );
  camera.position.z = 100;
  renderer = new THREE.WebGLRenderer({ alpha: true, antialias: true });
  renderer.setSize(WIDTH, HEIGHT);
  renderer.setPixelRatio(window.devicePixelRatio ? window.devicePixelRatio : 1);
  container.appendChild(renderer.domElement);

  // Create the cube.
  var geom = new THREE.CubeGeometry(16,8,8, 1);
  var material = new THREE.MeshStandardMaterial({
    color: 0x401A07
  });
  cube = new THREE.Mesh(geom, material);

  // Add the cube to the scene.
  scene.add(cube);

  // Create and add a light source.
  var globalLight = new THREE.AmbientLight(0xffffff, 1);
  scene.add(globalLight);

  // Listen to the window resize.
  window.addEventListener('resize', handleWindowResize, false);

  // Start a loop that will render the animation in each frame.
  loop();
}

function handleWindowResize() {
  // If the window is resized, we have to update the camera aspect ratio.
  HEIGHT = window.innerHeight;
  WIDTH = window.innerWidth;
  renderer.setSize(WIDTH, HEIGHT);
  camera.aspect = WIDTH / HEIGHT;
  camera.updateProjectionMatrix();
}

function loop(){
  // Call the update function in each frame to update the cube position.
  update();

  // Render the scene in each frame.
  renderer.render(scene, camera);

  // Call the loop function in next frame.
  requestAnimationFrame(loop);
}

// Initialize the demo when the page is loaded.
window.addEventListener('load', init, false);
这里,我们基本上创建了一个场景,一个相机,一个灯光和一个方块。然后,我们开始了一个循环来更新方块每帧的位置。
现在,我们需要添加 update() 函数,我们可以插入一些三角函数的公式:
function update(){
  // The angle is incremented by 0.1 every frame. Try higher values for faster animation.
  angle += .1;

  // Try modifying the angle and/or radius for a different movement.
  cube.position.x = cos(angle) * radius;
  cube.position.y = sin(angle) * radius;

  // You might want to use the same principle on the rotation property of an object. Uncomment the next line to see what happens.
  //cube.rotation.z = cos(angle) * PI/4;

  //Or vary the scale. Note that 1 is added as an offset to avoid a negative scale value.
  //cube.scale.y = 1 + cos(angle) * .5;

  /*
  Your turn! You might want to:
  - comment or uncomment the lines above to try new combinations,
  - replace cos by sin and vice versa,
  - replace radius with an other cyclic function.
  For example :
  cube.position.x = cos(angle) * (sin(angle) *radius);
  ...

  */
}
如果你感觉迷路了,你可以在 Codepen(很酷的在线编辑器,提供实时预览) 中打开这个项目。使用 sine 或者 cosine 函数可以让方块以不同的方式运动,这可以让你更好地理解如果使用三角函数的优势制作你的动画。
或者你可以直接跳到下个例子来作为制作自己走路或奔跑周期的起点。
步骤 3:如何使用三角函数制作步行或奔跑动画
现在,我们学习了如何用代码来让方块移动,用同样的方式,我们将一步步地制作一个简单的步行周期动画。
我们将使用和之前相同的设置,主要的不同在于构建不同的身体部位。
使用 three.js,在一组对象中嵌入另一组对象是可能的。例如,我们可以创建一个身体组包括腿,手臂和头。
让我们看看是怎么来的:
Hero = function() {
  // This will be incremented later at each frame and will be used as the rotation angle of the cycle.
  this.runningCycle = 0;

  // Create a mesh that will hold the body.
  this.mesh = new THREE.Group();
  this.body = new THREE.Group();
  this.mesh.add(this.body);

  // Create the different parts and add them to the body.
  var torsoGeom = new THREE.CubeGeometry(8,8,8, 1);//
  this.torso = new THREE.Mesh(torsoGeom, blueMat);
  this.torso.position.y = 8;
  this.torso.castShadow = true;
  this.body.add(this.torso);

  var handGeom = new THREE.CubeGeometry(3,3,3, 1);
  this.handR = new THREE.Mesh(handGeom, brownMat);
  this.handR.position.z=7;
  this.handR.position.y=8;
  this.body.add(this.handR);

  this.handL = this.handR.clone();
  this.handL.position.z = - this.handR.position.z;
  this.body.add(this.handL);

  var headGeom = new THREE.CubeGeometry(16,16,16, 1);//
  this.head = new THREE.Mesh(headGeom, blueMat);
  this.head.position.y = 21;
  this.head.castShadow = true;
  this.body.add(this.head);

  var legGeom = new THREE.CubeGeometry(8,3,5, 1);

  this.legR = new THREE.Mesh(legGeom, brownMat);
  this.legR.position.x = 0;
  this.legR.position.z = 7;
  this.legR.position.y = 0;
  this.legR.castShadow = true;
  this.body.add(this.legR);

  this.legL = this.legR.clone();
  this.legL.position.z = - this.legR.position.z;
  this.legL.castShadow = true;
  this.body.add(this.legL);

  // Ensure that every part of the body casts and receives shadows.
  this.body.traverse(function(object) {
    if (object instanceof THREE.Mesh) {
      object.castShadow = true;
      object.receiveShadow = true;
    }
  });
}
现在我们需要把这个模型加入到场景中:
function createHero() {
  hero = new Hero();
  scene.add(hero.mesh);
}
使用 three.js 创建一个模型就是这么简单。如果想学习更多关于 three.js 创建模型的知识,可以参考我在 Codrops 上的详细指导。
创建这个身体后,我们将要让这些部分一个接一个移动起来,知道达成一个简单的步行动画。
整体逻辑在于 Hero 对象中的 run 函数:
Hero.prototype.run = function(){

  // Increment the angle.
  this.runningCycle += .03;
  var t = this.runningCycle;

  // Ensure that the angle we will use is between 0 and 2 Pi.
  t = t % (2*PI);

  // Amplitude is used as the main radius of the legs movement.
  var amp = 4;

  // Update the position and rotation of every part of the body.
  this.legR.position.x =  Math.cos(t) * amp;
  this.legR.position.y = Math.max (0, - Math.sin(t) * amp);

  this.legL.position.x =  Math.cos(t + PI) * amp;
  this.legL.position.y = Math.max (0, - Math.sin(t + PI) * amp);

  if (t<PI){
    this.legR.rotation.z = Math.cos(t * 2 + PI/2) * PI/4;
    this.legL.rotation.z = 0;
  } else{
    this.legR.rotation.z = 0;
    this.legL.rotation.z = Math.cos(t * 2 + PI/2) *  PI/4;
  }

  this.torso.position.y = 8 - Math.cos(  t * 2 ) * amp * .2;
  this.torso.rotation.y = -Math.cos( t + PI ) * amp * .05;

  this.head.position.y = 21 - Math.cos(  t * 2 ) * amp * .3;
  this.head.rotation.x = Math.cos( t ) * amp * .02;
  this.head.rotation.y =  Math.cos( t ) * amp * .01;

  this.handR.position.x = -Math.cos( t ) * amp;
  this.handR.rotation.z = -Math.cos( t ) * PI/8;
  this.handL.position.x = -Math.cos( t + PI) * amp;
  this.handL.rotation.z = -Math.cos( t + PI) * PI/8;
}
这几行代码是最有趣的部分,你可以在 Codepen 中找到步行动画所有的代码。(里面有每一步的演示结果)
一旦你熟练掌握 sine 和 consine 函数,距离和频率,制作不同的周期动画也会变得相当简单,比如奔跑,游泳,飞翔,甚至月球漫步。
到你了!
作者还给出了一个兔子奔跑的动画,有兴趣可以试试。点击 Codepen 链接查看。
知乎专栏:极光日报
原文链接:Exploring Animation And Interaction Techniques With WebGL (A Case Study)
极光日报,极光开发者 的 Side Project,每天导读三篇国外技术类文章,欢迎投稿和关注。
