

###序言
最近在看Android触摸屏事件相关的源码,为了对整个事件体系的了解,所以对事件相关,从事件的产生,写入设备文件到我们的应用层如何获取到事件,整个传递机制源码进行了分析,以下为对于相关代码的梳理过程中的一些代码剖析记录。希望能够对大家有所帮助,同时也希望对于理解不当之处能够给予指正。
针对事件的分析,这里以触摸屏事件为例子,这也是我们最常用的一个事件处理,这里首先抛出我们应用层相关使用代码的例子,然后在来看事件管理的服务的启动到如何读取事件,事件的整个分发流程机制,如何一步步的走到我们的应用层中,其中对于涉及到WMS,View,跨进程一些知识,这里没有具体深入,接下来将针对每一个知识点,进行相关的代码分析。
###应用层
我们平时的开发中,对于应用层的处理,主要在于为View设置触摸监听器,然后从其中的回调函数中得到我们所需要的相关的触摸的数据。我们可以对View进行设置相应的触摸监听器。
@Override
public boolean onTouch(View v, MotionEvent event) {
    float x = event.getX();
    float y = event.getY();
    return true;
}
从这里,我们可以获取到触摸事件的相关信息。那么问题来了,这个事件是从哪里传递来的呢?也就是说这个回调函数是被谁调用的呢?事件是如何传递到该View的。同时也涉及到了一个在应用层,事件的传递问题,当一个事件到达,是如何在View的父子层级中进行传递的。
###Framework层
InputManager
对于Android Framework层的一些service,都是在SystemServer进程中创建的。和大多数的Service一样,InputManager它也是在SystemServer中创建。在SystemServer的startOtherService中,进行了一些Service的创建。(对于SystemServer启动相关在后续也会进行介绍们这里先着于InputManagerService相关。)
InputManager inputManager = new InputManagerService(context);
wm = WindowManagerService.main(context, inputManager,
                    mFactoryTestMode != FactoryTest.FACTORY_TEST_LOW_LEVEL,
                    !mFirstBoot, mOnlyCore);
ServiceManager.addService(Context.WINDOW_SERVICE, wm);
ServiceManager.addService(Context.INPUT_SERVICE, inputManager);
inputManager.setWindowManagerCallbacks(wm.getInputMonitor());
inputManager.start();
首先创建了一个InputManagerService的实例,然后将该服务加入到ServiceManger中,同时为其设置了窗口的输入监听器,然后调用该服务的start方法。这里我们从其构造函数开始,然后再看一下它start方法的实现。
public InputManagerService(Context context) {
    this.mContext = context;
    this.mHandler = new InputManagerHandler(DisplayThread.get().getLooper());

     mPtr = nativeInit(this, mContext, mHandler.getLooper().getQueue());

     ....

    LocalServices.addService(InputManagerInternal.class, new LocalService());
 }
首先创建了一个InputManagerHandler,同时传入了DisplayThread的looper,这里的InputManagerHandle为InputManager的一个内部类,其中进行了一些消息的处理,调用native方法,nativeInit。其native实现在framework/services/core/jni下的com_android_server_input_InputManagerService.cpp
其nativeInit的实现如下
static jlong nativeInit(JNIEnv* env, jclass /* clazz */,
        jobject serviceObj, jobject contextObj, jobject messageQueueObj) {
    sp<MessageQueue> messageQueue = android_os_MessageQueue_getMessageQueue(env, messageQueueObj);
    if (messageQueue == NULL) {
        jniThrowRuntimeException(env, "MessageQueue is not initialized.");
        return 0;
    }

    NativeInputManager* im = new NativeInputManager(contextObj, serviceObj,
            messageQueue->getLooper());
    im->incStrong(0);
    return reinterpret_cast<jlong>(im);
}
获取传递的消息队列,然后根据其创建本地的NativeInputManager。
对于NativeInputManger实例的创建。其构造函数如下所示。
NativeInputManager::NativeInputManager(jobject contextObj,
        jobject serviceObj, const sp<Looper>& looper) :
        mLooper(looper), mInteractive(true) {
    JNIEnv* env = jniEnv();
     ...

    mInteractive = true;
    sp<EventHub> eventHub = new EventHub();
    mInputManager = new InputManager(eventHub, this, this);
}
创建了一个EventHub,同时利用EventHub来创建了一个InputManger实例。InputManger在framework/services/inputflinger下,
InputManger的构造函数代码如下:
InputManager::InputManager(
        const sp<EventHubInterface>& eventHub,
        const sp<InputReaderPolicyInterface>& readerPolicy,
        const sp<InputDispatcherPolicyInterface>& dispatcherPolicy) {
    mDispatcher = new InputDispatcher(dispatcherPolicy);
    mReader = new InputReader(eventHub, readerPolicy, mDispatcher);
    initialize();
}
通过构造函数,我们可以看到,这里创建了一个InputDispatcher根据传入的分发策略,然后创建了InputReader,传递了读的策略和Dispatcher还是有EventHub。接下来调用了initialize方法。
void InputManager::initialize()
{
    mReaderThread = new InputReaderThread(mReader);
    mDispatcherThread = new InputDispatcherThread(mDispatcher);
}
将上面创建的读和分发事件的核心类传入我们所创建的线程之中。到此,在我们的SystemServer中,对于InputManager的创建已经完成,接下来调用了InputManager的start方法,顾名思义,是对于这个InputManger服务的开始。代码中的相关实现。
核心调用
nativeStart(mPtr);static void nativeStart(JNIEnv* env, jclass /* clazz */, jlong ptr) {
NativeInputManager* im = reinterpret_cast<NativeInputManager*>(ptr);
status_t result = im->getInputManager()->start();
}nativeStart函数中调用了InputManager的start方法。该方法执行如下
status_t InputManager::start() {
    status_t result = mDispatcherThread->run("InputDispatcher", PRIORITY_URGENT_DISPLAY);
    result = mReaderThread->run("InputReader", PRIORITY_URGENT_DISPLAY);
}
至此,我们可以看到start方法所做的事情是启动了在之前创建InputManger的时候,创建的DispatcherThread和ReaderThread.
上述创建启动流程图。
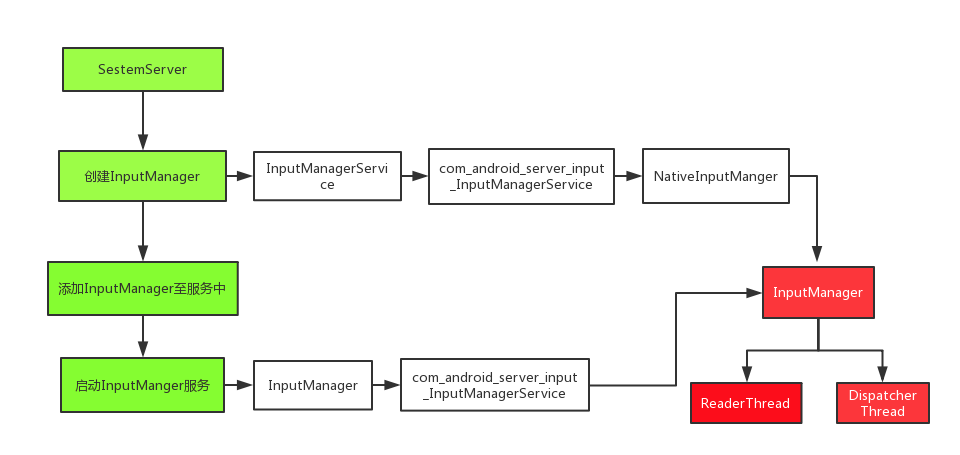
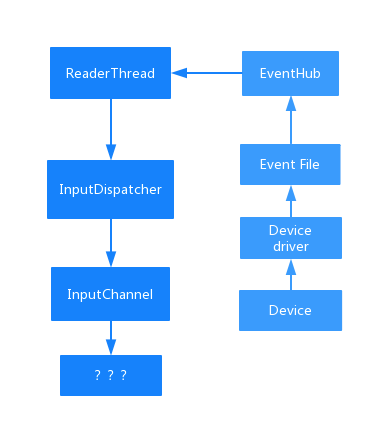
InputManager是系统事件处理的核心,它使用了两个线程,一个是InputReaderThread,读和处理未加工的输入事件然后发送事件到由DispatcherThread管理的队列中。InputDispatcherThread等待着在队列上新来的事件,然后将它们分发给应用程序。而对于上层的类只是对这的一个包装。所以要对输入服务有个细致的了解,对于InputManager类的剖析至关重要。
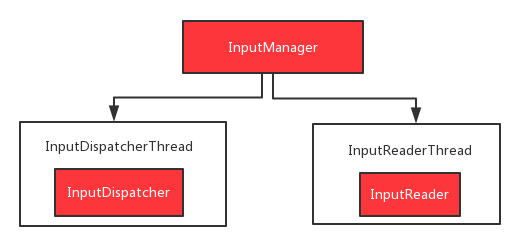
至此,我们可以看到InputManager开启两个线程,同时创建了Dispatcher核心类和InputReader核心类。
####EventHub
在NativeInputManager的构造函数中,创建了EventHub,同时将其作为参数传递给InputManager,在InputManager构造函数中,创建InputRead的时候,传递了EventHub,EventHub的作用是将来源不同的各种信息,转化成为一种类型的信息,然后将这些信息提交到上层,给上层做处理。也就是说在输入设备中,各种类型的输入信息,通过EventHub进行一个处理之后,将信息转化为同一种类型的信息传递到上层。
- epoll
在对源码分析之前,这里先讲一下epoll,当我们的应用程序要对多个输入流进行监控的时候,处理多个输入流来的数据,我们可以采取的一个方式是,对于这每一个流进行遍历,检测到有数据,读出。
while true {
  for i in stream[]; {
    if i has data
    read until unavailable
  }
}
如果有数据,则读取直到其中没有数据为止。该种方式也称为忙轮询,但是当输入流一直没有数据的时候,就是在空消耗CPU,因此产生了select,poll,epoll。select和poll相似,其实现为,当没有数据的时候阻塞,一旦有了数据,通过轮询的方式读取数据。
while true {
  select(streams[])
  for i in streams[] {
    if i has data
    read until unavailable
  }
}
但是当我们的流比较多的时候,对于轮询检测每一个输入流,也是比较消耗的,因此,epoll产生了,当没有数据的时候,岂会阻塞,但是当有数据的时候,epoll能够把哪一个流发生了怎样的事件发送给我们,这样我们对返回的流进行操作就是有意义的了。
- Eventhub
先从EventHub的构造函数看起。
EventHub::EventHub(void) :
      mBuiltInKeyboardId(NO_BUILT_IN_KEYBOARD), mNextDeviceId(1), mControllerNumbers(),
        mOpeningDevices(0), mClosingDevices(0),
        mNeedToSendFinishedDeviceScan(false),
        mNeedToReopenDevices(false), mNeedToScanDevices(true),
        mPendingEventCount(0), mPendingEventIndex(0), mPendingINotify(false) {

    acquire_wake_lock(PARTIAL_WAKE_LOCK, WAKE_LOCK_ID);
    //创建一个epoll句柄
    mEpollFd = epoll_create(EPOLL_SIZE_HINT);

    mINotifyFd = inotify_init();

    //监视dev/input目录的变化删除和创建变化
    int result = inotify_add_watch(mINotifyFd, DEVICE_PATH, IN_DELETE | IN_CREATE);

    struct epoll_event eventItem;
    memset(&eventItem, 0, sizeof(eventItem));
    eventItem.events = EPOLLIN;
    eventItem.data.u32 = EPOLL_ID_INOTIFY;

    //把inotify的句柄加入到epoll监测
    result = epoll_ctl(mEpollFd, EPOLL_CTL_ADD, mINotifyFd, &eventItem);

    //创建匿名管道
    int wakeFds[2];
    result = pipe(wakeFds);
    mWakeReadPipeFd = wakeFds[0];
    mWakeWritePipeFd = wakeFds[1];

    //将管道的读写端设置为非阻塞
    result = fcntl(mWakeReadPipeFd, F_SETFL, O_NONBLOCK);
    result = fcntl(mWakeWritePipeFd, F_SETFL, O_NONBLOCK);

    eventItem.data.u32 = EPOLL_ID_WAKE;

    //将管道的读端加入到epoll监测
    result = epoll_ctl(mEpollFd, EPOLL_CTL_ADD, mWakeReadPipeFd, &eventItem);

    int major, minor;
    getLinuxRelease(&major, &minor);
    // EPOLLWAKEUP was introduced in kerel 3.5
    mUsingEpollWakeup = major > 3 || (major == 3 && minor >= 5);
}
构造函数首先创建了epoll句柄,然后创建了inotify句柄,然后创建了一个匿名管道,并将匿名管道设置为非阻塞,inotify是Linux下的一个监控目录和文件变化的机制,这里监控了/dev/input目录,当这个目录发生变化,就表明有输入设备加入或者移除。至此,EventHub只是进行了一些监控操作的处理。而对于EventHub相关事件处理部分的调用则是在创建ReaderThread的时候。
ReaderThread是继承自Android的Thread实现。下面是一个创建Android中Native 线程的方式。
namespace android {

class MyThread: public Thread {
public:
    MyThread();
    //virtual ~MyThread();
    //如果返回true,循环调用此函数,返回false下一次不会再调用此函数
    virtual bool threadLoop();
};
}
ReaderThread的threadLoop实现如下,由于返回的结果为true,所以这里InputReader的loopOnce会被循环调用。
bool InputReaderThread::threadLoop() {
    mReader->loopOnce();
    return true;
}
下面是loopOnce实现的简略版,只是抽离了其中对于事件的处理。
void InputReader::loopOnce() {
      .....
    //从EventHub中获取事件
    size_t count = mEventHub->getEvents(timeoutMillis, mEventBuffer, EVENT_BUFFER_SIZE);

    { // acquire lock
        AutoMutex _l(mLock);
        mReaderIsAliveCondition.broadcast();
        //如果读到数据,处理事件数据
        if (count) {
            processEventsLocked(mEventBuffer, count);
        }

        if (mNextTimeout != LLONG_MAX) {
            nsecs_t now = systemTime(SYSTEM_TIME_MONOTONIC);
            if (now >= mNextTimeout) {
#if DEBUG_RAW_EVENTS
                ALOGD("Timeout expired, latency=%0.3fms", (now - mNextTimeout) * 0.000001f);
#endif
                mNextTimeout = LLONG_MAX;
                timeoutExpiredLocked(now);
            }
        }

        if (oldGeneration != mGeneration) {
            inputDevicesChanged = true;
            getInputDevicesLocked(inputDevices);
        }
    } // release lock

   //将排队的事件队列发送给监听者,实际上这个监听者就是Input dispatcher
    mQueuedListener->flush();
}其中比较关键的几个地方为getEvents()和processEventsLocked()接下来让对这个几个重要的方法进行一一的分析。
- getEvents()
size_t EventHub::getEvents(int timeoutMillis, RawEvent* buffer, size_t bufferSize) {
    RawEvent* event = buffer;
    size_t capacity = bufferSize;
     for(;;) {
        ....
      while (mPendingEventIndex < mPendingEventCount) {
         const struct epoll_event& eventItem = mPendingEventItems[mPendingEventIndex++];
        .....
       ssize_t deviceIndex = mDevices.indexOfKey(eventItem.data.u32);
     if (eventItem.events & EPOLLIN) {
         int32_t readSize = read(device->fd, readBuffer,
                        sizeof(struct input_event) * capacity);
        if (readSize == 0 || (readSize < 0 && errno == ENODEV)) {
           // 设备被移除,关闭设备
           deviceChanged = true;
           closeDeviceLocked(device);
         } else if (readSize < 0) {
             //无法获得事件
             if (errno != EAGAIN && errno != EINTR) {
                 ALOGW("could not get event (errno=%d)", errno);
             }
         } else if ((readSize % sizeof(struct input_event)) != 0) {
            //获得事件的大小非事件类型整数倍
            ALOGE("could not get event (wrong size: %d)", readSize);
       } else {
           int32_t deviceId = device->id == mBuiltInKeyboardId ? 0 : device->id;
          //计算读入了多少事件
           size_t count = size_t(readSize) / sizeof(struct input_event);
           for (size_t i = 0; i < count; i++) {
               struct input_event& iev = readBuffer[i];
               if (iev.type == EV_MSC) {
                 if (iev.code == MSC_ANDROID_TIME_SEC) {
                     device->timestampOverrideSec = iev.value;
                     continue;
                  } else if (iev.code == MSC_ANDROID_TIME_USEC) {
                     device->timestampOverrideUsec = iev.value;
                     continue;
                  }
               }
              //事件时间相关计算,时间的错误可能会导致ANR和一些bug。这里采取一系列的防范
               .........
             event->deviceId = deviceId;
             event->type = iev.type;
             event->code = iev.code;
             event->value = iev.value;
             event += 1;
             capacity -= 1;
          }
        if (capacity == 0) {
          //每到我们计算完一个事件,capacity就会减1,如果为0。则表示  结果缓冲区已经满了,
      //需要重置开始读取时间的索引值,来读取下一个事件迭代
           mPendingEventIndex -= 1;
           break;
      }
 }
    //表明读到事件了,跳出循环
    if (event != buffer || awoken) {
            break;
     }
     mPendingEventIndex = 0;
     int pollResult = epoll_wait(mEpollFd, mPendingEventItems, EPOLL_MAX_EVENTS, timeoutMillis);
       if (pollResult == 0) {
          mPendingEventCount = 0;
          break;
       }
      //判断是否有事件发生
       if (pollResult < 0) {
          mPendingEventCount = 0;
        } else {
            //产生的事件的数目
          mPendingEventCount = size_t(pollResult);
        }
    }
    //产生的事件数目
    return event - buffer;
}
方法开始部分会进行一些新增设备和移除设备的相关操作,来更新内部的状态。这里我们聚焦于事件部分。来看一下,触摸屏事件是如何被读出的。这里传入了一个参数RawEvent* ,RawEvent的指针,通过这个指针作为起始地址,记录了我们的事件,对于事件处理相关,是在一个循环体中,获取时间,检测事件对应的先关设备类型,然后读取事件,为事件进行赋值,如果有事件被读到,直接跳出循环,如果没有则会继续等待直到事件的到来。同时更新mPendingEventCout和mPendingEventIndex,通过这两个变量来控制事件的读取,同时读取的过程中和开始也会进行一些设备增加或者移除的相关事件的处理。事件的来源则是通过epoll_wait得到。而这个epoll也就是我们开始的时候对一些目录的输入监听。而事件的写入则是由相关的设备驱动写入,这里对驱动相关不再展开分析。
InputReaderThread函数不断地调用looperOnce函数,不断的从中读取事件,那么下一个问题来了,读取到事件要放置到哪里,又在哪里被消耗掉了呢?也就是事件接下来的流向问题。让我们回到looperOnce之前。
- processEventsLocked
在调用了getEvent之后,又调用了函数processEventsLocked
void InputReader::processEventsLocked(const RawEvent* rawEvents, size_t count) {
    for (const RawEvent* rawEvent = rawEvents; count;) {
        int32_t type = rawEvent->type;
        size_t batchSize = 1;
        if (type < EventHubInterface::FIRST_SYNTHETIC_EVENT) {
            int32_t deviceId = rawEvent->deviceId;
            while (batchSize < count) {
                if (rawEvent[batchSize].type >= EventHubInterface::FIRST_SYNTHETIC_EVENT
                        || rawEvent[batchSize].deviceId != deviceId) {
                    break;
                }
                batchSize += 1;
            }
            processEventsForDeviceLocked(deviceId, rawEvent, batchSize);
        } else {
            switch (rawEvent->type) {
            case EventHubInterface::DEVICE_ADDED:
                addDeviceLocked(rawEvent->when, rawEvent->deviceId);
                break;
            case EventHubInterface::DEVICE_REMOVED:
                removeDeviceLocked(rawEvent->when, rawEvent->deviceId);
                break;
            case EventHubInterface::FINISHED_DEVICE_SCAN:
                handleConfigurationChangedLocked(rawEvent->when);
                break;
            default:
                ALOG_ASSERT(false); // can't happen
                break;
            }
        }
        count -= batchSize;
        rawEvent += batchSize;
    }
}首先对于事件类型进行了判断,将事件中添加,移除设备的事件,和设备自身产生的事件进行了区分,这里我们只关心对于设备自身产生的事件。也就是processEventsForDeviceLocked函数中所进行的操作。
void InputReader::processEventsForDeviceLocked(int32_t deviceId,
        const RawEvent* rawEvents, size_t count) {
    ssize_t deviceIndex = mDevices.indexOfKey(deviceId);
    if (deviceIndex < 0) {
        ALOGW("Discarding event for unknown deviceId %d.", deviceId);
        return;
    }

    InputDevice* device = mDevices.valueAt(deviceIndex);
    if (device->isIgnored()) {
        //ALOGD("Discarding event for ignored deviceId %d.", deviceId);
        return;
    }

    device->process(rawEvents, count);
}
根据事件获得相应的设备类型,然后将事件交给相应的设备处理。
InputDevice的process方法
void InputDevice::process(const RawEvent* rawEvents, size_t count) {
     ....
    for (size_t i = 0; i < numMappers; i++) {
           InputMapper* mapper = mMappers[i];
           mapper->process(rawEvent);
    }
    ....
}
这里的事件又交给了InputMapper来处理
- InputMapper
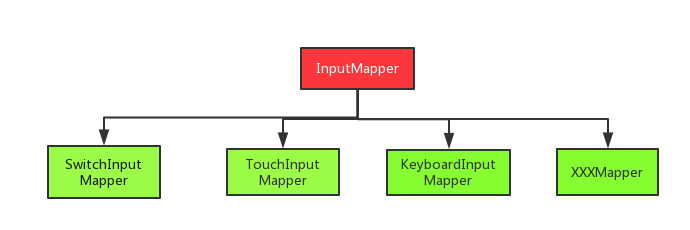
InputMapper对应了很多的子类,这里根据事件的类型进行相应的派发,处理。
事件到了这里之后,如何传递到应用层,这里mapper->process进行了那些处理。这里来看一下对于触摸屏事件的处理函数。
void TouchInputMapper::process(const RawEvent* rawEvent) {
    mCursorButtonAccumulator.process(rawEvent);
    mCursorScrollAccumulator.process(rawEvent);
    mTouchButtonAccumulator.process(rawEvent);

    if (rawEvent->type == EV_SYN && rawEvent->code == SYN_REPORT) {
        sync(rawEvent->when);
    }
}
通过这里的函数处理,我们继续追踪函数的数据流向。对于相关的事件处理,这里最终执行的是将
void TouchInputMapper::sync(nsecs_t when) {
    .....
    processRawTouches(false /*timeout*/);
}在相关的函数调用之后,最终调用了dispatchTouches
void TouchInputMapper::dispatchTouches(nsecs_t when, uint32_t policyFlags) {
      ....
    dispatchMotion();
      ....
}
对于相关事件的分发最终调用到了dispatchMotion(),对事件数据进行组装之后,调用了
void TouchInputMapper::dispatchMotion() {
   ....
   NotifyMotionArgs args(when, getDeviceId(), source, policyFlags,
            action, actionButton, flags, metaState, buttonState, edgeFlags,
            mViewport.displayId, pointerCount, pointerProperties, pointerCoords,
            xPrecision, yPrecision, downTime);
    getListener()->notifyMotion(&args);
}
getListener函数
InputListenerInterface* InputReader::ContextImpl::getListener() {
    return mReader->mQueuedListener.get();
}
notifyMotion函数实现
void QueuedInputListener::notifyMotion(const NotifyMotionArgs* args) {
    mArgsQueue.push(new NotifyMotionArgs(*args));
}这里可以看到,我们将触摸相关的事件进行包装之后,将其加入到一个ArgsQueue队列,到此,我们已经将数据加入到参数队列中,到此事件从设备文件获取到写入流程已经完成,这里让我们再回到loopOnce方法中,最后调用了QueuedInputListener的flush方法,
void QueuedInputListener::flush() {
    size_t count = mArgsQueue.size();
    for (size_t i = 0; i < count; i++) {
        NotifyArgs* args = mArgsQueue[i];
        args->notify(mInnerListener);
        delete args;
    }
    mArgsQueue.clear();
}
NotifyArgs的notify函数实现
void NotifyMotionArgs::notify(const sp<InputListenerInterface>& listener) const {
    listener->notifyMotion(this);
}
对于这个listener的创建来自于InputReader构建的时候。
mQueuedListener = new QueuedInputListener(listener); mReader = new InputReader(eventHub, readerPolicy, mDispatcher);而这里的Listener则是InputDispatcher,InputDispatcher 的notifyMotion实现源码。
void InputDispatcher::notifyMotion(const NotifyMotionArgs* args) {
    .....
   MotionEvent event;
   event.initialize(args->deviceId, args->source, args->action, args->actionButton,
                    args->flags, args->edgeFlags, args->metaState, args->buttonState,
                    0, 0, args->xPrecision, args->yPrecision,
                    args->downTime, args->eventTime,
                    args->pointerCount, args->pointerProperties, args->pointerCoords);
    ....
  MotionEntry* newEntry = new MotionEntry(args->eventTime,
                args->deviceId, args->source, policyFlags,
                args->action, args->actionButton, args->flags,
                args->metaState, args->buttonState,
                args->edgeFlags, args->xPrecision, args->yPrecision, args->downTime,
                args->displayId,
                args->pointerCount, args->pointerProperties, args->pointerCoords, 0, 0);
   needWake = enqueueInboundEventLocked(newEntry);
    ....
   if (needWake) {
      mLooper->wake();
   }
}
在该函数中,所做的事情是对于所传递的参数,构造MotionEntry,然后将其加入到enqueueInboundEventLocked之中。然后唤醒其中的looper。
bool InputDispatcher::enqueueInboundEventLocked(EventEntry* entry) {
    bool needWake = mInboundQueue.isEmpty();
    mInboundQueue.enqueueAtTail(entry);
    ...
    //进行一些事件和窗口相关的判断处理
}
Dispatcher开启的线程中,每次循环的操作如何?
bool InputDispatcherThread::threadLoop() {
    mDispatcher->dispatchOnce();
    return true;
}
Dispatcher下dispatchOnce的实现
void InputDispatcher::dispatchOnce() {
    ...
   dispatchOnceInnerLocked(&nextWakeupTime);
    ...
}
void InputDispatcher::dispatchOnceInnerLocked(nsecs_t* nextWakeupTime) {
....
mPendingEvent = mInboundQueue.dequeueAtHead();
....
switch (mPendingEvent->type) {
case EventEntry::TYPE_MOTION: {
MotionEntry* typedEntry = static_cast<MotionEntry*>(mPendingEvent);
if (dropReason == DROP_REASON_NOT_DROPPED && isAppSwitchDue) {
dropReason = DROP_REASON_APP_SWITCH;
}
if (dropReason == DROP_REASON_NOT_DROPPED
&& isStaleEventLocked(currentTime, typedEntry)) {
dropReason = DROP_REASON_STALE;
}
if (dropReason == DROP_REASON_NOT_DROPPED && mNextUnblockedEvent) {
dropReason = DROP_REASON_BLOCKED;
}
done = dispatchMotionLocked(currentTime, typedEntry,
&dropReason, nextWakeupTime);
break;
}
....
}
}从mInboudQueue中,获取到事件,然后对事件类型进行判断,判断之后调用了dispatchMotionLocked函数,来继续进行事件的传递。
dispatchEventLocked,
void InputDispatcher::dispatchEventLocked(nsecs_t currentTime,
    EventEntry* eventEntry, const Vector<InputTarget>& inputTargets) {
    ....
    pokeUserActivityLocked(eventEntry);
    .....
    for (size_t i = 0; i < inputTargets.size(); i++) {
        const InputTarget& inputTarget = inputTargets.itemAt(i);

        ssize_t connectionIndex = getConnectionIndexLocked(inputTarget.inputChannel);
        if (connectionIndex >= 0) {
            sp<Connection> connection = mConnectionsByFd.valueAt(connectionIndex);
            prepareDispatchCycleLocked(currentTime, connection, eventEntry, &inputTarget);
        }
    }
}
获得目标输入,根据InputChannel获取相应的连接,然后调用prepareDispatchCycleLocked(),进行事件的派发。enqueueDispatchEntriesLocked,在该方法中又调用了startDispatchCycleLocked方法。其实现为
void InputDispatcher::startDispatchCycleLocked(nsecs_t currentTime,
        const sp<Connection>& connection) {
   EventEntry* eventEntry = dispatchEntry->eventEntry;
    ....
   switch (eventEntry->type) {
      ....
    case EventEntry::TYPE_MOTION: {
      status = connection->inputPublisher.publishMotionEvent( ....);
      break;
    }
    ....
   }
    ...
}
至此调用了connection 的inputPublisher的publishMotionEvent方法将事件分发消耗。
InputPublisher定义在InputTransport.cpp中,
status_t InputPublisher::publishMotionEvent(...) {
  ....
  InputMessage msg;
  msg.header.type = InputMessage::TYPE_MOTION;
  msg.body.motion.seq = seq;
  msg.body.motion.deviceId = deviceId;
  msg.body.motion.source = source;
  msg.body.motion.action = action;
  msg.body.motion.actionButton = actionButton;
  msg.body.motion.flags = flags;
  msg.body.motion.edgeFlags = edgeFlags;
  msg.body.motion.metaState = metaState;
  msg.body.motion.buttonState = buttonState;
  msg.body.motion.xOffset = xOffset;
  msg.body.motion.yOffset = yOffset;
  msg.body.motion.xPrecision = xPrecision;
  msg.body.motion.yPrecision = yPrecision;
  msg.body.motion.downTime = downTime;
  msg.body.motion.eventTime = eventTime;
  msg.body.motion.pointerCount = pointerCount;
  for (uint32_t i = 0; i < pointerCount; i++) {
      msg.body.motion.pointers[i].properties.copyFrom(pointerProperties[i]);
      msg.body.motion.pointers[i].coords.copyFrom(pointerCoords[i]);
  }
    return mChannel->sendMessage(&msg);
}
该方法所执行的操作是利用传入的触摸信息,构建点击消息,然后通过InputChannel将消息发送出去。这里引出了InputChannel,在此,我们通InputPublisher的创建反推出InputChannel是何时被引入的,何时被创建的。从而进一步分析其作用。在分析之前先让我们来对上述的分析过程做一个总结。
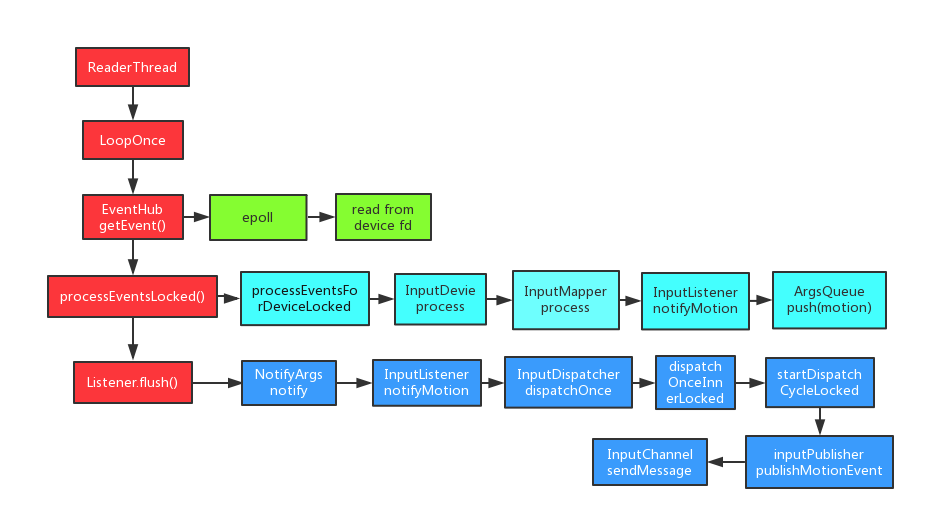
ReaderThread开启后会从EventHub中轮询获取时间,获取到事件之后,对手将进行一系列的处理,最终将经过一系列处理封装的事件信息通过InputChannel发送出去。
到此,对于输入事件,我们已经分析到了InputChannel,对于其上的具体分析转化,将是接下来分析的核心。
InputChannel
从上面分析可以看到事件传递部分最后是通过InputChannel所发送出去的,那么InputChannel是在何时被创建的呢?何时被InputManager所使用的呢?
public void registerInputChannel(InputChannel inputChannel,
            InputWindowHandle inputWindowHandle) {
   if (inputChannel == null) {
      throw new IllegalArgumentException("inputChannel must not be null.");
   }
   nativeRegisterInputChannel(mPtr, inputChannel, inputWindowHandle, false);
}
nativeRegisterInputManger
static void nativeRegisterInputChannel(JNIEnv* env, jclass /* clazz */,
        jlong ptr, jobject inputChannelObj, jobject inputWindowHandleObj, jboolean monitor) {
    NativeInputManager* im = reinterpret_cast<NativeInputManager*>(ptr);

    sp<InputChannel> inputChannel = android_view_InputChannel_getInputChannel(env,
            inputChannelObj);
    if (inputChannel == NULL) {
        throwInputChannelNotInitialized(env);
        return;
    }

    sp<InputWindowHandle> inputWindowHandle =
            android_server_InputWindowHandle_getHandle(env, inputWindowHandleObj);

    status_t status = im->registerInputChannel(
            env, inputChannel, inputWindowHandle, monitor);
    if (status) {
        String8 message;
        message.appendFormat("Failed to register input channel.  status=%d", status);
        jniThrowRuntimeException(env, message.string());
        return;
    }

    if (! monitor) {
        android_view_InputChannel_setDisposeCallback(env, inputChannelObj,
                handleInputChannelDisposed, im);
    }
}NativeInputManager的registerInputChannel还会调用到InputDispatcher的registerInputChannel,会通过InputChannel创建相应的Connection,同时将InputChannel加入到相应的监控之中。在上面对代码的分析之中,获取InputChannel,就是通过这个Connection来获取的。
status_t InputDispatcher::registerInputChannel(const sp<InputChannel>& inputChannel,
        const sp<InputWindowHandle>& inputWindowHandle, bool monitor) {
    { // acquire lock
        AutoMutex _l(mLock);

        if (getConnectionIndexLocked(inputChannel) >= 0) {
            ALOGW("Attempted to register already registered input channel '%s'",
                    inputChannel->getName().string());
            return BAD_VALUE;
        }

        sp<Connection> connection = new Connection(inputChannel, inputWindowHandle, monitor);

        int fd = inputChannel->getFd();
        mConnectionsByFd.add(fd, connection);

        if (monitor) {
            mMonitoringChannels.push(inputChannel);
        }

        mLooper->addFd(fd, 0, ALOOPER_EVENT_INPUT, handleReceiveCallback, this);
    } // release lock

    // Wake the looper because some connections have changed.
    mLooper->wake();
    return OK;
}
那么这个InputChannel是在何时创建的呢?同时,对于InputReaderThread和InputDispatcherThread是运行在SystemServer进程中的,而我们的应用进程是和其不在同一个进程中的。这之间一定也是有进程间的通信机制在里面。
InputChannel的创建是在 ViewRootImpl中setView方法中。
public void setView(View view, WindowManager.LayoutParams attrs, View panelParentView) {
    ....
  if ((mWindowAttributes.inputFeatures
                        & WindowManager.LayoutParams.INPUT_FEATURE_NO_INPUT_CHANNEL) == 0) {
       mInputChannel = new InputChannel();
   }
  ....
  res = mWindowSession.addToDisplay(mWindow, mSeq, mWindowAttributes,
                            getHostVisibility(), mDisplay.getDisplayId(),
                            mAttachInfo.mContentInsets, mAttachInfo.mStableInsets,
                            mAttachInfo.mOutsets, mInputChannel);
  ....
}这里对于ViewRootImpl和WindowSession相关暂且不介绍,对于这方面的知识,需要很大的篇幅来介绍,这里先只是讲到是在这里创建的,对于其相关的内容将在后续的文章中介绍。这里首先是创建了一个InputChannel,然后将其调用了WindowSession的addToDisplay方法将其作为参数传递。
public InputChannel() {
}在InputChannel中的方法都为调用了相应的native方法。这里调用的addToDisplay将会把InputChannel添加到WindowManagerService中。会调用WMS的addWindow方法。
 public int addWindow(Session session, IWindow client, int seq,
            WindowManager.LayoutParams attrs, int viewVisibility, int displayId,
            Rect outContentInsets, Rect outStableInsets, Rect outOutsets,
            InputChannel outInputChannel) {
      ....

      final boolean openInputChannels = (outInputChannel != null
                    && (attrs.inputFeatures & INPUT_FEATURE_NO_INPUT_CHANNEL) == 0);
      if  (openInputChannels) {
          win.openInputChannel(outInputChannel);
      }
      ....
}
对于InputChannel的相关处理交给了WindowState的openInputChannel方法。
void openInputChannel(InputChannel outInputChannel) {
    if (mInputChannel != null) {
        throw new IllegalStateException("Window already has an input channel.");
     }
     String name = makeInputChannelName();
     InputChannel[] inputChannels = InputChannel.openInputChannelPair(name);
     mInputChannel = inputChannels[0];
     mClientChannel = inputChannels[1];
     mInputWindowHandle.inputChannel = inputChannels[0];
     if (outInputChannel != null) {
       mClientChannel.transferTo(outInputChannel);
       mClientChannel.dispose();
       mClientChannel = null;
      } else {
         mDeadWindowEventReceiver = new DeadWindowEventReceiver(mClientChannel);
      }
       mService.mInputManager.registerInputChannel(mInputChannel, mInputWindowHandle);
}首先调用了InputChannel的openInputChannelPair方法,该方法调用了InputChannel的native方法nativeOpenInputChannelPair,创建了两个InputChannel,对其中一个通过InputManager进行了InputChannel的注册。对于InputChannel的相关Native的实现是在InputTransport中,nativeOpenInputChannelPair的源码如下。
status_t InputChannel::openInputChannelPair(const String8& name,
        sp<InputChannel>& outServerChannel, sp<InputChannel>& outClientChannel) {
    int sockets[2];
    if (socketpair(AF_UNIX, SOCK_SEQPACKET, 0, sockets)) {
        status_t result = -errno;
        ALOGE("channel '%s' ~ Could not create socket pair.  errno=%d",
                name.string(), errno);
        outServerChannel.clear();
        outClientChannel.clear();
        return result;
    }

    int bufferSize = SOCKET_BUFFER_SIZE;
    setsockopt(sockets[0], SOL_SOCKET, SO_SNDBUF, &bufferSize, sizeof(bufferSize));
    setsockopt(sockets[0], SOL_SOCKET, SO_RCVBUF, &bufferSize, sizeof(bufferSize));
    setsockopt(sockets[1], SOL_SOCKET, SO_SNDBUF, &bufferSize, sizeof(bufferSize));
    setsockopt(sockets[1], SOL_SOCKET, SO_RCVBUF, &bufferSize, sizeof(bufferSize));

    String8 serverChannelName = name;
    serverChannelName.append(" (server)");
    outServerChannel = new InputChannel(serverChannelName, sockets[0]);

    String8 clientChannelName = name;
    clientChannelName.append(" (client)");
    outClientChannel = new InputChannel(clientChannelName, sockets[1]);
    return OK;
}这里创建了两个Socket,这两个Socket设置具备读写双端,然后根据创建的socket,创建出两个InputChannel,一个Server,一个Client。这样在SystemServer进程和应用进程间的InputChannel的通信就可以通过这边,由于两个channel不在同一个进程中,这里进程通信则是通过其中的socket来进行。在sendMessage和receiveMessage中,通过对Socket的写,读操作来实现消息的传递。
status_t InputChannel::sendMessage(const InputMessage* msg) {
    size_t msgLength = msg->size();
    ssize_t nWrite;
    do {
        nWrite = ::send(mFd, msg, msgLength, MSG_DONTWAIT | MSG_NOSIGNAL);
    } while (nWrite == -1 && errno == EINTR);

    if (nWrite < 0) {
        int error = errno;
        if (error == EAGAIN || error == EWOULDBLOCK) {
            return WOULD_BLOCK;
        }
        if (error == EPIPE || error == ENOTCONN || error == ECONNREFUSED || error == ECONNRESET) {
            return DEAD_OBJECT;
        }
        return -error;
    }

    if (size_t(nWrite) != msgLength) {
        return DEAD_OBJECT;
    }
    return OK;
}
接收消息,通过读socket的方式来读取消息。
status_t InputChannel::receiveMessage(InputMessage* msg) {
    ssize_t nRead;
    do {
        nRead = ::recv(mFd, msg, sizeof(InputMessage), MSG_DONTWAIT);
    } while (nRead == -1 && errno == EINTR);

    if (nRead < 0) {
        int error = errno;
        if (error == EAGAIN || error == EWOULDBLOCK) {
            return WOULD_BLOCK;
        }
        if (error == EPIPE || error == ENOTCONN || error == ECONNREFUSED) {
            return DEAD_OBJECT;
        }
        return -error;
    }

    if (nRead == 0) { // check for EOF
        return DEAD_OBJECT;
    }

    if (!msg->isValid(nRead)) {
        return BAD_VALUE;
    }
    return OK;
}
接收端的消息由谁来触发呢?是如何触发开始接受消息,消息如何在传到InputChannel之后,进行的进一步的数据传递呢?这是接下来所要去分析的,这里先对上面InputChannel进行一个总结。

之前的setView中,我们创建了InputChannel之后,开启了对于InputChannel中输入事件的监听。
if (mInputChannel != null) {
   if (mInputQueueCallback != null) {
       mInputQueue = new InputQueue();
       mInputQueueCallback.onInputQueueCreated(mInputQueue);
  }
   mInputEventReceiver = new WindowInputEventReceiver(mInputChannel,
                            Looper.myLooper());
}
WindowInputEventReceiver的构造函数如下,其继承自InputEventReceiver。
final class WindowInputEventReceiver extends InputEventReceiver {
     public WindowInputEventReceiver(InputChannel inputChannel, Looper looper) {
         super(inputChannel, looper);
     }
      ....
}
InputEventReceiver的构造函数源码如下
public InputEventReceiver(InputChannel inputChannel, Looper looper) {
     ....
     mInputChannel = inputChannel;
     mMessageQueue = looper.getQueue();
     mReceiverPtr = nativeInit(new WeakReference<InputEventReceiver>(this),
                inputChannel, mMessageQueue);
}这里调用了native方法来做初始化,相关的native方法的实现在android_view_InputEventReceiver.cpp
static jlong nativeInit(JNIEnv* env, jclass clazz, jobject receiverWeak,
        jobject inputChannelObj, jobject messageQueueObj) {
   ....
  sp<InputChannel> inputChannel = android_view_InputChannel_getInputChannel(env,
            inputChannelObj);
  sp<MessageQueue> messageQueue = android_os_MessageQueue_getMessageQueue(env, messageQueueObj);
  sp<NativeInputEventReceiver> receiver = new NativeInputEventReceiver(env,
            receiverWeak, inputChannel, messageQueue);
    status_t status = receiver->initialize();
  .....
}根据传入的InputChannel和MessageQueue,创建一个NativeInputEventReceiver,然后调用其initialize方法。
status_t NativeInputEventReceiver::initialize() {
    setFdEvents(ALOOPER_EVENT_INPUT);
    return OK;
}在initialize()方法中,只调用了一个函数setFdEvents,
void NativeInputEventReceiver::setFdEvents(int events) {
    if (mFdEvents != events) {
        mFdEvents = events;
        int fd = mInputConsumer.getChannel()->getFd();
        if (events) {
            mMessageQueue->getLooper()->addFd(fd, 0, events, this, NULL);
        } else {
            mMessageQueue->getLooper()->removeFd(fd);
        }
    }
}从InputConsumer中获取到channel的fd,然后调用Looper的addFd方法。
int ALooper_addFd(ALooper* looper, int fd, int ident, int events,
        ALooper_callbackFunc callback, void* data) {
    return ALooper_to_Looper(looper)->addFd(fd, ident, events, callback, data);
}
Looper的addFd的实现如下
int Looper::addFd(int fd, int ident, int events, const sp<LooperCallback>& callback, void* data) {
    Request request;
    request.fd = fd;
    request.ident = ident;
    request.events = events;
    request.seq = mNextRequestSeq++;
    request.callback = callback;
     request.data = data;
     if (mNextRequestSeq == -1) mNextRequestSeq = 0;
     struct epoll_event eventItem;
     request.initEventItem(&eventItem);
     ssize_t requestIndex = mRequests.indexOfKey(fd);
      if (requestIndex < 0) {
          int epollResult = epoll_ctl(mEpollFd, EPOLL_CTL_ADD, fd, & eventItem);
          if (epollResult < 0) {
                return -1;
            }
         mRequests.add(fd, request);
       }
}该方法所执行的操作就是对传递的fd添加epoll监控,Looper会循环调用pollOnce方法,而pollOnce方法的核心实现就是pollInner。其代码大致实现内容为等待消息的到来,当有消息到来后,根据消息类型做一些判断处理,然后调用其相关的callback。我们当前是对于开启的socket的一个监听,当有数据到来,我们便会执行相应的回调。这里对于InputChannel的回调是在调用了NativeInputEventReceiver的handleEvent方法。
int NativeInputEventReceiver::handleEvent(int receiveFd, int events, void* data) {
    .....
   if (events & ALOOPER_EVENT_INPUT) {
        JNIEnv* env = AndroidRuntime::getJNIEnv();
        status_t status = consumeEvents(env, false /*consumeBatches*/, -1, NULL);
        mMessageQueue->raiseAndClearException(env, "handleReceiveCallback");
        return status == OK || status == NO_MEMORY ? 1 : 0;
    }
    ....
    return 1;
}
对于Event的处理,这里调用consumeEvents来对事件进行处理。
status_t NativeInputEventReceiver::consumeEvents(JNIEnv* env,
        bool consumeBatches, nsecs_t frameTime, bool* outConsumedBatch) {
    ...
    for(;;) {
      ...
     InputEvent* inputEvent;
     status_t status = mInputConsumer.consume(&mInputEventFactory,
                consumeBatches, frameTime, &seq, &inputEvent);
        ...
    }
   ...
}
InputConsumer是在InputTransport中做的声明。
status_t InputConsumer::consume(InputEventFactoryInterface* factory,
        bool consumeBatches, nsecs_t frameTime, uint32_t* outSeq, InputEvent** outEvent) {
    while (!*outEvent) {
         ....
         status_t result = mChannel->receiveMessage(&mMsg);
          ....
    }
}
调用consume方法会持续的调用InputChannel的receiveMessage方法来从socket中读取数据。到这里,我们已经将写入socket的事件读出来了。
####ViewRootImpl
事件在从socket读出之后,经过传递,最终会调用到ViewRootImpl的enqueueInputEvent方法。
void enqueueInputEvent(InputEvent event,
            InputEventReceiver receiver, int flags, boolean processImmediately) {
     adjustInputEventForCompatibility(event);
     QueuedInputEvent q = obtainQueuedInputEvent(event, receiver, flags);

     QueuedInputEvent last = mPendingInputEventTail;
     if (last == null) {
         mPendingInputEventHead = q;
         mPendingInputEventTail = q;
      } else {
          last.mNext = q;
          mPendingInputEventTail = q;
      }
      mPendingInputEventCount += 1;

      if (processImmediately) {
          doProcessInputEvents();
      } else {
          scheduleProcessInputEvents();
      }
}enqueueInputEvent方法从InputEventReceiver中获取到InputEvent,然后将其加入到当前的事件队列之中,最后调用doProcessInputEvents来进行处理。
void doProcessInputEvents() {
    while (mPendingInputEventHead != null) {
            QueuedInputEvent q = mPendingInputEventHead;
            mPendingInputEventHead = q.mNext;
            if (mPendingInputEventHead == null) {
                mPendingInputEventTail = null;
            }
            q.mNext = null;

            mPendingInputEventCount -= 1;

            long eventTime = q.mEvent.getEventTimeNano();
            long oldestEventTime = eventTime;
            if (q.mEvent instanceof MotionEvent) {
                MotionEvent me = (MotionEvent)q.mEvent;
                if (me.getHistorySize() > 0) {
                    oldestEventTime = me.getHistoricalEventTimeNano(0);
                }
            }
            mChoreographer.mFrameInfo.updateInputEventTime(eventTime, oldestEventTime);

           deliverInputEvent(q);
        }

        // We are done processing all input events that we can process right now
        // so we can clear the pending flag immediately.
        if (mProcessInputEventsScheduled) {
            mProcessInputEventsScheduled = false;
            mHandler.removeMessages(MSG_PROCESS_INPUT_EVENTS);
        }
}遍历所有的消息,如果事件类型为触摸屏事件,对其进行相应的时间修改,最后对于每一个处理完成的事件调用deliverInputEvent,
private void deliverInputEvent(QueuedInputEvent q) {

     q.mEvent.getSequenceNumber());
     if (mInputEventConsistencyVerifier != null) {
         mInputEventConsistencyVerifier.onInputEvent(q.mEvent, 0);
      }

     InputStage stage;
     if (q.shouldSendToSynthesizer()) {
          stage = mSyntheticInputStage;
      } else {
          stage = q.shouldSkipIme() ? mFirstPostImeInputStage : mFirstInputStage;
      }

     if (stage != null) {
          stage.deliver(q);
      } else {
          finishInputEvent(q);
      }
}在事件分发环节,首先进行事件的一个判断,通过shouldSkipIme来判断是否传递给输入法,然后决定使用何种InputStage进行消息的继续传递,这里实现了多种InputStage,对于每一个类型的InputStage都实现了一个方法process方法来针对不同类型的事件做处理,如果是触摸屏类的消息,最终会将事件的处理转交到View的身上。对于InputStage涉及的篇幅较多,这里也不再展开,当消息到达ViewRootImpl中后,接下来就是在View间的派发。
###View的事件派发
对于View层的事件派发,我们最常见的就是dispatchTouchEvent,onTouch,onInterceptTouchEvent,onClick,onTouchEvent等。对于View树上事件的派发,就是在对树的遍历传递中,主要起作用的就是这几个函数。这里我们先从View的相关事件函数开始分析,由于ViewGroup具有子View的原因,其相关的事件派发逻辑和View有所区别,这里我们先进行View的事件分析。
public boolean dispatchTouchEvent(MotionEvent event) {
    ....
    if (onFilterTouchEventForSecurity(event)) {
          if ((mViewFlags & ENABLED_MASK) == ENABLED && handleScrollBarDragging(event)) {
                result = true;
            }
            //noinspection SimplifiableIfStatement
            ListenerInfo li = mListenerInfo;
            if (li != null && li.mOnTouchListener != null
                    && (mViewFlags & ENABLED_MASK) == ENABLED
                    && li.mOnTouchListener.onTouch(this, event)) {
                result = true;
            }

            if (!result && onTouchEvent(event)) {
                result = true;
            }
        }
    ....
    return result;
}
对于在View上的事件派发,核心操作是两点,一个是调用监听器的onTouch方法,然后判断事件是否被消耗,如果没有被消耗,则会调用onTouchEvent方法。在onTouchEvent中根据消息类型进行一些处理。
根据事件类型来更新内部的一些状态。这里比较复杂的还是在ViewGroup中的事件分发逻辑,这里在分发的过程中,需要判断是否对事件进行拦截,如果不拦截,是否自身可处理,如果需要考虑到其中的子View。这里对其中的关键代码进行逐步分析。
final boolean intercepted;
if (actionMasked == MotionEvent.ACTION_DOWN
                    || mFirstTouchTarget != null) {
    final boolean disallowIntercept = (mGroupFlags & FLAG_DISALLOW_INTERCEPT) != 0;
    if (!disallowIntercept) {
        intercepted = onInterceptTouchEvent(ev);
        ev.setAction(action); // restore action in case it was changed
    } else {
         intercepted = false;
    }
   } else {
        intercepted = true;
}判断是否进行拦截,调用自身的onInterceptTouchEvent,开发者可以重载这个方法进行自己的一些操作。返回true表示拦截事件。如果要对事件进行拦截,则不再进行子View的遍历。否则将会进行子View的遍历,事件传递,在子View的事件传递结束之后,如果子View将事件消耗了则会将其加入到mFirstTouchTarget,如果遍历完成没有任何被添加
if (mFirstTouchTarget == null) {
                // No touch targets so treat this as an ordinary view.
                handled = dispatchTransformedTouchEvent(ev, canceled, null,
                        TouchTarget.ALL_POINTER_IDS);
            }
接下来进行的是对于事件在子View中的派发,这里我们也只是针对其中的核心代码进行分析。
 final View[] children = mChildren;
 for (int i = childrenCount - 1; i >= 0; i--) {
       final int childIndex = getAndVerifyPreorderedIndex(
                                    childrenCount, i, customOrder);
       final View child = getAndVerifyPreorderedView(
                                    preorderedList, children, childIndex);

        ....
      dispatchTransformedTouchEvent(ev, false, child, idBitsToAssign);
    ....
}在对子View进行遍历的处理的时候,如果子View的事件被消耗,那么我们就会将其TouchTarget赋值给mFirstTouchTarget,当检测到mFirstTouchTarget为空时会再调用Viewgroup自身的dispatchTransformedTouchEvent方法,这个时候就会调用其onTouchEvent,然后继续View中的事件传递流程。
if (mFirstTouchTarget == null) {
                // No touch targets so treat this as an ordinary view.
    handled = dispatchTransformedTouchEvent(ev, canceled, null,
                        TouchTarget.ALL_POINTER_IDS);
}对于dispatchTransformedTouchEvent函数
 private boolean dispatchTransformedTouchEvent(MotionEvent event, boolean cancel,
            View child, int desiredPointerIdBits) {
  if (cancel || oldAction == MotionEvent.ACTION_CANCEL) {
            event.setAction(MotionEvent.ACTION_CANCEL);
            if (child == null) {
                handled = super.dispatchTouchEvent(event);
            } else {
                handled = child.dispatchTouchEvent(event);
            }
            event.setAction(oldAction);
            return handled;
        }
    ....
}
这里事件的派发也是在调用了每一个子View的dispatchTouchEvent方法,根据返回结果来判断是否被消耗,一旦事件被消耗则会停止传递。
总结
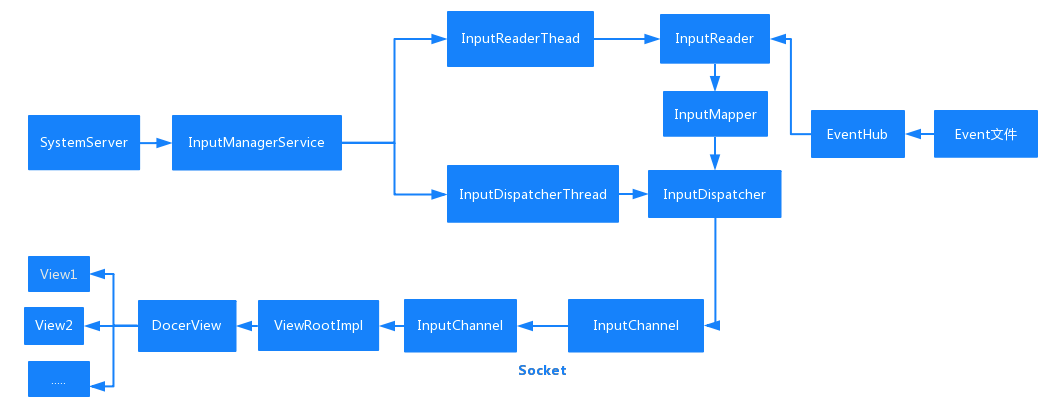
至此对于从硬件设备产生数据,到数据被逐层传递到应用程序中的整个流程就梳理完了。事件相关的创建,传递流程如下所示。
####参考资料
我读过的最好的epoll讲解--转自”知乎“
