

背景
要求:把WebView装进AlertDialog,并且实现Dialog的高度根据WebView的ContentHeight高度来变化,该怎么做?
当然是直接通过AlertDialog的setView方法,把WebView设置进去就好了,并不需要其他的特殊技巧,而且当WebView的ContentHeight超过屏幕高度的时候,WebView还可以自动变成滚动模式,非常nice。
好的,现在产品需求变了,要在WebView下面增加一个自定义的“确定”按钮。
也很简单,我们用一个LinearLayout来装上WebView和Button,同样通过setView来把这个Layout设置为Dialog视图,运行,大功告……不对,有问题。
当WebView的ContentHeight超过屏幕高度的时候,下方的自定义“确定”按钮就被挤得不见了,而正常的需求都会是优先保证Button的显示,WebView变成滚动才对。
那么,问题来了,怎么把WebView和Button一起装进AlertDialog,还要实现Dialo的高度适应WebView的高度?
RelativeLayout大法(失败)
对付这种部分固定部分弹性的布局,很容易让人想到用RelativeLayout来解决。
在RelativeLayout布局内,将Button设置为alignParentBottom=true,即靠着父布局底部放置,将WebView置于Button的上方,再将根布局的高度设置为wrap_content。这样应该就可以保证,Button是固定显示在弹窗底部的,WebView显示于Button的上方,使得WebView内容超高时也不会把button给挤掉。当内容超高时,可以看到效果如下:
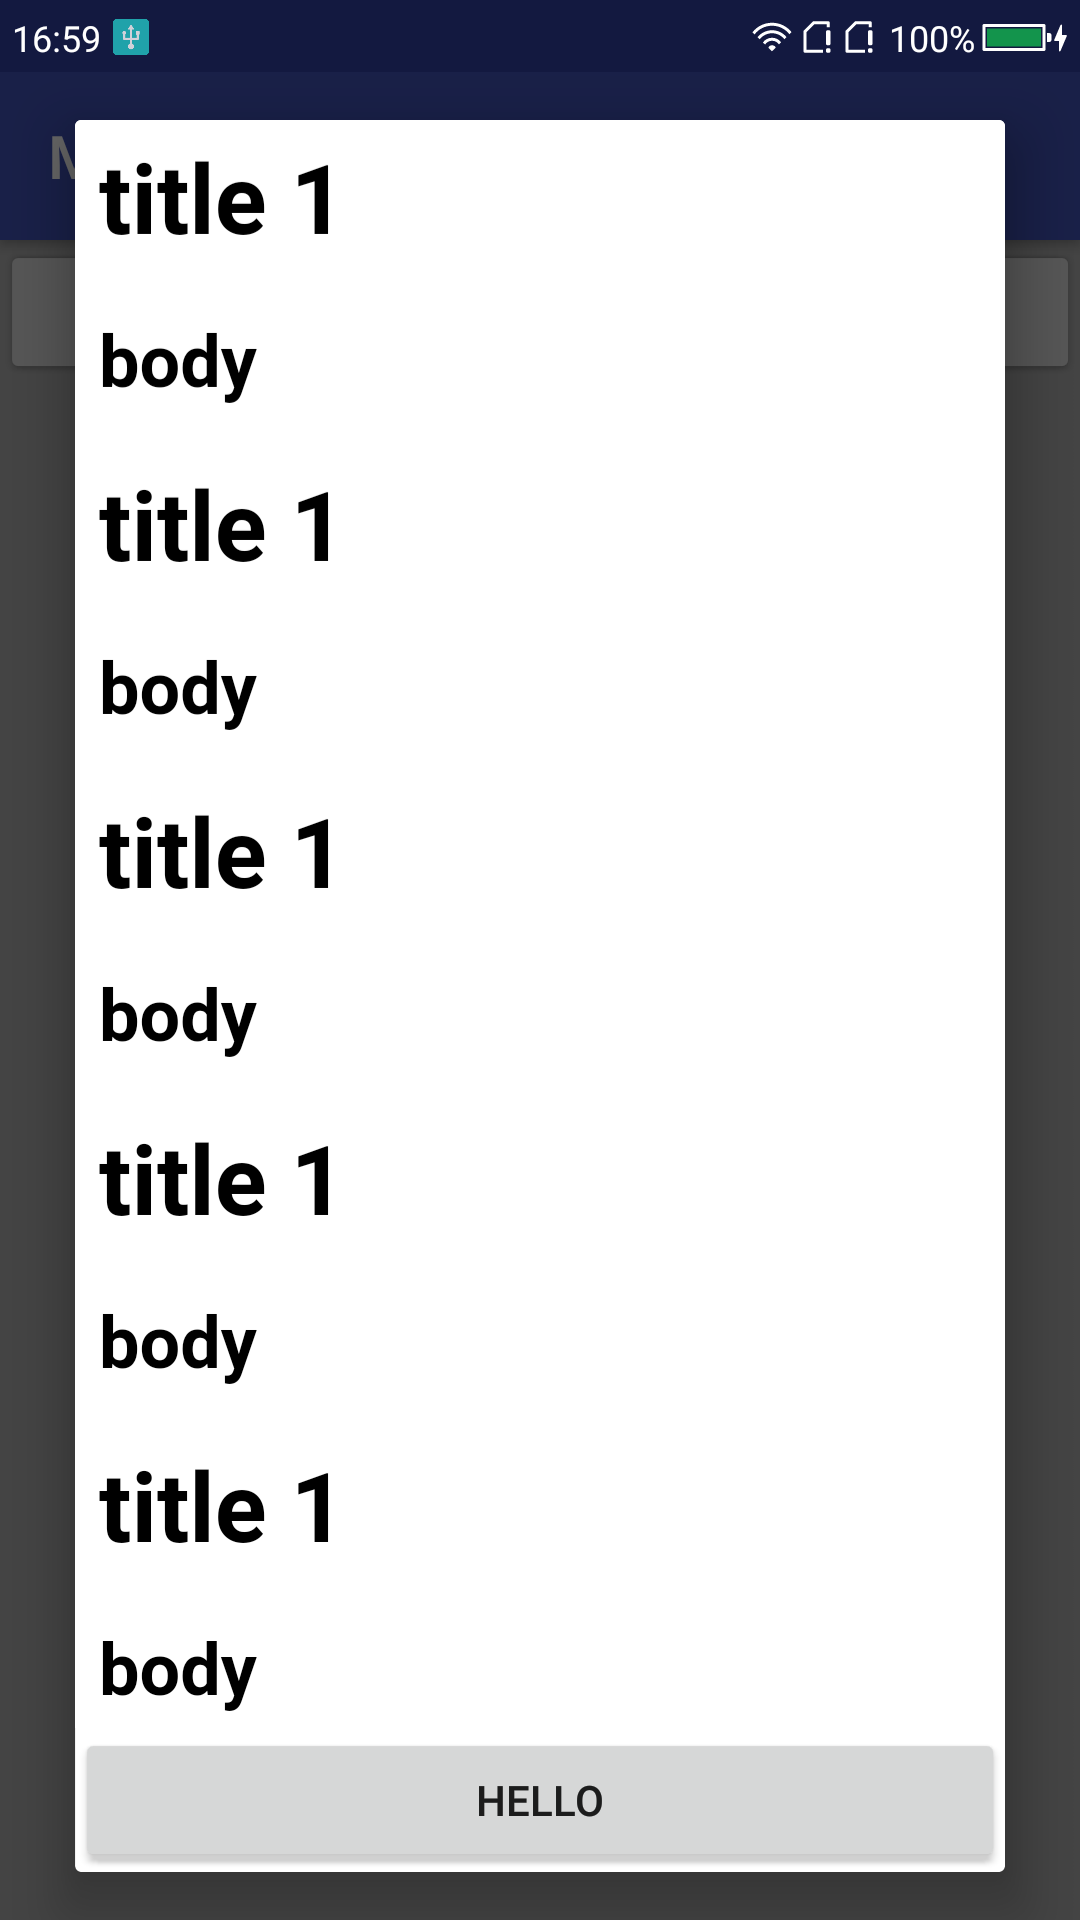
可以看到“HELLO”这个button没有被WebView挤掉,符合我的预期。再来测试一下WebView不超高的情况。
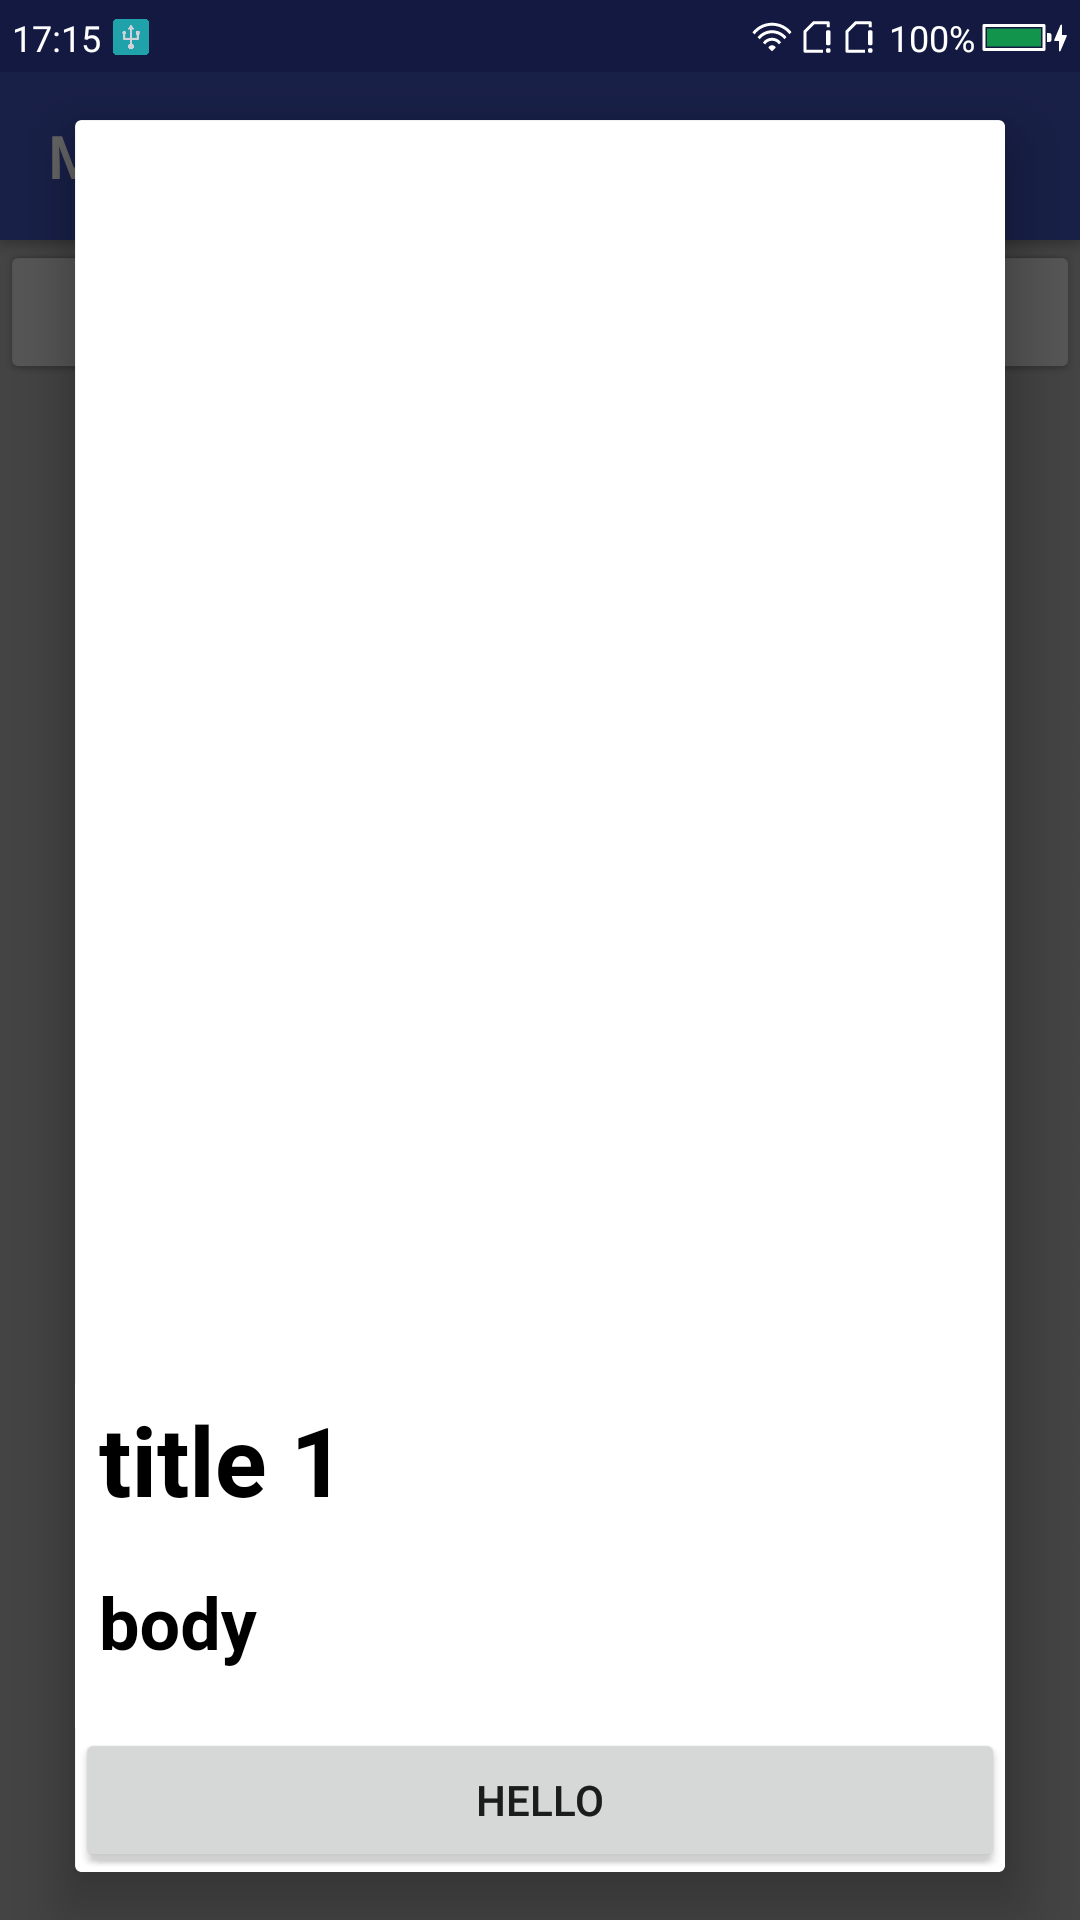
额,这上面多出来的空白是什么,是网页里的吗?用布局分析工具来查看,从而知道,这块空白不属于WebView,而是属于父布局RelativeLayout。这么看来,我们之前设置了RelativeLayout的高度为wrap_content,但是并没有使得RelativeLayout和WebView的上边缘重合。从现象来看,RelativeLayout的高度像是被设置成了match_parent。
是什么导致的这种现象呢?一个一个属性的查,很快就确认了,Button的alignParentBottom属性设置为true的时候就会导致这种现象发生。
我本来想看看RelativeLayout的源码来找找原因,结果刚看到这个类的注释,原因就找到了。且看注释:
 * <p>
 * Note that you cannot have a circular dependency between the size of the RelativeLayout and the
 * position of its children. For example, you cannot have a RelativeLayout whose height is set to
 * {@link android.view.ViewGroup.LayoutParams#WRAP_CONTENT WRAP_CONTENT} and a child set to
 * {@link #ALIGN_PARENT_BOTTOM}.
 * </p>
在RelativeLayout的size设置和子视图的定位之中,两者不允许产生循环依赖,比如,将RelativeLayout高设置为wrap_content,又将子视图设置为align_parent_bottom。
这个例子简直就是针对我来举的啊!注释中说的循环依赖在哪里呢?仔细想想看,wrap_content导致RelativeLayout需要等待子视图确定好高度,它才能确定好自己的高度;而align_parent_bottom导致子视图需要等待父视图RelativeLayout确定了底部位置才能确定自己的位置,可是父视图现在都不知道自己多高,怎么知道自己的底部在哪里呢?所以父视图干脆宣布wrap_content无效,用match_parent来做高度了。
LinearLayout大法(成功)
用RelativeLayout是做不到了,其他的布局似乎都不善于应对这种“固定+浮动”高度的场景,怎么办呢?
其实,原生的Dialog实现就已经给了我答案。
Dialog#setView无论传入多高的视图,它总是不可能把Dialog的标题,还有“确定”,“取消”这些按钮给挤走的。那么,只要按照这种原生实现方式来做,就可以满足我的需求了。嘿,又到了“read the fucking code”的时候了。
AlertDialog负责View展示,里面关联一个AlertDialogController来操作逻辑,我们要找它关联的layout文件,直接在它的构造函数里就可以看到,文件名为alert_dialog.xml。
<?xml version="1.0" encoding="utf-8"?>
<LinearLayout
    xmlns:android="http://schemas.android.com/apk/res/android"
    android:id="@+id/parentPanel"
    android:layout_width="match_parent"
    android:layout_height="wrap_content"
    android:orientation="vertical"
    android:paddingTop="9dip"
    android:paddingBottom="3dip"
    android:paddingStart="3dip"
    android:paddingEnd="1dip">

    <LinearLayout android:id="@+id/topPanel"
        android:layout_width="match_parent"
        android:layout_height="wrap_content"
        android:minHeight="54dip"
        android:orientation="vertical">
        <LinearLayout android:id="@+id/title_template"
            android:layout_width="match_parent"
            android:layout_height="wrap_content"
            android:orientation="horizontal"
            android:gravity="center_vertical"
            android:layout_marginTop="6dip"
            android:layout_marginBottom="9dip"
            android:layout_marginStart="10dip"
            android:layout_marginEnd="10dip">
            <ImageView android:id="@+id/icon"
                android:layout_width="wrap_content"
                android:layout_height="wrap_content"
                android:layout_gravity="top"
                android:paddingTop="6dip"
                android:paddingEnd="10dip"
                android:src="@drawable/ic_dialog_info" />
            <com.android.internal.widget.DialogTitle android:id="@+id/alertTitle"
                style="?android:attr/textAppearanceLarge"
                android:singleLine="true"
                android:ellipsize="end"
                android:layout_width="match_parent"
                android:layout_height="wrap_content"
                android:textAlignment="viewStart" />
        </LinearLayout>
        <ImageView android:id="@+id/titleDivider"
            android:layout_width="match_parent"
            android:layout_height="1dip"
            android:visibility="gone"
            android:scaleType="fitXY"
            android:gravity="fill_horizontal"
            android:src="@android:drawable/divider_horizontal_dark" />
        <!-- If the client uses a customTitle, it will be added here. -->
    </LinearLayout>

    <LinearLayout android:id="@+id/contentPanel"
        android:layout_width="match_parent"
        android:layout_height="wrap_content"
        android:layout_weight="1"
        android:orientation="vertical">
        <ScrollView android:id="@+id/scrollView"
            android:layout_width="match_parent"
            android:layout_height="wrap_content"
            android:paddingTop="2dip"
            android:paddingBottom="12dip"
            android:paddingStart="14dip"
            android:paddingEnd="10dip"
            android:overScrollMode="ifContentScrolls">
            <TextView android:id="@+id/message"
                style="?android:attr/textAppearanceMedium"
                android:layout_width="match_parent"
                android:layout_height="wrap_content"
                android:padding="5dip" />
        </ScrollView>
    </LinearLayout>

    <FrameLayout android:id="@+id/customPanel"
        android:layout_width="match_parent"
        android:layout_height="wrap_content"
        android:layout_weight="1">
        <FrameLayout android:id="@+android:id/custom"
            android:layout_width="match_parent"
            android:layout_height="wrap_content"
            android:paddingTop="5dip"
            android:paddingBottom="5dip" />
    </FrameLayout>

    <LinearLayout android:id="@+id/buttonPanel"
        android:layout_width="match_parent"
        android:layout_height="wrap_content"
        android:minHeight="54dip"
        android:orientation="vertical" >
        <LinearLayout
            style="?android:attr/buttonBarStyle"
            android:layout_width="match_parent"
            android:layout_height="wrap_content"
            android:orientation="horizontal"
            android:paddingTop="4dip"
            android:paddingStart="2dip"
            android:paddingEnd="2dip"
            android:measureWithLargestChild="true">
            <LinearLayout android:id="@+id/leftSpacer"
                android:layout_weight="0.25"
                android:layout_width="0dip"
                android:layout_height="wrap_content"
                android:orientation="horizontal"
                android:visibility="gone" />
            <Button android:id="@+id/button1"
                android:layout_width="0dip"
                android:layout_gravity="start"
                android:layout_weight="1"
                style="?android:attr/buttonBarButtonStyle"
                android:maxLines="2"
                android:layout_height="wrap_content" />
            <Button android:id="@+id/button3"
                android:layout_width="0dip"
                android:layout_gravity="center_horizontal"
                android:layout_weight="1"
                style="?android:attr/buttonBarButtonStyle"
                android:maxLines="2"
                android:layout_height="wrap_content" />
            <Button android:id="@+id/button2"
                android:layout_width="0dip"
                android:layout_gravity="end"
                android:layout_weight="1"
                style="?android:attr/buttonBarButtonStyle"
                android:maxLines="2"
                android:layout_height="wrap_content" />
            <LinearLayout android:id="@+id/rightSpacer"
                android:layout_width="0dip"
                android:layout_weight="0.25"
                android:layout_height="wrap_content"
                android:orientation="horizontal"
                android:visibility="gone" />
        </LinearLayout>
     </LinearLayout>
</LinearLayout>
布局元素很多,但是思路很清晰。
根元素为LinearLayout,共有四个子视图。
Title视图,展示标题icon和文案;
Content视图,展示Message,可以通过setMessage来展示文案,为应付文案过长问题还包了一层ScrollView;
Custom视图,看到名字就知道,setView设置的View就塞在这里;
Button视图,放positive,neutral,negative三个按钮用的。
再细看,可以看出Title和Button设置了MinHeight=54dp,没有设置weight;
而Content和Custom设置了weight=1,没有设置MinHeight;
这,就是使得Title和Button视图的高度能固定,而Content和Custom视图的高度浮动的关键属性。
在LinearLayout视图里,如果子视图都设置了weight,那么就按照weight权重来分配各自的高度(宽度);如果并不是所有的子视图都有weight,那么,LinearLayout会优先把高度(宽度)分配给无weight的子视图,分配完后,再把剩下的高度(宽度)按weight权重分配给其他子视图。
所以,最后用LinearLayout来实现我们的需求就很简单了:将根布局LinearLayout高度设置为wrap_content,里面上下放置WebView和Button,将WebView的weight设置为1(其实任意非0值都可以),高度可以设置为任意值(Android Studio会建议设置为0dp),再将Button高度设置为wrap_content,不设置weight值,就可以了。
编译运行,测试WebView高度越界和高度不越界的情况,表现都符合需求了,完美!
总结
综上,本轮问题的解决涉及到两个点:
- RelativeLayout中注意,其宽高的设置不要和子视图的位置设置产生循环依赖,否则会产生意料之外的布局效果;
- LinearLayout的子视图可以设置weight,也可以不设置,父布局总的高度(宽度)会优先满足给不设置weight的子视图,再将剩余的宽度(高度)按照weight权重分配给设置了weight的子视图。
11/07更新
评论区的@四月一号 同学有一种利用负值的margin来实现的方式,也可以解决问题,大家可以参考一下。
