

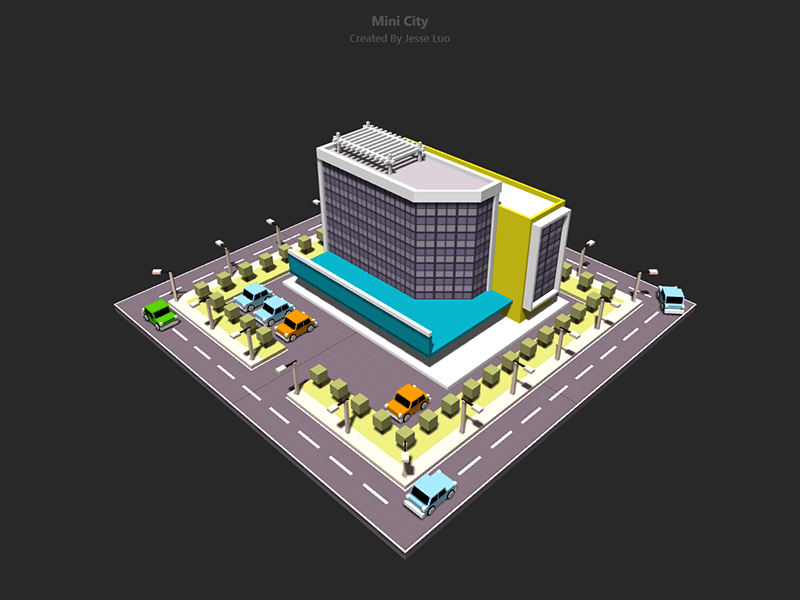
最近在捣鼓 Three.js 相关, 觉得做一个微场景是一个很不错的选择,结果做下来发现效果还可以。
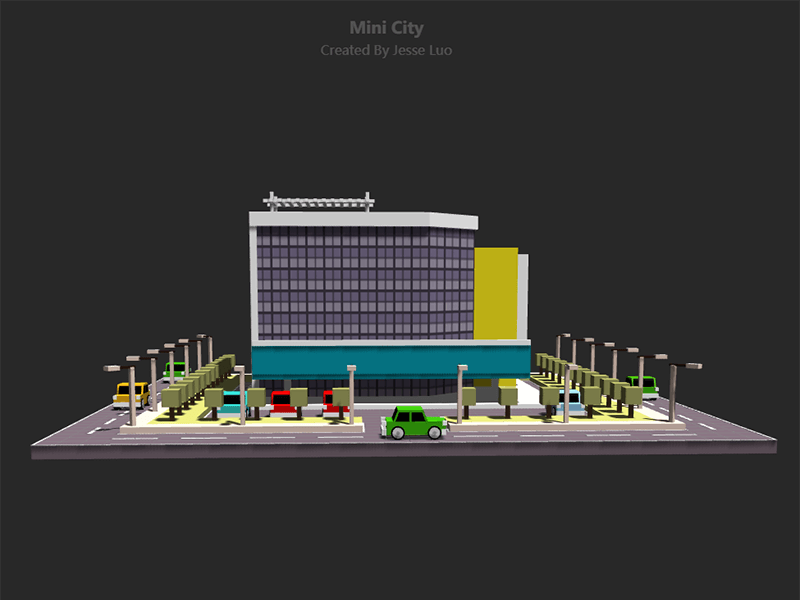
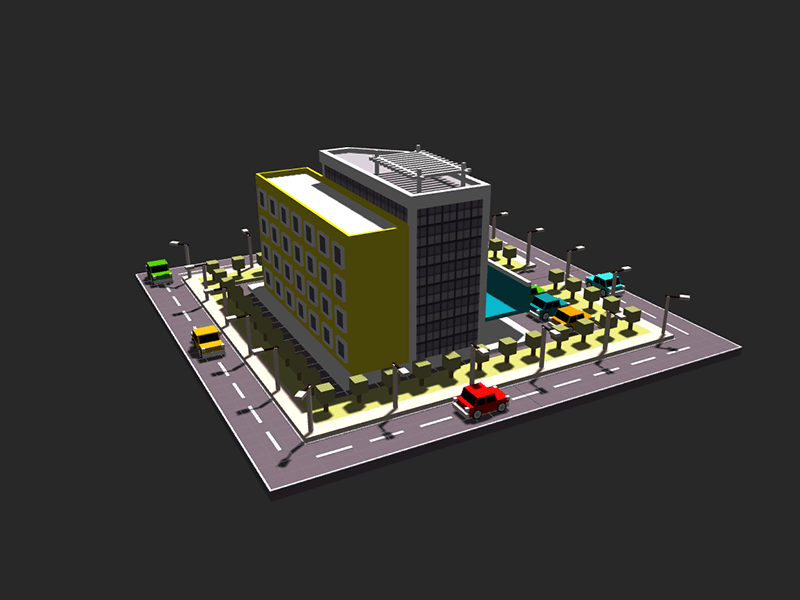
下面放几张不同角度的效果图
预览地址 luosijie.github.io/threejs-exa…
源码地址 github.com/luosijie/th…
配置较差的设备上预览效果不是很理想, 待优化中
实现过程
接下来大致说明一下实现过程
准备工作
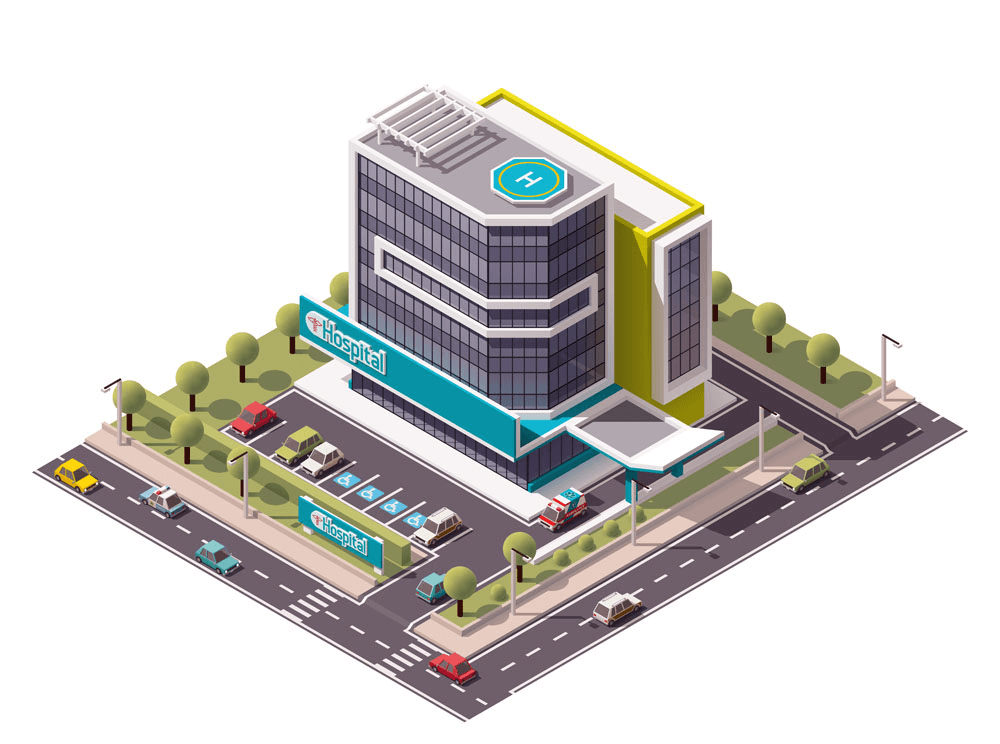
首先你要清楚自己想实现的效果, 就需要一张效果图, 然后才能根据效果图来建模。 我在网上找到一张自己喜欢的风格的建筑图做参考,明确自己大概要实现的效果,但结果不一定要一模一样。
然后根据效果图,画出自己想要的模型的平面图,方便模型中物体的精确定位

开发
Three.js来构建一个类似的微场景, 还是比较简单的。基本上就是在 场景 中 打好灯光 和 摄像机位置, 然后往 场景 添加各种几何图形,通过几个图形和材质的组合,构建出不同的模型和场景。对开发者的空间想象力有一定的要求。
新建一个空场景与设置
var scene, camera
    var renderer
    var width, width

    var cars = []
    // var stats

    var config = {
      isMobile: false,
      background: 0x282828
    }

    width = window.innerWidth
    height = window.innerHeight

    scene = new THREE.Scene() // 新建一个场景
    camera = new THREE.PerspectiveCamera(45, width / height, 1, 5000) // 新建一个透视摄像机, 并设置 视场, 视野长宽比例, 可见远近范围
    camera.position.set(330,330,330)  // 设置摄像机的位置
    camera.lookAt(scene.position)  // 设置摄像机观察的方向
    scene.add(camera)

    renderer = new THREE.WebGLRenderer({antialias: true}) // 新建一个渲染器, 渲染器用来输出最终结果
    renderer.setSize(width, height) // 设置渲染的尺寸, 在这里是浏览器尺寸
    renderer.setClearColor(config.background) // 设置背景的颜色
    renderer.shadowMap.enabled = true // 设置是否开启投影, 开启的话, 光照会产生投影
    renderer.shadowMap.type = THREE.PCFSoftShadowMap  // 设置投影类型, 这边的柔和投影
    document.body.appendChild(renderer.domElement) // renderer.domElement 是渲染器用来显示结果的 canvas 标签

    // checkUserAgent()

    // buildAuxSystem()
    // buildLightSystem()
    // buildbuilding()
    // buildRoad()
    // buildStaticCars()
    // buildMovingCars()

    loop()

    function loop () {
      cars.forEach(function(car){
        carMoving(car)
      })
      renderer.render(scene, camera) // 渲染器开始渲染, scene 和 camera 是必须参数, 因为场景里有动画, 所以放在 loop 里循环
      requestAnimationFrame(loop)
    }
设置一下光照系统
在3D世界里, 光 是非常重要的元素, 直接影响到场景内物体的显示效果, 通常会通过组合使用几种不同的 光 来调出自己满意的效果。在我的案例中,我分别在PC端和非PC端使用了不同的 光, 主要是出于性能考虑
if (!config.isMobile) {
  // PC端
  var directionalLight = new THREE.DirectionalLight( 0xffffff , 1.1); // 新建一个平行光, 平行光照射到的每个点的强度都一样
  directionalLight.position.set( 300, 1000, 500 );
  directionalLight.target.position.set( 0, 0, 0 );
  directionalLight.castShadow = true; // 开启平行光的投影

  // 下面是设置投影的效果
  var d = 300;
  directionalLight.shadow.camera = new THREE.OrthographicCamera( -d, d, d, -d,  500, 1600 ); // 投影的可视范围
  directionalLight.shadow.bias = 0.0001;
  directionalLight.shadow.mapSize.width = directionalLight.shadow.mapSize.height = 1024; // 投影的精度
  scene.add(directionalLight)

  // 再添加一个环境光, 目的是为了调和平行光的投影区域, 防止投影过度黑
  var light = new THREE.AmbientLight( 0xffffff, 0.3 )
  scene.add( light )
}else{
 // 非PC端
 // 只添加一个天空光, 天空光从正上方往下照, 可以照出明暗对比, 但是不产生阴影
  var hemisphereLight = new THREE.HemisphereLight( 0xffffff, 1.6)
  scene.add( hemisphereLight)
}
添加场景中的物体
Three.js中,通过 几何体(geometry) 和 材质(material) 来生成一个可视物体,我举2个例子简单说明一下
树
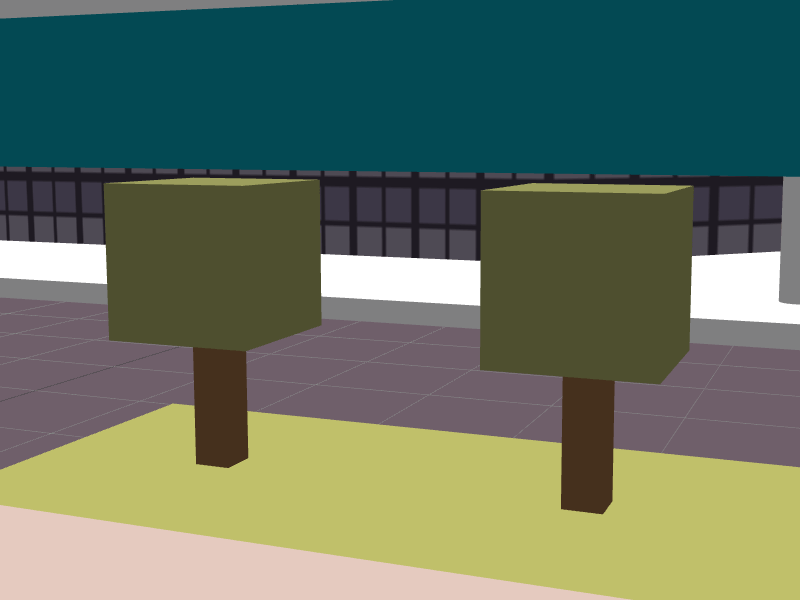
在我的案例中, 树围绕在建筑周围, 所以需要一个 单体树, 还有树的坐标(可以通过平面图得出), 然后根据坐标,在每个位置放置一个树
// 种树函数
function addTrees () {
  // 树的坐标
  var treesPosition = [
    [-110, -110], [-90, -110],[-70, -110],[-50, -110],[-30, -110],[ -10, -110],[10, -110],[30, -110],[50, -110],[70, -110],[90, -110],
    [-110,  110], [-110, 90],[-110, 70],[-110, 50],[-110, 30],[ -110, 10],[-110, -10],[-110, -30],[-110, -50],[-110, -70],[-110, -90],
    [ 110,  110], [90, 110], [70, 110], [50, 110], [30, 110],[-30, 110], [-50, 110], [-70, 110], [-90, 110],
    [ 110, -110], [ 110, -90], [ 110, -70], [ 110, -50], [ 110, -30], [ 110, -10], [ 110, 10], [ 110, 30], [ 110, 50], [ 110, 70],  [ 110, 90],
  ]
  treesPosition.forEach(function (elem) {
    var x = elem[0],
        y = 1,
        z = elem[1]
    var tree = createTree(x, y, z)
    scene.add(tree)
  })
}

// 单体树
function createTree (x, y, z) {
  var x = x || 0
  var y = y || 0
  var z = z || 0

  var tree = new THREE.Object3D()  // 新建一个空对象用来放 树干 和 树叶 部分

  var treeTrunkGeometry = new THREE.BoxGeometry(2,16,2) // 树干
  var treeTrunk = utils.makeMesh('lambert', treeTrunkGeometry, 0x8a613a)
  treeTrunk.position.y = 8 // 树干 y 轴位置
  tree.add(treeTrunk) // 树干添加到空对象中

  var treeLeafsGeometry = new THREE.BoxGeometry(8, 8, 8) // 树叶
  var treeLeafs = utils.makeMesh('lambert', treeLeafsGeometry, 0x9c9e5d)
  treeLeafs.position.y = 13 // 树叶 y 轴的位置
  tree.add( treeLeafs) // 树叶添加到空对象中

  tree.position.set(x, y, z)

  return tree // 返回 树 = 树干 + 树叶 对象
}
汽车
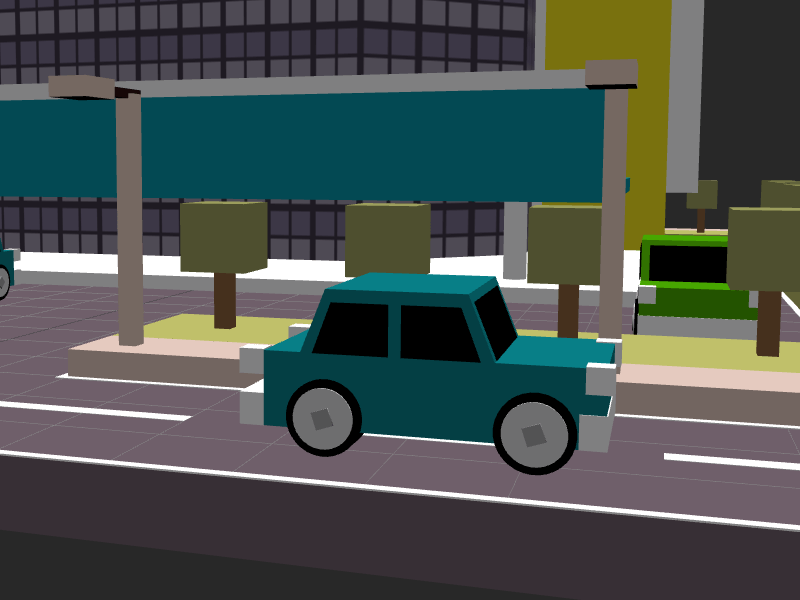
汽车是场景中唯一运动的元素, 也是相对复杂的物体, 除了车身的构建, 还需要开放 前进 , 后退, 转弯 等方法, 方便以后实现运动效果, 所以我单独封装
function Car (color) {
  // 可以自定义车身的颜色, 默认随机
  var colors = [0x2cbab2, 0x47a700, 0xd60000, 0x087f87, 0x37ad0e, 0x4d4d4d, 0xce7e00, 0xe0a213, 0x87bcde]
  var index = Math.floor(Math.random() * colors.length)

  this.color = color || colors[index]
  this.mesh = new THREE.Object3D()
  this.wheels = []
  this.startAngle = 0

  var that = this
  addBody() // 添加车身到 this.mesh
  addWindows() // 添加车窗到 this.mesh
  addLights() // 添加车灯到 this.mesh
  addWheels() // 添加车轮到 this.mesh
  ...
}
Car.prototype = {
  // 设置车的位置
  setPosition: function (x,y,z) {
    this.mesh.position.set(x,y,z)
  },
  // 前进, 实现不管车旋转的角度怎样, 车都能按车头的方向前进
  forward: function  (speed) {
    var speed = speed || 1
    this._moving(speed, true)
  },
  // 后退, 实现不管车旋转的角度怎样, 车都能按车尾的方向后退
  backward: function  (speed) {
    var speed = speed || 1
    this._moving(speed, false)
  },
  // 左转
  turnLeft: function (angle, speed) {
  	this._turn(angle, true, speed)
  },
  // 右转
  turnRight: function (angle, speed) {
    this._turn(angle, false, speed)
  },
  _turn: function (angle, direction, speed) {
  	var direction = direction ? 1 : -1
  	if (speed) {
      if(this.startAngle < angle) {
  	    this.mesh.rotation.y += speed
        this.startAngle += speed
        if (angle - this.startAngle < speed) {
          var originAngle = this.mesh.rotation.y - this.startAngle
          this.mesh.rotation.y = originAngle + angle
          this.startAngle = 0
          return
        }
      }
	  } else {
      this.mesh.rotation.y += angle * direction
  	}
  },
  _moving: function (speed, direction) {
    var rotation = this.mesh.rotation.y
    var direction = direction ? 1 : -1
    var xLength = speed * Math.cos(rotation) * direction,
        zLength = speed * Math.sin(rotation) * direction
    this.mesh.position.x +=  xLength
    this.mesh.position.z -= zLength
    this._rotateWheels(speed)
  },
  _rotateWheels: function (speed) {
    this.wheels.forEach(function (elem) {
      elem.rotation.z -= 0.1*speed
    })
  }
}
 // 生成汽车
 function buildStaticCars () {
   var carsPosition = [
     [-84, 82, 1.5], [-58, 82, 1.5], [-32, 82, 1.5] , [84, 82, 1.5]
   ]
   carsPosition.forEach(function (elem) {
     var car = new Car()
     var x = elem[0],
         z = elem[1],
         r = elem[2]
     car.setPosition(x, 0, z)
     car.mesh.rotation.y = r * Math.PI
     scene.add(car.mesh)
   })
 }
最后
作为自己入门Three.js的一个案例, 还是以实现基本效果为目标, 最终效果和期望的还是有一定的差距, 所以未来还将不断探索Three.js的一些高级技巧。
大概就到这里了, 欢迎star
