<?php
namespace App\Providers;
use App\User;
use Illuminate\Support\Facades\Gate;
use Illuminate\Support\ServiceProvider;
class AuthServiceProvider extends ServiceProvider
{
/**
* Register any application services.
*
* @return void
*/
public functionregister()
{
//
}
/**
* Boot the authentication services for the application.
*
* @return void
*/
public functionboot()
{
// Here you may define how you wish users to be authenticated for your Lumen
// application. The callback which receives the incoming request instance
// should return either a User instance or null. You're free to obtain
// the User instance via an API token or any other method necessary.
$this->app['auth']->viaRequest('api', function ($request) {
if ($request->input('api_token')) {
return User::where('api_token', $request->input('api_token'))->first();
}
});
}
}
当然在实际开发中,我们不能只是简单的获取 api_token直接关联数据库查找用户信息。
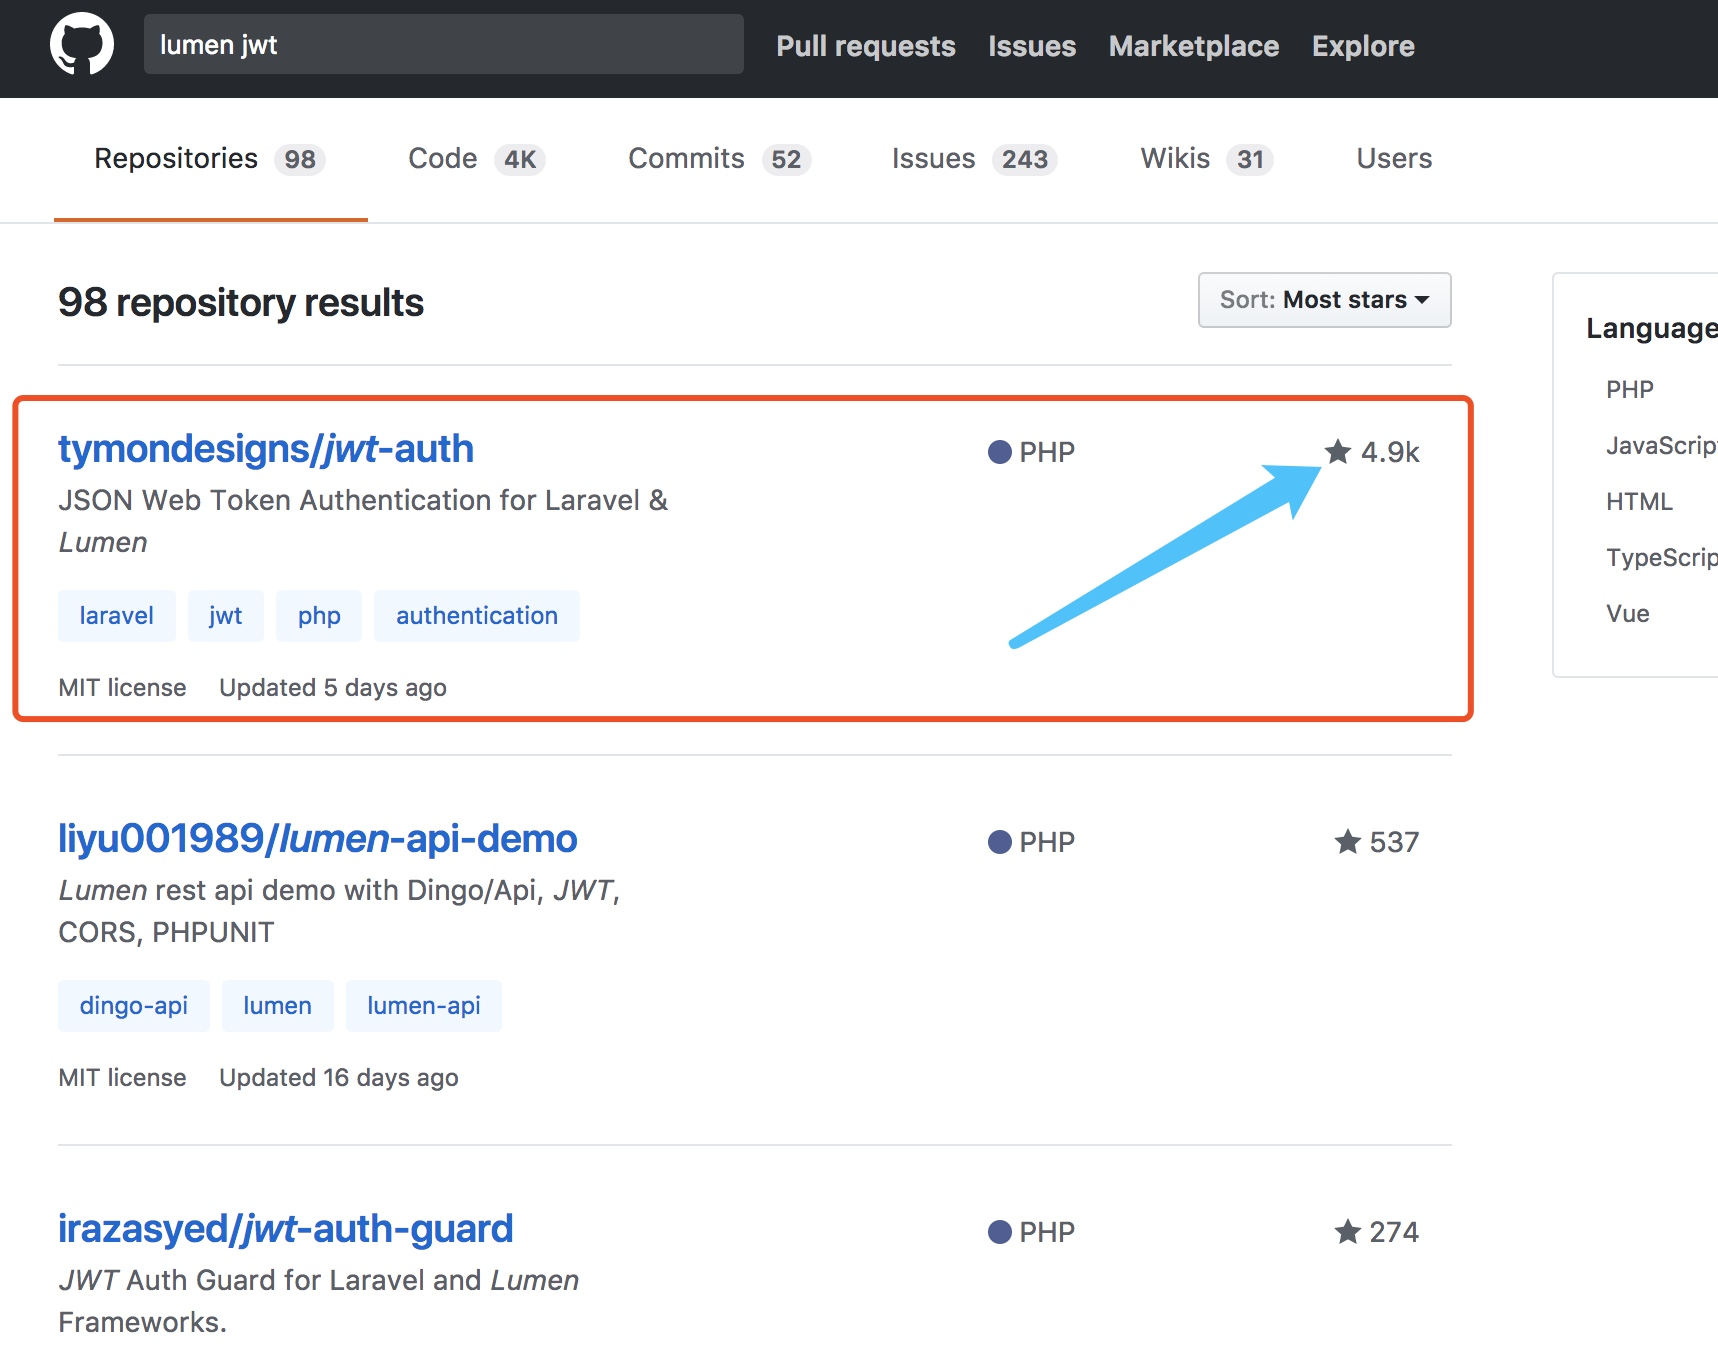
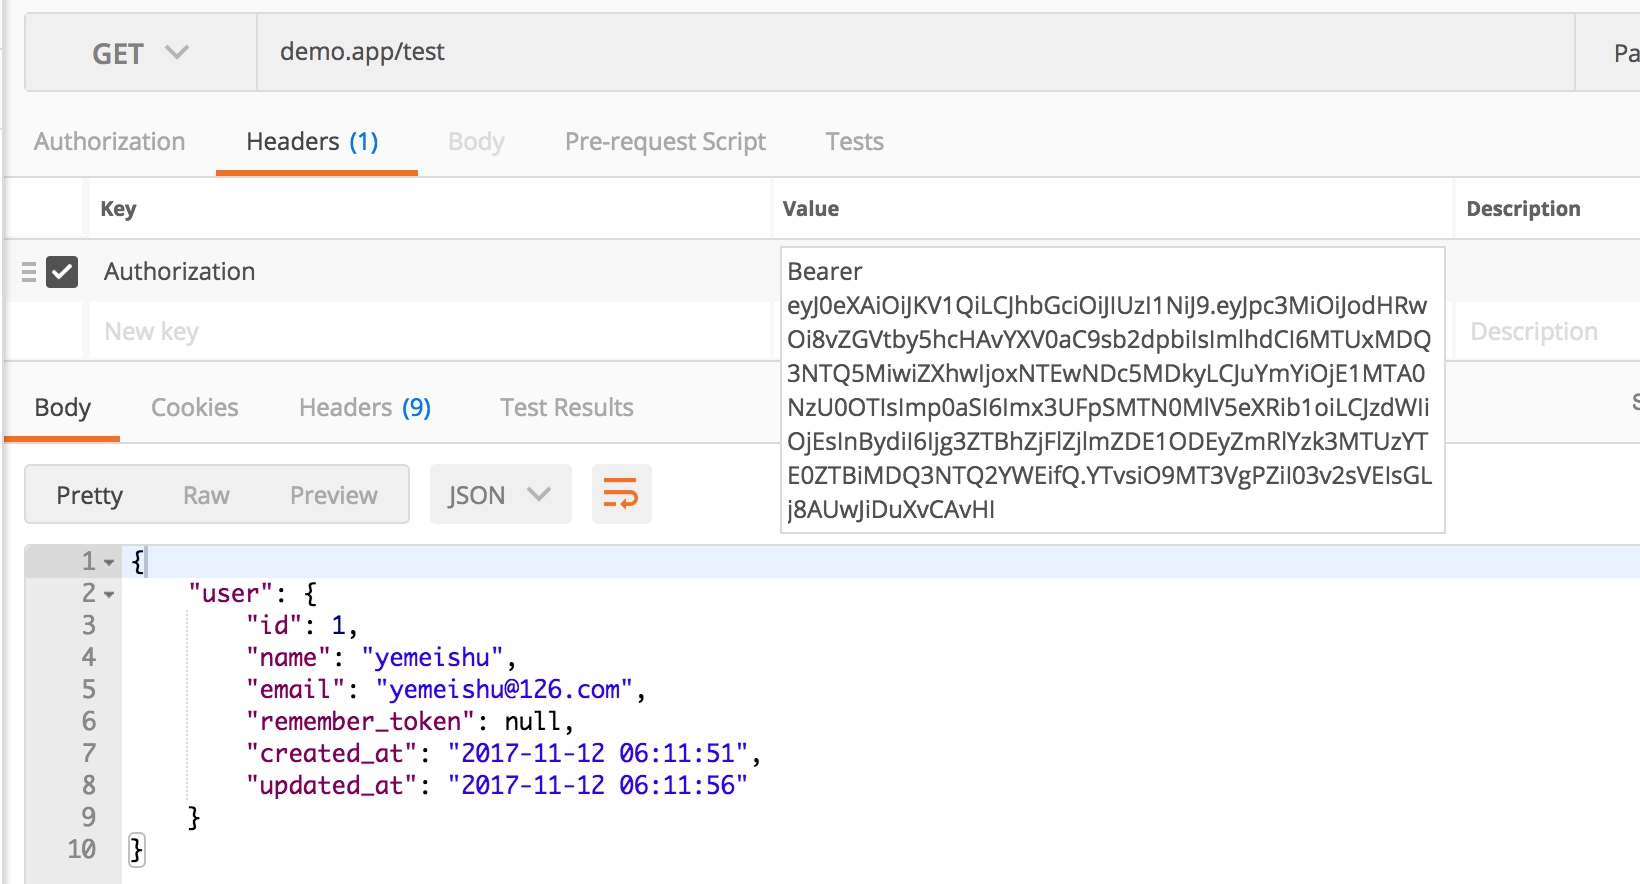
在 API 开发中,用户认证是核心,是数据是否有保障的前提,目前主要有两种常用方式进行用户认证: JWT 和 OAuth2。
<?php

require_once __DIR__.'/../vendor/autoload.php';

try {
    (new Dotenv\Dotenv(__DIR__.'/../'))->load();
} catch (Dotenv\Exception\InvalidPathException $e) {
    //
}

/*
|--------------------------------------------------------------------------
| Create The Application
|--------------------------------------------------------------------------
|
| Here we will load the environment and create the application instance
| that serves as the central piece of this framework. We'll use this
| application as an "IoC" container and router for this framework.
|
*/

$app = new Laravel\Lumen\Application(
    realpath(__DIR__.'/../')
);

// 取消注释,这样就可以通过 Auth::user(),获取当前授权用户
$app->withFacades();

$app->withEloquent();

/*
|--------------------------------------------------------------------------
| Register Container Bindings
|--------------------------------------------------------------------------
|
| Now we will register a few bindings in the service container. We will
| register the exception handler and the console kernel. You may add
| your own bindings here if you like or you can make another file.
|
*/

$app->singleton(
    Illuminate\Contracts\Debug\ExceptionHandler::class,
    App\Exceptions\Handler::class
);

$app->singleton(
    Illuminate\Contracts\Console\Kernel::class,
    App\Console\Kernel::class
);

/*
|--------------------------------------------------------------------------
| Register Middleware
|--------------------------------------------------------------------------
|
| Next, we will register the middleware with the application. These can
| be global middleware that run before and after each request into a
| route or middleware that'll be assigned to some specific routes.
|
*/

// $app->middleware([
//    App\Http\Middleware\ExampleMiddleware::class
// ]);

// 增加 auth 中间件
$app->routeMiddleware([
    'auth' => App\Http\Middleware\Authenticate::class,
]);

/*
|--------------------------------------------------------------------------
| Register Service Providers
|--------------------------------------------------------------------------
|
| Here we will register all of the application's service providers which
| are used to bind services into the container. Service providers are
| totally optional, so you are not required to uncomment this line.
|
*/

$app->register(App\Providers\AppServiceProvider::class);
$app->register(App\Providers\AuthServiceProvider::class);
// $app->register(App\Providers\EventServiceProvider::class);

/*
|--------------------------------------------------------------------------
| Load The Application Routes
|--------------------------------------------------------------------------
|
| Next we will include the routes file so that they can all be added to
| the application. This will provide all of the URLs the application
| can respond to, as well as the controllers that may handle them.
|
*/

$app->router->group([
    'namespace' => 'App\Http\Controllers',
], function ($router) {
    require __DIR__.'/../routes/web.php';
});

return $app;
在 Lumen 项目中,默认没有 config 文件夹,需要在项目根目录创建,并将 vendor 源代码中auth.php 复制出来,同时将 api 认证指定为「jwt」:
<?php

return [

    /*
    |--------------------------------------------------------------------------
    | Authentication Defaults
    |--------------------------------------------------------------------------
    |
    | This option controls the default authentication "guard" and password
    | reset options for your application. You may change these defaults
    | as required, but they're a perfect start for most applications.
    |
    */

    'defaults' => [
        'guard' => env('AUTH_GUARD', 'api'),
    ],

    /*
    |--------------------------------------------------------------------------
    | Authentication Guards
    |--------------------------------------------------------------------------
    |
    | Next, you may define every authentication guard for your application.
    | Of course, a great default configuration has been defined for you
    | here which uses session storage and the Eloquent user provider.
    |
    | All authentication drivers have a user provider. This defines how the
    | users are actually retrieved out of your database or other storage
    | mechanisms used by this application to persist your user's data.
    |
    | Supported: "session", "token"
    |
    */

    'guards' => [
        'api' => [
            'driver' => 'jwt',
            'provider' => 'users'
        ],
    ],

    /*
    |--------------------------------------------------------------------------
    | User Providers
    |--------------------------------------------------------------------------
    |
    | All authentication drivers have a user provider. This defines how the
    | users are actually retrieved out of your database or other storage
    | mechanisms used by this application to persist your user's data.
    |
    | If you have multiple user tables or models you may configure multiple
    | sources which represent each model / table. These sources may then
    | be assigned to any extra authentication guards you have defined.
    |
    | Supported: "database", "eloquent"
    |
    */

    'providers' => [
        'users' => [
            'driver' => 'eloquent',
            'model'  => \App\User::class,
        ],
    ],

    /*
    |--------------------------------------------------------------------------
    | Resetting Passwords
    |--------------------------------------------------------------------------
    |
    | Here you may set the options for resetting passwords including the view
    | that is your password reset e-mail. You may also set the name of the
    | table that maintains all of the reset tokens for your application.
    |
    | You may specify multiple password reset configurations if you have more
    | than one user table or model in the application and you want to have
    | separate password reset settings based on the specific user types.
    |
    | The expire time is the number of minutes that the reset token should be
    | considered valid. This security feature keeps tokens short-lived so
    | they have less time to be guessed. You may change this as needed.
    |
    */

    'passwords' => [
        //
    ],

];
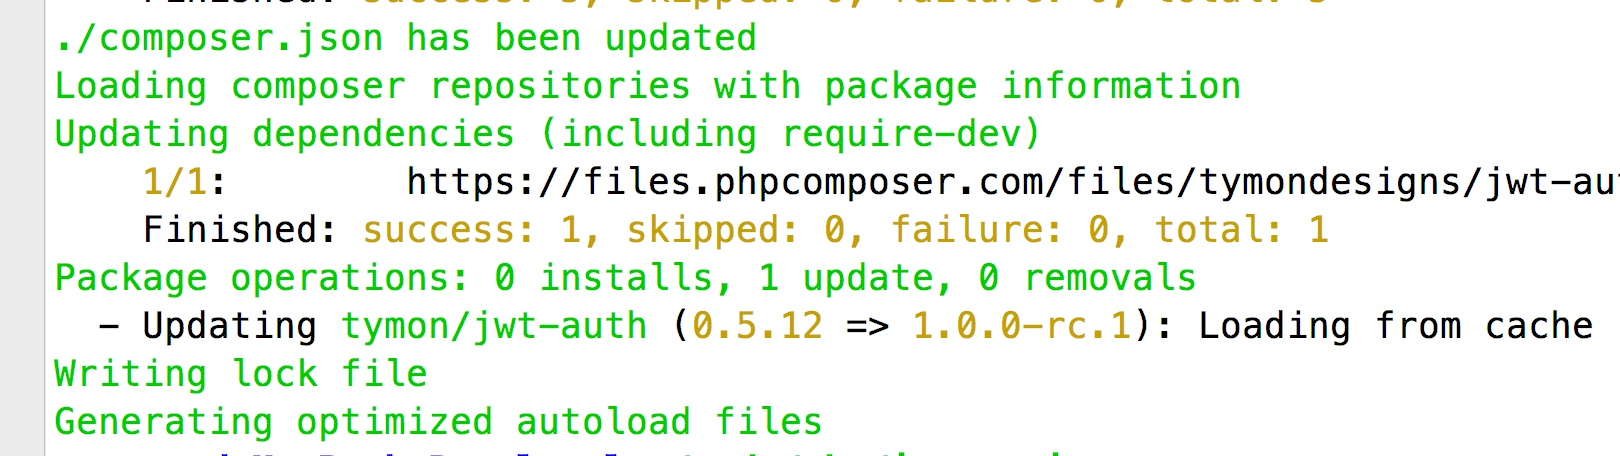
最后,因为 JWT 协议需要用到 secret,所以需要生成一个 secret:
php artisan jwt:secret
使用 jwt-auth
1. 更新 User Model
继承 Tymon\JWTAuth\Contracts\JWTSubject:
<?php

namespace App;

use Illuminate\Auth\Authenticatable;
use Laravel\Lumen\Auth\Authorizable;
use Illuminate\Database\Eloquent\Model;
use Illuminate\Contracts\Auth\Authenticatable as AuthenticatableContract;
use Illuminate\Contracts\Auth\Access\Authorizable as AuthorizableContract;
use Tymon\JWTAuth\Contracts\JWTSubject;

class User extends Model implements AuthenticatableContract, AuthorizableContract, JWTSubject
{
    use Authenticatable, Authorizable;

    /**
     * The attributes that are mass assignable.
     *
     * @var array
     */
    protected $fillable = [
        'name', 'email',
    ];

    /**
     * The attributes excluded from the model's JSON form.
     *
     * @var array
     */
    protected $hidden = [
        'password',
    ];

    /**
     * Get the identifier that will be stored in the subject claim of the JWT.
     *
     * @return mixed
     */
    public function getJWTIdentifier()
    {
        return $this->getKey();
    }

    /**
     * Return a key value array, containing any custom claims to be added to the JWT.
     *
     * @return array
     */
    public function getJWTCustomClaims()
    {
        return [];
    }
}