

系列文章传送门 (持续更新中..) :
自定义控件(四) 源码分析 layout 和 draw 流程
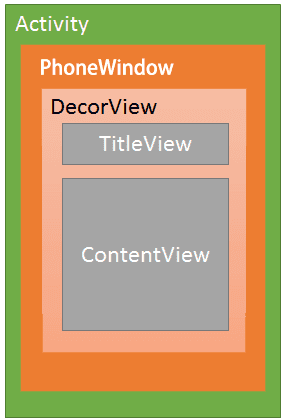
先看一张 Activity 的构成简化图
-
每一个Activity都包含一个Window对象,Window由它的唯一的子类PhoneWindow实现
-
PhoneWindow:将Decoriew设置为整个应用窗口的根View。它是Android中的最基本的窗口系 统,每个Activity 均会创建一个PhoneWindow对象,是Activity和整个View系统交互的接口。
-
DecorView:顶层视图,将要显示的具体内容呈现在PhoneWindow上. 它并不会向用户呈现任何东西,它主要有如下几个功能,可能不全:
-
A. Dispatch ViewRoot分发来的key、touch、trackball等外部事件;
-
B. DecorView有一个直接的子View,我们称之为System Layout,这个View是从系统的Layout.xml中解析出的,它包含当前UI的风格,如是否带title、是否带process bar等。可以称这些属性为Window decorations。
-
C. 作为PhoneWindow与ViewRoot之间的桥梁,ViewRoot通过DecorView设置窗口属性。可以同 View view = getWindow().getDecorView() 获取它;
-
D. DecorView只有一个子元素为LinearLayout。代表整个Window界面,包含通知栏,标题栏,内容显示栏三块区域。DecorView里面TitleView:标题,可以设置requestWindowFeature(Window.FEATURE_NO_TITLE)取消掉. ContentView:是一个id为content的FrameLayout。我们平常在Activity使用的setContentView就是设置在这里,也就是在FrameLayout上
1. 从setContentView()开始
大家都知道当我们写Activity时会调用 setContentView() 方法来加载布局, 让我们来看一下内部实现:
public void setContentView(@LayoutRes int layoutResID) {
    getWindow().setContentView(layoutResID);
    initWindowDecorActionBar();
}
getWindow() :
public Window getWindow() {
    return mWindow;
}
###Window 可以看到返回了一个 mWindow , 它的类型是 Window 类, 而 Window 是一个抽象类, setContentView() 也是一个抽象方法, 所以我们必须要找到它的实现子类
/**
 * Abstract base class for a top-level window look and behavior policy.  An
 * instance of this class should be used as the top-level view added to the
 * window manager. It provides standard UI policies such as a background, title
 * area, default key processing, etc.
 *
 * <p>The only existing implementation of this abstract class is
 * android.view.PhoneWindow, which you should instantiate when needing a
 * Window.
 * 顶级窗口视图和行为的抽象基类。它的实例作为一个顶级View被添加到Window Manager。
 * 它提供了一套标准的UI策略,例如背景,标题区域等。当你需要用到Window的时候,应该使
 * 用它的唯一实现子类PhoneWindow。
 */
public abstract class Window {
	...
	public abstract void setContentView(@LayoutRes int layoutResID);
	...
}
而在 attach() 中 证实了 PhoneWindow 的初始化
final void attach(Context context, ActivityThread aThread,
            Instrumentation instr, IBinder token, int ident,
            Application application, Intent intent, ActivityInfo info,
            CharSequence title, Activity parent, String id,
            NonConfigurationInstances lastNonConfigurationInstances,
            Configuration config, String referrer, IVoiceInteractor voiceInteractor,
            Window window) {
        attachBaseContext(context);

        mFragments.attachHost(null /*parent*/);

        mWindow = new PhoneWindow(this, window);
}
PhoneWindow
我们继续看一下 PhoneWindow 这个类以及实现方法 setContentView()
public class PhoneWindow extends Window implements MenuBuilder.Callback {

	...

    // This is the top-level view of the window, containing the window decor.
    private DecorView mDecor;

	...

	// This is the view in which the window contents are placed. It is either
    // mDecor itself, or a child of mDecor where the contents go.
    ViewGroup mContentParent;

	...

	public void setContentView(int layoutResID) {
	      // Note: FEATURE_CONTENT_TRANSITIONS may be set in the process of installing the window
	      // decor, when theme attributes and the like are crystalized. Do not check the feature
	      // before this happens.
	      if (mContentParent == null) {
		       // 1. 初始化: 创建 DecorView 对象和 mContentParent 对象
	          installDecor();
	      } else if (!hasFeature(FEATURE_CONTENT_TRANSITIONS)) {
	          mContentParent.removeAllViews();
	      }

	      if (hasFeature(FEATURE_CONTENT_TRANSITIONS)) {
	          final Scene newScene = Scene.getSceneForLayout(mContentParent, layoutResID,
	                  getContext());
	          transitionTo(newScene);   // Activity 转场动画相关
	      } else {
		      // 2. 填充布局: 把 setContentView() 设置进来的布局, 加载到 mContentParent,也就是 DecorView 中 id = content 的 FrameLayout
	          mLayoutInflater.inflate(layoutResID, mContentParent);
	      }
	      mContentParent.requestApplyInsets();  // 让DecorView的内容区域延伸到systemUi下方,防止在扩展时被覆盖,达到全屏、沉浸等不同体验效果。

	      // 3. 通知 Activity 布局改变
	      final Callback cb = getCallback();
	      if (cb != null && !isDestroyed()) {
	          cb.onContentChanged();  // 触发 Activity 的 onContentChanged() 方法
	      }
	      mContentParentExplicitlySet = true;
	  }
}
可以看到当 mContentParent = null , 即当前内容布局还没有放置到窗口, 也就是第一次调用的时候, 会执行 installDecor(), 我们继续去看下该方法
private void installDecor() {
      mForceDecorInstall = false;
      if (mDecor == null) {
	      // 生成 DecorView
          mDecor = generateDecor(-1);
          mDecor.setDescendantFocusability(ViewGroup.FOCUS_AFTER_DESCENDANTS);
          mDecor.setIsRootNamespace(true);
          if (!mInvalidatePanelMenuPosted && mInvalidatePanelMenuFeatures != 0) {
              mDecor.postOnAnimation(mInvalidatePanelMenuRunnable);
          }
      } else {
          mDecor.setWindow(this);
      }
      if (mContentParent == null) {
	       // 根据主题 theme 设置对应的 xml布局文件以及 Feature(包括style,layout,转场动画,
	       // 属性等)到 DecorView中。并将 mContentParent 和 DecorView 布局中的
	       // ID_ANDROID_CONTENT(com.android.internal.R.id.content)绑定
          mContentParent = generateLayout(mDecor);

          // 省略
          ...

  }
可以看到先调用 genaratDecor() 生成了 mDecorView
protected DecorView generateDecor(int featureId) {
	...

	return new DecorView(context, featureId, this, getAttributes());
}
创建完了后执行了 generateLayout() , 在这个方法中会 根据主题 theme 设置对应的 xml布局文件以及 Feature(包括style,layout,转场动画,属性等)到 DecorView中, 并在 DecorView 的xml 布局中 findViewById() 获取内容布局的应用 contentView 并返回,即 mContentParent 就是 DecorView 中的内容布局。由此我们可以知道为什么要在setContentView 之前调用 requesetFeature 的原因。
这个方法有点长,我们大致看一下
protected ViewGroup generateLayout(DecorView decor) {
    // Apply data from current theme.  -->  获取当前的主题, 加载默认的资源和布局

    /**
     * 下面的代码: 根据 theme 设定, 找到对应的 Feature(包括 style, layout, 转场动画, 属性等)
     * /
    TypedArray a = getWindowStyle();
	...
	// 如果你在theme中设置了window_windowNoTitle,则这里会调用到,其他方法同理,这里是根据你在theme中的设置去设置的
    if (a.getBoolean(R.styleable.Window_windowNoTitle, false)) {
        requestFeature(FEATURE_NO_TITLE);
    } else if (a.getBoolean(R.styleable.Window_windowActionBar, false)) {
        // Don't allow an action bar if there is no title.
        requestFeature(FEATURE_ACTION_BAR);
    }
	...
	// 设置全屏
    if (a.getBoolean(R.styleable.Window_windowFullscreen, false)) {
        setFlags(FLAG_FULLSCREEN, FLAG_FULLSCREEN & (~getForcedWindowFlags()));
    }
	// 透明状态栏
    if (a.getBoolean(R.styleable.Window_windowTranslucentStatus,
            false)) {
        setFlags(FLAG_TRANSLUCENT_STATUS, FLAG_TRANSLUCENT_STATUS
                & (~getForcedWindowFlags()));
    }

	// 其它资源的加载
	...
	...

	/**
	 * 下面是添加布局到 DecorView.
	 * 在前面我们看到已经调用 new DecorView 来创建一个实例, 但是 DecorView 本身是一个
	 * 继承了 FrameLayout 的 ViewGroup, 创建完了后还没有内容所以还需要对它创建相应的布
	 * 局. 而下面的代码则是根据用户设置的 Feature 来创建相应的默认布局主题.
	 *
	 * 举个例子:
	 * 如果我在setContentView之前调用了requestWindowFeature(Window.FEATURE_NO_TITLE),
	 * 这里则会通过getLocalFeatures来获取你设置的feature,进而选择加载对应的布局,此时则是加载
	 * 没有标题栏的主题,对应的就是R.layout.screen_simple
	 * /
	 *
    // Inflate the window decor.

    int layoutResource;
    int features = getLocalFeatures();
    if ((features & (1 << FEATURE_SWIPE_TO_DISMISS)) != 0) {
        layoutResource = R.layout.screen_swipe_dismiss;
    } (// 省略各种 else if 判断){
	    layoutResource = ...;
    }else {
        // Embedded, so no decoration is needed.
        layoutResource = R.layout.screen_simple;
    }

    mDecor.startChanging();
    // 把相应的布局创建并添加到 DecorView 中
    mDecor.onResourcesLoaded(mLayoutInflater, layoutResource);
	// 从布局中获取 R.id.content
    ViewGroup contentParent = (ViewGroup)findViewById(ID_ANDROID_CONTENT);

	...

	// 配置 DecorView 完成
    mDecor.finishChanging();

    return contentParent;
}
可以看到 在 else{} 中加载的是没有标题栏的主题,对应的就是R.layout.screen_simple,我们看下里面的布局
<LinearLayout xmlns:android="http://schemas.android.com/apk/res/android"
    android:layout_width="match_parent"
    android:layout_height="match_parent"
    android:fitsSystemWindows="true"
    android:orientation="vertical">
    <ViewStub android:id="@+id/action_mode_bar_stub"
              android:inflatedId="@+id/action_mode_bar"
              android:layout="@layout/action_mode_bar"
              android:layout_width="match_parent"
              android:layout_height="wrap_content"
              android:theme="?attr/actionBarTheme" />
    <FrameLayout
         android:id="@android:id/content"
         android:layout_width="match_parent"
         android:layout_height="match_parent"
         android:foregroundInsidePadding="false"
         android:foregroundGravity="fill_horizontal|top"
         android:foreground="?android:attr/windowContentOverlay" />
</LinearLayout>
可以看到xml布局中根布局是 LinearLayout, 包含两个子元素, 因为可以 no_title , 所以第一个是 ViewStub, 第二个子元素 id : content , 则是对应之前代码中的 mContentParent, 也就是 generateLayout() 返回的对象, 即 setContentView() 设置的内容就是添加到这个 FrameLayout 中。
我们继续回到 setContentView() . 在方法的最后通过 cb.onContentChanged() 来通知界面改变的。Callback 是 Window 的内部接口,里面声明了当界面更改触摸时调用的各种方法, 并在Activity 中实现了这个接口, 并且实现的方法是空的,所以我们可以通过重写这个方法, 来监听布局内容的改变了
public void onContentChanged() {
}
参考文章: Android窗口机制 Android View体系(六)从源码解析Activity的构成
如果觉得对你有帮助, 请点个赞再走吧~
