

Web开发多年来有了显著的发展。它允许开发人员部署网站或Web应用程序并在数分钟内为全球数百万人服务。只需一个浏览器,用户可以输入URL就可以访问Web应用程序了。随着 Progressive Web Apps的到来,开发人员可以使用现代Web技术向用户提供很好体验的应用程序。在这篇文章中,你会学习到如何构建一个离线的渐进式 web 应用程序(Progressive Web Apps),下面就叫 PWA 啦。
首先介绍一下什么是 PWA
虽然很多文章已经说过了,已经理解的童鞋请跳过这个步骤。PWA基本上是使用现代Web技术构建的网站,但是体验上却像一个移动 app,在2015年,谷歌工程师Alex Russell和Frances Berriman创造了“ Progressive Web Apps”。此后谷歌就一直致力于让 PWA能给用户像原生 app一般的体验。一个典型的PWA的应该是这样的:
1、开始在Web浏览器的地址栏中访问
2、有显示添加到设备的主屏幕选项
3、逐步开始展示诸如离线使用、推送通知和后台同步等应用程序属性。
到目前为止,移动APP可以做很多Web App不能真正做的事情。PWA,一个web app尝试去做移动app已经很长时间了。它结合最好的 web技术的和最好的app技术,可以在慢速网络连接上快速加载,离线浏览,推送消息,并在Web屏幕上加载Web应用程序入口。
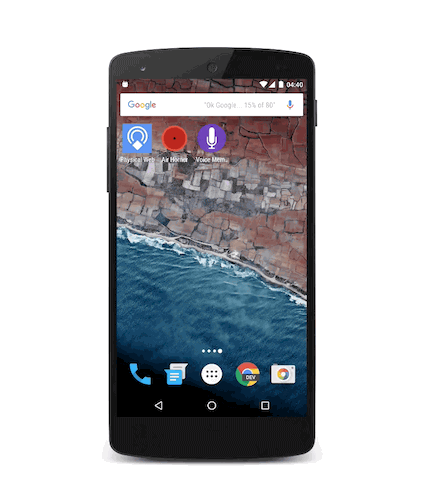
到现在,安卓上最心版本的Chrome浏览器,支持在桌面上快速打开你的 web app 了,这一切都感谢 PWA,如下图
WPA 的特性
这类新的Web应用程序具有定义它们存在的特性。没有很难的知识点,下面这些都是 PWA具有的一些特性:
-
Responsive(响应式):Ui可以适配多个终端,桌面,手机,平板等等
-
App-like(像app):当与一个PWA交互时,它应该感觉像一个原生的应用程序。
-
Connectivity Independent(连接独立): 它能离线浏览(通过 Service Workers) 或者在低网速上也能浏览
-
Re-engageable(重新连接):通过推送通知等功能,用户应该能够持续地参与和重用应用程序。
-
Installable(安装):用户可以添加在主屏幕并且从那里启动它他们就可以重新应用程序了。
-
Discoverable(可发现的):用户通过搜索应被识别发现的
-
Fresh(最新数据):当用户连接到网络时,应该能够在应用程序中提供新的内容。
-
Safe(安全):该通过HTTPS提供服务,防止内容篡改和中间人攻击。
-
Progressive(渐进式):不管浏览器的选择如何,它应该对每个用户都有效。
-
Linkable(可链接):通过URL分享给别人。
PWA的一些生产用例
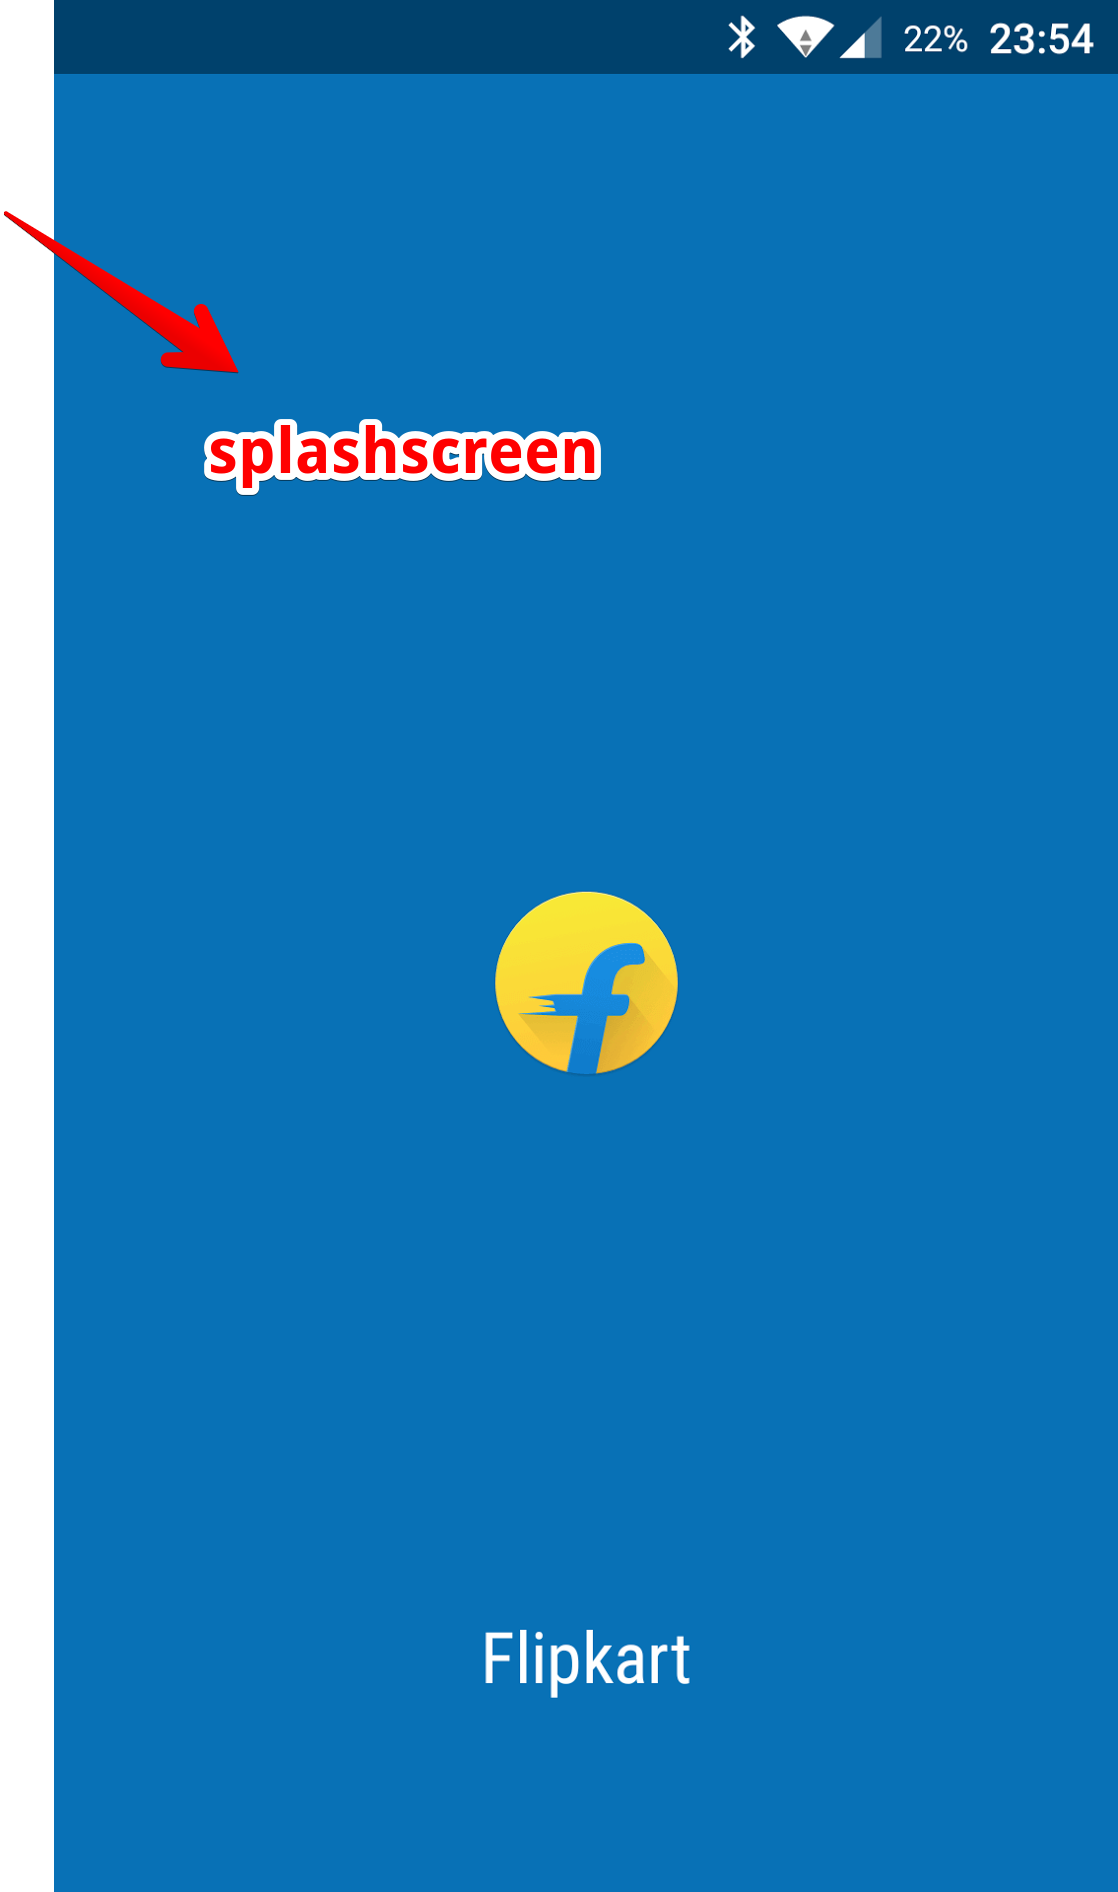
Flipkart Lite: FlipKart 是印度最大的电商之一。如下图
AliExpress:AliExpress 是个非常受欢迎的全球在线零售市场,通过实践 PWA之后,访问量和浏览数都成倍增加这里不做详细讲解。如下图


Service Workers
Service Workers是可编程代理的一个script脚本运行在你浏览器的后台,它具有拦截、处理HTTP请求的能力,也能以各种方式对他们作出响应。它有响应网络请求、推送通知、连接更改等等的功能。Service Workers不能访问DOM,但它可以利用获取和缓存API。您可以Service Workers缓存所有静态资源,这将自动减少网络请求并提高性能。 Service worker 可以显示一个 app应用壳,通知用户,他们与互联网断开了并且提供一个页面供用户在离线时进行交互、浏览。
一个Service worker文件,例如sw.js需要像这样放置在根目录中:
在你的PWA中开始service workers,如果你的应用程序的JS文件是app.js,你需要去注册service workers在你的app.js文件,下面的代码就是注册你的service workers。
  if ('serviceWorker' in navigator) {
    navigator.serviceWorker
             .register('./sw.js')
             .then(function() { console.log('Service Worker Registered'); });
  }
上面的代码检查浏览器是否支持service workers。如果支持,就开始注册service workers,一旦service workers注册了,我们就开始体验用户第一次访问页面时service workers的生命周期。
service workers的生命周期
- Install:在用户第一次访问页面时触发安装事件。在这个阶段中,service workers被安装在浏览器中。在安装过程中,您可以将Web app的所有静态资产缓存下来。如下面代码所示:
// Install Service Worker
self.addEventListener('install', function(event) {

    console.log('Service Worker: Installing....');

    event.waitUntil(

        // Open the Cache
        caches.open(cacheName).then(function(cache) {
            console.log('Service Worker: Caching App Shell at the moment......');

            // Add Files to the Cache
            return cache.addAll(filesToCache);
        })
    );
});
filesToCache变量代表的所有文件要缓存数组
cachename指给缓存存储的名称
- Activate:当service worker启动时,此事件将被触发。
// Fired when the Service Worker starts up
self.addEventListener('activate', function(event) {

    console.log('Service Worker: Activating....');

    event.waitUntil(
        caches.keys().then(function(cacheNames) {
            return Promise.all(cacheNames.map(function(key) {
                if( key !== cacheName) {
                    console.log('Service Worker: Removing Old Cache', key);
                    return caches.delete(key);
                }
            }));
        })
    );
    return self.clients.claim();
});
在这里, service worker每当应用壳(app shell)文件更改时都更新其缓存。
- Fetch:此事件作用与于从服务器端的数据缓存到 app壳中。
caches.match()解析了触发Web请求的事件,并检查它是否在缓存中获得数据。然后,它要么响应于缓存版本的数据,要么用fetch从网络中获取数据。用e.respondWith()方法来响应返回到Web页面。
self.addEventListener('fetch', function(event) {

    console.log('Service Worker: Fetch', event.request.url);

    console.log("Url", event.request.url);

    event.respondWith(
        caches.match(event.request).then(function(response) {
            return response || fetch(event.request);
        })
    );
});
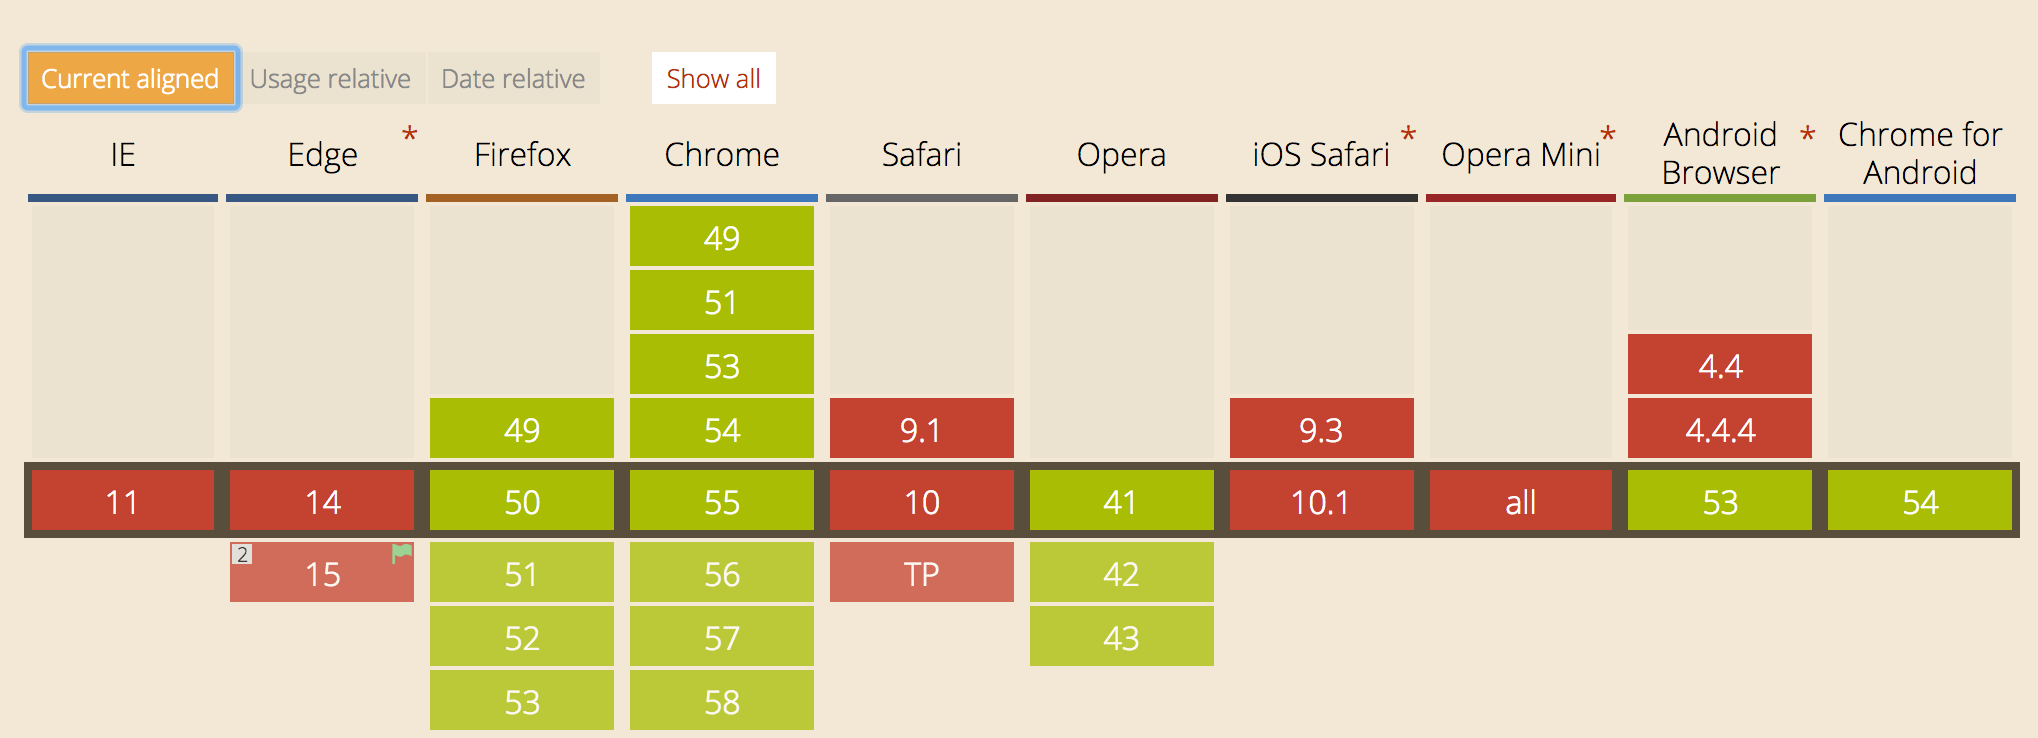
在写代码的时候。我们需要注意一下Chrome, Opera、Firefox是支持service workers 的,但是Safari 和 Edge 还没有兼容到service workers
Service Worker Specification 和 primer 都是关于Service Workers的一下非常有用的学习资料。
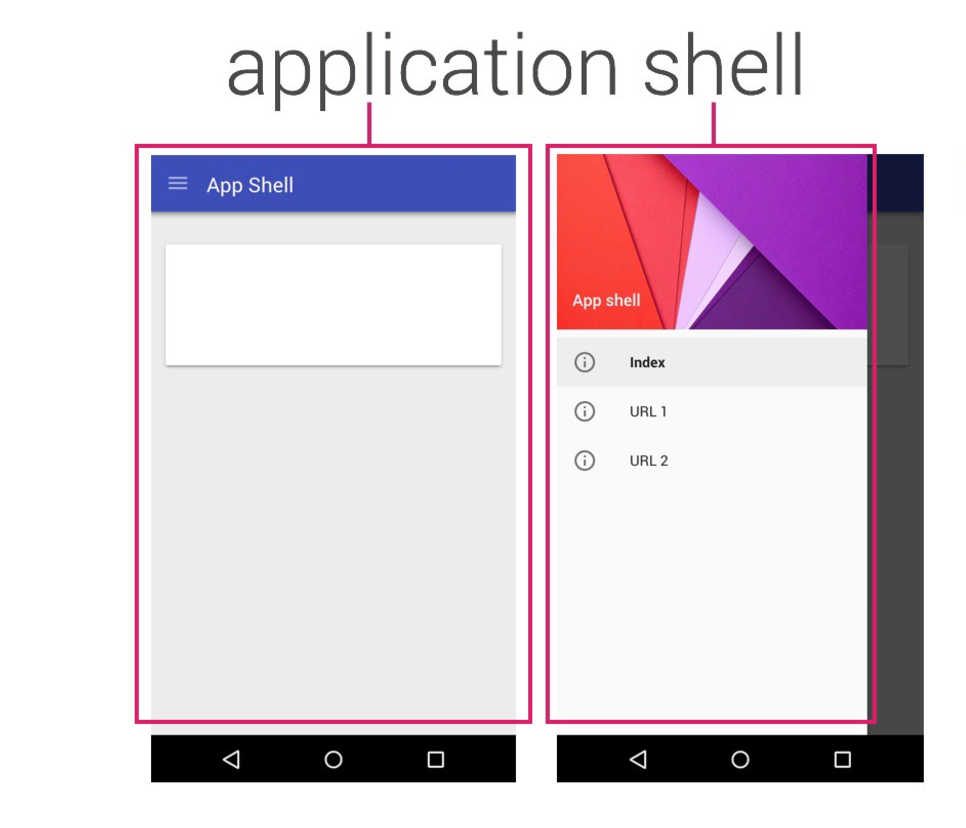
Application Shell(应用壳)
在文章的前面,我曾多次提到过应用壳app shell。应用程序壳是用最小的HTML,CSS和JavaScript驱动应用程序的用户界面。一个PWA确保应用壳被缓存,以对应app多次快速访问和快速加载。
下面我们将逐步写一个 PWA例子
我们将构建一个简单的PWA。这个app只跟踪来自特定开源项目的最新提交。作为一个 PWA,他应该具具有:
- 离线应用,用户应该能够在没有Internet连接的情况下查看最新提交。
- 应用程序应立即加载重复访问
- 打开按钮通知按钮后,用户将获得对最新提交到开放源代码项目的通知。
- 可安装(添加到主屏幕)
- 有一个Web应用程序清单
光说不做瞎扯淡,开始吧!
创建index.html和latest.html文件在你的代码文件夹里面。
index.html
<!DOCTYPE html>
<html>
<head>
  <meta charset="utf-8">
  <meta http-equiv="X-UA-Compatible" content="IE=edge">
  <meta name="viewport" content="width=device-width, initial-scale=1.0">
  <title>Commits PWA</title>
  <link rel="stylesheet" type="text/css" href="css/style.css">
</head>
<body>
    <div class="app app__layout">
      <header>
        <span class="header__icon">
          <svg class="menu__icon no--select" width="24px" height="24px" viewBox="0 0 48 48" fill="#fff">
            <path d="M6 36h36v-4H6v4zm0-10h36v-4H6v4zm0-14v4h36v-4H6z"></path>
          </svg>
        </span>

        <span class="header__title no--select">PWA - Home</span>
      </header>

      <div class="menu">
        <div class="menu__header"></div>
        <ul class="menu__list">
          <li><a href="index.html">Home</a></li>
          <li><a href="latest.html">Latest</a></li>
      </div>

      <div class="menu__overlay"></div>

      <div class="app__content">

        <section class="section">
          <h3> Stay Up to Date with R-I-L </h3>
          <img class="profile-pic" src="./images/books.png" alt="Hello, World!">

          <p class="home-note">Latest Commits on Resources I like!</a></p>
        </section>


        <div class="fab fab__push">
          <div class="fab__ripple"></div>
          <img class="fab__image" src="./images/push-off.png" alt="Push Notification" />
        </div>

        <!-- Toast msg's  -->
        <div class="toast__container"></div>
      </div>
    </div>

    <script src="./js/app.js"></script>
    <script src="./js/toast.js"></script>
    <script src="./js/offline.js"></script>
    <script src="./js/menu.js"></script>
</body>
</html>
latest.html
<!DOCTYPE html>
<html>
<head>
  <meta charset="utf-8">
  <meta http-equiv="X-UA-Compatible" content="IE=edge">
  <meta name="viewport" content="width=device-width, initial-scale=1.0">
  <title>Commits PWA</title>
  <link rel="stylesheet" type="text/css" href="css/style.css">
</head>
<body>
    <div class="app app__layout">
      <header>
        <span class="header__icon">
          <svg class="menu__icon no--select" width="24px" height="24px" viewBox="0 0 48 48" fill="#fff">
            <path d="M6 36h36v-4H6v4zm0-10h36v-4H6v4zm0-14v4h36v-4H6z"></path>
          </svg>
        </span>
        <span class="header__title no--select">PWA - Commits</span>
      </header>

      <div class="menu">
        <div class="menu__header"></div>
        <ul class="menu__list">
          <li><a href="index.html">Home</a></li>
          <li><a href="latest.html">Latest</a></li>
        </ul>
      </div>

      <div class="menu__overlay"></div>

      <section class="card_container">
        <h2 style="margin-top:70px;" align="center">Latest Commits!</h2>


        <div class="container">
            <section class="card first">

            </section>
            <section class="card second">

            </section>
            <section class="card third">

            </section>
            <section class="card fourth">

            </section>
            <section class="card fifth">

            </section>
        </div>
      </section>

       <div class="loader">
          <svg viewBox="0 0 32 32" width="32" height="32">
            <circle id="spinner" cx="16" cy="16" r="14" fill="none"></circle>
          </svg>
        </div>

      <!-- Toast msg's  -->
      <div class="toast__container"></div>
    </div>


  <script src="./js/app.js"></script>
  <script src="./js/latest.js"></script>
  <script src="./js/toast.js"></script>
  <script src="./js/offline.js"></script>
  <script src="./js/menu.js"></script>
</body>
</html>
创建一个 css 文件夹,并且在这个文件下载创建一个style.css文件(可以点击这里查看),创建一个js文件夹,并在这个文件下创建app.js, menu.js, offline.js, latest.js,toast.js。
js/offline.js
(function () {
  'use strict';

  var header = document.querySelector('header');
  var menuHeader = document.querySelector('.menu__header');

  //After DOM Loaded
  document.addEventListener('DOMContentLoaded', function(event) {
    //On initial load to check connectivity
    if (!navigator.onLine) {
      updateNetworkStatus();
    }

    window.addEventListener('online', updateNetworkStatus, false);
    window.addEventListener('offline', updateNetworkStatus, false);
  });

  //To update network status
  function updateNetworkStatus() {
    if (navigator.onLine) {
      header.classList.remove('app__offline');
      menuHeader.style.background = '#1E88E5';
    }
    else {
      toast('You are now offline..');
      header.classList.add('app__offline');
      menuHeader.style.background = '#9E9E9E';
    }
  }
})();
上面的代码帮助用户在 ui视觉上区分离线和在线状态。
js/menu.js
(function () {
  'use strict';

  var menuIconElement = document.querySelector('.header__icon');
  var menuElement = document.querySelector('.menu');
  var menuOverlayElement = document.querySelector('.menu__overlay');

  //Menu click event
  menuIconElement.addEventListener('click', showMenu, false);
  menuOverlayElement.addEventListener('click', hideMenu, false);
  menuElement.addEventListener('transitionend', onTransitionEnd, false);

   //To show menu
  function showMenu() {
    menuElement.style.transform = "translateX(0)";
    menuElement.classList.add('menu--show');
    menuOverlayElement.classList.add('menu__overlay--show');
  }

  //To hide menu
  function hideMenu() {
    menuElement.style.transform = "translateX(-110%)";
    menuElement.classList.remove('menu--show');
    menuOverlayElement.classList.remove('menu__overlay--show');
    menuElement.addEventListener('transitionend', onTransitionEnd, false);
  }

  var touchStartPoint, touchMovePoint;

  /*Swipe from edge to open menu*/

  //`TouchStart` event to find where user start the touch
  document.body.addEventListener('touchstart', function(event) {
    touchStartPoint = event.changedTouches[0].pageX;
    touchMovePoint = touchStartPoint;
  }, false);

  //`TouchMove` event to determine user touch movement
  document.body.addEventListener('touchmove', function(event) {
    touchMovePoint = event.touches[0].pageX;
    if (touchStartPoint < 10 && touchMovePoint > 30) {
      menuElement.style.transform = "translateX(0)";
    }
  }, false);

  function onTransitionEnd() {
    if (touchStartPoint < 10) {
      menuElement.style.transform = "translateX(0)";
      menuOverlayElement.classList.add('menu__overlay--show');
      menuElement.removeEventListener('transitionend', onTransitionEnd, false);
    }
  }
})();
上面的代码作用于菜单省略号按钮的动画。
js/toast.js
(function (exports) {
  'use strict';

  var toastContainer = document.querySelector('.toast__container');

  //To show notification
  function toast(msg, options) {
    if (!msg) return;

    options = options || 3000;

    var toastMsg = document.createElement('div');

    toastMsg.className = 'toast__msg';
    toastMsg.textContent = msg;

    toastContainer.appendChild(toastMsg);

    //Show toast for 3secs and hide it
    setTimeout(function () {
      toastMsg.classList.add('toast__msg--hide');
    }, options);

    //Remove the element after hiding
    toastMsg.addEventListener('transitionend', function (event) {
      event.target.parentNode.removeChild(event.target);
    });
  }

  exports.toast = toast; //Make this method available in global
})(typeof window === 'undefined' ? module.exports : window);
上面的代码是是一个 tost 的提示信息框
latest.js 和 app.js 现在还是空的。
现在,使用本地服务器启动你的应用程序,例如 http-server模块可以帮组你启动本地服务,您的Web应用程序应该如下所示:
Side menu

Index Page

Latest Page

Application Shell
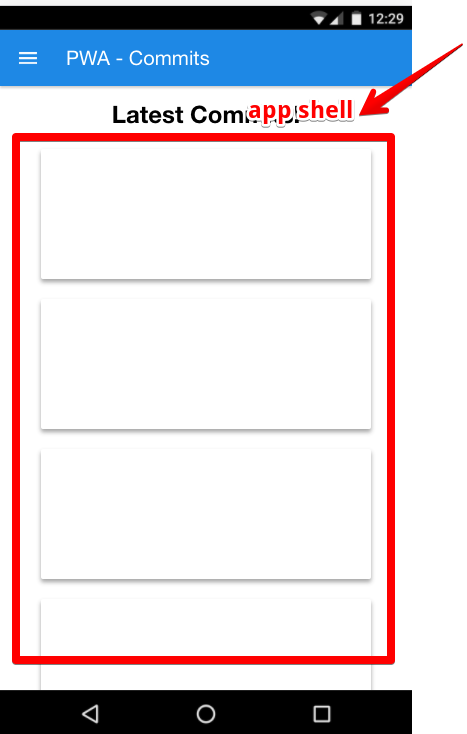
您的应用壳也在上面突出显示。现在尚未实现加载动态内容,下一步,我们需要从 Github's API获取最新的提交。
获取动态内容
打开js/latest.js增加下面的代码
(function() {
  'use strict';

  var app = {
    spinner: document.querySelector('.loader')
  };

  var container = document.querySelector('.container');


  // Get Commit Data from Github API
  function fetchCommits() {
    var url = 'https://api.github.com/repos/unicodeveloper/resources-i-like/commits';

    fetch(url)
    .then(function(fetchResponse){
      return fetchResponse.json();
    })
    .then(function(response) {

        var commitData = {
            'first': {
              message: response[0].commit.message,
              author: response[0].commit.author.name,
              time: response[0].commit.author.date,
              link: response[0].html_url
            },
            'second': {
              message: response[1].commit.message,
              author: response[1].commit.author.name,
              time: response[1].commit.author.date,
              link: response[1].html_url
            },
            'third': {
              message: response[2].commit.message,
              author: response[2].commit.author.name,
              time: response[2].commit.author.date,
              link: response[2].html_url
            },
            'fourth': {
              message: response[3].commit.message,
              author: response[3].commit.author.name,
              time: response[3].commit.author.date,
              link: response[3].html_url
            },
            'fifth': {
              message: response[4].commit.message,
              author: response[4].commit.author.name,
              time: response[4].commit.author.date,
              link: response[4].html_url
            }
        };

        container.querySelector('.first').innerHTML =
        "<h4> Message: " + response[0].commit.message + "</h4>" +
        "<h4> Author: " + response[0].commit.author.name + "</h4>" +
        "<h4> Time committed: " + (new Date(response[0].commit.author.date)).toUTCString() +  "</h4>" +
        "<h4>" + "<a href='" + response[0].html_url + "'>Click me to see more!</a>"  + "</h4>";

        container.querySelector('.second').innerHTML =
        "<h4> Message: " + response[1].commit.message + "</h4>" +
        "<h4> Author: " + response[1].commit.author.name + "</h4>" +
        "<h4> Time committed: " + (new Date(response[1].commit.author.date)).toUTCString()  +  "</h4>" +
        "<h4>" + "<a href='" + response[1].html_url + "'>Click me to see more!</a>"  + "</h4>";

        container.querySelector('.third').innerHTML =
        "<h4> Message: " + response[2].commit.message + "</h4>" +
        "<h4> Author: " + response[2].commit.author.name + "</h4>" +
        "<h4> Time committed: " + (new Date(response[2].commit.author.date)).toUTCString()  +  "</h4>" +
        "<h4>" + "<a href='" + response[2].html_url + "'>Click me to see more!</a>"  + "</h4>";

        container.querySelector('.fourth').innerHTML =
        "<h4> Message: " + response[3].commit.message + "</h4>" +
        "<h4> Author: " + response[3].commit.author.name + "</h4>" +
        "<h4> Time committed: " + (new Date(response[3].commit.author.date)).toUTCString()  +  "</h4>" +
        "<h4>" + "<a href='" + response[3].html_url + "'>Click me to see more!</a>"  + "</h4>";

        container.querySelector('.fifth').innerHTML =
        "<h4> Message: " + response[4].commit.message + "</h4>" +
        "<h4> Author: " + response[4].commit.author.name + "</h4>" +
        "<h4> Time committed: " + (new Date(response[4].commit.author.date)).toUTCString() +  "</h4>" +
        "<h4>" + "<a href='" + response[4].html_url + "'>Click me to see more!</a>"  + "</h4>";

        app.spinner.setAttribute('hidden', true); //hide spinner
      })
      .catch(function (error) {
        console.error(error);
      });
  };

  fetchCommits();
})();
此外在你的latest.html引入latest.js
<script src="./js/latest.js"></script>
增加 loading 在你的latest.html
....
<div class="loader">
      <svg viewBox="0 0 32 32" width="32" height="32">
        <circle id="spinner" cx="16" cy="16" r="14" fill="none"></circle>
      </svg>
</div>

<div class="toast__container"></div>
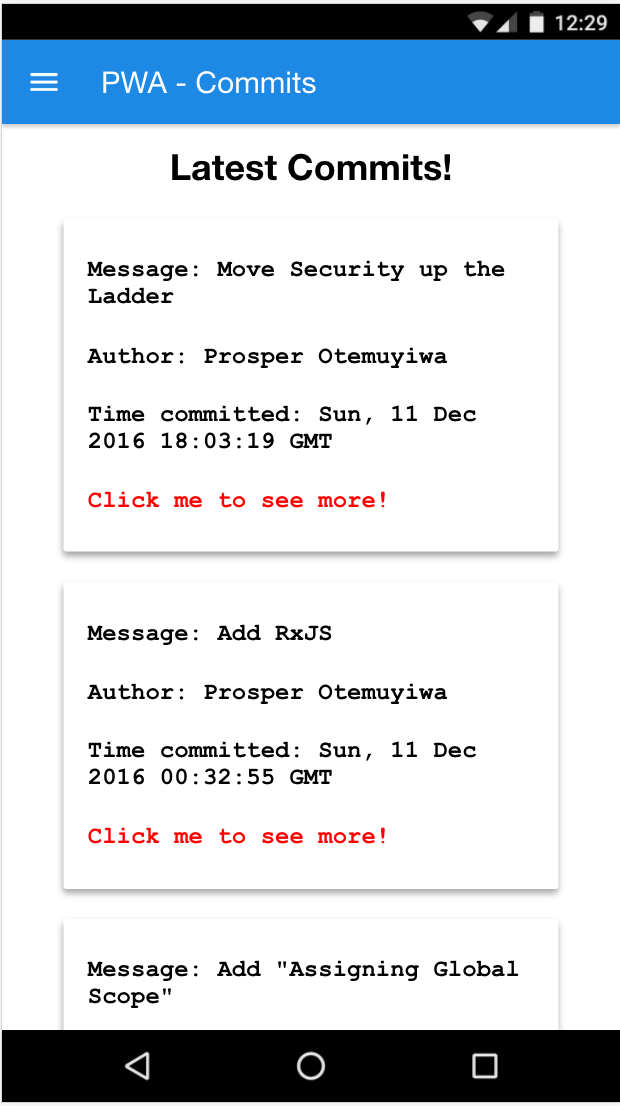
在latest.js你可以观察到,我们从GitHub的API获取到数据并将其附加到DOM中来,现在获取后的页面长这样子了。
Latest.html 页面
通过Service Workers预加载 app shell
为了确保我们的app快速加载和离线工作,我们需要缓存app shell通过service worker
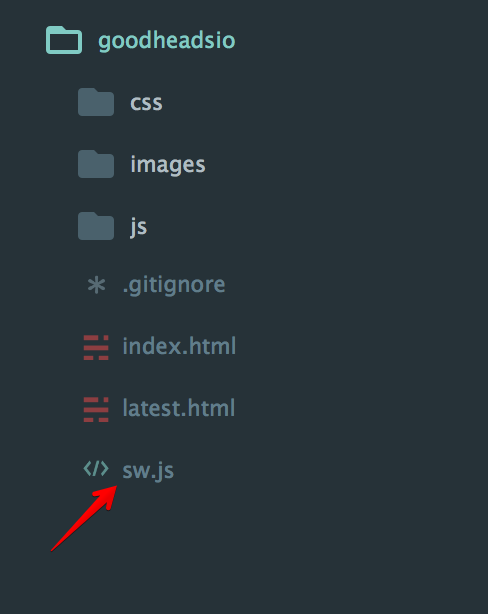
- 首先,在根目录中创建一个 service worker文件。它的名字sw.js
- 第二,打开app.js文件和添加这段代码来实现service worker注册使用
app.js
  if ('serviceWorker' in navigator) {
     navigator.serviceWorker
             .register('./sw.js')
             .then(function() { console.log('Service Worker Registered'); });
  }
- 打开
sw.js文件并添加这段代码
sw.js
var cacheName = 'pwa-commits-v3';

var filesToCache = [
    './',
    './css/style.css',
    './images/books.png',
    './images/Home.svg',
    './images/ic_refresh_white_24px.svg',
    './images/profile.png',
    './images/push-off.png',
    './images/push-on.png',
    './js/app.js',
    './js/menu.js',
    './js/offline.js',
    './js/toast.js'
];

// Install Service Worker
self.addEventListener('install', function(event) {

    console.log('Service Worker: Installing....');

    event.waitUntil(

        // Open the Cache
        caches.open(cacheName).then(function(cache) {
            console.log('Service Worker: Caching App Shell at the moment......');

            // Add Files to the Cache
            return cache.addAll(filesToCache);
        })
    );
});


// Fired when the Service Worker starts up
self.addEventListener('activate', function(event) {

    console.log('Service Worker: Activating....');

    event.waitUntil(
        caches.keys().then(function(cacheNames) {
            return Promise.all(cacheNames.map(function(key) {
                if( key !== cacheName) {
                    console.log('Service Worker: Removing Old Cache', key);
                    return caches.delete(key);
                }
            }));
        })
    );
    return self.clients.claim();
});


self.addEventListener('fetch', function(event) {

    console.log('Service Worker: Fetch', event.request.url);

    console.log("Url", event.request.url);

    event.respondWith(
        caches.match(event.request).then(function(response) {
            return response || fetch(event.request);
        })
    );
});
就像我在这篇文章的前面部分所解释的,我们所有的静态资源都放到filesToCache数组里面,当service worker被安装时,它在浏览器中打开缓存并且数组里面所有文件都被缓存到pwa-commits-v3这个缓存里面。一旦 service worker已经安装,install事件就会触发。此阶段确保您的service worker在任何应用壳文件更改时更新其缓存。fetch事件阶段应用壳从缓存中获取数据。
注意:为了更容易和更好的方式预先高速缓存你的资源。检查谷歌浏览器的sw-toolbox 和 sw-precachelibraries
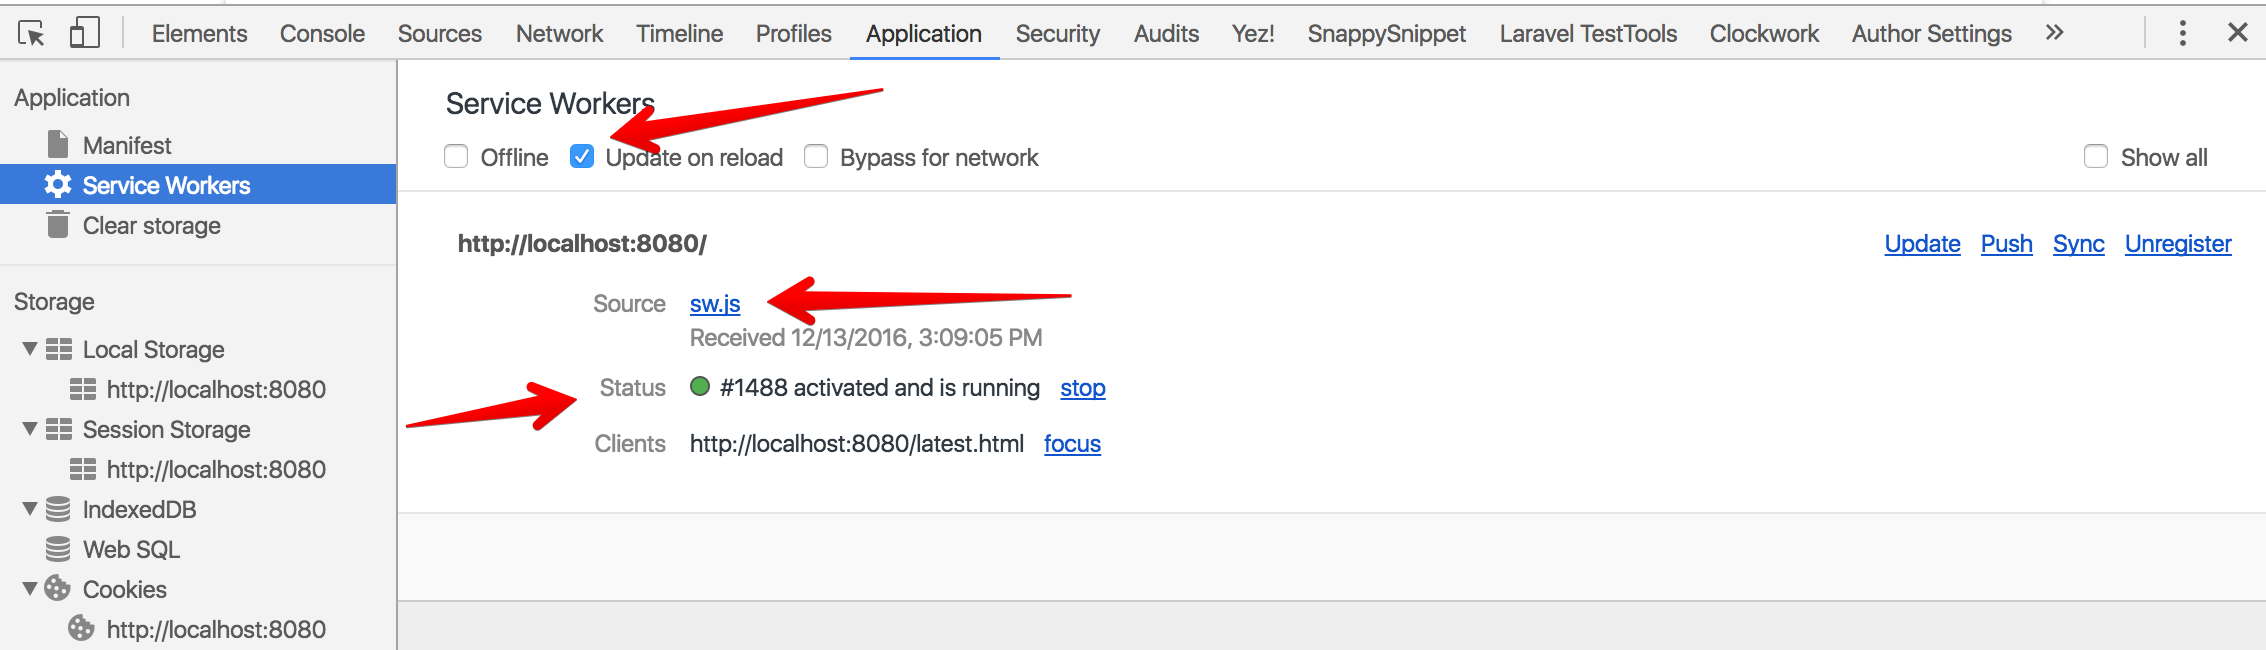
现在重载你的 web app 并且打开 DevTools,到Application选项去查看Service Worker面板,确保Update on reload这个选项是勾选的。如下图
现在,重新加载Web页面并检查它。有离线浏览么?
Index Page Offline
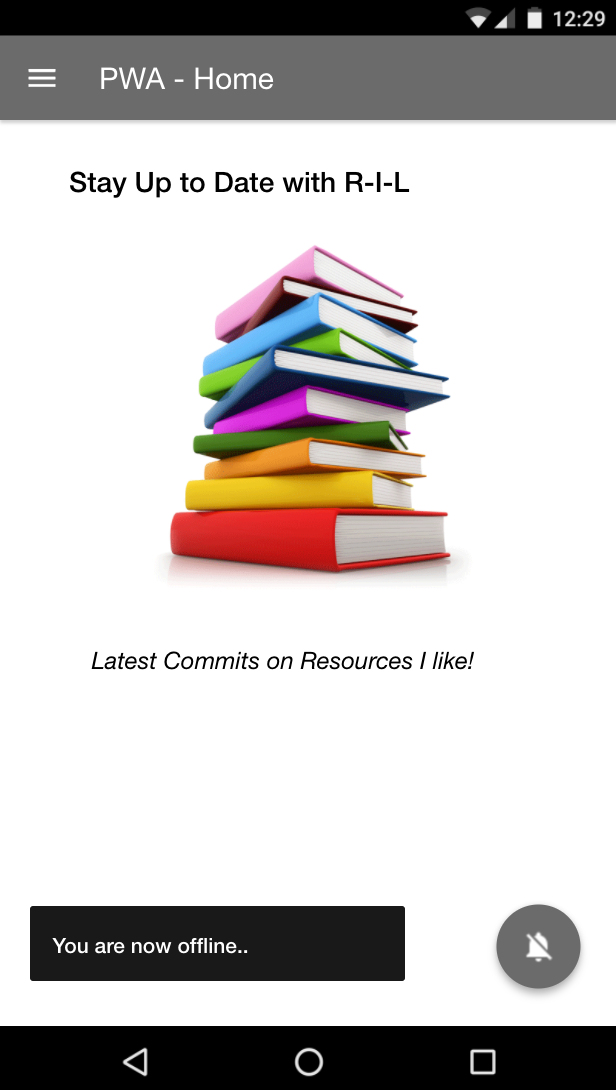
Yaaay!!! 首页终于离线也是可以浏览了,那么latest页面是不是显示最新的提交呢?
Latest Page Offline
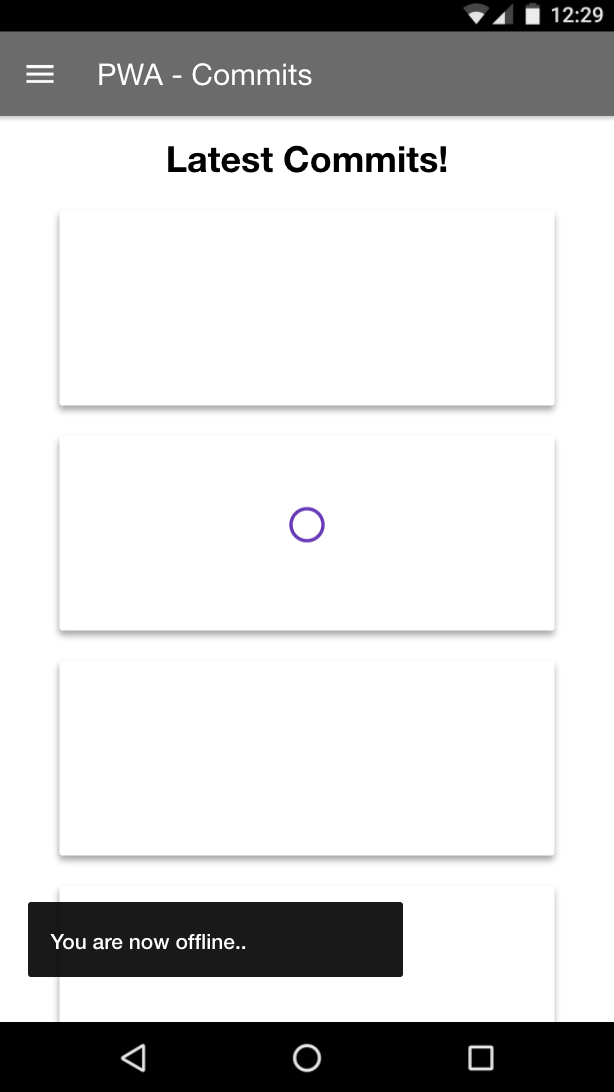
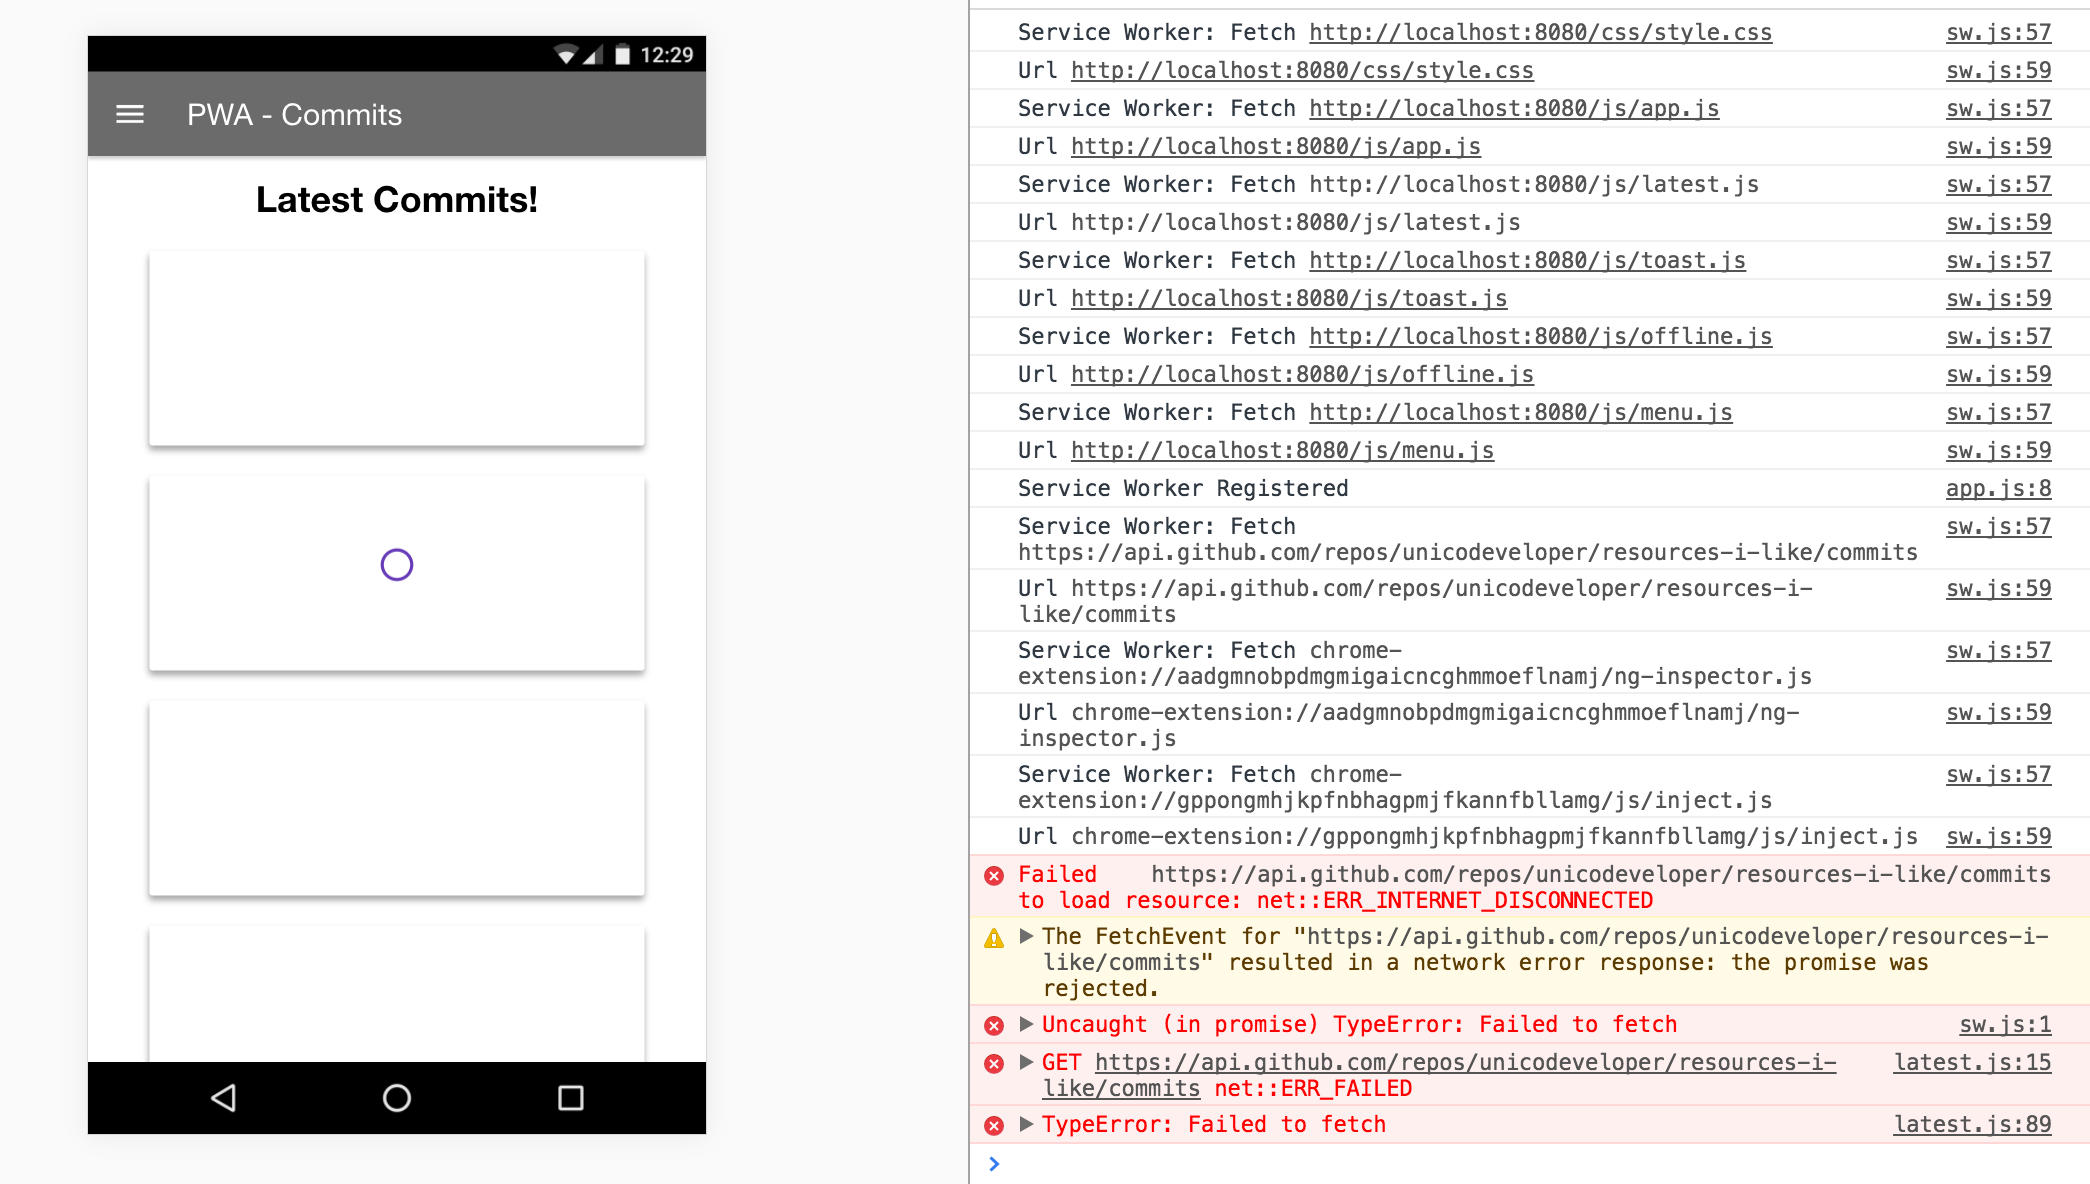
Yaaay!!!latest已是离线服务。但是等一下!数据在哪里?提交在哪里?哎呀!我们的 app试图请求Github API当用户与Internet断开连接时,它失败了。
Data Fetch Failure, Chrome DevTools
我们该怎么办?处理这个场景有不同的方法。其中一个选项是告诉service worker提供离线页面。另一种选择是在第一次加载时缓存提交数据,在后续请求中加载本地保存的数据,然后在用户连接时获取最新的数据。提交的数据可以存储在IndexedDB或local Storage。
好了,我们现在就此结束!
附上:
原文地址: https://auth0.com/blog/introduction-to-progressive-apps-part-one/
项目代码地址:https://github.com/unicodeveloper/pwa-commits
博客文章:https://blog.naice.me/articles/5a31d20a78c3ad318b837f59
如果有那个地方翻译出错或者失误,请各位大神不吝赐教,小弟感激不尽
期待下一篇: 介绍一下渐进式 Web App(即时加载) - Part 2
