

声明:我为这个框架写了四篇文章:
第一篇:[iOS]UINavigationController全屏pop之为每个控制器自定义UINavigationBar
第二篇:[iOS]UINavigationController全屏pop之为每个控制器添加底部联动视图

框架特性
✅ 全屏 pop 手势支持
✅ 全屏 push 到绑定的控制器支持
✅ 为每个控制器定制 UINavigationBar 支持(包括设置颜色和透明度等)
✅ 为每个控制器添加底部联动视图支持
✅ 自定义 pop 手势范围支持(从屏幕最左侧开始计算宽度)
✅ 为单个控制器关闭 pop 手势支持
✅ 为所有控制器关闭 pop 手势支持
❤️ 当当前控制器使用 AVPlayer 播放视频的时候, 使用自定义的 pop 动画以保证 AVPlayer 流畅播放.
这是“UINavigationController全屏pop”系列的第三篇文章,这次将讲述如何实现左滑push到绑定的控制器中,并且带有push动画。如果你没有看过我之前的两篇文章,建议你从第一篇开始看。或者你也可以直接去我的Github上查看 JPNavigationController 的源码。
01、引子
用过新闻软件的朋友应该都知道,比方说网易新闻,你如果在它的新闻详情页左滑,它会出现一个 push 动画打开评论页面。这次我们就来讨论,在基于之前的封装基础上如何实现这个功能。
02、世面上现有的APP都是怎么实现的?
左滑 push 到下一个页面的功能,借助于 Reveal 观察,大致可以分为两类:
- 第一类,以网易新闻、腾讯新闻、凤凰新闻等主流新闻为代表的 APP,他们都在新闻详情页绑定了左滑手势 push 到评论页面的功能。
- 第二类,以 Instagram、Snapchat 为代表的国外社交 APP,他们在
UITabBarController的某些分支上集成了左滑和右滑手势绑定切换到不同的控制器的功能。
通过 Reveal 观察发现,第一类左滑手势的功能是集成到了当前控制器对应的 UINavigationController 上。而第二类是采用让 window 的根控制器上集成一个 UICollectionView,然后把每个控制器的 view 添加到 UICollectionViewCell 上,这样就可以实现左滑以及右滑切换到不同的控制器的效果。第二类和我常见的新闻页面的子栏目切换是一个道理,相信大家都会实现的。我们现在要讲的就是怎么将左滑手势的功能是集成到了当前控制器对应的 UINavigationController 上。
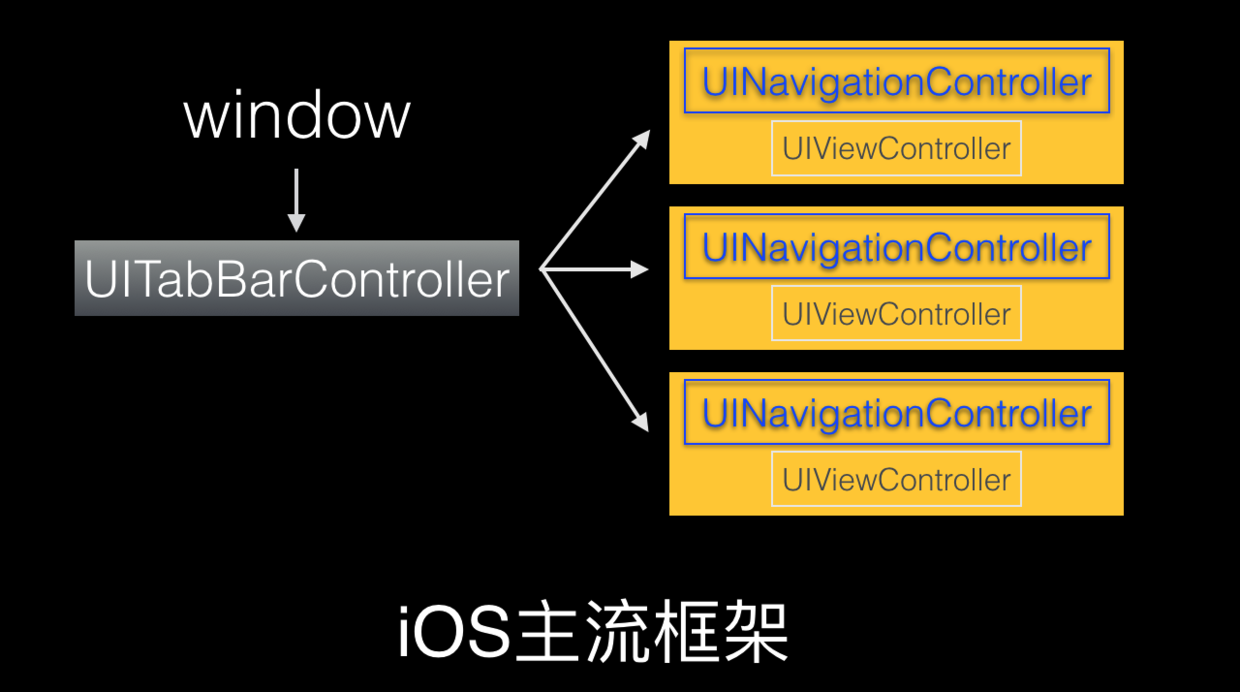
iOS 现在主流的框架结构是像上图这样的,如果要像第二类 APP 那样实现左滑功能,势必需要重新架构项目,这对于很多成熟的 APP 来说,工作量还是比较繁重的。所以值得尝试的方案是,在不改变现有项目架构的前提下实现左滑 push 功能。也就是说,要把左滑手势绑定到对应的导航控制器上。
03、AOP面向切面编程思想
iOS 工程师都知道 runtime,也就是运行时,得益于 Objective-C 的 runtime 的特性,我们可以动态的为类添加方法,以及替换系统的实现等。如果把这种行为抽象成为一个更高级的思想的话,就是所谓的 AOP(AOP 是Aspect Oriented Program的首字母缩写),也就是面向切面编程。关于 AOP 具体可以看 维基百科 上的解释,或者 知乎 上的回答。这个框架也是基于 AOP 思想的,所以能够在不侵入用户的项目的条件下实现以上的特性。
04、大致思路
- 01.首先我们要拿到用户左滑
left-slip这个事件 - 02.接下来要询问用户是否需要给左滑手势绑定对应的 push 事件
- 03.如果用户绑定了事件,此时应该创建要push到的控制器
- 04.跟踪用户的手势,驱动过渡动画
- 05.完成 push 手势
05、具体实现
5.1. 首先我们要拿到用户左滑 left-slip 这个事件
之前我的第二篇文章说过,框架里使用 UIPanGestureRecognizer 代替了系统的手势,所以我们能够在 UIPanGestureRecognizer 的代理方法中拿到用户是否左滑了。
  -(BOOL)gestureRecognizerShouldBegin:(UIPanGestureRecognizer *)gestureRecognizer{

        // System pop action.
        SEL action = NSSelectorFromString(@"handleNavigationTransition:");

        CGPoint translation = [gestureRecognizer velocityInView:gestureRecognizer.view];
        if (translation.x<0) {
            // left-slip --> push.
            UIViewController *rootVc = [UIApplication sharedApplication].keyWindow.rootViewController;
            UIImage *snapImage = [JPSnapTool snapShotWithView:rootVc.view];
            NSDictionary *dict = @{
                                   @"snapImage" : snapImage,
                                   @"navigationController" : self.navigationController
                                   };
            [[NSNotificationCenter defaultCenter]postNotificationName:@"NavigationDidSrolledLeft" object:dict userInfo:nil];
            [gestureRecognizer removeTarget:_target action:action];
            return YES;
        }
        else{
            // right-slip --> pop.
            [[NSNotificationCenter defaultCenter]postNotificationName:@"NavigationDidSrolledRight" object:self.navigationController userInfo:nil];
            [gestureRecognizer addTarget:_target action:action];
        }
    }
5.2. 接下来要询问用户是否需要给左滑手势绑定对应的push事件
首先我们应该创建一个协议,只要遵守协议,并实现协议方法,每个控制器就都能拥有push功能。
    /*!
     * \~english
     * Just follow the JPNavigationControllerDelegate protocol and override the delegate-method in this protocol use [self.navigationController pushViewController:aVc animated:YES] if need push gesture transition animation when left-slip.
     * You should preload the data of next viewController need to display for a good user experience.
     *
     * \~chinese
     * 如果需要在某个界面实现push左滑手势动画, 只需要遵守这个协议, 并且实现以下这个的协议方法, 在协议方法里使用[self.navigationController pushViewController:aVc animated:YES], 就可拥有左滑push动画了.
     * 关于数据预加载, 为了获得良好的用户体验, 建议在push之前就把要push到的页面的数据请求到本地, push过去直接能展示数据.
     */
    @protocol JPNavigationControllerDelegate <NSObject>

    @required
    /*!
     * \~english
     * The delegate method need to override if need push gesture transition animation when left-slip.
     *
     * \~chinese
     * 实现push左滑手势需要实现的代理方法.
     */
    -(void)jp_navigationControllerDidPushLeft;

    @end
因为我们希望在每个页面都能拥有绑定左滑 push 的功能,所以我们可以把询问用户是否需要 push 的代理绑定到每个控制器的 navigationController 上。
    /*!
     * \~english
     * The delegate for function of left-slip to push next viewController.
     *
     * \~chinese
     * 实现左滑left-slip push到下一个控制器的代理.
     */
    @property(nonatomic)id<JPNavigationControllerDelegate> jp_delegate;
5.3. 如果用户绑定了事件,此时应该创建要 push 到的控制器
由于之前已经为每个控制器添加了检查是否需要 push 动画的入口。所以,当检测到用户 push 的时候,应该开始检查用户是否遵守了协议并实现了协议方法,从而决定是否需要创建 push 动画。
    -(void)didPushLeft:(JPNavigationInteractiveTransition *)navInTr{

        // Find the displaying warp navigation controller first now when left-slip, check this navigation is overrided protocol method or not after, if yes, call this method.
        // 左滑push的时候, 先去找到当前在窗口的用于包装的导航控制器, 再检查这个控制器有没有遵守左滑push协议, 看这个界面有没有实现左滑调起push的代理方法, 如果实现了, 就执行代理方法.

        NSArray *childs = self.childViewControllers;
        JPWarpViewController *warp = (JPWarpViewController *)childs.lastObject;
        JPWarpNavigationController *nav = (JPWarpNavigationController *)warp.childViewControllers.firstObject;
        if (nav) {
            if ([nav.jp_delegate respondsToSelector:@selector(jp_navigationControllerDidPushLeft)]) {
                [nav.jp_delegate jp_navigationControllerDidPushLeft];
            }
        }
    }
当检测到用户需要 push 动画的时候,我们就要开始准备 push 动画了。我们把 pop 动画交给系统的时候,是需要把根导航控制器(JPNavigationController)的 delegate 置为 nil 的,并且需要为我们自定义的 UIPanGestureRecognizer 添加 target,这个我在第一篇文章已经讲过了。由于pop已经交给系统处理,所以这里只负责处理push动画。系统是没有push动画的,所以我们要自己动手来实现。要想代理系统的push动画,我们需要成为根导航控制器(JPNavigationController)的代理,遵守协议,并且实现两个require的代理方法。
我们在第一个方法里检查是否是push操作,如果是,我们就要返回我们自定义的push动画对象。同时,我们需要手势驱动动画过程,所以,我们需要创建手势监控者来负责在用户滑动的时候更新动画,也就是第二个方法。
    - (id<UIViewControllerAnimatedTransitioning>)navigationController:(UINavigationController *)navigationController
                                  animationControllerForOperation:(UINavigationControllerOperation)operation
                                               fromViewController:(UIViewController *)fromVC
                                                 toViewController:(UIViewController *)toVC {

        // If the animation operation now is push, return custom transition.
        // 判断如果当前执行的是Push操作,就返回我们自定义的push动画对象。

        if (self.isGesturePush && operation == UINavigationControllerOperationPush) {
            self.transitioning.snapImage = self.snapImage;
            return self.transitioning;
        }
        return nil;
    }

    - (id<UIViewControllerInteractiveTransitioning>)navigationController:(UINavigationController *)navigationController
                         interactionControllerForAnimationController:(id<UIViewControllerAnimatedTransitioning>)animationController {

        // If the animationController is custom push instance, return interactivePopTransition to manage transition progress.
       // 判断动画对象animationController是我们自定义的Push动画对象,那么就返回interactivePopTransition来监控动画完成度。

        if (self.isGesturePush && [animationController isKindOfClass:[JPPushnimatedTransitioning class]]) {
            return self.interactivePopTransition;
        }

        return nil;
    }
创建手势监控者的代码如下:
    - (void)handleControllerPop:(UIPanGestureRecognizer *)recognizer {

        // This method be called when pan gesture start, because entrust system handle pop, so only handle push here.
        // Calculate the percent of the point origin-X / screen width, alloc UIPercentDrivenInteractiveTransition instance when push start, and check user is overrided the protocol method or not, if overrided, then start push and, set start percent = 0.
        // Refresh the slip percent when pan gesture changed.
        // Judge the slip percent is more than the JPPushBorderlineDelta when pan gesture end.
        // 当用户滑动的时候就会来到这个方法, 由于pop已经交给系统处理, 所以这里只负责处理push动画.
        // 先计算用户滑动的点占屏幕宽度的百分比, 当push开始的时候, 创建百分比手势驱动过渡动画, 检查用户有没有在这个界面设置需要push, 如果设置了, 就开始push, 并把起点百分比置为0.
        // 在用户滑动的过程中更新手势驱动百分比.
        // 在滑动结束的时候, 判断停止点是否已达到约定的需要pop的范围.

        CGFloat progress = [recognizer translationInView:recognizer.view].x / recognizer.view.bounds.size.width;
        CGPoint translation = [recognizer velocityInView:recognizer.view];
        if (recognizer.state == UIGestureRecognizerStateBegan) {
            self.isGesturePush = translation.x<0 ? YES : NO;
        }
        if (self.isGesturePush) {
            progress = -progress;
        }
        progress = MIN(1.0, MAX(0.0, progress));

        if (recognizer.state == UIGestureRecognizerStateBegan) {
            if (self.isGesturePush) {
                if ([self.delegate respondsToSelector:@selector(didPushLeft:)]) {
                    self.interactivePopTransition = [[UIPercentDrivenInteractiveTransition alloc] init];
                    self.interactivePopTransition.completionCurve = UIViewAnimationCurveEaseOut;
                    [self.delegate didPushLeft:self];
                    [self.interactivePopTransition updateInteractiveTransition:0];
                }
            }
        }
        else if (recognizer.state == UIGestureRecognizerStateChanged) {
            [self.interactivePopTransition updateInteractiveTransition:progress];
        }
        else if (recognizer.state == UIGestureRecognizerStateEnded || recognizer.state == UIGestureRecognizerStateCancelled) {
            if (progress > JPPushBorderlineDelta) {
                [self.interactivePopTransition finishInteractiveTransition];
            }
            else {
                [self.interactivePopTransition cancelInteractiveTransition];
            }

            self.interactivePopTransition = nil;
            self.isGesturePush = NO;

            // Set root navigation controller's delegate be nil for follow user's gesture.
            // 置空导航控制器代理, 等待用户下一次滑动.

            self.nav.delegate = nil;
        }
    }
5.4. 跟踪用户的手势,驱动过渡动画
还记得上面那个左滑 push 的动画吗?你可能觉得和系统默认的 pop 动画相比,就是把系统的 pop 动画反过来,就成了 push 动画了。如果你能这么想,那恭喜你,你的直觉很对!!其实,我们很多时候做很多东西都是在模仿系统的实现,在猜系统这个效果究竟是怎么实现的,然后再一步一步验证我们的想法是否正确。
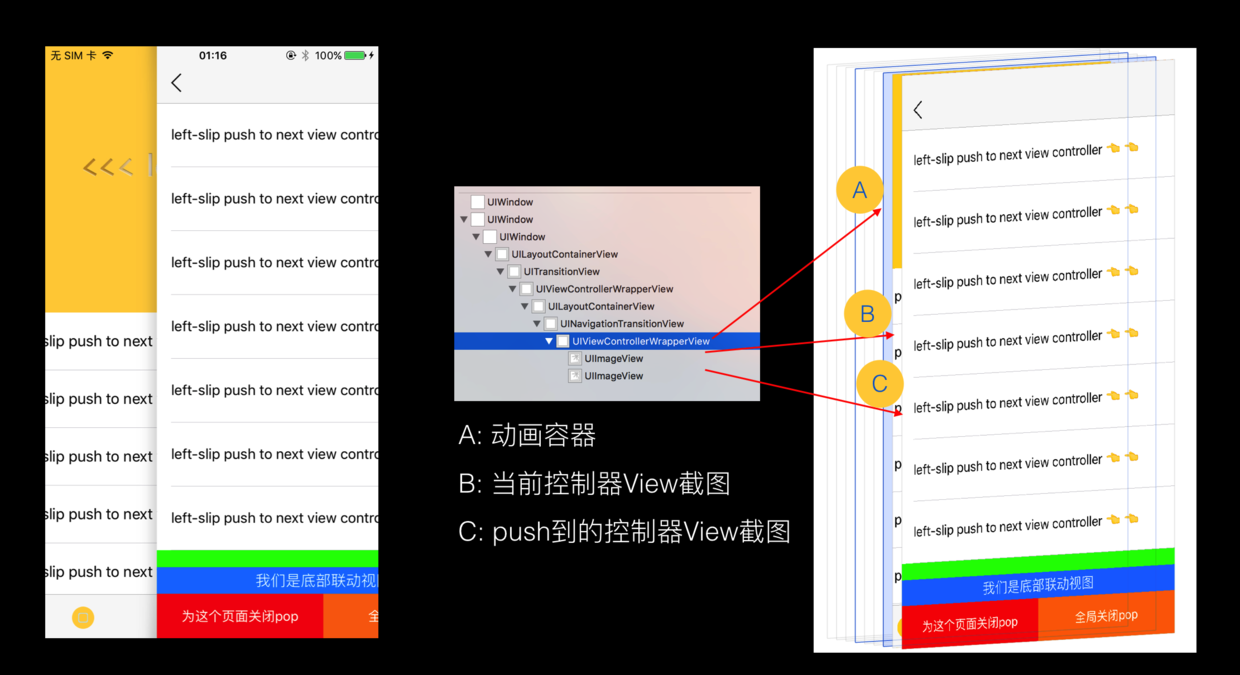
当你打开我的 demo 运行的时候,你看到的是左边的那个样子,现在我告诉你,实际上它的图层关系是右边的这个样子。也就说,在用户左滑的那一刻我们需要将准备右图做动画需要的元素,包括当前控制器的 View 的截图 B,要 push 到的控制器的 View 的截图 C,然后把它们按照这个图层关系添加到系统提供给我们用来做动画的容器中。 再在动画提供者中告诉系统,我们需要做动画的两个元素 B 和 C 在动画起始的时候的 frame,以及在动画终点的时候这两个元素的 frame。这个手势驱动的过程,因为我们已经把这个监听过程交给手势监控者,并返还给系统处理了,所以这个过程系统会帮我们处理好。
但是问题是,为什么我们要用截图的方式,而不是直接用两个控制器的 View 来做动画? 这么做的原因就是,当当前窗口有显示 tabBar 的时候,tabBar 图层是在动画容器图层之上的,所以我们无法优雅的做百分手势驱动。所以采取这种方式。但是系统的 pop 手势不是用截图的形式,而是直接使用两个控制器的View来做动画,就像下面这样,但是由于权限问题,我们不可能像系统那样做,但是也不排除有同学想到巧妙的办法来实现。

下面看下动画提供者的源码:
    - (void)animateTransitionEvent {

        // Mix shadow for toViewController' view.
        CGFloat scale = [UIScreen mainScreen].scale/2.0;
        [self.containerView insertSubview:self.toViewController.view aboveSubview:self.fromViewController.view];
        UIImage *snapImage = [JPSnapTool mixShadowWithView:self.toViewController.view];

        // Alloc toView's ImageView
        UIImageView *ivForToView = [[UIImageView alloc]initWithImage:snapImage];
        [self.toViewController.view removeFromSuperview];
        ivForToView.frame = CGRectMake(JPScreenWidth, 0, snapImage.size.width, JPScreenHeight);
        [self.containerView insertSubview:ivForToView aboveSubview:self.fromViewController.view];

        //  Alloc fromView's ImageView
        UIImageView *ivForSnap = [[UIImageView alloc]initWithImage:self.snapImage];
        ivForSnap.frame = CGRectMake(0, 0, JPScreenWidth, JPScreenHeight);
        [self.containerView insertSubview:ivForSnap belowSubview:ivForToView];

        // Hide tabBar if need.
        UIViewController *rootVc = [UIApplication sharedApplication].keyWindow.rootViewController;
        if ([rootVc isKindOfClass:[UITabBarController class]]) {
            UITabBarController *r = (UITabBarController *)rootVc;
            UITabBar *tabBar = r.tabBar;
            tabBar.hidden = YES;
        }

        self.fromViewController.view.hidden = YES;
        [UIView animateWithDuration:self.transitionDuration animations:^{

            // Interative transition animation.
            ivForToView.frame = CGRectMake(-shadowWidth*scale, 0, snapImage.size.width, JPScreenHeight);
            ivForSnap.frame = CGRectMake(-moveFactor*JPScreenWidth, 0, JPScreenWidth, JPScreenHeight);

        }completion:^(BOOL finished) {

            self.toViewController.view.frame = CGRectMake(0, 0, JPScreenWidth, JPScreenHeight);
            [self.containerView insertSubview:self.toViewController.view belowSubview:ivForToView];
            [ivForToView removeFromSuperview];
            [ivForSnap removeFromSuperview];
            self.fromViewController.view.hidden = NO;
            [self completeTransition];
        }];
    }
5.5. 完成 push 手势
到了这里,基本上已经完成了 push 功能了。只需要在手势结束的时候告诉系统,是 push 成功还是失败就可以了。
if (progress > JPPushBorderlineDelta) {
    [self.interactivePopTransition finishInteractiveTransition];
 }
 else {
       [self.interactivePopTransition cancelInteractiveTransition];
 }
06、注意
注意: tabBar 的 translucent 默认为 YES, 使用 JPNavigationCotroller 不能修改 tabBar 的透明属性. 这是因为 Xcode 9 以后, 苹果对导航控制器内部做了一些修改, 一旦将 tabBar 设为不透明, 当前架构下的 UI 就会错乱, 设置 tabBar 的 backgroundImage 为不透明图片, 或者设置 backgroundColor 为不透明的颜色值也是一样的会出错.
