

本系列文章是对 metalkit.org 上面MetalKit内容的全面翻译和学习.
在本系列的第二部分中,我们将学习soft shadows软阴影.我们将使用在Raymarching in Metal中的playground,因为它已经建立了3D物体.让我们建立一个基本场景,包含一个球体,一个平面,一个灯光和一个射线:
struct Ray {
    float3 origin;
    float3 direction;
    Ray(float3 o, float3 d) {
        origin = o;
        direction = d;
    }
};

struct Sphere {
    float3 center;
    float radius;
    Sphere(float3 c, float r) {
        center = c;
        radius = r;
    }
};

struct Plane {
    float yCoord;
    Plane(float y) {
        yCoord = y;
    }
};

struct Light {
    float3 position;
    Light(float3 pos) {
        position = pos;
    }
};
下一步,我们创建几个distance operation距离运算函数来帮助我们确定元素到场景之间的距离:
float unionOp(float d0, float d1) {
    return min(d0, d1);
}

float differenceOp(float d0, float d1) {//差集
    return max(d0, -d1);
}

float distToSphere(Ray ray, Sphere s) {
    return length(ray.origin - s.center) - s.radius;
}

float distToPlane(Ray ray, Plane plane) {
    return ray.origin.y - plane.yCoord;
}
下一步,我们创建一个distanceToScene() 函数,它给出场景中到任意物体的最近距离.我们用这些函数来生成一个形状,它看起来像是一个带有几个洞的空心球体:
float distToScene(Ray r) {
    Plane p = Plane(0.0);
    float d2p = distToPlane(r, p);
    Sphere s1 = Sphere(float3(2.0), 1.9);
    Sphere s2 = Sphere(float3(0.0, 4.0, 0.0), 4.0);
    Sphere s3 = Sphere(float3(0.0, 4.0, 0.0), 3.9);
    Ray repeatRay = r;
    repeatRay.origin = fract(r.origin / 4.0) * 4.0;
    float d2s1 = distToSphere(repeatRay, s1);
    float d2s2 = distToSphere(r, s2);
    float d2s3 = distToSphere(r, s3);
    float dist = differenceOp(d2s2, d2s3);
    dist = differenceOp(dist, d2s1);
    dist = unionOp(d2p, dist);
    return dist;
}
目前我们写的都是旧代码,只是对Raymarching文章中的重构.让我们谈谈normals法线及为什么需要法线.如果我们有一个平板-比如我们的平面-它的法线总是(0,1,0)也就是指向上方.本例中却很繁琐.法线在3D空间是一个float3而且我们需要知道它在射线上的位置.假设射线刚好接触到球体的左侧.法线应是(-1,0,0),就是指向左边并远离球体.如果射线稍稍移动到该点的右边,在球体内部(如-0.001).如果射线稍稍移动到该点的左边,在球体外部(如0.001).如果我们从左边减去左边得到-0.001 - 0.001 = -0.002它指向左边,所以这就是我们法线的x坐标.然后对y和z重复同样操作.我们使用一个名为eps的2D向量,来让向量调和vector swizzling更容易操作,每次都使用选定的值0.001作为各个坐标值:
float3 getNormal(Ray ray) {
    float2 eps = float2(0.001, 0.0);
    float3 n = float3(distToScene(Ray(ray.origin + eps.xyy, ray.direction)) -
                      distToScene(Ray(ray.origin - eps.xyy, ray.direction)),
                      distToScene(Ray(ray.origin + eps.yxy, ray.direction)) -
                      distToScene(Ray(ray.origin - eps.yxy, ray.direction)),
                      distToScene(Ray(ray.origin + eps.yyx, ray.direction)) -
                      distToScene(Ray(ray.origin - eps.yyx, ray.direction)));
    return normalize(n);
}
最后,我们已经准备好看到图形了.我们再次使用Raymarching代码,放在已经添加了法线的内核函数的末尾,这样我们就可以给每个像素插值出颜色:
kernel void compute(texture2d<float, access::write> output [[texture(0)]],
constant float &time [[buffer(0)]],
uint2 gid [[thread_position_in_grid]]) {
int width = output.get_width();
int height = output.get_height();
float2 uv = float2(gid) / float2(width, height);
uv = uv * 2.0 - 1.0;
uv.y = -uv.y;
Ray ray = Ray(float3(0., 4., -12), normalize(float3(uv, 1.)));
float3 col = float3(0.0);
for (int i=0; i<100; i++) {
float dist = distToScene(ray);
if (dist < 0.001) {
col = float3(1.0);
break;
}
ray.origin += ray.direction * dist;
}
float3 n = getNormal(ray);
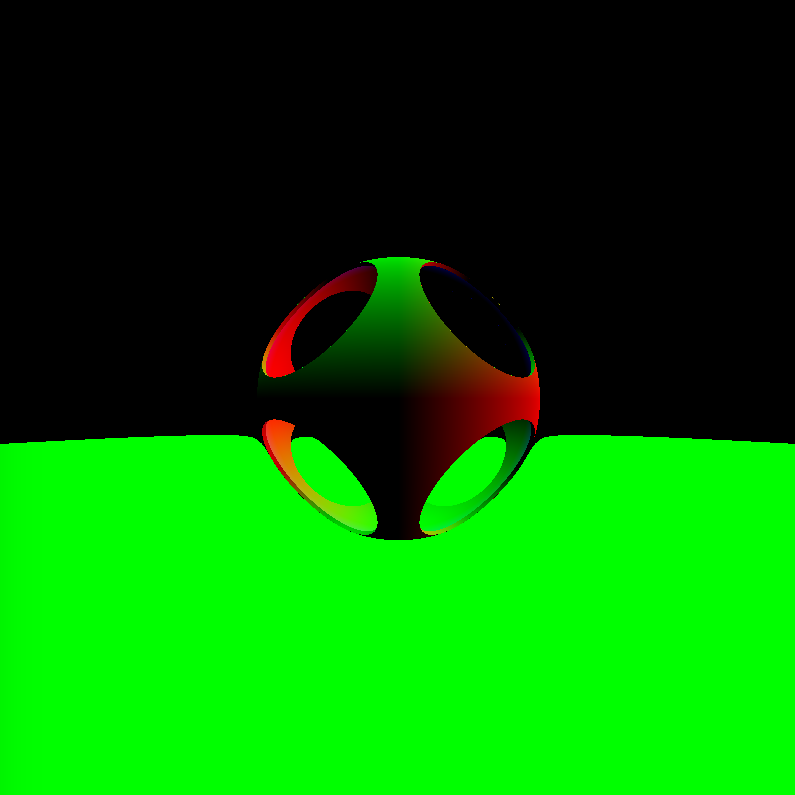
output.write(float4(col * n, 1.0), gid);
}
如果你现在运行playground你将看到类似的图像:
现在我们有了法线,我们可以用lighting() 函数来计算场景中每个像素的光照.首先我们需要知道灯光的方向(lightRay光线),我们用规范化的灯光位置和当前射线来取得灯光方向.对diffuse漫反射光照我们需要知道法线和光线间的角度,也就是两者的点积.对specular高光光照我们需要在表面进行反射,它们依赖于我们寻找的角度.不同之处在于,本例中,我们首先发射一个射线到场景中,从表面反射回来,再测量反射线和lightRay光线间的角度.然后对这个值进行一个高次乘方运算来让它更锐利.最后我们返回混合光线:
float lighting(Ray ray, float3 normal, Light light) {
    float3 lightRay = normalize(light.position - ray.origin);
    float diffuse = max(0.0, dot(normal, lightRay));
    float3 reflectedRay = reflect(ray.direction, normal);
    float specular = max(0.0, dot(reflectedRay, lightRay));
    specular = pow(specular, 200.0);
    return diffuse + specular;
}
在内核函数中用下面几行替换最后一行:
Light light = Light(float3(sin(time) * 10.0, 5.0, cos(time) * 10.0));
float l = lighting(ray, n, light);
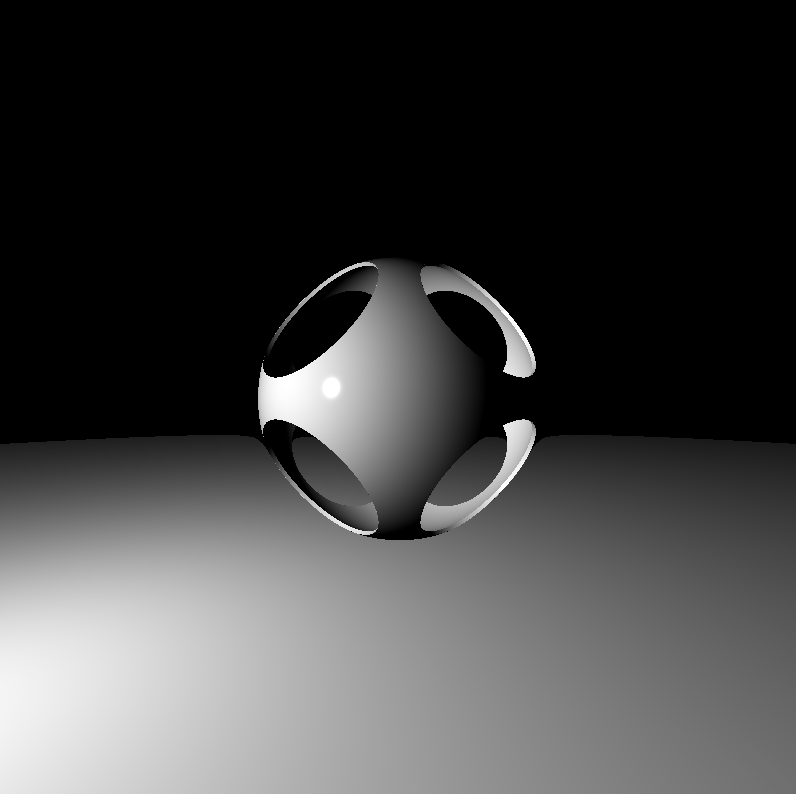
output.write(float4(col * l, 1.0), gid);
如果你现在运行playground你将看到类似的图像:
下一步,阴影!我们几乎从本系列的第一部分就开始使用shadow() 函数到现在,只做过少许修改.我们规范化灯光方向(lightDir),并在步进射线时不断更新disAlongRay:
float shadow(Ray ray, Light light) {
    float3 lightDir = light.position - ray.origin;
    float lightDist = length(lightDir);
    lightDir = normalize(lightDir);
    float distAlongRay = 0.01;
    for (int i=0; i<100; i++) {
        Ray lightRay = Ray(ray.origin + lightDir * distAlongRay, lightDir);
        float dist = distToScene(lightRay);
        if (dist < 0.001) {
            return 0.0;
            break;
        }
        distAlongRay += dist;
        if (distAlongRay > lightDist) { break; }
    }
    return 1.0;
}
用下面几行替换内核函数中的最后一行:
float s = shadow(ray, light);
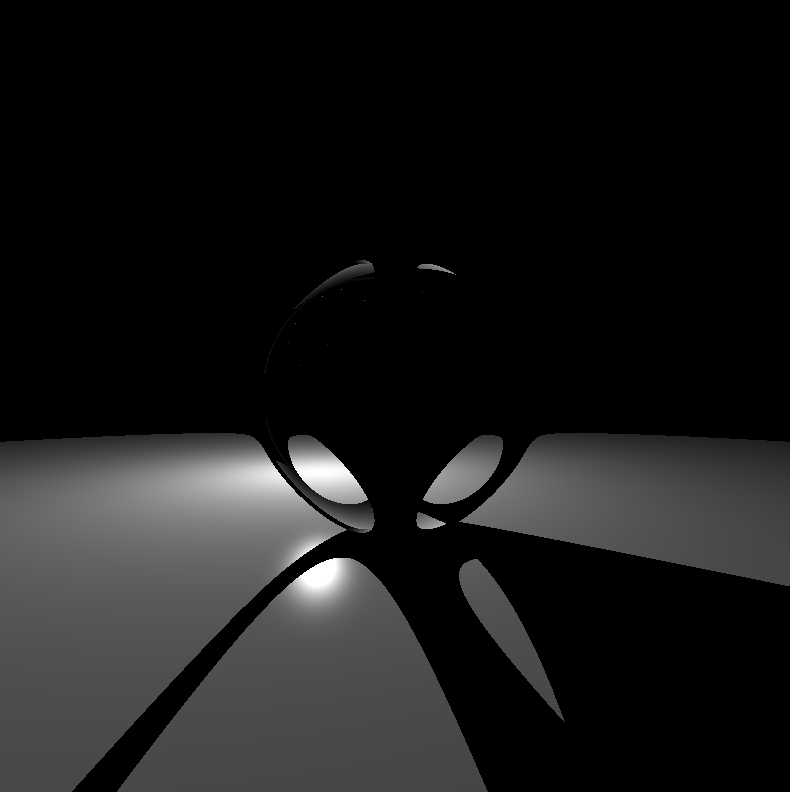
output.write(float4(col * l * s, 1.0), gid);
如果你现在运行playground你将看到类似的图像:
让我们给场景添加点soft shadows软阴影.在现实生活中,离物体越远阴影散布越大.例如,如果地板上有个立方体,在立方体的顶点我们得到清晰的阴影,但离立方体远的地方看起来像一个模糊的阴影.换句话说,我们从地板上的某点出发,向着灯光前进,要么撞到要么错过.硬阴影很简单:我们撞到了什么东西,这个点主在阴影中.软阴影则处于两者之间.用下面几行更新shadow() 函数:
float shadow(Ray ray, float k, Light l) {
    float3 lightDir = l.position - ray.origin;
    float lightDist = length(lightDir);
    lightDir = normalize(lightDir);
    float eps = 0.1;
    float distAlongRay = eps * 2.0;
    float light = 1.0;
    for (int i=0; i<100; i++) {
        Ray lightRay = Ray(ray.origin + lightDir * distAlongRay, lightDir);
        float dist = distToScene(lightRay);
        light = min(light, 1.0 - (eps - dist) / eps);
        distAlongRay += dist * 0.5;
        eps += dist * k;
        if (distAlongRay > lightDist) { break; }
    }
    return max(light, 0.0);
}
你会注意到,我们这次从白色(1.0)灯光开始,通过使用一个衰减器(k)来得到不同的(中间的)灯光值.eps变量告诉我们当光线进入场景中时beam波束有多宽.窄波束意味着锐利的阴影,而宽波束意味着软阴影.我们从小distAlongRay到大开始,不然的话该点所在的曲面会投射阴影到自己身上.然后我们像硬阴影中那样沿射线前进,并得到离场景的距离,之后我们从eps(beam width波束宽度)中减掉dist并除以eps.这样给出了波束覆盖的百分比.如果我们颠倒它(1 - beam width)就得到了处于灯光中的百分比.当我们沿着射线前进时,我们取这个新的值和light值中的最小值,来让阴影保持最黑.然后再沿射线前进,并根据行进距离均匀地增加beam width波束宽度,并缩放k倍.如果超过了灯光,就跳出循环.最后,我们想要避免给灯光一个负值,所以我们返回0.0和灯光值之间的最大值.现在让我们用新的shadow()函数来改写内核函数:
float3 col = float3(1.0);
bool hit = false;
for (int i=0; i<200; i++) {
float dist = distToScene(ray);
if (dist < 0.001) {
hit = true;
break;
}
ray.origin += ray.direction * dist;
}
if (!hit) {
col = float3(0.5);
} else {
float3 n = getNormal(ray);
Light light = Light(float3(sin(time) * 10.0, 5.0, cos(time) * 10.0));
float l = lighting(ray, n, light);
float s = shadow(ray, 0.3, light);
col = col * l * s;
}
Light light2 = Light(float3(0.0, 5.0, -15.0));
float3 lightRay = normalize(light2.position - ray.origin);
float fl = max(0.0, dot(getNormal(ray), lightRay) / 2.0);
col = col + fl;
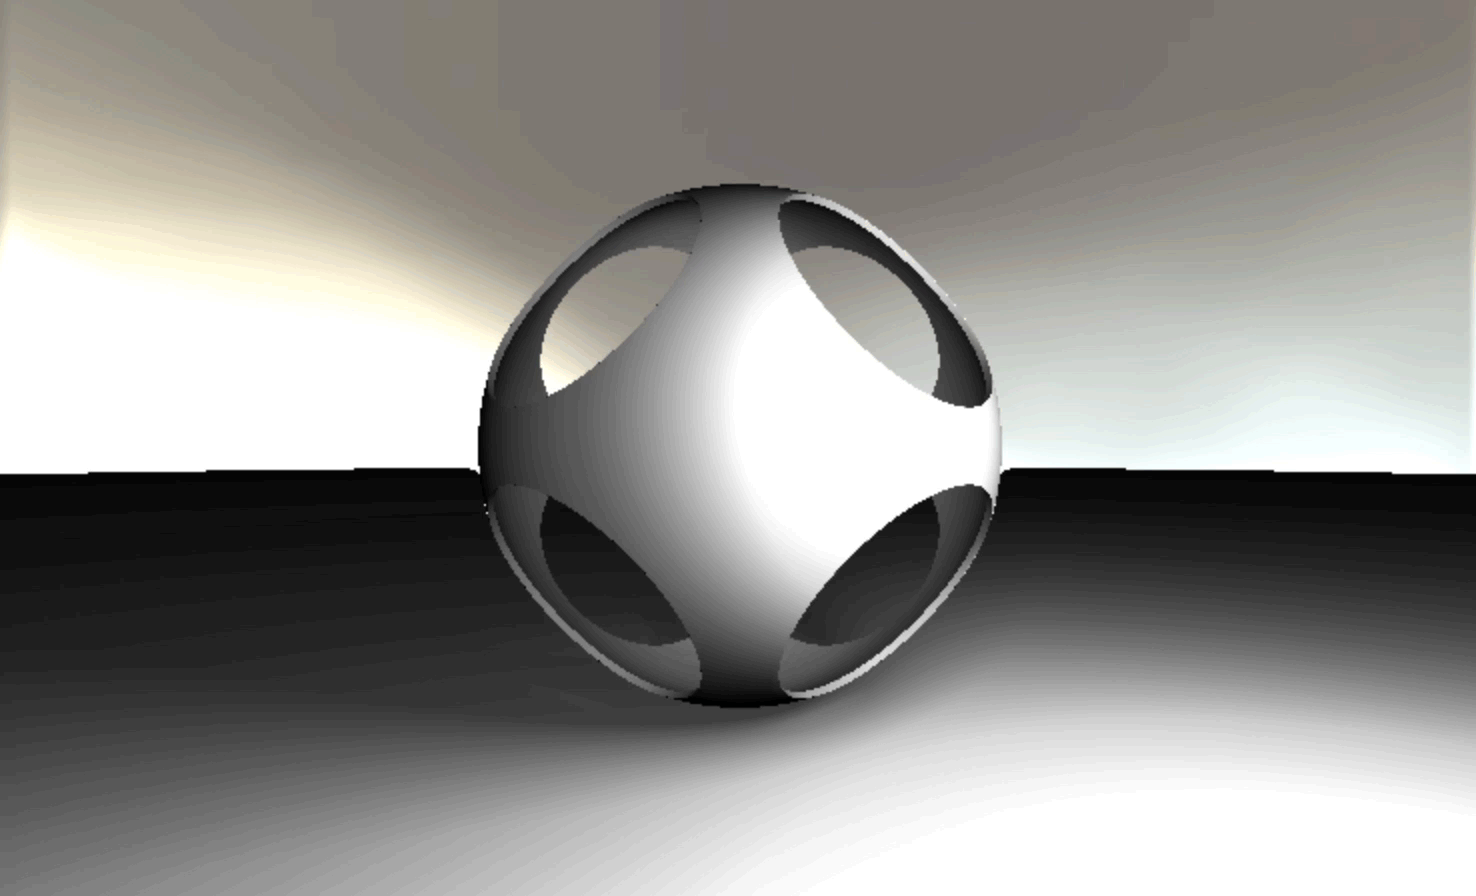
output.write(float4(col, 1.0), gid);
注意我们切换到了默认的白色.然后我们添加一个布尔值叫hit,它来告诉我们碰撞到物体没有.我们限定当我们到场景的距离在0.001之内就是碰撞了,如果我们没有碰到任何东西,则用灰色着色,否则确定阴影的数值.在最后我们只需要在场景前面添加另一个(固定的)光源,就能看到阴影的更多细节.如果你现在运行playground你将看到类似的图像:

要看这份代码的动画效果,我在下面使用一个Shadertoy嵌入式播放器.只要把鼠标悬浮在上面,并单击播放按钮就能看到动画:<译者注:这里不支持嵌入播放器,我用gif代替https://www.shadertoy.com/embed/XltSWf>
下次见!
