

前言
这里是针对日常使用react-navigation中的遇到的一些问题对其进行解决而总结出的小技巧。
TabNavigator 和 StackNavigator
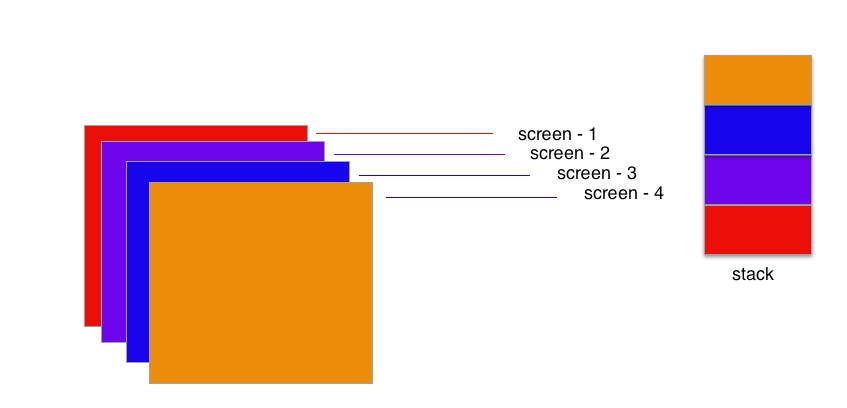
简单了解一下 StackNavigator
简单了解一下TabNavigator
在初始化TabNavigator的时候就会将TabNavigator上的所有screen都进行初始化。通过左右滑动/点击底部的TabBar对应的icon项目进行切换。
而一个TabNavigator也可以作为一个screen放入到StackNavigator中。
在了解了其简单使用原理后,进入到日常可能会遇到的一些问题。
TabNavigator的子screen缺少一些额外的钩子
由于TabNavigator会在第一次加载的时候实例化其子screen,所以其所以子screen的componentDidMount() 会随着TabNavigator实例的时候执行。
于是就有了这样的需要,子screen在屏幕上的时候才向服务器请求数据,或者是更新数据等逻辑。
目前react-navigation并没有提供相关的钩子去帮助我们(见#51),所以我们就有需要去使用一些高阶组件为我们的screen添加一些hook。
如https://github.com/pmachowski/react-navigation-is-focused-hoc
这里提供一个在集成redux后自己实现的一个方案
import React from 'react'
import { connect } from 'react-redux'

import PropTypes from 'prop-types'


function _getCurrentRouteName(navigationState) {
  if (!navigationState) return null
  const route = navigationState.routes[navigationState.index]
  if (route.routes) return _getCurrentRouteName(route)
  return route.routeName
}

/**
 * 给当前screen传递isFocused以判断是否在为当前路由
 * @param {Component} WrappedComponent
 * @param {string} screenName
 */
export default function withNavigationFocus(WrappedComponent, screenName) {
  class InnerComponent extends React.Component {
    static propTypes = {
      nav: PropTypes.object,
    }

    static navigationOptions = (props) => {
      if (typeof WrappedComponent.navigationOptions === 'function') {
        return WrappedComponent.navigationOptions(props)
      }
      return { ...WrappedComponent.navigationOptions }
    }

    constructor(props) {
      super(props)
      this.state = {
        isFocused: true,
      }
    }

    componentDidMount() {

    }

    componentWillReceiveProps(nextProps) {
      if (nextProps && nextProps.nav) {
        this._handleNavigationChange(_getCurrentRouteName(nextProps.nav))
      }
    }

    componentWillUnmount() {

    }

    _handleNavigationChange = (routeName) => {
      // update state only when isFocused changes
      if (this.state.isFocused !== (screenName === routeName)) {
        this.setState({
          isFocused: screenName === routeName,
        })
      }
    }

    render() {
      return <WrappedComponent isFocused={this.state.isFocused} {...this.props} />
    }
  }
  return connect(mapStateToProps)(InnerComponent)
}

/*将react-navigation集成到redux中*/
const mapStateToProps = (state) => ({
  nav: state.nav,
})
通过抛出引玉可以为相关的其他钩子实现提供思路
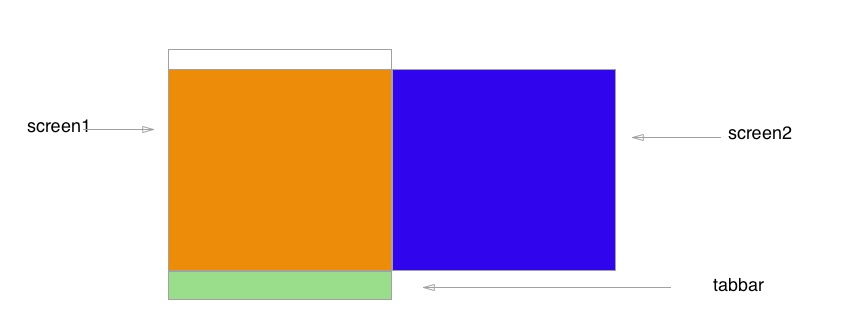
实现一个自定义的tabbar
为什么会有这个需求,因为设计师总会各种新(sao)的想(cao)法(zuo),例如issues上看到的这个图

这里之前实践的例子
import React, { Component } from 'react'
import {
  View,
  TouchableOpacity,
  Text,
  StyleSheet,
  Dimensions,
  Image,
} from 'react-native'
import PropTypes from 'prop-types'
import { connect } from 'react-redux'

const { width } = Dimensions.get('window')

function _getCurrentRouteName(navigationState) {
  if (!navigationState) return null
  const route = navigationState.routes[navigationState.index]
  if (route.routes) return _getCurrentRouteName(route)
  return route.routeName
}

const extraRoutes = [{
  routeName: 'InsuranceTimeline',
  defaultIcon: require('../../assets/tabbar-icon/verify-icon/ic_circle_n.png'),
  selectIcon: require('../../assets/tabbar-icon/verify-icon/ic_circle_s.png'),
  title: 'screen2',
}, {
  routeName: 'InsuranceLesson',
  defaultIcon: require('../../assets/tabbar-icon/verify-icon/ic_umbrella_n.png'),
  selectIcon: require('../../assets/tabbar-icon/verify-icon/ic_umbrella_s.png'),
  title: 'sreen2',
}]

class TabBar extends Component {
  static defaultProps = {
    activeTintColor: '#3478f6', // Default active tint color in iOS 10
    activeBackgroundColor: 'transparent',
    inactiveTintColor: '#929292', // Default inactive tint color in iOS 10
    inactiveBackgroundColor: 'transparent',
    showLabel: true,
    showIcon: true,
  }

  static propTypes = {
    activeTintColor: PropTypes.string,
    inactiveTintColor: PropTypes.string,
    navigation: PropTypes.object,
    showPromoteModal: PropTypes.func,
    nav: PropTypes.object.isRequired,
  }

  renderExtraTabBtns = (props) => {
    const { navigation } = this.props
    const {
      activeTintColor,
      inactiveTintColor,
    } = this.props
    const imageType = isActive ? 'selectedIcon' : 'defaultIcon'
    const color = isActive ? activeTintColor : inactiveTintColor
    const isActive = _getCurrentRouteName(navigation.state) == props.name
    return <TouchableOpacity
      onPress={() => {
        navigation.navigate(props.routeName)
      }}
      style={styles.tab}
      key={props.routeName}
    >
      <Image
        source={props[imageType]}
        style={styles.icon}
      />
      <Text style={{ color, fontSize: 10 }}>{props.title}</Text>
    </TouchableOpacity>
  }

  render() {
    let navigation = this.props.navigation
    let images = [
      {
        default: require('../../assets/tabbar-icon/verify-icon/ic_home_n.png'),
        selected: require('../../assets/tabbar-icon/verify-icon/ic_home_s.png'),
      },
      {
        default: require('../../assets/tabbar-icon/verify-icon/ic_mine_n.png'),
        selected: require('../../assets/tabbar-icon/verify-icon/ic_mine_s.png'),
      },
    ]

    let titles = [
      'screen1',
      'screen2',
    ]
    const { routes, index } = navigation.state
    const {
      activeTintColor,
      inactiveTintColor,
    } = this.props

    const tabBtns = routes.map((route, idx) => {
      const color = (index === idx) ? activeTintColor : inactiveTintColor
      const isActive = index === idx
      const imageType = isActive ? 'selected' : 'default'
      return (
        <TouchableOpacity
          onPress={() => {
            navigation.navigate(route.routeName)
          }}
          style={styles.tab}
          key={route.routeName}
        >
          <Image
            source={images[idx][imageType]}
            style={styles.icon}
          />
          <Text style={{ color, fontSize: 10 }}>{titles[idx]}</Text>
        </TouchableOpacity>
      )
    })

    const extraBtns = extraRoutes.map(route => (
      this.renderExtraTabBtns(route)
    ))

    return (
      <View style={styles.tabContainer}>
        {
          [...tabBtns.slice(0, 1),
            ...extraBtns
            , ...tabBtns.slice(1)]
        }
      </View>
    )
  }
}


const styles = StyleSheet.create({
  tabContainer: {
    borderTopWidth: 1,
    borderTopColor: '#e6e6e6',
    position: 'relative',
    flexDirection: 'row',
    width,
    backgroundColor: '#fff',
    // borderTopColor: theme.primaryColor
  },
  tab: {
    flex: 1,
    alignItems: 'center',
    justifyContent: 'center',
    height: 55,
  },
  icon: {
    width: 30,
    height: 30,
  },
})

const mapStateToProps = (state) => ({
  nav: state.nav,
})

export default connect(mapStateToProps)(TabBar)
stackNavigator登录后通过状态刷新screen
由于登录后一般是将登录页reset即将上面的screen直接出栈,而下面的screen是直接呈现在页面上面,而在单一数据流,有时候没有触发其刷新的数据,此时就通过加一个高阶函数
import React, { Component } from 'react'
import { ScrollView, RefreshControl } from 'react-native'
import { connect } from 'react-redux'
import PropTypes from 'prop-types'

/**
 *
 * @param {Component} WrappedComponent 需要套的高阶组件
 * @param {Array}  extraKeys 需要更新数据的额外key
 * 连接了redux中的user
 * 通过受控组件的fetchData更新数据
 * (可以传入extraKeys)
 */
const AuthComponent = (WrappedComponent, extraKeys = [], scroll = false) => {
  class InnerComponent extends Component {
    static navigationOptions = (props) => {
      if (typeof WrappedComponent.navigationOptions === 'function') {
        return WrappedComponent.navigationOptions(props)
      }
      return { ...WrappedComponent.navigationOptions }
    }
    static propTypes = {
      fetchData: PropTypes.func,
      user: PropTypes.object,
    }

    constructor(props) {
      super(props)
      this.state = {
        refreshing: false,
      }
    }

    /**
     * 执行获取数据(子控件通过这个方法刷新数据)
     */
    fetchData = (nextProps) => {
      if (this.wrappedComponent.fetchData) {
        //传递下一次props
        this.wrappedComponent.fetchData(nextProps)
      }
    }

    componentDidMount = () => {
      this.fetchData()
    }

    componentWillReceiveProps(nextProps) {
      if (nextProps.user.isLogin !== this.props.user.isLogin) {
        if (nextProps) {
          this.fetchData(nextProps)
        } else {
          this.fetchData()
        }

      }

      for (let i = 0; i < extraKeys.length; i++) {
        let key = extraKeys[i]
        if (this.props.hasOwnProperty(key)) {
          //只支持浅比较
          if (nextProps[key] !== this.props[key]) {
            this.fetchData(nextProps)
            break
          }
        }
      }
    }

    /**
     * 比对前后属性
     */
    compare = (now, next) => {
      if (Array.isArray(now) && Array.isArray(next)) {
        if (now.length !== next.length) {
          return false
        }
        return now.every((element, index) => {
          return now[index] === next[index]
        })
      }
    }

    _onRefresh = () => {

    }

    render() {
      if (scroll) {
        return <ScrollView
          refreshControl={
            <RefreshControl
              refreshing={this.state.refreshing}
              onRefresh={this._onRefresh}
            />
          }
        >
          <WrappedComponent
            ref={(wrappedComponent) => this.wrappedComponent = wrappedComponent}
            {...this.props}
          />
        </ScrollView>
      }
      return <WrappedComponent
        ref={(wrappedComponent) => this.wrappedComponent = wrappedComponent}
        {...this.props}
      />

    }
  }
  return connect(mapStateToProps)(InnerComponent)
}


const mapStateToProps = (state) => ({
  user: state.user,
})

export default AuthComponent
重置 stack状态
在上面提到了重置stack状态
    const resetAction = NavigationActions.reset({
      index: 1,
      actions: [
        NavigationActions.navigate({ routeName: 'screen1' }),//重置后的第一层screen
        NavigationActions.navigate({ routeName: 'screen2' }),//重置后的第二层screen(此时是栈顶,即为当前屏幕显示页面)
      ],
    })
 this.props.navigation.dispatch(resetAction)
替换screen
      this.props.dispatch({
        key: 'NearMeMap',
        type: 'ReplaceCurrentScreen',
        routeName: routeName,
      })
