

1. 概述
本文实现了包含spring cloud的所有的基本要素的完整demo。配置中心、服务注册和发现中心、通过eureka实现服务的注册和发现、通过feign+hystrix调用服务。
1.1 Demo概述
下图 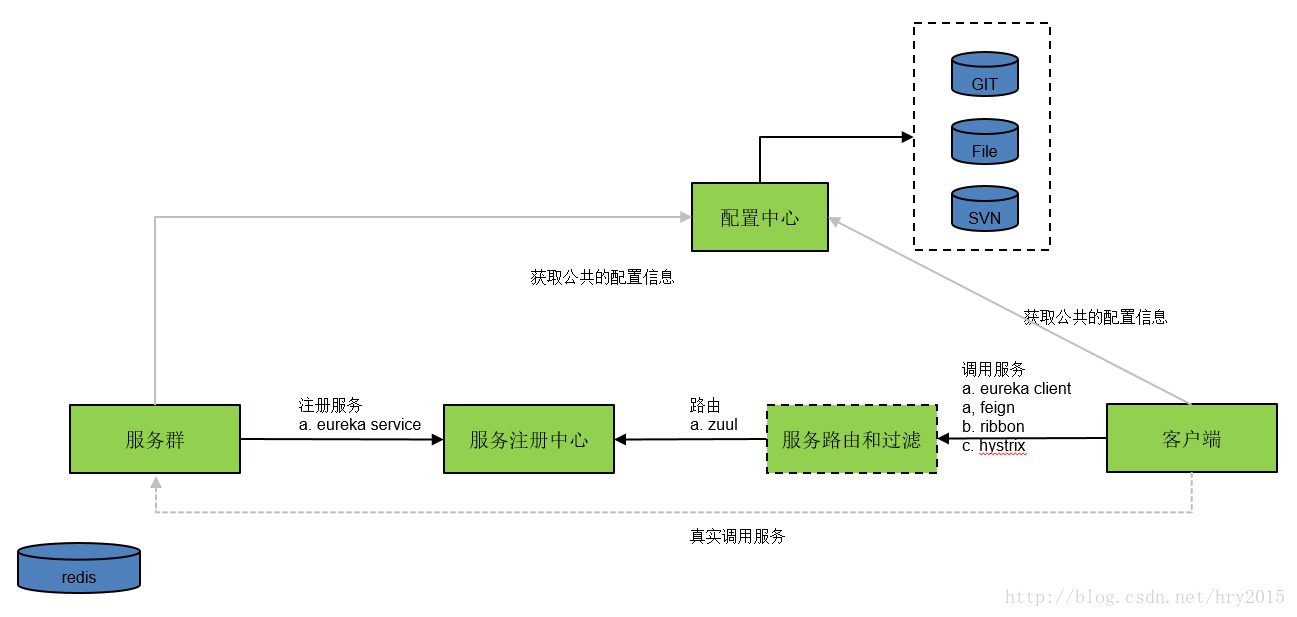
配置中心:通过git/svn/本地中获取公共配置文件,并通过REST方式供其它服务获取配置信息
服务注册中心:提供服务注册和发现
服务群(服务提供者):提供服务。服务启动时,从配置中心获取公共配置信息,并将本服务通过eureka注册到注册中心。在注册时,需要配置本服务的名称,调用者通过此名称调用此服务
客户端(服务调用者):客户端启动时,从配置中心获取公共配置信息,通过要访问的服务注册到服务注册中心的名称调用对应的服务。如果服务注册的方式是eureka,则客户端也需要使用eureka访问。通过ribbon可以实现对服务群的均衡负载。hystrix作为断路器。feign方式简化了服务的调用方式。
服务路由:通过zuul实现服务的路由。 zuul的作用类似Nginx,这个模块在spring cloud不是必须的。
具有1-5工作经验的,面对目前流行的技术不知从何下手,需要突破技术瓶颈的可以加群。在公司待久了,过得很安逸,但跳槽时面试碰壁。需要在短时间内进修、跳槽拿高薪的可以加群。如果没有工作经验,但基础非常扎实,对java工作机制,常用设计思想,常用java开发框架掌握熟练的可以加群。java架构群:591240817 一起交流。
下文介绍如何通过spring cloud实现如上的一个简单的demo,不含zuul部分。
3. 父工程
工程:cloud-parent
在pom.xml中定义所有服务的公共依赖jar
<parent>
    <groupId>org.springframework.boot</groupId>
    <artifactId>spring-boot-starter-parent</artifactId>
    <version>1.5.2.RELEASE</version>
    <relativePath/> <!-- lookup parent from repository -->
</parent>
<!-- 使用spring cloud必须引入 -->
<dependencyManagement>
    <dependencies>
        <dependency>
            <groupId>org.springframework.cloud</groupId>
            <artifactId>spring-cloud-dependencies</artifactId>
            <version>Dalston.SR2</version>
            <type>pom</type>
            <scope>import</scope>
        </dependency>
    </dependencies>
</dependencyManagement>

<dependencies>
    <dependency>
        <groupId>org.springframework.boot</groupId>
        <artifactId>spring-boot-starter</artifactId>
    </dependency>

    <dependency>
        <groupId>org.springframework.boot</groupId>
        <artifactId>spring-boot-starter-web</artifactId>
    </dependency>

    <!-- logback + slf4j -->
    <dependency>
        <groupId>ch.qos.logback</groupId>
        <artifactId>logback-classic</artifactId>
    </dependency>
    <dependency>
        <groupId>org.slf4j</groupId>
        <artifactId>jcl-over-slf4j</artifactId>
    </dependency>

    <!-- 测试模块,包括JUnit、Hamcrest、Mockito -->
    <dependency>
        <groupId>org.springframework.boot</groupId>
        <artifactId>spring-boot-starter-test</artifactId>
        <scope>test</scope>
    </dependency>

    <!-- https://mvnrepository.com/artifact/com.alibaba/fastjson -->
    <dependency>
        <groupId>com.alibaba</groupId>
        <artifactId>fastjson</artifactId>
        <version>1.2.37</version>
    </dependency>

    <dependency>
        <groupId>org.springframework.boot</groupId>
        <artifactId>
            spring-boot-configuration-processor
        </artifactId>
    </dependency>
</dependencies>12345678910111213141516171819202122232425262728293031323334353637383940414243444546474849505152535455565758596061
3. 配置中心
工程名称: cloud-config-center
配置中心的配置文件方式有git,本地文件(native),svn,这里只演示前2者的使用方式。
3.1. 配置文件使用git方式
工程名称: cloud-config-center
application.properties
server.port=88881application-gitsimple.properties
# 指定配置文件所在的git工程路径
spring.cloud.config.server.git.uri=https://github.com/hryou0922/spring_cloud.git
# 表示将搜索该文件夹下的配置文件
spring.cloud.config.server.git.searchPaths=cloud-config-git/simple1234
CloudGitConfigServerApplication
- @EnableConfigServer :激活该应用为配置文件服务器:读取远程配置文件,转换为rest接口服务
@SpringBootApplication
@EnableConfigServer // 激活该应用为配置文件服务器:读取远程配置文件,转换为rest接口服务
public class CloudGitConfigServerApplication {

    public static void main(String[] args) {
        args = new String[1];
        args[0] = "--spring.profiles.active=gitsimple";
        SpringApplication.run(CloudGitConfigServerApplication.class, args);
    }
}12345678910
运行CloudGitConfigServerApplication即可启动服务
Git的配置文件放置在这个工程中:cloud-config-git
在simple有两个文件,名称和内容如下:
cloud-config-dev.properties:
simple.config.name=git-dev
simple.config.age=112

#注册服务的zone
registercenter.eureka.defaultzone=http://localhost:8761/eureka/12345
cloud-config-test.properties:
simple.config.name=git-test
simple.config.age=1

#注册服务的zone
registercenter.eureka.defaultzone=http://localhost:8761/eureka/12345- simple.config.name和simple.config.age做为测试数据,用于后续服务和客户读取配置。
- registercenter.eureka.defaultzone:服务注册到服务注册的zone
3.2 配置方式使用native方式
工程名称: cloud-config-center
在resoucres的目录下config/simple的创建配置文件
cloud-config-dev.properties
simple.config.name=native_dev
simple.config.age=113

# 注册服务的zone
registercenter.eureka.defaultzone=http://localhost:8761/eureka/12345
cloud-config-test.properties
simple.config.name=native_test
simple.config.age=1

# 注册服务的zone
registercenter.eureka.defaultzone=http://localhost:8761/eureka/12345
application-nativesimple.properties
server.port=8888
# native:启动从本地读取配置文件,必须指定active的值,才可以使用本场配置模式
spring.profiles.active=native
# 自定义配置文件路径
spring.cloud.config.server.native.searchLocations=classpath:/config/simple/12345
CloudNativeConfigServerApplication
@SpringBootApplication
@EnableConfigServer // 激活该应用为配置文件服务器:读取远程配置文件,转换为rest接口服务
public class CloudNativeConfigServerApplication {

    public static void main(String[] args) {
        args = new String[1];
        // 使用native不可以使用spring.profiles.active的方式使用native模式
    //  args[0] = "--spring.profiles.active=nativesimple";
        args[0] = "--spring.config.name=application-nativesimple";
        SpringApplication.run(CloudNativeConfigServerApplication.class, args);
    }
}123456789101112
运行CloudGitConfigServerApplication即可启动服务
4. 注册中心
工程名称:cloud-registration-center
提供服务的注册和发现
4.1 pom.xml
pom.xml除了继承cloud-parent的父pom.xml外,还需要加上如下依赖jar
<dependencies>
    <!-- eureka -->
    <dependency>
        <groupId>org.springframework.cloud</groupId>
        <artifactId>spring-cloud-starter-eureka</artifactId>
    </dependency>
    <dependency>
        <groupId>org.springframework.cloud</groupId>
        <artifactId>spring-cloud-starter-eureka-server</artifactId>
    </dependency>
    <dependency>
        <groupId>com.sun.jersey</groupId>
        <artifactId>jersey-core</artifactId>
    </dependency>
    <dependency>
        <groupId>com.sun.jersey</groupId>
        <artifactId>jersey-client</artifactId>
    </dependency>
    <dependency>
        <groupId>com.sun.jersey</groupId>
        <artifactId>jersey-server</artifactId>
    </dependency>
    <dependency>
        <groupId>org.springframework.boot</groupId>
        <artifactId>spring-boot-starter-actuator</artifactId>
    </dependency>

    <dependency>
        <groupId>org.springframework.boot</groupId>
        <artifactId>spring-boot-configuration-processor</artifactId>
        <optional>true</optional>
    </dependency>

</dependencies>
1234567891011121314151617181920212223242526272829303132333435
4.2 application.properties
应用启动配置
application.properties
server.port=87611application-simple.properties
# eureka : 主要配置属性在EurekaInstanceConfigBean和EurekaClientConfigBean中
eureka.instance.hostname=127.0.0.1
#eureka.client.enabled=false
# 表示是否注册自身到eureka服务器,因为当前这个应用就是eureka服务器,没必要注册自身
eureka.client.registerWithEureka=false
# 表示是否从eureka服务器获取注册信息
eureka.client.fetchRegistry=false
# 设置eureka服务器所在的地址,查询服务和注册服务都需要依赖这个地址
eureka.client.serviceUrl.defaultZone=http://${eureka.instance.hostname}:${server.port}/eureka/123456789
4.3 应用入口
SimpleCloudRegistrationCenterApplication
- @EnableEurekaServer:启动Eureka
@SpringBootApplication
@EnableEurekaServer
public class SimpleCloudRegistrationCenterApplication {

    public static void main(String[] args) {
        args = new String[1];
        args[0] = "--spring.profiles.active=simple";
        SpringApplication.run(SimpleCloudRegistrationCenterApplication.class, args);
    }

}
想要了解更可以关注我的微信公众号
