

相信各位github资深玩家们都有自己基于 github pages 搭建的个人站点。官方推荐的静态站点生成器是 Jekyll,关于 Jekyll 的使用感兴趣的各位请自行 google,这里就不赘述了。本文主要介绍下基于 Create-React-App 搭建个人博客的相关实践,可能更适合做前端开发的伙伴。
github pages 是 github 推出的静态站点服务,主要的用途在于使用你在 github 仓库中的代码构建你自己的静态站点,为用户提供 github.io 二级域名,您也可以通过添加DNS的 CNAME 记录来绑定自己的域名。
github pages 最简单粗暴的方法就是直接往 github 上方静态页面了,创建一个名为 [您的github账号名].github.io 的github仓库,将您的index.html页面代码扔进master分支,就可以直接通过 https://[您的github账号名].github.io 访问到您的站点了。
对于一个简单的个人博客站点来说,存在以下基本功能特性:
- 文章的新增、编辑、一键发布
- 文章的分类、归档
- 风格良好的博客样式
- 评论、SEO等等功能
下面介绍基于React如何实现一个简单的静态博客。
1. 创建一个 React 项目
使用 Create-React-App(以下简称CRA) 的generator创建一个React前端项目骨架。对此项目进行一定改造以方便我们日常的开发和使用习惯:
- 使用
react-app-rewired来调整CRA中webpack的配置- 对CRA的webpack配置感兴趣的童鞋可以看看这篇文章
- 使用
core-js对浏览器版本进行向下兼容 - 通过编写不同的React容器组件(container)来实现不同的页面,通过统一的json结构来配置应用的页面路由
- 使用蚂蚁金服的
antd设计语言(React组件)快速实现业务UI - 使用
axios实现前后端的数据请求
个人改造后的项目代码在这里,您可以直接fork或者down下来使用。
2. 使用 markdown 搞定你的文章
2.1 用于新建文章的交互式命令行(基于 inquirer)
一般的静态博客系统(如gatsby),会给用户提供一个用于创建新文章的交互式命令行,效果大致如下:

类似功能可以使用nodejs中readline模块的原生方法来实现。这里推荐一个第三方工具:inquirer,本质上是对readline模块进行了增强,提供了很多实用的方法用于交互式命令行开发,实现的用户界面(命令行)也比较友好。
对于上面GIF示例的功能,其代码实现如下:
// newPost.js

const inquirer = require('inquirer');
const moment = require('moment');

const questions = [
  {
    type: 'input',
    name: 'post_name',
    message: '请输入您的文章别名(用于创建文章目录,仅限英文,单词间用短横杠‘-’连接):',
    validate: value => {
      if (/(\.|\*|\?|\\|\/)/gi.test(value)) {
        return '文章别名不得包含特殊符号(.*?\\/),请重新输入↑↑';
      }

      if (/(([A-z]+-)+)?[A-z]+/gi.test(value)) {
        return true;
      }

      return '文章别名不合法,请重新输入↑↑';
    },
    filter: value => value.replace(/\s+/gi, '-'),
  },
  {
    type: 'input',
    name: 'create_at',
    message: '请输入文章的发布时间(或者按回车键使用默认值):',
    default: () => {
      return moment().format('YYYY-MM-DDThh:mm:ss');
    },
    validate: value => {
      if (/\d{4}-\d\d-\d\dT\d\d:\d\d:\d\d/gi.test(value)) {
        return true;
      }

      return '时间格式不合法,请重新输入↑↑';
    },
  },
];

inquirer
  .prompt(questions)
  .then(answers => {
    // 获取用户输入
    const { post_name, create_at } = answers;

    /* 此处做一些命令行反馈和过程性的工作 */
    /* (如:提示用户输入是否合法、创建文章对应的目录和文件等等) */
  })
  .catch(err => {
    /* 异常处理 */
  });
如是,将此node脚本添加到项目package.json的scripts中(如:new-post: "node newPost.js"),即可通过npm run命令执行。
2.2 md 转 html(基于 react-markdown)
为使用markdown文档来编辑、存储博客的文章内容,需要将md文档转换为react的JSX对象以渲染到网页中。在此推荐使用react-markdown,功能很6,作者维护得也比较勤。
使用方式如下:
import ReactMarkdown from 'react-markdown';

<ReactMarkdown source={'# 这是文章标题\n\n'} />
// <h1>这是文章标题</h1>
2.3 代码块的语法高亮
react-markdown提供了一个renderers属性,用户可以传入一系列renderer组件来自定义文章中一些内容的渲染方式(有兴趣的童鞋可以看下包作者对默认renderer的实现)。
如:自定义md中图片的渲染方式(用法如下)。
// 传入renderer的方式
<ReactMarkdown
  source={'[md文本内容]'}
  renderers={{
    image: ImageRenderer,
  }}
/>
// ImageRenderer的实现

import React, { Component } from 'react';
import PropTypes from 'prop-types';

class ImageRenderer extends Component {
  static propTypes = {
    src: PropTypes.string.isRequired,
  };

  render() {
    return (
      <img
        className="post-content-image"
        src={this.props.src}
        alt={this.props.src}
      />
    );
  }
}

export default ImageRenderer;
与此类似,我们可以通过传入一个自定义的renderer来实现文章中代码块的语法高亮。名为CodeBlock的renderer实现如下:
import React, { Component } from 'react';
import PropTypes from 'prop-types';
import { highlight, languages } from 'prismjs';
import ReactHtmlParser from 'react-html-parser';
import 'prismjs/themes/prism.css';

export class HtmlComponent extends Component {
  static propTypes = {
    html: PropTypes.string.isRequired,
  };

  render() {
    return ReactHtmlParser(this.props.html);
  }
}

export class CodeBlock extends Component {
  static propTypes = {
    literal: PropTypes.string.isRequired,
    language: PropTypes.string.isRequired,
  };

  render() {
    const html = highlight(this.props.literal, languages[this.props.language]);
    const cls = `language-${this.props.language}`;

    return (
      <pre className={cls}>
        <code className={cls}>
          <HtmlComponent html={html} />
        </code>
      </pre>
    );
  }
}

export default CodeBlock;
此处用到了prismjs和react-html-parser两个npm包,前者用于将代码文本转化为html文本,后者用于将html文本转化为React的JSX对象以传入React组件(这样做比直接使用dangerouslySetInnerHTML属性更安全些)。
3. 文章分类
一个友好的站点肯定少不了导航菜单(或文章的分类菜单),本人的实现方式是直接使用文章的“标签”来进行分类统计,并生成站点的顶部导航,效果如下:
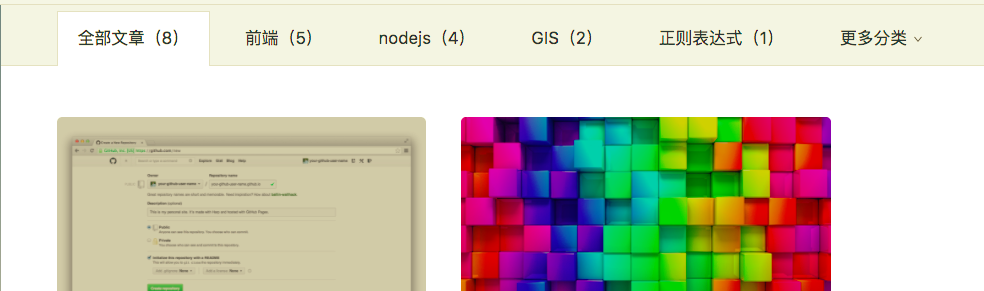
为此,需要撰写一定的脚本实现文章的分类统计和打包,个人的实现方式是将统计结果和文章内容各自打包为json文件,通过前端组件请求数据并加载。
导航栏组件的具体实现如下:
import React, { Component } from 'react';
import PropTypes from 'prop-types';
import { Link } from 'react-router-dom';
import { Dropdown, Menu, Icon } from 'antd';
import { randomId } from 'utils';
import './style.css';

export class Header extends Component {
  static propTypes = {
    data: PropTypes.array,
    activeTag: PropTypes.string,
  };

  static defaultProps = {
    data: [{ tag: '前端', count: 5 }],
    activeTag: '',
  };

  constructor(props) {
    super(props);
    this.navTotal = 6;
  }

  renderMore() {
    if (this.props.data.length <= this.navTotal) {
      return false;
    }

    const subNavItems = this.props.data.slice(this.navTotal).map(t =>
      <Menu.Item key={`sub_nav_${randomId()}`}>
        <Link
          to={t.linkTo || `/tag/${t.tag}`}
          className={`ant-dropdown-link ${this.props.activeTag === t.tag
            ? 'active'
            : ''}`}
          key={`nav_top_${randomId()}`}>
          {t.tag}({t.count})
        </Link>
      </Menu.Item>
    );

    const SubNav = (
      <Menu>
        {subNavItems}
      </Menu>
    );

    const DropDownBtn = (
      <Dropdown overlay={SubNav} key={`nav_top_${randomId()}`}>
        <div className="header-nav-item">
          更多分类 <Icon type="down" />
        </div>
      </Dropdown>
    );

    return DropDownBtn;
  }

  renderTop5() {
    const items = this.props.data.slice(0, this.navTotal - 1).map(t =>
      <Link
        className={`header-nav-item ${this.props.activeTag === t.tag
          ? 'active'
          : ''}`}
        to={t.linkTo || `/tag/${t.tag}`}
        key={`nav_top_${randomId()}`}>
        {!t.linkTo ? `${t.tag}(${t.count})` : t.tag}
      </Link>
    );

    return (
      <div className="header-nav">
        {items}
        {this.renderMore()}
      </div>
    );
  }

  render = () => this.renderTop5();
}

export default Header;
大家可以根据实际需要实现自己的文章打包方式(这里就不奉上我的脚本了😝)。
4. 更多功能
对于个人博客来说,到这里为止还有很多功能没有实现,这里偷个懒,奉上一些相关的链接吧:
4.1 关于文章评论
4.2 关于文章结构树
我最近应该会实现一个React用途的markdown树组件,大家不妨期待下☺️
5. 发布你的个人静态站点
5.1 部署到 github pages(基于 gh-pages)
CRA针对github pages用途专门推荐了一个包:gh-pages,使用方法如下:
(1)修改项目的package.json文件,添加homepage属性:
"homepage": "https://parksben.github.io",
(2)项目安装gh-pages依赖后修改,在package.json中添加如下配置:
  "scripts": {
+   "predeploy": "npm run build",
+   "deploy": "gh-pages -d build",
    "start": "react-scripts start",
    "build": "react-scripts build",
(3)将本地代码上传到github博客仓库的某个分支(只要不是master分支就行),然后执行:
yarn deploy
gh-pages会将CRA项目build到仓库的master分支,然后,你就可以访问你的站点了(有关 CRA 项目部署到 github pages 的详细描述可以看这里)。
5.2 如何兼容 React 的客户端路由(一种比较 hack 的方法)
单页面应用一般需要设置服务端路由,将应用的所有页面路径都重定向到index.html,而github pages并没有这样的默认设置。
因而,当你使用React的客户端路由(React的createBrowserHistory方法创建前端路由)时,除根路径以外的页面,github都会返回自己的404页面。
为此,CRA项目提供了一种比较hack的方法来支持React的客户端路由(通过操作window.history来强行匹配url)。也算是一种奇技淫巧吧☺️。
(1)在CRA项目的public目录下添加一个404.html,其内容如下:
<!DOCTYPE html>
<html>
  <head>
    <meta charset="utf-8">
    <title>矮大紧的日常 | parksben's blog</title>
    <script type="text/javascript">
      var segmentCount = 0;
      var l = window.location;
      l.replace(
        l.protocol + '//' + l.hostname + (l.port ? ':' + l.port : '') +
        l.pathname.split('/').slice(0, 1 + segmentCount).join('/') + '/?p=/' +
        l.pathname.slice(1).split('/').slice(segmentCount).join('/').replace(/&/g, '~and~') +
        (l.search ? '&q=' + l.search.slice(1).replace(/&/g, '~and~') : '') +
        l.hash
      );
    </script>
  </head>
  <body>
  </body>
</html>
(2)在index.html的head中添加如下代码:
<script type="text/javascript">
  (function(l) {
    if (l.search) {
      var q = {};
      l.search.slice(1).split('&').forEach(function(v) {
        var a = v.split('=');
        q[a[0]] = a.slice(1).join('=').replace(/~and~/g, '&');
      });
      if (q.p !== undefined) {
        window.history.replaceState(null, null,
          l.pathname.slice(0, -1) + (q.p || '') +
          (q.q ? ('?' + q.q) : '') +
          l.hash
        );
      }
    }
  }(window.location))
</script>
大功告成,你的github站点支持React的客户端路由了。
除此之外,也可以改为使用createHashHistory方法来创建客户端路由,这样前端路由就与服务端路由没多大关系了,不过url里面一串hash毕竟不够优雅。
有兴趣了解奇技淫巧的童鞋,可以点这里。
5.3 部署到自己的服务
与CRA项目的生产环境部署方式一样:
- 线上执行 yarn build 命令,站点的所有静态资源将打包到 build 目录下
- 将你的站点的入口配置到 build 目录下
6. 项目参考(源码奉上)

这是我的github博客(基于上述过程实现的静态站点),感兴趣的伙伴可以点击这里查看项目源码,觉得有用也可以fork或star一下下。
