

目录
- 概述
- hello-world 实例
- 运行原理
- 多路由多回调以及中间件
概述
Express是一个基于 Node.js 平台,快速、开放、极简的 web 开发框架。主要有 路由、中间件、模板引擎、 错误处理等功能
Hello world 实例
在test文件夹中新加1.helloworld.js
var express = require('express');
var app = express();

app.get('/', function (req, res) {
    res.end('Hello World!');
});

var server = app.listen(3000, function () {
    console.log('Example app listening at 3000');
});
运行 1.helloworls.js
node 1.helloworls.js
上面代码会在本机的3000端口启动一个网站,网页显示Hello World。
运行原理
现在新建lib文件夹我们手写一个自己的express库 了解其运行原理
YUAN-EXPRESS
|
|
| - lib
|   | - application.js #包裹app层
|   | - express.js  #框架入口
|
| - test
|   | - 1.helloworld.js
|
express.js
const Application = require('./application');
function createApplicaton() {
    return new Application();
}
module.exports = createApplicaton;
目的:在application.js中实现实例中app.get、app.listen两个方法
操作:构造Appliaction函数,在原型上添加 get、listen方法
application.js
const http = require('http')
const url = require('url')

let router = [{
    path:"*",
    method:"*",
    handler(req,res){
        res.end(`Cannot ${req.method}_${req.url}`)
    }
}]
function Application() {

}

Application.prototype.get = function (path,handler) {//在Application原型上添加get方法
    router.push({
        path,
        method: 'get',
        handler
    })
}

Application.prototype.listen = function () {//在Application原型上添加listen方法匹配路径,执行对应的handler方法
    let self = this
    const server = http.createServer(function (req,res) {
        let { pathname } = url.parse(req.url,true)
        for(var i = 1;i<router.length;i++){
            let { path,method,handler } = router[i]
            if (pathname == path && req.method.toLocaleLowerCase() == method){
                return handler(req,res)
            }
        }
        router[0].handler(req,res)
    })
    server.listen(...arguments)
}


module.exports = Application
Express框架建立在node.js内置的http模块上。
上面代码的关键是http模块的createServer方法,表示生成一个HTTP服务器实例。该方法接受一个回调函数,该回调函数的参数,分别为代表HTTP请求和HTTP回应的request对象和response对象。
循环请求过来时放入router数组的对象,当请求方法和路径与对象中的一致时,执行回调handler方法。
多路由多回调以及中间件
- 测试用例
const express = require('../lib/express');
const app = express();
/**
 * 1.get是指定多个处理函数
 * 2.中间件错误处理
 * 3. 子路径系统 单独创建一个子路径系统,并且把它挂载到主路径 系统上
 *
 */
/**
 * app.use
 * express.Router();
 */
app.use(function (req, res, next) {
    console.log('Ware1:', Date.now());
    next();
});
//路由是完整匹配的。/ != /user 所以进不来
app.get('/', function (req, res, next) {
    res.end('1');
});
//创建一个新的路由容器,或者说路由系统
const user = express.Router();// router
user.use(function (req, res, next) {
    console.log('Ware2', Date.now());
    next();
});
//在子路径里的路径是相对于父路径
user.get('/2', function (req, res, next) {
    res.end('2');
});
//use表示使用中间件,只需要匹配前缀就可以了
app.use('/user', user);//user第二个参数是处理函数 (req,res,next)
// req.url = /user/3
//app.use('/user', artcile);
app.use(function (err, req, res, next) {
    res.end('catch ' + err);
});
app.listen(3000, function () {
    console.log('server started at port 3000');
});
- 先对项目结构改造
iExpress/
|
|
| - application.js  #包裹app层
|
| - route/
|   | - index.js    #Router类
|   | - route.js    #Route类
|   | - layer.js    #Layer类
|
| - middle/
|   | - init.js     #内置中间件
|
| - test/
|    | - 测试用例文件1
|    | - ...
|
·- express.js       #框架入口
- app从字面量变为Application类
- 丰富HTTP请求方法
- 封装Router
- 路径一样的路由整合为一组,引入Layer的概念
- 增加路由控制,支持next方法,并增加错误捕获功能
- 执行Router.handle的时候传入out参数
- 理清逻辑
测试代码中 注册添加了多个路由且能添加多个回调方法,将逻辑分为三步。
(1)Application容器将请求方法和handler分发给router,在执行listen监听函数时,执行self._router.handle(req, res, done),让塞入Router中的逻辑运行。
Application类
const Router = require('./router');

Application.prototype.lazyrouter = function () {
    if (!this._router) {
        this._router = new Router();
    }
}
methods.forEach(function (method) {
    Application.prototype[method] = function () {
        this.lazyrouter();
        //这样写可以支持多个处理函数
        this._router[method].apply(this._router, slice.call(arguments));
        return this;
    }
});
Application.prototype.listen = function () {
    let self = this;
    let server = http.createServer(function (req, res) {
        function done() {//如果没有任何路由规则匹配的话会走此函数
            res.end(`Cannot ${req.method} ${req.url}`);
        }
        //如果路由系统无法处理,也就是没有一条路由规则跟请求匹配,是会把请求交给done
        self._router.handle(req, res, done);
    });
    server.listen(...arguments);
}
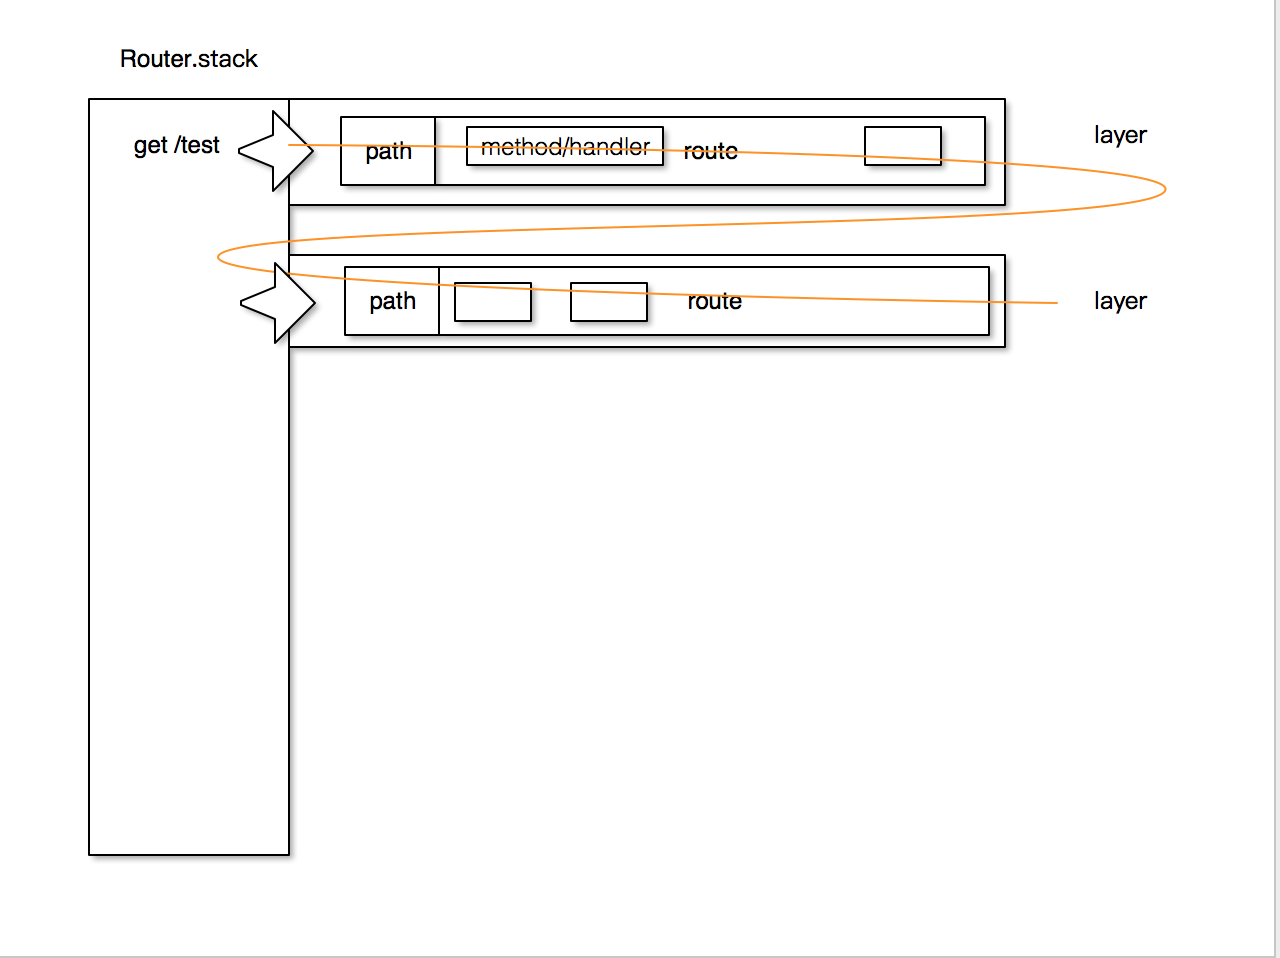
(2) 在Router中每一个方法的请求都会往当前的路由系统中添加一个层,在层(layer)中创建一个route实例
Router类
proto.route = function (path) {
    let route = new Route(path);
    let layer = new Layer(path, route.dispatch.bind(route));
    layer.route = route;
    this.stack.push(layer);//在Router中新增一层layer
    return route;
}

methods.forEach(function (method) {
    proto[method] = function (path) {//请求过来
        let route = this.route(path);//往Router里添一层
        route[method].apply(route, slice.call(arguments, 1));//
        return this;
    }
});
如果是中间件,默认没有path 所以layer的route设为undefined
proto.use = function (path, handler) {
    if (typeof handler != 'function') {
        handler = path;
        path = '/';
    }
    let layer = new Layer(path, handler);
    layer.route = undefined;//我们正是通过layer有没有route来判断是一个中间件函数还是一个路由
    this.stack.push(layer);
    return this
}
Application开始监听端口时,执行Router的handle方法。 添加 next 函数主要负责将控制权交给下一个中间件,如果当前中间件没有终结请求,并且next没有被调用,那么请求将被挂起,后边定义的中间件将得不到被执行的机会。
当Router中的路径和方法匹配时,走到当前layer中,运行layer.handle_request 执行route中添加的方法。
proto.handle = function (req, res, out) {
    //slashAdded是否添加过/ removed指的是被移除的字符串
    let idx = 0,
        self = this,
        slashAdded = false,
        removed = '';
    // /user/2
    let { pathname } = url.parse(req.url, true);
    function next(err) {
        if (slashAdded) {
            req.url = '';
            slashAdded = false;
        }
        if (removed.length > 0) {
            req.url = removed + req.url;
            removed = '';
        }
        if (idx >= self.stack.length) {
            return out(err);
        }
        let layer = self.stack[idx++];
        //在此匹配路径 params   正则+url= req.params
        if (layer.match(pathname)) {// layer.params
            if (!layer.route) { //这一层是中间件层//  /user/2
                removed = layer.path;//  /user
                req.url = req.url.slice(removed.length);// /2
                if (err) {
                    layer.handle_error(err, req, res, next);
                } else {
                    if (req.url == '') {
                        req.url = '/';
                        slashAdded = true;
                    }
                    layer.handle_request(req, res, next);
                }
            } else {
                if (layer.route && layer.route.handle_method(req.method)) {
                    //把layer的parmas属性拷贝给req.params
                    req.params = layer.params;
                    self.process_params(layer, req, res, () => {
                        layer.handle_request(req, res, next);
                    });
                } else {
                    next(err);
                }
            }
        } else {
            next(err);
        }
    }
    next();
}
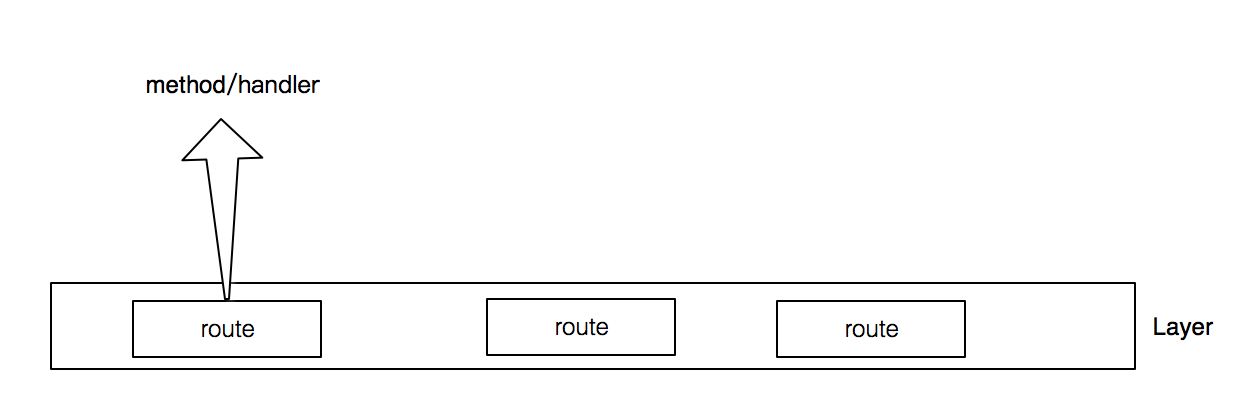
(3)进入到当前layer,按照顺序执行添加的每一个route
Layer类
Layer.prototype.handle_request = function (req, res, next) {
    this.handler(req, res, next);
}
注意 这里的this.handler方法,是添加layer时加入的route.dispatch.bind(route),dispatch是在router.route方法中,初始化layer的时候绑定到Layer.handler上的,解析下dispatch代码:
Route.prototype.dispatch = function (req, res, out) {
    let idx = 0, self = this;
    function next(err) {
        if (err) {//如果一旦在路由函数中出错了,则会跳过当前路由
            return out(err);
        }
        if (idx >= self.stack.length) {
            return out();//route.dispath里的out刚好是Router的next
        }
        let layer = self.stack[idx++];
        if (layer.method == req.method.toLowerCase()) {
            layer.handle_request(req, res, next);
        } else {
            next();
        }
    }
    next();
}
文字结构图如下
Application
|
|
Router
|
| - stack
    |
    | - Layer
        |
        | - path  router
                    |
                    | - method  handler
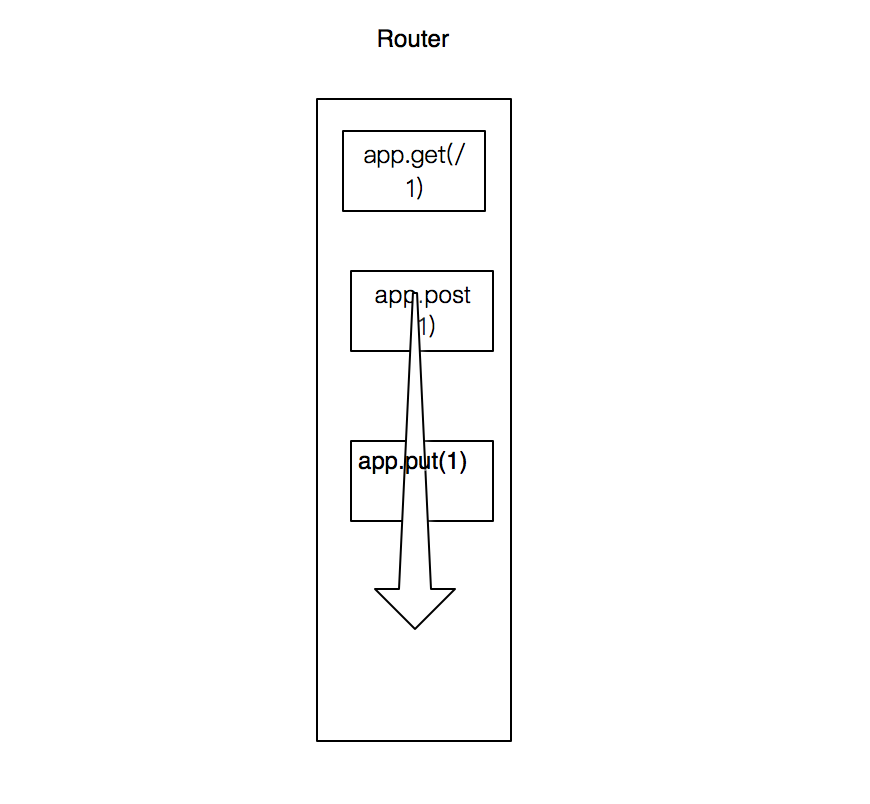
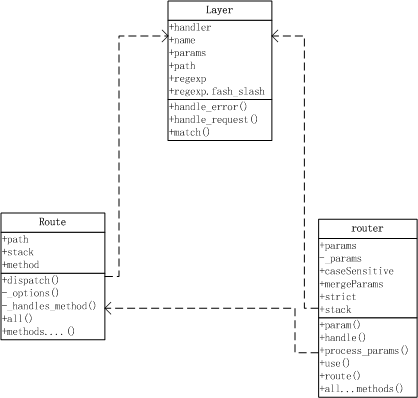
Router Layer
- Router Layer 路径 处理函数(route.dispatch) 有一个特殊的route属性
- Route layer 路径 处理函数(真正的业务代码) 有一特殊的属性method
Application只做包装幻术及路由分发, Router实现 app.use、 app.param、 app.get、 app.post等路由方法方法的封装
逻辑说明图
源码
仓库地址:源码链接点这里~
