

前言
一直想写博客来着,一来可以记录一些自己学习和研究的东西,二来也可以将自己写的一些东西分享出去,给他人参考,还可能收到他人的一些建议,从而完善自己的项目和提升自己的技术,这也是一种很好的技术交流方式。但是之前一直不知道怎么去写?怎么去总结?在经过一些观摩和学习后,终于决定先来试试水了😂。下面正式开始我的第一篇博客。
这篇博客是自己基于
iOS系统实现的指纹解锁(系统API)和手势解锁(CAShapeLayer)功能。
在之前自学
CAAnimation,再加上公司老大说可以预研(之前没有做过)一下各种解锁方式的情况下,想着自己来实现一下现在常用的解锁方式:指纹解锁和手势解锁。
指纹解锁
基于iOS的指纹解锁其实很简单,因为系统已经提供了API给你,你只需要做一些简单的判断和适时的调用就可以了。
第一步
首先导入头文件#import <LocalAuthentication/LocalAuthentication.h>
判断是否开启了TouchID,如果已经开启,直接校验指纹,如果未开启,则需要先开启TouchID
//判断是否开启了TouchID
[[[NSUserDefaults standardUserDefaults] objectForKey:@"OpenTouchID"] boolValue]
第二步
- 未开启TouchID,询问是否开启
- (void)p_openTouchID
{
    dispatch_async(dispatch_get_main_queue(), ^{
        UIAlertController *alertController = [UIAlertController alertControllerWithTitle:@"温馨提示" message:@"是否开启TouchID?" preferredStyle:UIAlertControllerStyleAlert];
        [alertController addAction:[UIAlertAction actionWithTitle:@"YES" style:UIAlertActionStyleDefault handler:^(UIAlertAction * _Nonnull action) {
            //开启TouchID
            [[NSUserDefaults standardUserDefaults] setObject:@(YES) forKey:@"OpenTouchID"];
            [[NSNotificationCenter defaultCenter] postNotificationName:@"OpenTouchIDSuccess" object:nil userInfo:nil];
        }]];
        [alertController addAction:[UIAlertAction actionWithTitle:@"NO" style:UIAlertActionStyleCancel handler:^(UIAlertAction * _Nonnull action) {
            //不开启TouchID
            [[NSUserDefaults standardUserDefaults] setObject:@(NO) forKey:@"OpenTouchID"];
            [[NSNotificationCenter defaultCenter] postNotificationName:@"OpenTouchIDSuccess" object:nil userInfo:nil];
        }]];
        [self presentViewController:alertController animated:YES completion:nil];
    });
}
- 已开启TouchID
- (void)p_touchID
{
    dispatch_async(dispatch_get_main_queue(), ^{
        LAContext *context = [[LAContext alloc] init];
        NSError *error = nil;
        //判断是否支持TouchID
        if ([context canEvaluatePolicy:LAPolicyDeviceOwnerAuthenticationWithBiometrics error:&error]) {
            [context evaluatePolicy:LAPolicyDeviceOwnerAuthenticationWithBiometrics localizedReason:@"TouchID Text" reply:^(BOOL success, NSError * _Nullable error) {
                if (success) {//指纹验证成功
                    [[NSNotificationCenter defaultCenter] postNotificationName:@"UnlockLoginSuccess" object:nil];
                }else {//指纹验证失败
                    switch (error.code)
                    {
                        case LAErrorAuthenticationFailed:
                        {
                            NSLog(@"授权失败"); // -1 连续三次指纹识别错误
                            [[NSNotificationCenter defaultCenter] postNotificationName:@"touchIDFailed" object:nil];
                        }
                            break;
                        case LAErrorUserCancel:
                        {
                            NSLog(@"用户取消验证Touch ID"); // -2 在TouchID对话框中点击了取消按钮
                            [self dismissViewControllerAnimated:YES completion:nil];
                        }
                            break;
                        case LAErrorUserFallback:
                        {
                            [[NSOperationQueue mainQueue] addOperationWithBlock:^{
                                [[NSNotificationCenter defaultCenter] postNotificationName:@"touchIDFailed" object:nil];
                                NSLog(@"用户选择输入密码,切换主线程处理"); // -3 在TouchID对话框中点击了输入密码按钮
                            }];

                        }
                            break;
                        case LAErrorSystemCancel:
                        {
                            NSLog(@"取消授权,如其他应用切入,用户自主"); // -4 TouchID对话框被系统取消,例如按下Home或者电源键
                        }
                            break;
                        case LAErrorPasscodeNotSet:

                        {
                            NSLog(@"设备系统未设置密码"); // -5
                        }
                            break;
                        case LAErrorBiometryNotAvailable:
                        {
                            NSLog(@"设备未设置Touch ID"); // -6
                        }
                            break;
                        case LAErrorBiometryNotEnrolled: // Authentication could not start, because Touch ID has no enrolled fingers
                        {
                            NSLog(@"用户未录入指纹"); // -7
                        }
                            break;

#if __IPHONE_OS_VERSION_MAX_ALLOWED >= __IPHONE_9_0
                        case LAErrorBiometryLockout: //Authentication was not successful, because there were too many failed Touch ID attempts and Touch ID is now locked. Passcode is required to unlock Touch ID, e.g. evaluating LAPolicyDeviceOwnerAuthenticationWithBiometrics will ask for passcode as a prerequisite 用户连续多次进行Touch ID验证失败,Touch ID被锁,需要用户输入密码解锁,先Touch ID验证密码
                        {
                            NSLog(@"Touch ID被锁,需要用户输入密码解锁"); // -8 连续五次指纹识别错误,TouchID功能被锁定,下一次需要输入系统密码
                        }
                            break;
                        case LAErrorAppCancel:
                        {
                            NSLog(@"用户不能控制情况下APP被挂起"); // -9
                        }
                            break;
                        case LAErrorInvalidContext:
                        {
                            NSLog(@"LAContext传递给这个调用之前已经失效"); // -10
                        }
                            break;
#else
#endif
                        default:
                        {
                            [[NSOperationQueue mainQueue] addOperationWithBlock:^{
                                NSLog(@"其他情况,切换主线程处理");
                            }];
                            break;
                        }
                    }
                }
            }];
        }else {
            //不支持
            UIAlertController *alertController = [UIAlertController alertControllerWithTitle:@"温馨提示" message:@"该设备不支持TouchID" preferredStyle:UIAlertControllerStyleAlert];
            [alertController addAction:[UIAlertAction actionWithTitle:@"完成" style:UIAlertActionStyleCancel handler:nil]];
            [self presentViewController:alertController animated:YES completion:nil];
        }
    });
}
注:代码中的NSNotificationCenter用于不同操作后的界面跳转,重新设置window.rootViewController,可忽略。
到这里指纹解锁就结束了,很简单的一个API调用。
手势解锁
其实在之前还没有接触和刚开始接触iOS开发的时候,觉得手势解锁很难,完全不知道怎么去实现?但是当我在自学CAAnimation的时候,脑海中突然就想到了一个实现手势解锁的方案,下面就开始介绍我的实现方法:
构思
-
手势解锁是怎么去验证你滑动的手势是正确的?
其实手势解锁和输入密码的验证是一样的,在你画UI的时候,你可以给每一个*圆点*一个id,在你设置手势的时候,将滑动到对应*圆点*的id放入一个有序集合中,并保存起来,然后验证登录的时候,用另外一个有序集合记录你当前滑动到的*圆点*id,然后和之前保存在本地的进行对比,就可以达到验证的目的了 -
用什么方式去具体实现UI?
在之前想过几种实现方式,但是都被pass掉了,直到自学CAAnimation的时候,才突然意识到有一个很好的实现方式----CAShapeLayer
其实,当你有了这两个问题的答案的时候,你的手势解锁就已经实现了一大部分,后面的部分就是敲代码了。
实现 (工程代码见文末链接)
先上几张效果图:(由于本人艺术细胞有限,所以为了好看点,界面的UI是参照QQ安全中心的手势解锁)
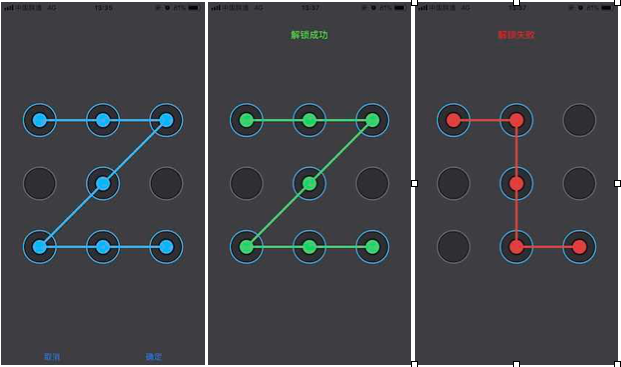
目录结构

GesturesViewController:这个controller用于展示UI,你可以替换成自己controller,GesturesView:用于圆点按钮的初始化和布局,PointView:圆点手势按钮。
这里主要介绍一下GesturesView和PointView,主要逻辑也都在这两个类中:
PointView(主要是界面UI,不多介绍,直接上代码)
PointView.h
- (instancetype)initWithFrame:(CGRect)frame
                       withID:(NSString *)ID;

@property (nonatomic, copy, readonly) NSString             *ID;

//选中
@property (nonatomic, assign) BOOL             isSelected;
//解锁失败
@property (nonatomic, assign) BOOL             isError;
//解锁成功
@property (nonatomic, assign) BOOL             isSuccess;
-
-initWithFrame:withID:传入frameheID,用于初始化PointView, -
ID:只读,用于外部获取ID, -
isSelected,isError,isSuccess:用于判断PointView的状态以显示不通的UI。
PointView.m
通过懒加载初始化三个CAShapeLayer
#pragma mark - 懒加载
//外层手势按钮
- (CAShapeLayer *)contentLayer
{
    if (!_contentLayer) {
        _contentLayer = [CAShapeLayer layer];
        UIBezierPath *path = [UIBezierPath bezierPathWithRoundedRect:CGRectMake(2.0, 2.0, SELF_WIDTH - 4.0, SELF_HEIGHT - 4.0) cornerRadius:(SELF_WIDTH - 4.0) / 2.0];
        _contentLayer.path = path.CGPath;
        _contentLayer.fillColor = RGBCOLOR(46.0, 47.0, 50.0).CGColor;
        _contentLayer.strokeColor = RGBCOLOR(26.0, 27.0, 29.0).CGColor;
        _contentLayer.strokeStart = 0;
        _contentLayer.strokeEnd = 1;
        _contentLayer.lineWidth = 2;
        _contentLayer.cornerRadius = self.bounds.size.width / 2.0;
    }
    return _contentLayer;
}

//手势按钮边框
- (CAShapeLayer *)borderLayer
{
    if (!_borderLayer) {
        _borderLayer = [CAShapeLayer layer];
        UIBezierPath *borderPath = [UIBezierPath bezierPathWithArcCenter:CGPointMake(SELF_WIDTH / 2.0, SELF_HEIGHT / 2.0) radius:SELF_WIDTH / 2.0 startAngle:0 endAngle:2 * M_PI clockwise:NO];
        _borderLayer.strokeColor = RGBCOLOR(105.0, 108.0, 111.0).CGColor;
        _borderLayer.fillColor = [UIColor clearColor].CGColor;
        _borderLayer.strokeEnd = 1;
        _borderLayer.strokeStart = 0;
        _borderLayer.lineWidth = 2;
        _borderLayer.path = borderPath.CGPath;
    }
    return _borderLayer;
}

//选中时,中间样式
- (CAShapeLayer *)centerLayer
{
    if (!_centerLayer) {
        _centerLayer = [CAShapeLayer layer];
        UIBezierPath *centerPath = [UIBezierPath bezierPathWithRoundedRect:CGRectMake(SELF_WIDTH / 2.0 - (SELF_WIDTH - 4.0) / 4.0, SELF_HEIGHT / 2.0 - (SELF_HEIGHT - 4.0) / 4.0, (SELF_WIDTH - 4.0) / 2.0, (SELF_WIDTH - 4.0) / 2.0) cornerRadius:(SELF_WIDTH - 4.0) / 4.0];
        _centerLayer.path = centerPath.CGPath;
        _centerLayer.lineWidth = 3;
        _centerLayer.strokeColor = [UIColor colorWithWhite:0 alpha:0.7].CGColor;
        _centerLayer.fillColor = RGBCOLOR(30.0, 180.0, 244.0).CGColor;
    }
    return _centerLayer;
}
设置PointView的UI状态
//根据情况显示三种状态
- (void)setIsSuccess:(BOOL)isSuccess
{
    _isSuccess = isSuccess;
    if (_isSuccess) {
        self.centerLayer.fillColor = RGBCOLOR(43.0, 210.0, 110.0).CGColor;
    }else {
        self.centerLayer.fillColor = RGBCOLOR(30.0, 180.0, 244.0).CGColor;
    }
}

- (void)setIsSelected:(BOOL)isSelected
{
    _isSelected = isSelected;
    if (_isSelected) {
        self.centerLayer.hidden = NO;
        self.borderLayer.strokeColor = RGBCOLOR(30.0, 180.0, 244.0).CGColor;
    }else {
        self.centerLayer.hidden = YES;
        self.borderLayer.strokeColor = RGBCOLOR(105.0, 108.0, 111.0).CGColor;
    }
}

- (void)setIsError:(BOOL)isError
{
    _isError = isError;
    if (_isError) {
        self.centerLayer.fillColor = RGBCOLOR(222.0, 64.0, 60.0).CGColor;
    }else {
        self.centerLayer.fillColor = RGBCOLOR(30.0, 180.0, 244.0).CGColor;
    }
}
GesturesView(基本所有的逻辑都在这个里面了)
GesturesView.h
//回传选择的id
typedef void (^GestureBlock)(NSArray *selectedID);
//回传手势验证结果
typedef void (^UnlockBlock)(BOOL isSuccess);
//设置手势失败
typedef void (^SettingBlock)(void);

@interface GesturesView : UIView

/**
 设置密码时,返回设置的手势密码
 */
@property (nonatomic, copy) GestureBlock             gestureBlock;

/**
 返回解锁成功还是失败状态
 */
@property (nonatomic, copy) UnlockBlock            unlockBlock;

/**
 判断手势密码时候设置成功(手势密码不得少于四个点)
 */
@property (nonatomic, copy) SettingBlock           settingBlock;

/**
 判断是设置手势还是手势解锁
 */
@property (nonatomic, assign) BOOL         settingGesture;
这里我申明了三个block:
GestureBlock:将选择的ID有序集合回传给控制器,UnlockBlock:回传手势验证结果,SettingBlcok:设置手势失败
属性:
gestureBlock,unlockBlock,settingBlock:分别是对应block的实例,settingGesture:用于判断是设置手势还是手势解锁
GesturesView.h (最主要的逻辑实现部分)
私有属性部分:
//可变数组,用于存放初始化的点击按钮
@property (nonatomic, strong) NSMutableArray             *pointViews;
//记录手势滑动的起始点
@property (nonatomic, assign) CGPoint                    startPoint;
//记录手势滑动的结束点
@property (nonatomic, assign) CGPoint                    endPoint;
//存储选中的按钮ID
@property (nonatomic, strong) NSMutableArray             *selectedView;
//手势滑动经过的点的连线
@property (nonatomic, strong) CAShapeLayer               *lineLayer;
//手势滑动的path
@property (nonatomic, strong) UIBezierPath               *linePath;
//用于存储选中的按钮
@property (nonatomic, strong) NSMutableArray             *selectedViewCenter;
//判断时候滑动是否结束
@property (nonatomic, assign) BOOL                       touchEnd;
代码实现部分:
初始化startPoint,endPoint以及9个PointView按钮,startPoint和endPoint默认为0,并设置PointView的ID:
//初始化开始点位和结束点位
    self.startPoint = CGPointZero;
    self.endPoint = CGPointZero;
    //布局手势按钮(采用自定义的全能初始化方法)
    for (int i = 0; i<9 ; i++) {
        PointView *pointView = [[PointView alloc] initWithFrame:CGRectMake((i % 3) * (SELF_WIDTH / 2.0 - 31.0) + 1, (i / 3) * (SELF_HEIGHT / 2.0 - 31.0) + 1, 60, 60)
                                                         withID:[NSString stringWithFormat:@"gestures %d",i + 1]];
        [self addSubview:pointView];
        [self.pointViews addObject:pointView];
    }
滑动事件:
- 开始滑动:
如果self.touchEnd为YES则直接return,为NO开始以下处理:
- 首先获取到滑动的点,遍历所有的
PointView,判断该点是否在某个手势按钮范围,在范围内记录状态,否则不做处理; - 判断
self.startPoint是否为CGPointZero,如果为YES,则将该手势按钮的center赋值给self.startPoint; - 判断该手势按钮的
center是否包含在self.selectedViewCenter中,如果为YES,忽略此次记录,为NO则记录该中心点,用于画线,同样记录该手势按钮的ID,用于记录保存手势密码; - 如果
self.startPoint不为CGPointZero,则记录当前滑动到的点为self.endPoint,并划线。
//touch事件
- (void)touchesMoved:(NSSet<UITouch *> *)touches withEvent:(UIEvent *)event
{
    if (self.touchEnd) {
        return;
    }

    UITouch *touch = [touches anyObject];
    CGPoint point = [touch locationInView:self];
    //判断手势滑动是否在手势按钮范围
    for (PointView *pointView in self.pointViews) {
        //滑动到手势按钮范围,记录状态
        if (CGRectContainsPoint(pointView.frame, point)) {
            //如果开始按钮为zero,记录开始按钮,否则不需要记录开始按钮
            if (CGPointEqualToPoint(self.startPoint, CGPointZero)) {
                self.startPoint = pointView.center;
            }
            //判断该手势按钮的中心点是否记录,未记录则记录
            if (![self.selectedViewCenter containsObject:[NSValue valueWithCGPoint:pointView.center]]) {
                [self.selectedViewCenter addObject:[NSValue valueWithCGPoint:pointView.center]];
            }
            //判断该手势按钮是否已经选中,未选中就选中
            if (![self.selectedView containsObject:pointView.ID]) {
                [self.selectedView addObject:pointView.ID];
                pointView.isSelected = YES;
            }
        }
    }
    //如果开始点位不为zero则记录结束点位,否则跳过不记录
    if (!CGPointEqualToPoint(self.startPoint, CGPointZero)) {
        self.endPoint = point;
        [self p_drawLines];
    }
}
- 画线:
如果self.touchEnd为YES则直接return,为NO开始画线:
- 首先移除
self.lineLayer,self.linePath,否则你会发现随着你的滑动,会出现很多条线。; - 设置
self.linePath的起始点,并遍历self.selectedViewCenter,为self.linePath添加节点,最后将self.endPoint添加上去(为结束滑动的时候,self.endPoint为当前滑动位置的点); - 设置
self.lineLayer的相应属性,并添加到self.layer。
//画线
- (void)p_drawLines
{
    //结束手势滑动,不画线
    if (self.touchEnd) {
        return;
    }
    //移除path的点和lineLayer
    [self.lineLayer removeFromSuperlayer];
    [self.linePath removeAllPoints];
    //画线
    [self.linePath moveToPoint:self.startPoint];
    for (NSValue *pointValue in self.selectedViewCenter) {
        [self.linePath addLineToPoint:[pointValue CGPointValue]];
    }
    [self.linePath addLineToPoint:self.endPoint];

    self.lineLayer.path = self.linePath.CGPath;
    self.lineLayer.lineWidth = 4.0;
    self.lineLayer.strokeColor = RGBCOLOR(30.0, 180.0, 244.0).CGColor;
    self.lineLayer.fillColor = [UIColor clearColor].CGColor;

    [self.layer addSublayer:self.lineLayer];

    self.layer.masksToBounds = YES;
}
- 结束滑动:
- 将
self.endPoint设置为self.selectedViewCenter.lastObject,如果self.endPoint还是为CGPointZero,则说明未滑动到手势按钮范围,不做任何处理,否则继续以下逻辑处理; - 再次调用
-(void)p_drawLines画线; - 判断是
设置手势密码还是手势解锁;设置手势密码:- 如果选中的
手势按钮数量少于4,设置self.touchEnd = NO使其可以重新设置,return结束此次设置; - 如果设置的
手势按钮符合要求则调用self.gestureBlock(self.selectedView)将手势密码回传给控制器;
- 如果选中的
手势解锁:- 获取本地存储的
手势密码;我这里用的是已使用keychain保存密码,具体使用见DemoNSUserDefaults,其实这是不安全的,建议使用Keychain,我也会在后续的更新中使用Keychain - 如果
self.selectedView和本地手势密码一样,则解锁成功,并设置pointView.isSuccess = YES改变手势按钮样式等,并调用self.unlockBlock(YES),告知控制器结果; - 否则解锁失败,
pointView.isError = YES改变手势按钮样式等,并调用self.unlockBlock(NO),告知控制器结果;
- 获取本地存储的
- (void)touchesEnded:(NSSet<UITouch *> *)touches withEvent:(UIEvent *)event
{
    //结束手势滑动的时候,将结束按钮设置为最后一个手势按钮的中心点,并画线
    self.endPoint = [self.selectedViewCenter.lastObject CGPointValue];
    //如果endPoint还是为zero说明未滑动到有效位置,不做处理
    if (CGPointEqualToPoint(self.endPoint, CGPointZero)) {
        return;
    }
    [self p_drawLines];
    //改变手势滑动结束的状态,为yes则无法在滑动手势划线
    self.touchEnd = YES;
    //设置手势时,返回设置的时候密码,否则继续下面的操作进行手势解锁
    if (_gestureBlock && _settingGesture) {
        //手势密码不得小于4个点
        if (self.selectedView.count < 4) {
            self.touchEnd = NO;
            for (PointView *pointView in self.pointViews) {
                pointView.isSelected = NO;
            }
            [self.lineLayer removeFromSuperlayer];
            [self.selectedView removeAllObjects];
            self.startPoint = CGPointZero;
            self.endPoint = CGPointZero;
            [self.selectedViewCenter removeAllObjects];
            if (_settingBlock) {
                self.settingBlock();
            }
            return;
        }
        _gestureBlock(self.selectedView);
        return;
    }

    //手势解锁
    NSArray *selectedID = [[NSUserDefaults standardUserDefaults] objectForKey:@"GestureUnlock"];
    //解锁成功
    if ([self.selectedView isEqualToArray:selectedID]) {
        //解锁成功,遍历pointview,设置为成功状态
        for (PointView *pointView in self.pointViews) {
            pointView.isSuccess = YES;
        }
        self.lineLayer.strokeColor = RGBCOLOR(43.0, 210.0, 110.0).CGColor;
        if (_unlockBlock) {
            self.unlockBlock(YES);
        }
        dispatch_after(dispatch_time(DISPATCH_TIME_NOW, (int64_t)(1.5 * NSEC_PER_SEC)), dispatch_get_main_queue(), ^{
            [[NSNotificationCenter defaultCenter] postNotificationName:@"UnlockLoginSuccess" object:nil];
        });
    }else {//解锁失败
        //解锁失败,遍历pointView,设置为失败状态
        for (PointView *pointView in self.pointViews) {
            pointView.isError = YES;
        }
        self.lineLayer.strokeColor = RGBCOLOR(222.0, 64.0, 60.0).CGColor;
        if (_unlockBlock) {
            self.unlockBlock(NO);
        }
    }
}
到这里就实现了手势解锁的所有逻辑,在实现之前还在担心有什么问题,结果实现出来之后感觉其实很简单。
最后
希望这篇文章能够帮助到一些人。对于代码和博客的一些规范希望大家谅解一下了,后面也会慢慢去优化的。最后的最后附上Demo的链接 Demo-GitHub。
