

从去年开始学习vue到今天有半年多的时间了,大部分功能也已经用的很熟练,所以是时候开始学习源码修炼修炼内功了,我会把自己学到看到的内容用最容易理解方式与大家分享,一起进步,如果文章有哪些不对的地方也欢迎大家指正。
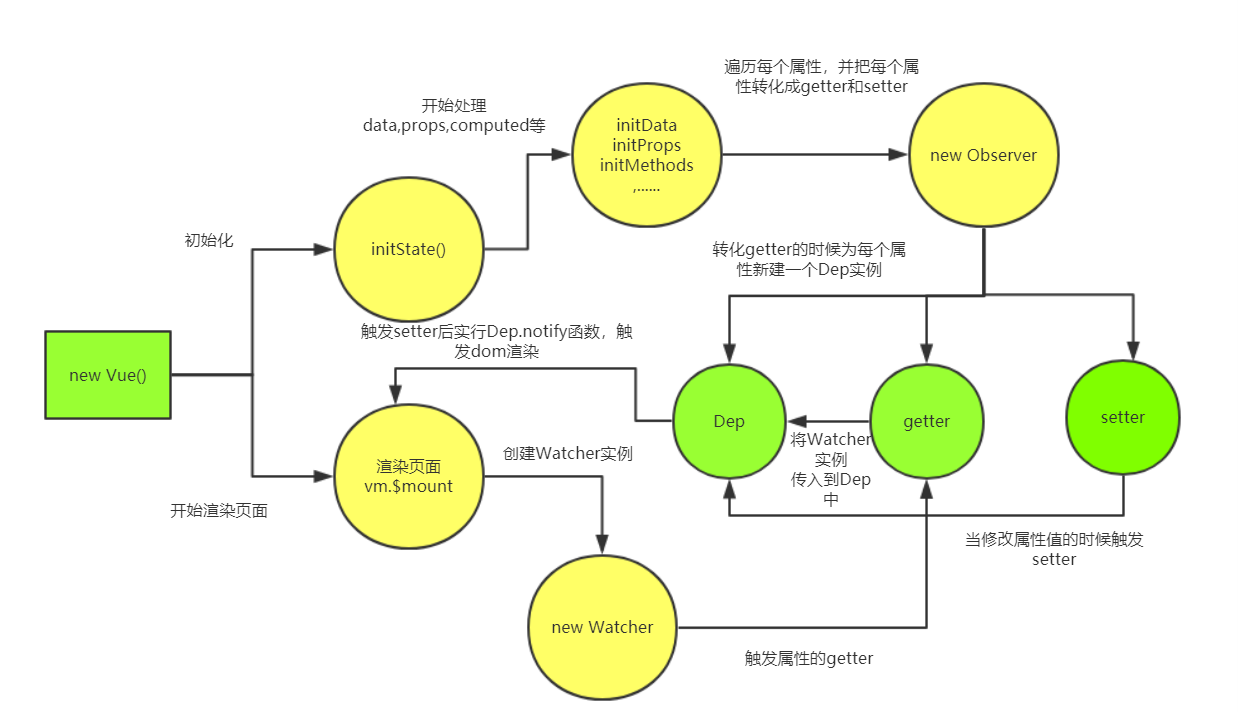
老规矩,先放一张自己整理的图:
vue版本:2.5.0
一.准备
在分析源码之前,我先说两个关于数据绑定相关的知识点:
1. 对象的访问器属性——getter和setter:
Object有一个名为defineProperty的方法,可以设置访问器属性,比如:
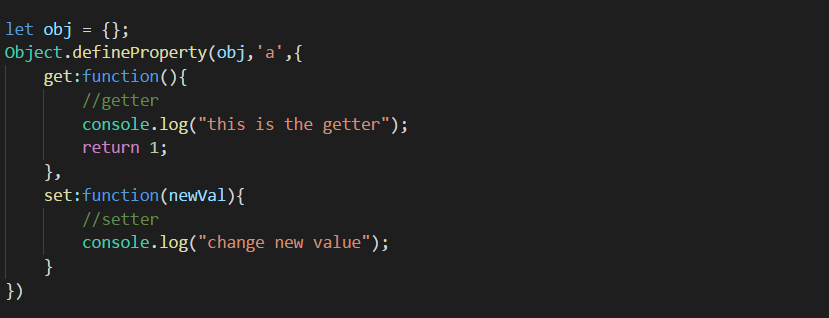
当我们执行obj.a的时候会触发get函数,控制台会打印'this is the getter',当我们为obj.a赋值的时候,obj.a=2;这是控制台会打印"change new value"
大家可以把getter和setter理解成获取对象属性值和给对象属性赋值时的钩子就可以了。
2. 订阅者模式:
订阅者模式也叫“订阅-发布者模式”,对于前端来说这种模式简直无处不在,比如我们常用的xx.addEventListener('click',cb,false)就是一个订阅者,它订阅了click事件,当在页面触发时,浏览器会作为发布者告诉你,可以执行click的回调函数cb了。
再举一个更简单的例子,士兵与长官就是一个订阅与发布者的关系,士兵的所有行动都通过长官来发布,只有长官发号施令,士兵们才能执行对应的行动。
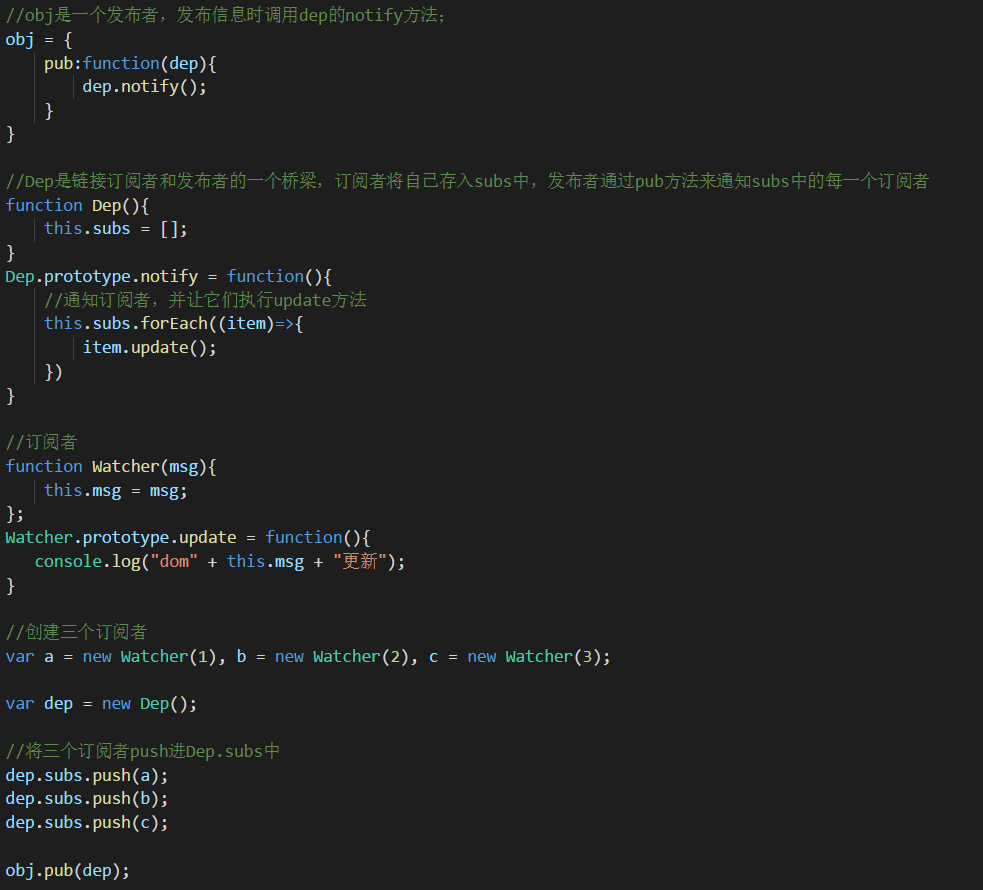
在这段代码中,obj是发布者,Watcher实例是订阅者,Dep用来储存订阅者,以及接受发布者通知的一个媒介。
另外,关于数据绑定还有一个知识点,那就是虚拟dom(vnode),不过鉴于这部分东西太多,我就在文中一笔带过了,今后会专门开一篇文章聊一聊vnode相关的内容。
二. 从data看数据绑定
1. 在vue/src/core/instance/index.js中:
function Vue (options) {
  //options就是我们传入new Vue中的el,data,props,methods等
  if (process.env.NODE_ENV !== 'production' &&
    !(this instanceof Vue)
  ) {
    warn('Vue is a constructor and should be called with the `new` keyword')
  }
  this._init(options)
}
这段代码是我们执行new Vue()时执行的函数,它先判断是否是使用new Vue()而不是Vue()创建实例,否则会有提示。接下来执行函数this._init(options);
2. 在vue/src/core/instance/init.js中的initMixin函数定义了vue._init()方法,需要关注的重点是这里:
Vue.prototype._init = function (options?: Object) {
    const vm: Component = this;
    ......
    initLifecycle(vm)
    initEvents(vm)
    initRender(vm)
    callHook(vm, 'beforeCreate')
    initInjections(vm)
    initState(vm) //初始化data、props等数据的监听
    initProvide(vm)
    callHook(vm, 'created')

    ......

    if (vm.$options.el) {
      //渲染页面
      vm.$mount(vm.$options.el)
    }
}前半部分代码是初始化各种东西,包括生命周期,事件,数据等。后半部分代码vm.$mount(vm.$options.el)是用来渲染页面的。
这里我们先说最重要的initState(vm);
3. 在vue/src/core/instance/state.js中:
export function initState (vm: Component) {
  vm._watchers = []
  const opts = vm.$options; //opts就是options,即包含了el,data,props等属性或方法的对象
  if (opts.props) initProps(vm, opts.props); //初始化props
  if (opts.methods) initMethods(vm, opts.methods); //初始化methods
  if (opts.data) {
    initData(vm) //初始化data
  } else {
    observe(vm._data = {}, true /* asRootData */)
  }
  if (opts.computed) initComputed(vm, opts.computed)
  if (opts.watch && opts.watch !== nativeWatch) {
    initWatch(vm, opts.watch)
  }
}
无论是props,data还是computed,属性绑定的思路都是差不多的,所以我就用data来说明了。
4. 在与initState相同的文件下,我们可以看到initData方法:
function initData (vm: Component) {
  let data = vm.$options.data
  //为data和vm._data赋值
  data = vm._data = typeof data === 'function'
    //如果data是函数,我们就将data的返回值挂载到vm下,赋给data和vm._data
    ? getData(data, vm)
    : data || {}
  if (!isPlainObject(data)) {
    data = {}
    process.env.NODE_ENV !== 'production' && warn(
      'data functions should return an object:\n' +
      'https://vuejs.org/v2/guide/components.html#data-Must-Be-a-Function',
      vm
    )
  }
  // proxy data on instance
  const keys = Object.keys(data) //keys为data的属性组成的数组
  const props = vm.$options.props
  const methods = vm.$options.methods
  let i = keys.length
  while (i--) {
    //这个循环里是判断是否出现data的属性与props,methods重名,否则给出警告
    const key = keys[i]
    if (process.env.NODE_ENV !== 'production') {
      if (methods && hasOwn(methods, key)) {
        warn(
          `Method "${key}" has already been defined as a data property.`,
          vm
        )
      }
    }
    if (props && hasOwn(props, key)) {
      process.env.NODE_ENV !== 'production' && warn(
        `The data property "${key}" is already declared as a prop. ` +
        `Use prop default value instead.`,
        vm
      )
    } else if (!isReserved(key)) {
      proxy(vm, `_data`, key)
    }
  }
  // observer方法,创建并返回Observer实例,实现绑定的重要函数
  observe(data, true /* asRootData */)
}
5. 在vue/src/core/observer/index.js文件中,可以看到observer函数:
export function observe (value: any, asRootData: ?boolean): Observer | void {
  if (!isObject(value) || value instanceof VNode) {
    return
  }
  let ob: Observer | void
  //如果传入的data有__ob__方法,直接复制给ob
  if (hasOwn(value, '__ob__') && value.__ob__ instanceof Observer) {
    ob = value.__ob__
  } else if (
    observerState.shouldConvert &&
    !isServerRendering() &&
    (Array.isArray(value) || isPlainObject(value)) &&
    Object.isExtensible(value) &&
    !value._isVue
  ) {
    //否则通过new Observer(value)方法创建一个实例,并赋值给ob
    ob = new Observer(value)
  }
  if (asRootData && ob) {
    ob.vmCount++
  }
  return ob
}
6. 在同文件下可以看到Observer类的定义:
export class Observer {
  value: any;
  dep: Dep;
  vmCount: number; // number of vms that has this object as root $data

  constructor (value: any) {
    this.value = value
    this.dep = new Dep()
    this.vmCount = 0
    //为传入的data对象添加一个__ob__属性,值为Observer实例本身
    def(value, '__ob__', this)
    if (Array.isArray(value)) {
      const augment = hasProto
        ? protoAugment
        : copyAugment
      //如果传入的data是个数组,执行augment()方法
      augment(value, arrayMethods, arrayKeys)
      this.observeArray(value)
    } else {
      //否则运行walk()方法,事实上大部分情况我们都走walk这个方法
      this.walk(value)
    }
 }
7. 同文件下有walk函数:
在看代码之前我先插一句,这里传入的obj已经不是完整的data了,假设我们的data是这样的:
data(){
    return {
        a:1,
        b:2,
    }
}那么在经历了initData中的getData后,已经变成了{a:1, b:2};
好的我们接着说walk方法:
walk (obj: Object) {
    const keys = Object.keys(obj)
    for (let i = 0; i < keys.length; i++) {
      defineReactive(obj, keys[i], obj[keys[i]])
    }
}walk()方法遍历对象的每一个属性,执行defineReactive()方法,这个方法的作用就是将每个属性转化为getter和setter,同时新建一个Dep的实例。
8. 在和walk,Observer同文件下:
export function defineReactive (
  obj: Object,
  key: string,
  val: any,
  customSetter?: ?Function,
  shallow?: boolean
) {
  //每个属性偶读新建一个Dep的实例
  const dep = new Dep()

  //获取每个属性的特性:configurable、enumerable,getter,setter等等.......
  const property = Object.getOwnPropertyDescriptor(obj, key)
  if (property && property.configurable === false) {
    return
  }

  // cater for pre-defined getter/setters
  const getter = property && property.get
  const setter = property && property.set

  //这里是递归遍历属性值,有的属性的值还是对象,就继续执行observer
  let childOb = !shallow && observe(val)

  //重点!!将属性转化为getter,setter
  Object.defineProperty(obj, key, {
    enumerable: true,
    configurable: true,
    get: function reactiveGetter () {
      const value = getter ? getter.call(obj) : val
      if (Dep.target) {
        dep.depend()
        if (childOb) {
          childOb.dep.depend()
          if (Array.isArray(value)) {
            dependArray(value)
          }
        }
      }
      return value
    },
    set: function reactiveSetter (newVal) {
      const value = getter ? getter.call(obj) : val
      /* eslint-disable no-self-compare */
      if (newVal === value || (newVal !== newVal && value !== value)) {
        return
      }
      /* eslint-enable no-self-compare */
      if (process.env.NODE_ENV !== 'production' && customSetter) {
        customSetter()
      }
      if (setter) {
        setter.call(obj, newVal)
      } else {
        val = newVal
      }
      childOb = !shallow && observe(newVal)
      dep.notify()
    }
  })
}
如果看了前面文章还有印象的话,相信大家在这段代码里会看到一位老朋友,没错,他就是在订阅者模式时提到的Dep。
在getter时执行了reactiveGetter函数,里面会判断Dep.target是否存在,如果存在,则执行dep.depend()方法;而在setter的最后,执行了dep.notify()方法。
三. Dep类
在vue/src/core/observer/dep.js中我们可以看到Dep类的定义:
export default class Dep {
  static target: ?Watcher;
  id: number;
  subs: Array<Watcher>;

  constructor () {
    this.id = uid++
    this.subs = []
  }
  //将订阅者添加到this.subs中
  addSub (sub: Watcher) {
    this.subs.push(sub)
  }

  removeSub (sub: Watcher) {
    remove(this.subs, sub)
  }
  //defineReactive方法中使用的depend方法
  depend () {
    if (Dep.target) {
      Dep.target.addDep(this)
    }
  }
  //通知订阅者执行update()函数
  notify () {
    // stabilize the subscriber list first
    const subs = this.subs.slice()
    for (let i = 0, l = subs.length; i < l; i++) {
      subs[i].update()
    }
  }
}
看到this.subs和notify()相信你已经知道Dep是什么了吧?没错,就如同我前面讲的,Dep这个类就是在vue实现数据绑定的过程中,作为订阅者和发布者的一个桥梁。通过defineReactive的代码我们可以知道,当为属性赋值触发setter时会执行dep.notify(),我们可以说set函数执行了发布者的行为,那订阅者又是谁呢?Dep.target又是什么呢?我们继续往下看。
四. 订阅者Watcher
我们继续看dep.js这个文件,在文件最后几行,有如下代码:
Dep.target = null
const targetStack = []

export function pushTarget (_target: Watcher) {
  if (Dep.target) targetStack.push(Dep.target)
  Dep.target = _target
}

export function popTarget () {
  Dep.target = targetStack.pop()
}pushTarget()方法就是把传入的Watcher实例赋给Dep.target,一旦Dep.target有值的话,就可以执行dep.depend()方法了。
我们在vue/src/core/obsever/watcher.js可以看到Watcher类的定义:
export default class Watcher {
  .......
  constructor (
    vm: Component, //vm
    expOrFn: string | Function,
    cb: Function,
    options?: Object
  ) {
    this.vm = vm
    vm._watchers.push(this)
    // options
    if (options) {
      this.deep = !!options.deep
      this.user = !!options.user
      this.lazy = !!options.lazy
      this.sync = !!options.sync
    } else {
      this.deep = this.user = this.lazy = this.sync = false
    }
    this.cb = cb
    this.id = ++uid // uid for batching
    this.active = true
    this.dirty = this.lazy // for lazy watchers
    this.deps = []
    this.newDeps = []
    this.depIds = new Set()
    this.newDepIds = new Set()
    this.expression = process.env.NODE_ENV !== 'production'
      ? expOrFn.toString()
      : ''
    // parse expression for getter
    //如果Watcher第二个参数是函数,就赋值给this.getter
    if (typeof expOrFn === 'function') {
      this.getter = expOrFn
    } else {
      this.getter = parsePath(expOrFn)
      if (!this.getter) {
        this.getter = function () {}
        process.env.NODE_ENV !== 'production' && warn(
          `Failed watching path: "${expOrFn}" ` +
          'Watcher only accepts simple dot-delimited paths. ' +
          'For full control, use a function instead.',
          vm
        )
      }
    }
    this.value = this.lazy
      ? undefined
      //大部分情况下不会传options参数,this.lazy值为false,所以执行this.get()方法
      : this.get()
  }
Watcher下方就有get()方法的定义:
get () {
    //先将Watcher实例赋值给Dep.target;
    pushTarget(this)
    let value
    const vm = this.vm
    try {
      //执行this.getter方法
      value = this.getter.call(vm, vm)
    } catch (e) {
      if (this.user) {
        handleError(e, vm, `getter for watcher "${this.expression}"`)
      } else {
        throw e
      }
    } finally {
      // "touch" every property so they are all tracked as
      // dependencies for deep watching
      if (this.deep) {
        traverse(value)
      }
      popTarget()
      this.cleanupDeps()
    }
    return value
  }
get方法先给Dep.Target赋值,接着执行this.getter()方法。那么什么时候新建Watcher实例?给Dep.target赋值呢?
在回答这个问题前我先说一下dep.depend方法,里面执行了Dep.target.addDep(this),这个方法也可以换成new Watcher.addDep(this);这里的this就是new Watcher实例本身
addDep (dep: Dep) {
    const id = dep.id
    if (!this.newDepIds.has(id)) {
      this.newDepIds.add(id)
      this.newDeps.push(dep)
      if (!this.depIds.has(id)) {
        //经过一系列判断,最终将Watcher实例传给dep.subs中;
        dep.addSub(this)
      }
    }
  }
好的,我们接着回到什么新建Watcher实例的这个问题上,还记得我在Vue.prototype._init方法中提到的$mount渲染页面的方法吗?
在vue/src/platforms/web/runtime/index.js中可以看到$mount方法的定义:
Vue.prototype.$mount = function (
  el?: string | Element,
  hydrating?: boolean
): Component {
  el = el && inBrowser ? query(el) : undefined
  return mountComponent(this, el, hydrating)
}
在vue/src/core/instance/lifecycle.js中可以看到mountComponent的中有这样几行代码:
updateComponent = () => {
    vm._update(vm._render(), hydrating)
}

vm._watcher = new Watcher(vm, updateComponent, noop);
vm._update(vm._render(), hydrating)这段代码中vm.render()实际上就是生成了vnode(虚拟dom),vm._update则是根据vnode生成真正的dom,渲染页面。把这段代码赋值给updateComponent,之后创建new Watcher的实例,将updateComponent作为第二个参数传给this.getter。Watcher实例执行get()方法时给Dep.target赋值,执行updateComponent函数,从而刷新页面,获取data中各个属性值的时候又会触发getter,于是将Watcher实例传给Dep.subs中形成依赖。
最后,我们再来看dep.notify()函数,它会遍历subs中的每一个元素,执行update()方法:
update () {
  if (this.lazy) {
    this.dirty = true
  } else if (this.sync) {
    this.run()
  } else {
    //在nextTick的时候执行run
    queueWatcher(this)
  }
}
我们主要看this.run()方法:
run () {
    if (this.active) {
      const value = this.get()
      if (
        value !== this.value ||
        // Deep watchers and watchers on Object/Arrays should fire even
        // when the value is the same, because the value may
        // have mutated.
        isObject(value) ||
        this.deep
      ) {
        // set new value
        const oldValue = this.value
        this.value = value
        if (this.user) {
          try {
            this.cb.call(this.vm, value, oldValue)
          } catch (e) {
            handleError(e, this.vm, `callback for watcher "${this.expression}"`)
          }
        } else {
          this.cb.call(this.vm, value, oldValue)
        }
      }
    }
}实际上,run()方法就是执行了get()方法,从而触发this.getter方法的执行,然后渲染页面的。这样,vue数据绑定的整个流程就串下来了——
初始化页面,获取data中属性的同时将订阅者Watcher传个Dep中,当data中的属性有更新的时候,触发notify方法通知对应的Watcher进行更新,更新后重新渲染页面,继续添加依赖......
整个流程就是这样,如果你还不清楚的话,可以结合文章开头的图片,这样可能会让你的思路更清晰。
